About Transition in Video Production
Transition is a common technique used in video and film post-production. A video transition makes one scene move to the next one smoothly. When a video creator or filmmaker wants to combine two shots together, they can use a creative transition effect.
Apart from that, a video transition can convey a particular mood, jump between storylines, and spice up your video. There’re different types of video transitions, such as cut, dissolves, L cuts, fades, match cuts, wipes, and more.
To learn more about types of video transitions, you can read this post: Windows 11 Video Editor Transitions: Full Review + User Guides.
In video editing, adding smooth transitions to your video clips is an effective and simple way to help you create eye-catching videos.
If you need some apps for video transitions, you’ve come to the right place. The following parts introduce 8 video transition apps and tell you how to use them to add a transition.
Best Apps for Video Transitions on Windows
Many people wonder how to add transition to video in the default Windows 11/10 Video Editor in the Photos app (the new version called Photos Legacy). Actually, there’s no video transition in the default Windows Video Editor.
If you want an app for video transitions to create transition videos on your Windows PC, try out the following video editor with transitions.
#MiniTool MovieMaker
MiniTool MovieMaker is a great transition video editor for Windows. Currently, it provides 97 transition effects for you to choose from. This video transitions app supports real-time preview before you add a transition and editing transition mode and duration.
With MiniTool MovieMaker, you can add a transition between two videos or images. How does the transition video editor work? Follow the steps below to add a transition to your video.
Step 1. Download, install, and launch MiniTool MovieMaker on your PC.
MiniTool MovieMakerClick to Download100%Clean & Safe
Step 2. Click on Import Media Files to upload your videos and drag them to the timeline.
Step 3: Here’re 3 ways to add a transition to video.
Option 1: add a transition between two clips
On the timeline, select the clip where you want to add a transition next to it, go to Transition, hover your mouse over a transition to preview it, and click the + to add it or drag and drop it to the desired location.
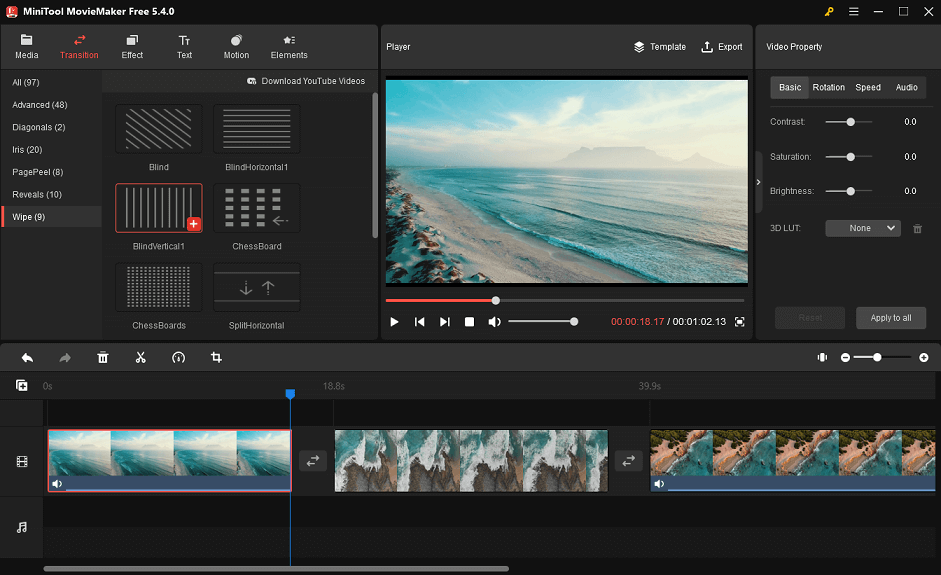
Option 2: add a transition between multiple clips
Select the clips where you want to add the same transition, go to Transition, right-click on the target transition, and click Apply to Selected Clips.
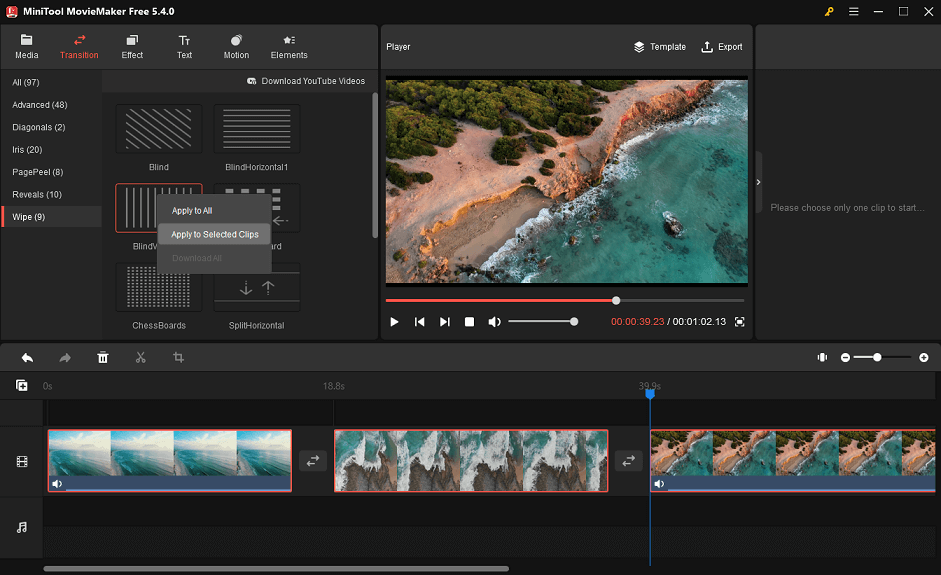
Option 3: add a transition to all clips
Select any clip on the timeline, go to Transition, right-click on the target transition, and click Apply to All.
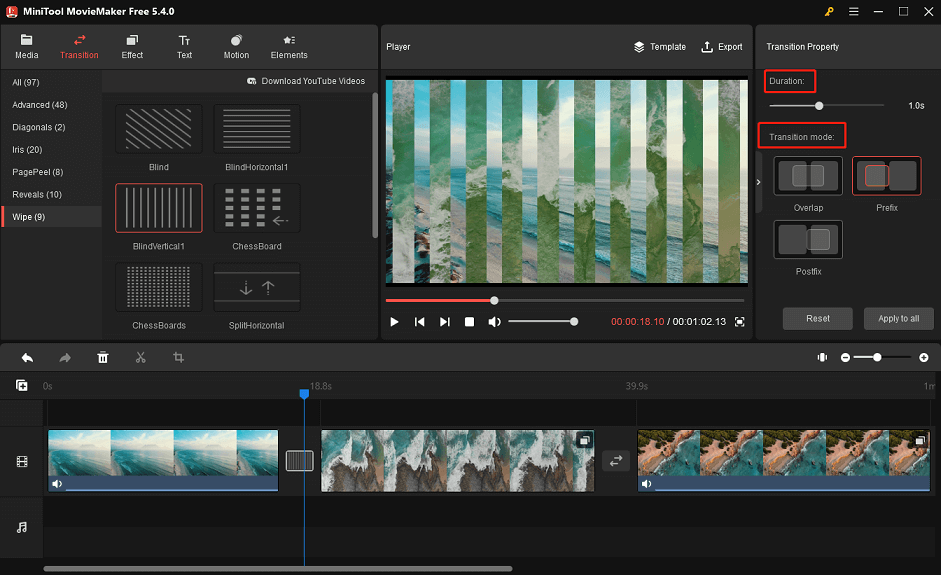
Step 3. Edit the transition. Click the transition icon on the timeline, then you can adjust the duration of the transition and choose another transition mode.
MiniTool MovieMaker will instantly apply your settings. Click Apply to All to apply the same settings to all the added transitions.
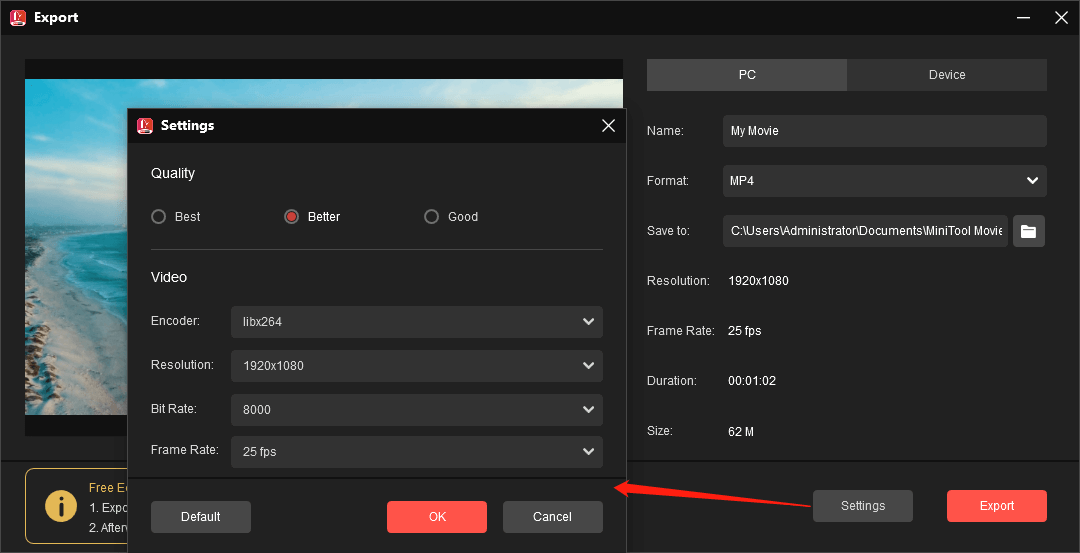
Step 4. Click Export, adjust the output settings, and click Export again to export your transition video.
In addition to functioning as a video editor with transitions, MiniTool MovieMaker is equipped with many editing tools like crop, trim, split, and rotate, diverse text templates, video filters, pan & zoom effects, and stickers, and video playback speed adjustment.
When exporting videos, MiniTool MovieMaker offers different output formats and allows you to change the frame rate, resolution, and bitrate.
Most importantly, MiniTool MovieMaker is a no-watermark video editor with transitions.
#OpenShot
The second app for video transitions is OpenShot, a free and open-source video editing application. Its official website claims that 400+ transitions are included in OpenShot to help you gradually fade from one clip to another.
As one of the most professional video editing programs, OpenShot has more capabilities. It enables you to resize, scale, trim, rotate, speed up, slow down, reverse videos, remove video backgrounds, adjust video’s color, and more.
Follow the steps below to add a transition to video using OpenShot.
Step 1. Download, install, and open OpenShot on your computer.
Step 2. Click the green + icon to upload your video and add it to the timeline. If you overlap two clips, a transition will be automatically created.
You can also manually put a transition over your video. OpenShot recommends that a transition should be placed on the beginning or end of your clip by overlapping.
Step 3. Click Transition and you’ll see various transitions. Select and drag a transition onto the timeline and place it at the beginning or end of your video.
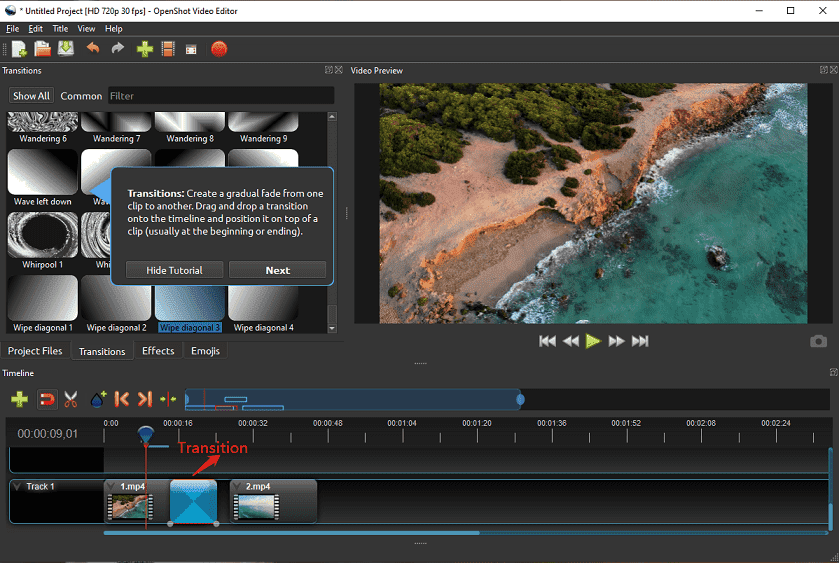
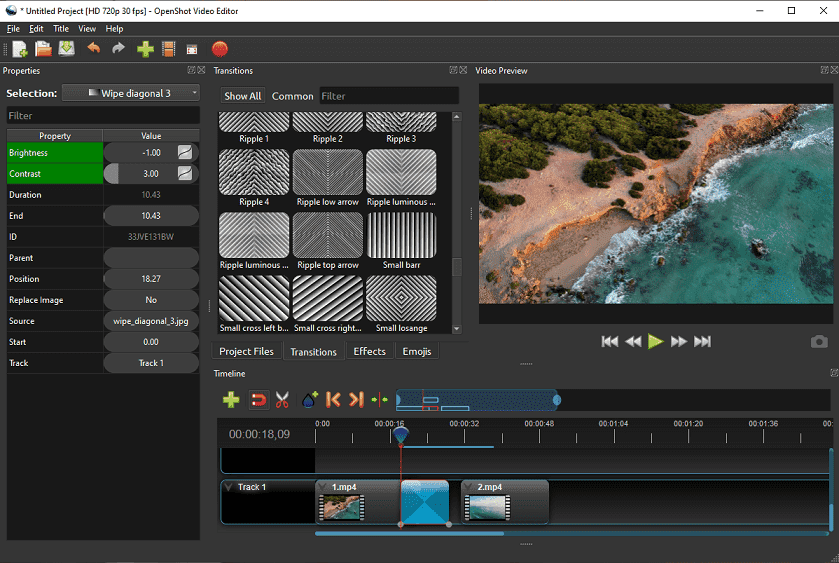
Step 4. Drag either edge of the transition to change its duration. Right-click on transition and you can splice, reverse, or remove it. You can make more settings in the left Property section.
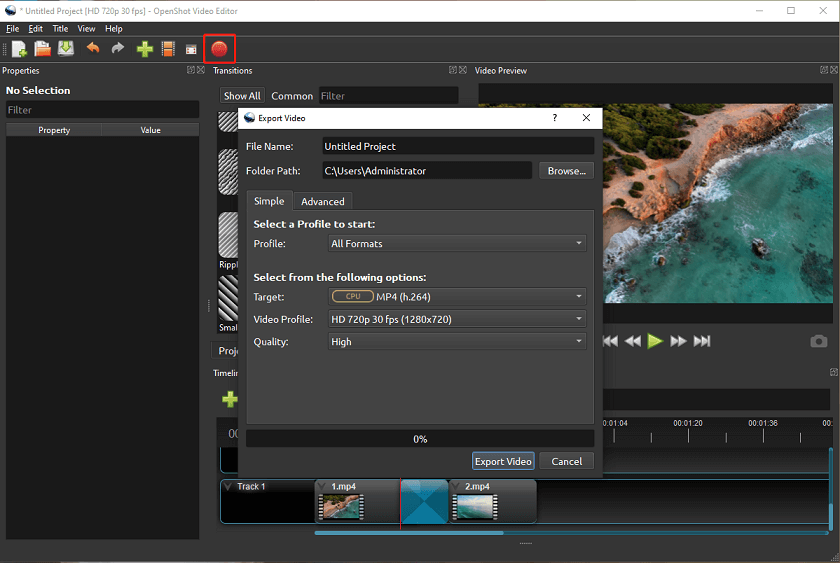
Step 5. When you’re ready to create your edited video, click the red Export Video button on the top-left menu bar, complete the output settings, and click Export Video.
#VideoProc Vlogger
VideoProc Vlogger is another video transitions app and it has 61 transition effects. You can right-click on a transition and click Play to preview it.
In addition, VideoProc Vlogger provides more effects to edit your video, such as 20+ speed presets, motion effects, color grading & color correction, filters, and more.
Follow the steps and learn how to make a transition video in VideoProc Vlogger.
Step 1. Download and install VideoProc Vlogger on your computer.
Step 2. Launch this video transitions application and click + New Project to create a new project.
Step 3. Click the big + icon to upload your videos and add them to the Video Track on the timeline.
Step 4. Click Transitions, choose a transition effect and drag it between two clips on the timeline. Adjust its start time, end time, and duration as you like.
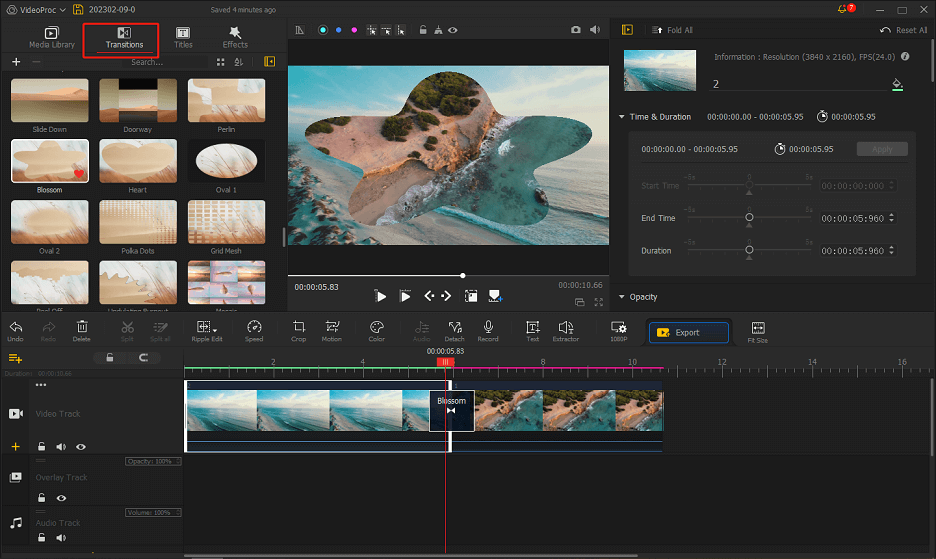
Step 5. Click Export, then make your settings, and click Start to export the transition video.
Best Apps for Video Transitions on Mac
How to create a transition on your Mac? Here’re 2 video transition apps for your Mac.
#iMovie
iMovie, a preinstalled video editor on your Mac, comes as the first option of the app for video transitions on Mac. 20+ transitions are included in iMovie. It allows you to add transitions automatically or manually.
Apart from transitions, iMovie offers you more editing tools and features. It lets you add subtitles, automatically enhance videos, crop and rotate videos, change clip speed, fade audio, record a voiceover, and more.
Here’s how to manually add transitions in iMovie.
Step 1. Open iMovie on your Mac. If it isn’t preinstalled, go to the App Store and download it.
Step 2. Click the Create New button, select the Movie, and tap the Import Media button to import your videos.
Step 3. Add your video clips to the timeline. Click the Transitions tab at the top and move the pointer over a transition to preview it.
Step 4. To add a transition, drag and drop it between two clips on the timeline.
In iMovie, you can add a transition at the beginning and end of your clip. Select the clip and double-click a transition.
Step 5. To edit the transition’s duration, you can click the transition icon or go to iMovie > Preferences to change the number of seconds.
Step 6. To export your video, click Share > Export File, make your settings, click Next, choose the location where you want to save the video, and click Save.
#VideoPad Video Editor
VideoPad is also a useful transition video app to add transitions on Mac. This application has more than 50 transition effects for you to choose from.
What’s more, VideoPad allows you to crop, trim, and split videos, stabilize shaky videos, record your voiceover, add custom watermarks or logos, and more.
Here’s a quick guide on how to add transitions in VideoPad.
Step 1. Download, install, and open VideoPad on your Mac.
Step 2. Click the Add Files(s) button to upload your videos and add them to the timeline.
Step 3. To add a transition, click the transition icon between the two clips on the timeline to open the transition menu. Click a transition to add it.
Step 4. To edit the duration, click the transition icon and enter a number in the Duration field.
Step 5. After editing, click Export Video and select Video File. Complete the output file settings and click Create.
Best Mobile Apps for Video Transitions
Here’re two video transition effects apps for your Android and iPhone.
#InShot
InShot is one of the best mobile video editors and also one of the best apps for video transitions. It provides various awesome transition effects to help you combine clips.
Also, InShot allows you to trim & split videos, adjust video aspect ratio, extract audio from video, apply filters, add sound effects, create photo collage, etc.
Here’s how to add transitions to video using InShot.
Step 1. Open the InShot app, tap Video, and choose your videos.
Step 2. Click the small icon between two clips to enable the transitions menu.
Step 3. Tap a transition to add it and then you can adjust its duration. Click the tick icon to save your changes.
Step 4 Click Save to export your video.
#CapCut
CapCut is also a great video transitions app for your phone. This app has different types of transitions for you to explore, and you can easily add a transition.
With CapCut, you can also use green screen, adjust video speed and apply velocity editing, add text and stickers, reverse videos, add trending filters, and more.
Here’s how to add a transition to video in CapCut.
Step 1. Open the CapCut app, tap New Project, select your target videos, and tap Add.
Step 2. Tap the white icon between two clips to open the transition menu.
Step 3. Click a transition to apply it and drag the slider to change the duration.
Step 4. Save your changes and click Export to export the transition video.
Best Online App for Video Transitions
#Kapwing
Kapwing is a powerful online video editor and it’s also a great online video transition app. It comes with a variety of transitions, filters, animated stickers, and many editing tools.
Step 1. Open the Kapwing website and sign in with your account.
Step 2. Click Create New Project and then click Add Media to open your videos.
Step 3. Drag the videos to the timeline. Go to the Transitions tab on the left side, and drag a transition between two clips.
Step 4. Click Export Project to export your video.
Conclusion
There are many apps for video transitions on your device and most video editors have some transition effects. This post picks up 8 video editors with transitions for your reference. You can follow the above steps to create your transition video.
What’s your favorite transition video editor? Share it with us in the below comments area. If you have any questions while using MiniTool MovieMaker, please contact us via [email protected] for help.



User Comments :