Color correction is all about putting the finishing touches on your cinematic masterpiece. Adjust the color to amend anything that isn’t quite the right hue, or if you want to convey a certain tone. Make the shots bluer to get a cooler feeling. Or more red to get a warmer feeling.
Part 1. What Is Color Correction
Color correction is the process used to balance the colors throughout the video. It is used for making all the colors appear in harmony, with the proper temperature, matching the scene in the video lens with the appearance when viewed from the human eye. With the naked eye in hot or cold light, the white object is always displayed in white. But for the camera, if you don’t set it to the appropriate white balance, it may appear blue-white, yellow-white or actual white.
That’s why color correction is so important because it makes your shots seamless and makes the video look like more harmonious. Color correction is used in many Hollywood blockbusters to make scenes from a movie look as natural and as close to the way the human eye views something. Color correction can be done by some video editing tools.
Part 2. How to Choose the Right Color Correction Software
It happened that you took a video, but due to the bad weather, you noticed that the video color is very dim and you wanted to correct the colors to make the video look brighter. The first time you might think of some professional color correction software, such as Premiere Pro CC. Of course, with these professional video color correction software, you will get the best results.
But for beginners and semi-professionals, we don’t recommend using this highly specialized software. Consider your own conditions and then choose the most appropriate software based on availability and functionality and price.
Part 3. Top 5 Best Color Correction Software
Actually, there are still lots of easy-to-use video color editors for your reference in addition to those professional yet complex color correction software like Premiere Pro. Although they don’t have as many features as those professional color correction software, you can easily correct video color in seconds.
The most recommended here is MiniTool Movie Maker released by MiniTool. This is an extremely friendly video editing software. Even if you have little experience with video color correction, this easy-to-use video editor can help you break the monotony.
Sounds great? Now, let’s see how to do color correction in your videos.
#MiniTool Movie Maker
This free color correction tool helps you adjust the color of your videos easily and quickly because of its simple operations as well as powerful functions. In general, even a new user can easily correct color via this tool because it offers wizard-like and simple interfaces. If you’re looking for a free program that you can use to your advantage, this is the one for you. Follow the tutorial below to easily correct color in your videos.
MiniTool MovieMakerClick to Download100%Clean & Safe
Step 1. After downloading and installing MiniTool Movie Maker, select Full-Feature Mode to enter the main interface and click Import Media Files to import your video.
Step 2. Drag and drop the video to the timeline or click + to add it to the timeline.
Step 3. Double click the target video on the timeline and the video editing window will pop up. To change the color correction settings, just left-click the indicator and move it to the left or right along the slider. When releasing the mouse button, the respective value will be set.
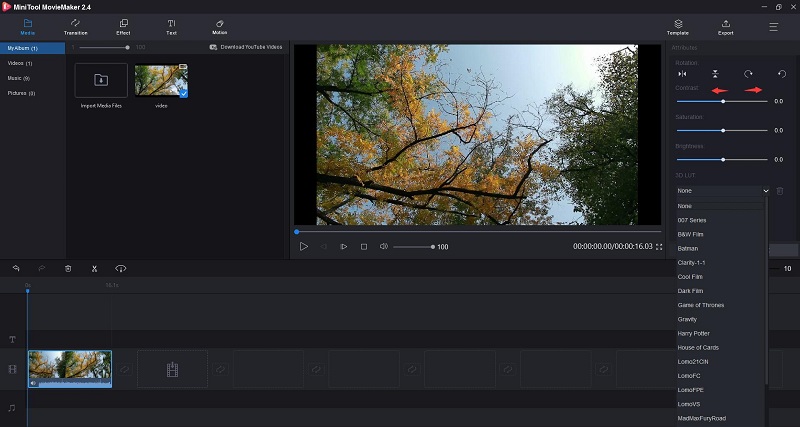
- Contrast: Contrast is defined as the separation between the darkest and brightest areas of the image. Increase contrast and you increase the separation between dark and bright, making shadows darker and highlights brighter. Decrease contrast and you bring the shadows up and the highlights down to make them closer to one another.
- Saturation: This setting represents the amount of gray in proportion to the hue. You can adjust it to make colors of the entire video image look more saturated or inconspicuous. In a basic sense, it refers to how colorful a color is. Saturation varies between there is no color in an image and a pure color.
- Brightness: You can change this setting to customize the overall lightness or darkness of your video image. This term deals with how bright or dark a color is. However, they each refer to a different scale and have different relationships with saturation and contrast.
- 3D LUT: The 3D Lookup Tables in MiniTool Movie Maker allows you to employ some excellent and famous looking color sets to your video, such as 007 series, Batman, Harry Potter, Game of Thrones,
Step 4. You can immediately see the result in the preview window. If you don’t like the result, you can click the Reset button to cancel all the changes. If you are satisfied, just click OK to save the changes to your video and back to the main interface.
Step 5. Now you’ve finished correcting the video color. Press the Play icon and go over the whole video though the previewing window. If all things are right, hit the Export button to enter the export window, where you can give a name to your video, choose the output format, select the store destination, and even select the resolution as you like. At last, click the Export button again.
You might be interested in: How to Change Video Resolution Easily on Different Platforms.
After exporting the video to your device, you can share it to video-sharing sites like YouTube and Facebook.
Recommend article: How to Upload a Video to YouTube from Computer and Phone.
Unlike Adobe Premiere Pro or other video editing software for professionals, this video color correction for beginners is really easy to use and high efficiency. Besides color correction feature, you can achieve more effects with MiniTool Movie Maker.
Features:
- Import video, photo, and audio in various formats and combine videos into one.
- Offer a simple and intuitive timeline.
- Offer different types of templates to help you create your own video easily and quickly.
- Support lots of popular transitions and effects.
- Add text (titles, captions, and credits) in video.
- Split/trim videos and delete the unnecessary parts.
- Edit audio (fade in and fade out).
- Export video in common internet video formats.
- Change the video resolution to reduce video file size.
- Save video on different devices.
MiniTool Movie Maker is not only a video editor, but also a converter, which supports lots of video formats conversion with no watermark, such as MP4 to MP3, MP4 to MOV, etc. More importantly, it is a totally free and no ads software.
#Filmora Video Editor
Filmora Video Editor is also one of the best options to meet your satisfaction. Because this program requires no professional skills in video editing or video grading. That means, you can handle this video color correction software to change video color without any knowledge and techniques. This color correction tool will help you correct color, adjust brightness, contrast, saturation and more on your videos with few clicks. 200+ filters and overlay effects to change the video color as you like.
#DaVinci Resolve
DaVinci Resolve can also be used as video color correction software. Its Color tab provides a variety of tools like color match, color wheels, curves, and windows. If you’re just getting started, this will be a great program to show you how color correction changes images or frames. Some advanced features are also embedded in this application, but requires in-depth knowledge about the app and proficient video making skills. The program is very popular among professional filmmakers and video enthusiasts. But the price is very high.
#ApowerEdit
ApowerEdit comes with a built-in color correction tool that can be used to change the video color. All you have to do is drag the slider in the Edit panel. The player will allow you to preview the video while correcting the color. You can adjust the contrast, saturation, brightness and hue of the video to any degree.
In addition to correcting video colors, ApowerEdit has many built-in utility features. It provides a number of templates for filters, overlays and transition effects. You can use these templates to add titles, add watermarks and copy videos in your own voice. There is also a basic video editor by which you can cut the footage into pieces, delete unwanted parts from the project, and add mosaics.
Recommend article: Top 8 Video Editors without Watermark for PC (2020).
#Lightworks
Lightworks is certainly one color correction tool easy-to-do tool. It has a visual effect that is quite easy to use. It can tweak every angle of the image and takes good care of the degree of detail. Filling in the colors and maintaining optimum balance for the same can be done in a fruitful manner.
Lightworks even has an assured ability of tuning titles to set exact pixels for orientations, customize shadows and look after several other aspects. If your budget is running on a low key angle, then the need of editing can be satiated by this simple and useful tool.
Part 4. Color Correction vs Color Grading
The terms “color correction” and “color grading” are often used interchangeably. However, they actually refer to different processes of editing color in videos. Color correction is usually done first. This is because raw footage tends to be over-saturated and the colors need to be balanced out. Color grading is the next step, aiming to create the actual aesthetic of videos.
Color correction is the first thing you do with any footage you’ve shot. It is used to cover mistakes made with camera settings as well as to pull more information from flat-profiles. Color correction is a singular process that involves making adjustments to an image to correct any deviations from its standard appearance.
These include:
- Exposure
- White Balance
- ISO Noise
- Contrast
Color grading, on the other hand, relates more to creative choices that are made on the look of the video. Color grading is considered a more high-end process than color correction and it’s not used quite as often for most videos. If you are looking to create more detailed color profiles, be prepared for more labor intensive editing and longer render times.
These include:
- Shot Matching
- Removing Objects
- Shape Masks
- Cinematic Looks (day-to-night, underwater, flashbacks, etc…)
Bottom Line
With the help of this post, color correction of videos is just a piece of cake, right? If you have any questions or suggestions about it, please let us know via [email protected] or share it in the comments section below.
Color Correction FAQ
- MiniTool Movie Maker
- Filmora Video Editor
- DaVinci Resolve
- ApowerEdit
- Lightworks
User Comments :