Part 1: What Is Pan and Zoom Effect?
Pan and zoom are two common and different camera movements in film-making and video production.
#Pan
When you pan your camera, it means you move the direction of the camera from a fixed position horizontally left or right. You are not moving the position of your camera.
This movement is similar to that when you turn your head from left to right.
Also, you can use the camera on your phone to record a video to have a more profound perception. While recording, move the direction your camera faces from left to right.
When you watch the video recording, you feel like the frame is moving to the right side. Many video editing software applications have panning effects that can be applied to the image and video clip to imitate the camera movement.
If you apply a panning effect to a still image, the image will scroll horizontally and become dynamic.
#Zoom
Zooming can be said to be the most used camera movement. It can magnify (zoom in) or reduce (zoom out) the size of the subject in the frame by changing the focal length of the camera lens.
You can zoom from different directions to achieve unique visual effects. To make your video more creative or attractive, you can zoom in on the important person or object in your shot to get more details.
On the contrary, if you zoom out from a video, the subject will appear smaller and the background will be more visible.
Also read: What Is a Velocity Edit & How to Make a Velocity Edit [Solved]
Camera movement is a common technique in film-making. Cinematographers use this effect to change the perspective of the frame and shift the focus of the video content. These movements will have a psychological and emotional impact on the audience and also make the film more immersive and fascinating.
In addition to pan and zoom, there’re other types of camera movements in film. Continue to read the following part to learn more details.
Part 2: Other Types of Camera Movements in Film
This part explains the other 6 common types of camera movements in film.
#Tilt
Similar to panning, tilting is when you shift the camera’s view vertically up to down or down to up from a certain position, but you’re not moving the camera itself. You can tilt a camera to change its angle to involve more content in your shot.
What’s more, there might be some new subjects that were not in your lens before. Tilting shots are popular and common in a movie when introducing an important character.
#Dolly
A dolly (or dolly zoom) shot occurs when a camera places on a track or vehicle and you move the camera forward or backward.
Dolly shots sound similar to zoom shots, but they are different. A zooming lens only changes the focal length of the camera, while a dolly zoom moves the entire camera toward or away from a subject. In other words, a dolly shot requires the actual physical movement of your camera.
#Truck
Truck movement is a type of tracking shot. Just place a camera on a truck and move it to the left or right from a fixed point, but the distance from your camera to the moving subject always keeps the same.
#Pedestal
A pedestal movement is when you put a camera on a tripod and you move the camera vertically up or down on the tripod instead of moving the camera’s angle tilting.
This is a vertical camera movement, in which the entire camera is raised or lowered relative to the subject to make the camera fit the height of the subject. This movement is suitable to shoot a tall character or subject.
#Rack Focus
Rack focus is a shooting technique rather than a type of camera movement. It’s a basic skill for filmmakers. You adjust the focus from one scene to another to make the subject in the previous scene blurry and gradually make the subject in the next background clear.
We’ve introduced 7 common types of camera movements in filmmaking. With effective camera movements, you can shoot professional-quality videos.
![Top 8 DJI Video Editors to Edit DJI Video Footage [Free & Paid]](https://images.minitool.com/moviemaker.minitool.com/images/uploads/2022/03/dji-video-editor-thumbnail.jpg)
Part 3: Pan and Zoom Video Editors for PC
Now, let’s get back to the main topic, pan and zoom effects. Through the above introduction, you’ve learned that pan and zoom are two common and widely-used camera movements.
Many video editing applications offer similar camera motion effects that can be applied to the video clips and images in your project. In most video editing programs, the motion effects mainly include pan and zoom effects.
This part will introduce 3 pan and zoom video editors for you to choose from.
#MiniTool MovieMaker
If you’re looking for a video editor with pan and zoom effects for the latest Windows 11 operating system, MiniTool MovieMaker is a good choice.
MiniTool MovieMakerClick to Download100%Clean & Safe
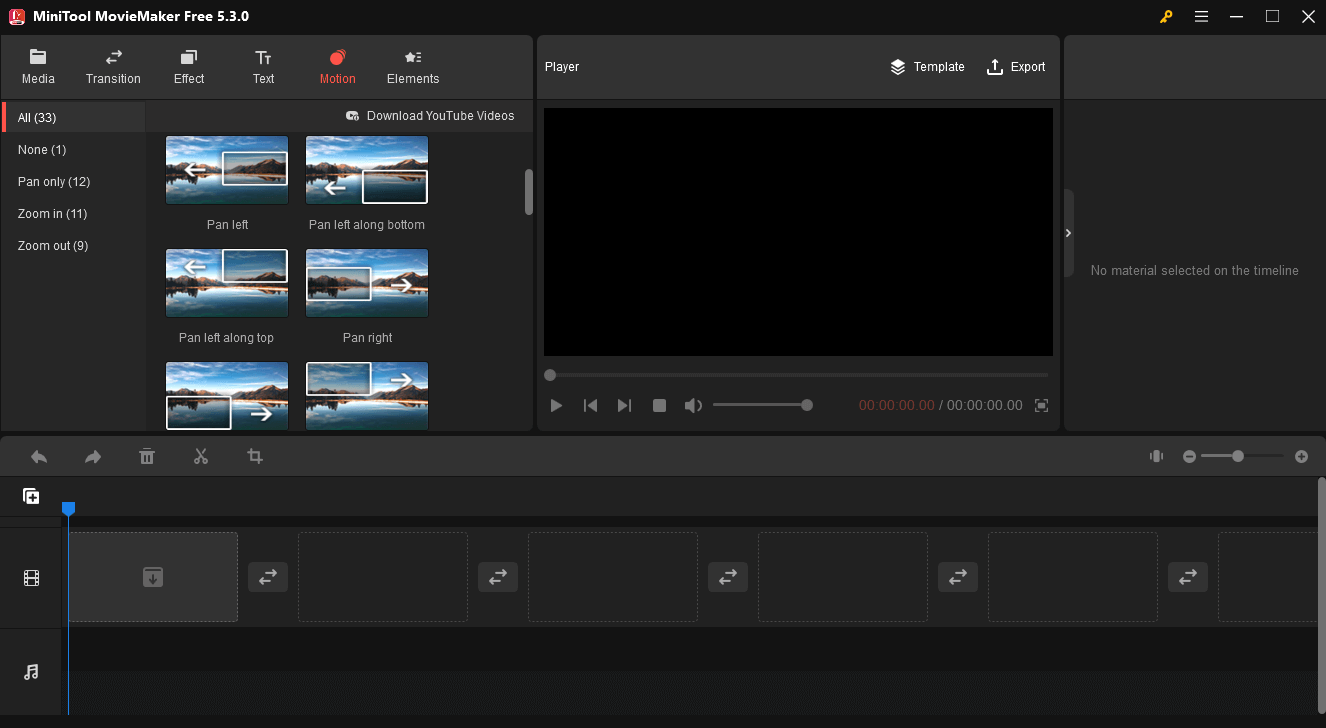
Currently, there’re more than 30 pan and zoom effects in MiniTool MovieMaker, including pan-only, zoom-in, and zoom-out categories. The arrow in each effect indicates the direction of camera movement.
You can choose and add one effect to your video or image to imitate the camera movement. Then, you’ll find the direction of the video or image you can see is opposite to the arrow direction of your chosen effect.
Pan and zoom effects can be added to both video clips and still images, but the effect on the static image is more obvious.
Here’s how to use pan and zoom effects in MiniTool MovieMaker on your PC.
Step 1. Click the Free Download button to get the installer of MiniTool MovieMaker, double-click the setup file and follow the on-screen instructions to complete the installation.
MiniTool MovieMakerClick to Download100%Clean & Safe
Step 2. After installation, launch this video editor with pan and zoom effects, close the pop-up window, and you’ll access the main user interface of MiniTool MovieMaker.
Step 3. Under the default Media tab in the upper left side, click Import Media Files to upload your video clips and images from your computer.
Step 4. Choose all your videos and pictures and drag and drop them into the timeline, and click the Zoom to Fit Timeline button to make your footage fit the timeline.
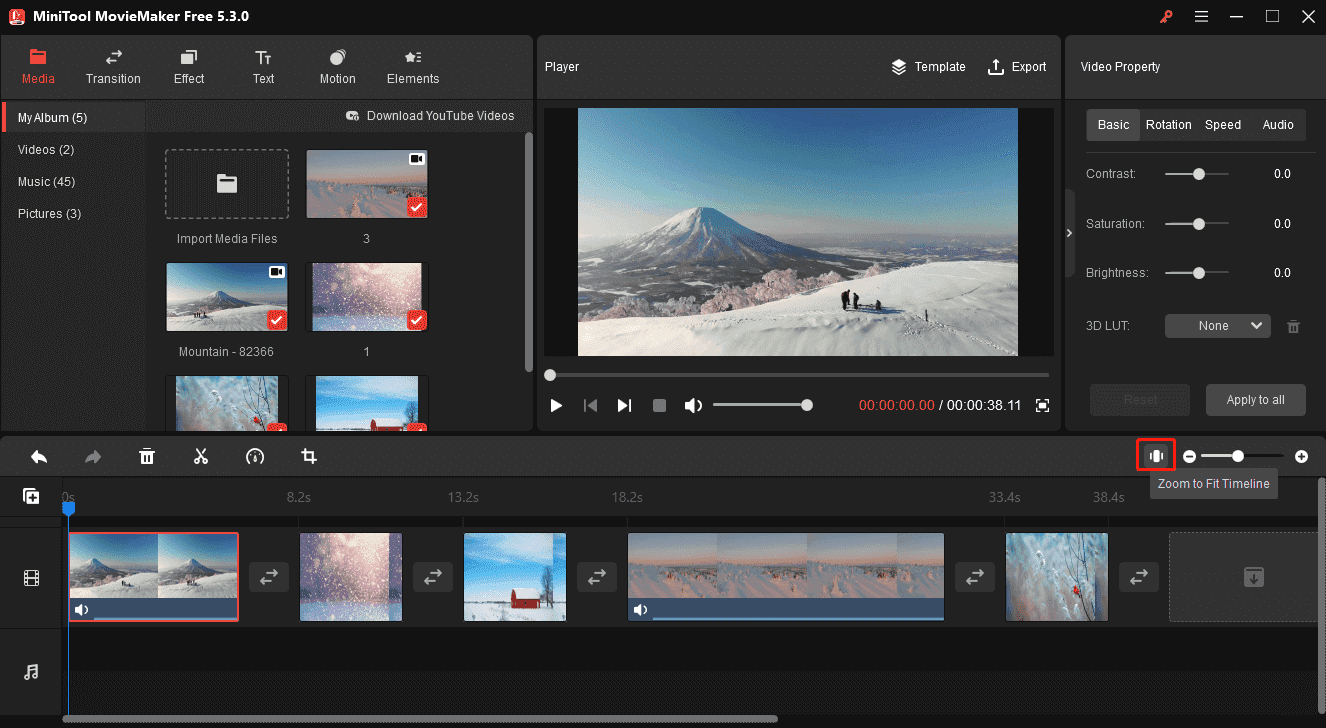
Step 5. Select a picture or video on the timeline and go to the Motion tab. Choose a target category and preview the effects to find the desired one. Place your mouse over an effect and you can preview it immediately.
Click the + icon at the bottom right corner to add the pan or zoom effect to your clip.
From the Image or Video Property section on the right side, you can click the Apply to all button to add the same motion effect to all images or videos on the timeline.
Step 6. If you want to delete the motion effect, click the motion icon on the clip and click Delete, drag the None effect to it, or click the trash icon next to the motion effect name in the Basic bar from the Image or Video Property.
Step 7. You can continue to edit the video as you like. After editing, click Export to open the output settings window. Choose an output format and destination folder.
Click Settings to select the video quality, encoder, bitrate, and frame rate. Click Export again to start exporting your video.

In addition to pan and zoom effects, MiniTool MovieMaker is equipped with other tools and resources to edit and decorate your videos.
Key Features of MiniTool MovieMaker:
- Split, trim, rotate, flip, and crop videos/images.
- Speed up, slow down, and reverse videos.
- Edit the clip’s contrast, saturation, & brightness, or add 3D LUT effects to make it brighter or darker.
- Adjust the duration to still image up to 30 seconds.
- Edit audio in the original video, fade it, fade out, and change the volume.
- A library of transitions, filters, text templates, and animated stickers.
- Export videos up to 1080p without watermarks.
- …
#Microsoft Video Editor
Windows 10’ built-in Video Editor in the Photos app also offers some zoom effects. However, if your PC is running the latest version of Windows 11, you should get the Photos Legacy to use the Video Editor because the latest version of the Windows 11 Photos app kills Video Editor, Albums, and Collections.
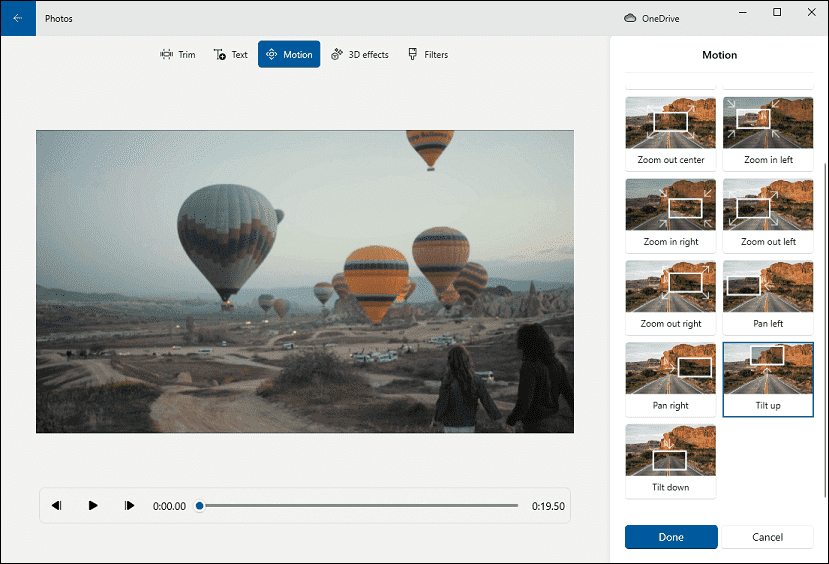
Currently, this Microsoft video editor mainly includes several zoom effects, two pan effects, and two tilt effects.
Here’s a quick guide to using the camera movement effects in Microsoft video editor.
Step 1. Type “video editor” in the search box to find and launch Windows 10/11’s built-in Video Editor app.
Step 2. Click New video project to create a new video and click Add to upload your videos and pictures. Then, drag them to the storyboard.
Step 3. Choose the picture or video that you’d like to add the camera motion to, and click Motion.
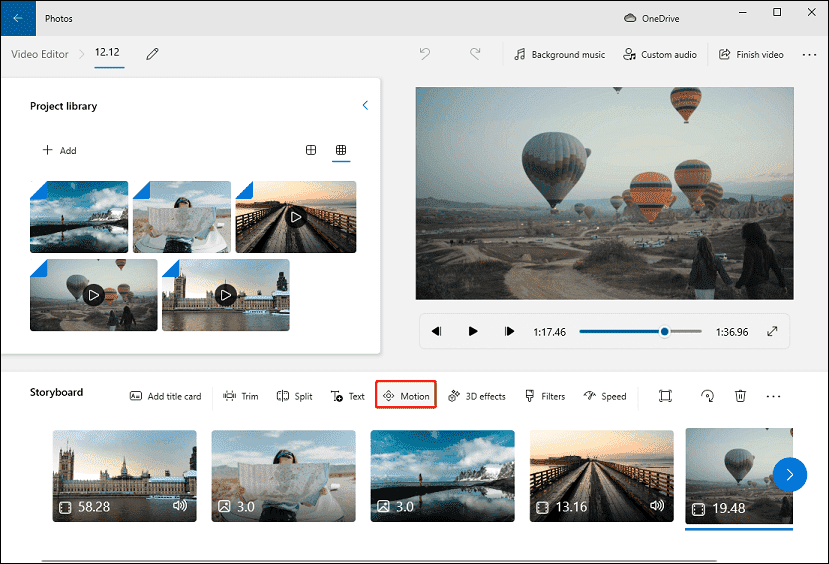
Step 4. Select an effect from the right side, and click Done to apply the motion effect.
Step 5. Click Finish video in the upper right corner and export your video.
What’s more, this Windows 10/11 free video editor allows you to split & trim videos, change video speed, add a title card, add custom audio, apply filters & 3D effects, etc.
#Movavi Video Editor
Another choice of pan and zoom video editor is Movavi Video Editor. Here’s how to use the pan and zoom effects in this video editor.
Step 1. Download and install Movavi Video Editor on your PC. Open it and click Add Files to add your videos and images.
Step 2. Drag your video and picture to the timeline, and select the target clip.
Step 3. Click the More Tools button located at the bottom of the left menu list, and click Pan and zoom.
Step 4. Then, you’ll see 6 options, Top to bottom, Right to left, Left to right, Bottom to top, Zoom in, and Zoom out. Click the desired effect to add it.
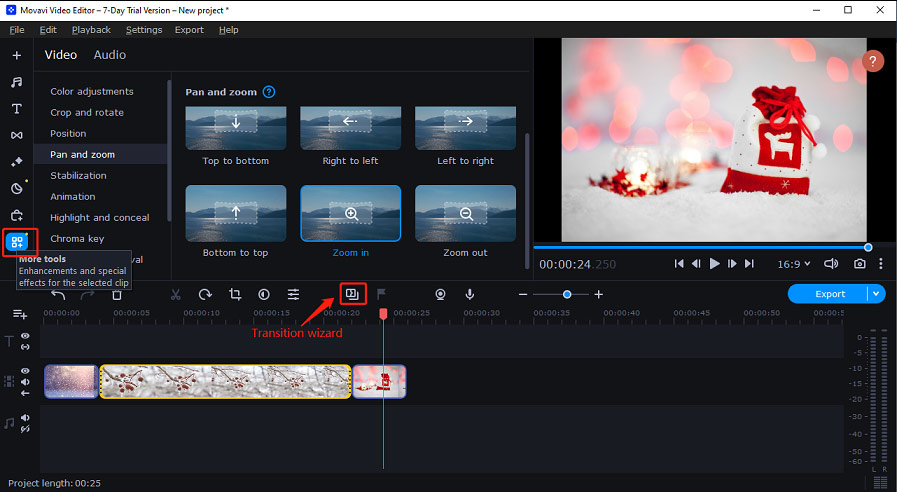
Alternatively, you can add the pan and zoom effect to all image clips. Select these images on the timeline, click the Transition wizard button above the timeline, and click Apply to All Clips button under the Pan and zoom option.
Step 5. To export your video, click File > Save movie as a media file, choose a video format, and click Start.
Movavi Video Editor is compatible with both Windows and macOS. Apart from pan and zoom effects, this video editing program offers more features for you to explore, such as filters, stickers, music, titles, color adjustments, and more.
Conclusion
This post gives you a quick review of 7 common camera movements in film, including pan and zoom. Also, it introduces 3 video editors that have this kind of camera motion effects as well as specific steps.
In addition to the above 3 pan and zoom video editors, some other video editing applications also share pan and zoom effects like Final Cut Pro, VideoStudio, MAGIX Movie Studio, VideoPad Video Editor, iMovie, etc.
Choose a video editor and add pan and zoom effects to your video or image clips. If you have any questions while using MiniTool MovieMaker, you can contact us via [email protected].
About The Author

Position: Columnist
Cora is a tech writer specializing in digital media workflows, with over six years of hands-on experience in video post-production, media transcoding, and screen capture. Her writing is always clear and practical. Cora also produces in-depth software reviews for users across skill levels to help them find the right tool and enjoy video editing.
User Comments :