iMovie is one of the best free video editors on Mac, iPhone, and iOS. It’s endowed with massive features and tools to create and edit trailers and videos, such as titles, subtitles, and transitions. And you can also record your voiceover and add it to your video. This post will illustrate how to do a voiceover on iMovie with clear steps.
And if you want to add your favorite music to a video on Windows, just try MiniTool MovieMaker. It’s free to use and has no watermarks.
MiniTool MovieMakerClick to Download100%Clean & Safe
How to Do a Voiceover on iMovie on Mac
iMovie is pre-installed on most Apple devices. If not, go to the App Store to download iMovie and then complete the installation. And it’s easy to do iMovie voice over to add your narration to your work.
Here’s how to add voiceover in iMovie on Mac.
Step 1. Open iMovie on your Mac, click the Create New button, select the Movie, and tap the Import Media button to import your video.
Step 2. Then drag the video to the timeline. Optionally, you can mute the audio in the video. Just right-click it, and choose the Modify > Detach Audio option.
Step 3. Before recording your voiceover, you should move the playhead to the desired place where you want the recording to begin.
Step 4. Tap the microphone icon in the bottom left corner, or click the Window > Record Voiceover.
Step 5. To change the recording settings, click the Voiceover Options icon next to the Recording button, then you can choose the Input Source, adjust the volume, etc.
Step 6. Click the Record button to start recording your narration. Click it again to stop recording. Then tap Done, and the recording will appear under the video clip in the timeline.
How to Do a Voiceover on iMovie on iPhone/iPad
Below are detailed steps on how to do a voiceover on iMovie on iPhone/iPad.
Step 1. Launch iMovie, tap the Create Project to make a new project, then click the Movie, select Create Movie, and then add your video. Drag the clip to the timeline.
Step 2. If you need to mute this video, just tap it, and then click the Audio button, and click the Mute button next to the volume slider.
Step 3. Drag the playhead to the desired place where you want the narration to begin.
Step 4. On iPhone, click the big + icon and select Voiceover. On iPad, just tap the microphone button.
Step 5. Tap the Record button, then start your narration after a three-second countdown. Click the Stop to stop the recording.
Step 6. Click Accept to add the recording to your video. Or you can Cancel, Retake, Review the recording. Click the Dode, then export your iMovie work.
How to Do a Voiceover on Windows Movie Maker
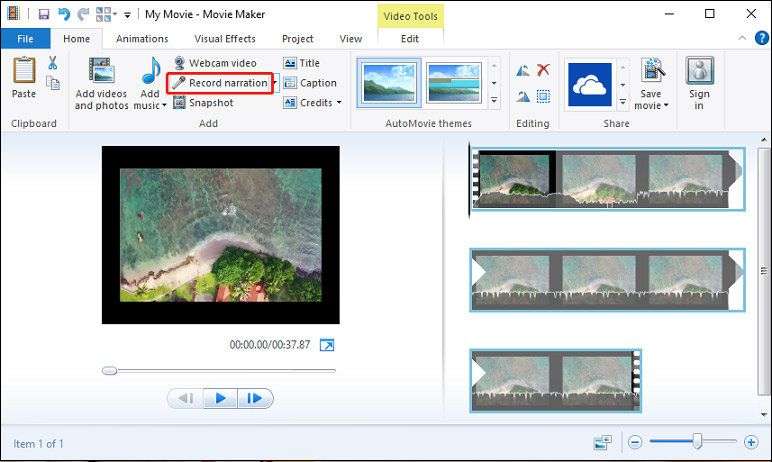
Windows Movie Maker is a free alternative to iMovie for Windows. And here’s how to do a voiceover on Windows Movie Maker on Windows.
Step 1. Open Windows Movie Maker, click the Add videos and photos to browse for a video and click the Open.
Step 2. To remove the audio from the video, click Edit, click the Video volume, and drag the slider to the complete left next to the Mute button.
Step 3. Click the Home, then tap the Record narration button, and click the Record to start recording your narration.

Step 4. Tap Stop to stop the recording. Then a pop-up window appears, and you can choose a folder to save this recording. After clicking Save, you’ll return to the Windows Movie Maker interface, and you can click the Play button to preview the video with narrations.
Step 5. To save this video, tap the Save movie button, then select a folder, give the file a name, and click Save.
Conclusion
Now, it’s your turn. Follow the above steps and learn how to do a voiceover on iMovie on Mac/iPhone/iPad. If you want to add a voiceover to video on Windows, try Windows Movie Maker.


User Comments :