

This post focuses on video editors for Windows 7, including self-contained and third-party video editing software: Windows Movie Maker, MiniTool MovieMaker, OpenShot, Blender, and Lightworks.
Although many Windows operating system (OS) users are using Windows 10 or the new Windows 11, there are still some people who persist on Windows 7. They believe that Win7 is the best and most stable edition of the Windows system. Those users still need to take advantage of a video editor to edit video Windows 7.
Does Windows 7 Have Video Editing Software?
To begin with, let’s see whether Windows 7 has a video-making program or not. The answer is yes. Win 7 does own its video creators and there is more than one. They can help users create and edit wonderful videos, movies, and audio using various effects, filters, tricks, magic, decorations, etc.
Best Video Editors for Windows 7:
- MiniTool MovieMaker
- Windows Movie Maker
- OpenShot
- Blender
- Lightworks
| Software | Platform | Price | Watermark | Win7 Compatibility | Current Status (2026) |
| MiniTool MovieMaker | Windows | Free + paid | No watermark | Supported | Actively updated |
| Windows Movie Maker | Windows | Free | No watermark | Supported | Discontinued (2017) |
| OpenShot | Cross-platform | Free & open-source | No watermark | Supported | Actively updated |
| Blender | Cross-platform | Free & open-source | No watermark | Supported | Actively updated |
| Lightworks | Cross-platform | Free + Paid | No watermark | Supported | Actively updated |

Microsoft Windows 7 Video Editor
First of all, there is a Windows 7 built-in video editor named Windows Movie Maker that is preinstalled with the OS on your PC.
Windows Movie Maker Windows 7 or Windows Movie Maker Video Editing Software Windows 7, also called Windows Live Movie Maker Windows 7 from 2009 to 2011, is a discontinued video editing tool developed by Microsoft. It is a part of the Windows Essentials app suite.
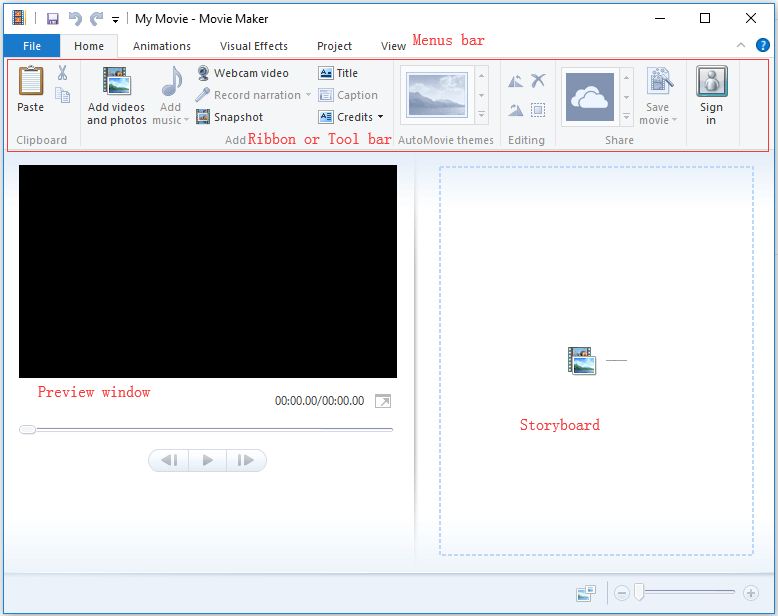
Since Windows Movie Maker Windows 7 Video Editor was officially abandoned on January 10, 2017, you can no longer download it from its official website. Yet, as a Windows 7 user, you probably still have the program on your computer.
If you accidentally removed it, you have to reinstall it on your machine. How to get Movie Maker on Windows 7? You can get Windows Movie Maker for Windows 7 by downloading the Windows Live Essentials toolkit.
Best Open-Source Video Editor Windows 7
Secondly, there are many third-party open-source video makers for Windows 7.
#1 OpenShot Video Editor for Windows 7
OpenShot is a free and open-source video editing software hand-crafted with heart. Relying on this simple app, you can create stunning videos. It is easy to use, quick to learn, and surprisingly powerful to use. Just get started by making beautiful videos!
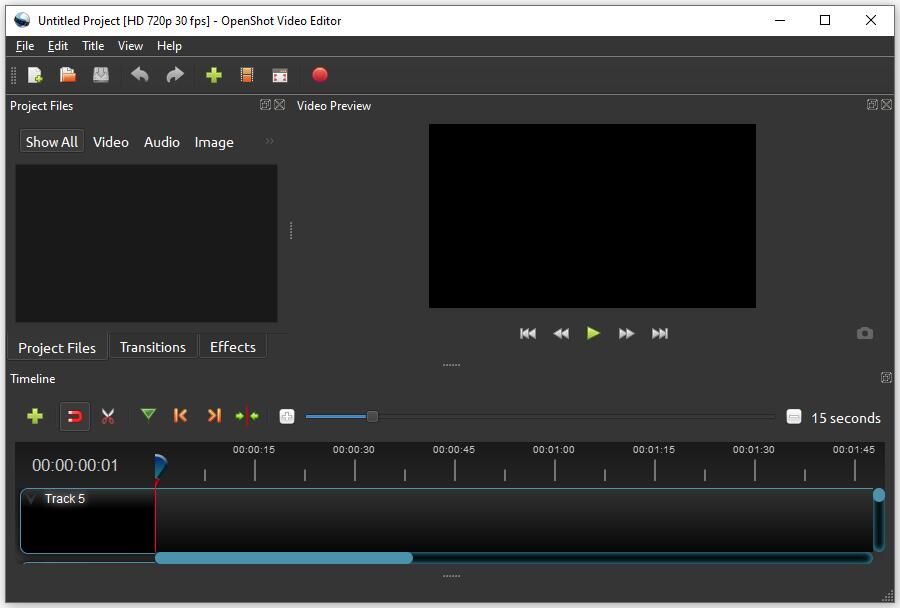
- Cross-platform
- Trim and slice
- Animation and keyframes
- 3D animations
- Unlimited tracks
- Video effects
- Slow motion and time effects
- Audio waveforms
- Title editor
- 70+ languages support
OpenShot is a relatively barebones video editor, even compared to free alternatives, but it’s simple to use and has enough features to entice amateur editors working on personal projects.https://www.creativebloq.com/reviews/openshot
#2 Blender Video Editing Software Windows 7
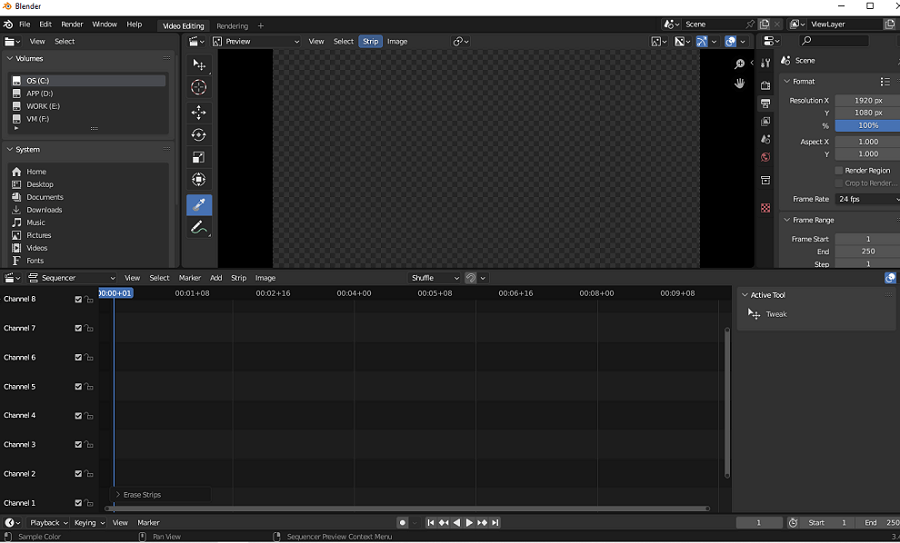
Blender is free to use, free to share, free to change, and free to sell your work. It is totally free video editing software for Windows 7, 8, 10, and 11. Whether you apply animation, modeling, games, or VFX, just name it. Blender will get you covered.
- Rendering
- Modeling
- Sculpting
- Animation and rigging
- Story artist
- VFX
- Simulation
- Pipeline
- Scripting
For artists entering the world of 3D animation, Blender provides unrivaled access to tools and concepts you need to learn.https://www.pcmag.com/reviews/blender
#3 Lightworks Free Video Editor for Windows 7
Lightworks is a brand of video editing program that assists you in being creative and changing the way people see the world. On the one hand, it provides Hollywood-strength video editing for its users. The Media QC platform ensures the created videos match international delivery standards.
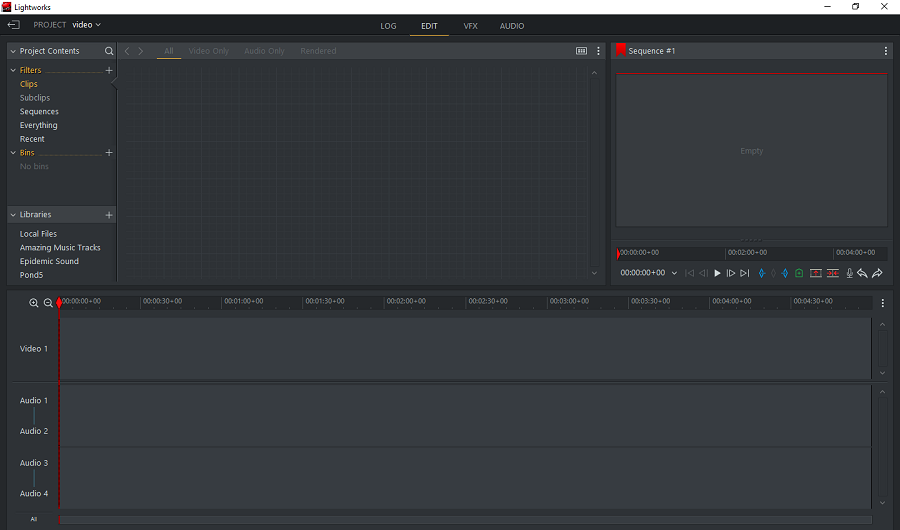
On the other hand, Lightworks’ ioGates REACT redefines remote workflows and enables you to share your work with powerful features (e.g. automated transfer, transcoding, and QC) and industry-grade security. The process is fast, flexible, and simple.
It’s a perfectly serviceable pro video editor with a clear, pleasant user interface and decent in-app performance.https://www.pcmag.com/reviews/lightworks
Free Video Editing Software for Windows 7 No Watermark
Thirdly, we will introduce a freeware video editor for Windows 7 without a watermark well-known as MiniTool MovieMaker, which is a free professional video editing software for Windows 7 that allows you to export videos without charge and any watermark. The following takes how to edit mp4 video on Windows 7 with MiniTool MovieMaker and get a watermark-free video for example.
 MiniTool MovieMaker
-
 Split and trim videos to remove redundance.
- Change video aspect ratio to match screen sizes.
- Add bubble texts, bgm, transitions, and more effects.
- Create PiP or split-screen videos by multitrack editing.
Here is how to edit videos with the software on Windows 7:
Fast Track Steps:
- Install MiniTool MovieMaker.
- Import video files and add them to the timeline.
- Add and edit transitions.
- Apply effects, add text, and elements to enhance clips.
- Trim and crop videos.
- Add music or sound effects.
- Export the edited video.
1: Download and Install
Download and install the Windows 7 video editor.
2: Add Videos
Install and launch the app on your computer. Enter its main user interface (UI) and click the Import Media Files option under the Media tab in the left window to upload your source MP4 video. The uploaded media files will be listed in the Media library.
Then, click the + icon in the bottom-right corner of the target video in the media library to add it to the timeline below on the video track. Or, simply drag and drop the video to the destination track. To add multiple videos, just add them one by one. Or, you can select them all and click + or drag & drop.
2. You are able to change the order of the media files on the same track. Just click on the target file to select it, click and hold your mouse when your cursor turns into a four-direction arrow, move to the destination file location, and drop your mouse. If there is already a file in the location, it will be pushed behind the target file.
3. To remove a media file from the timeline, just right-click on it and choose Delete.
3: Add Transitions
Go to the Transitions tab from the upper left menu. There, pick up a proper transition and add it between two videos on the timeline just like adding media files to the timeline. Add other transitions between other transitions. You can use the same transition between all your video clips. Just right-click on the target transition and select Apply to All. Or, you can apply your favorite transition to selected clips. Of course, you can use no transition between video clips.
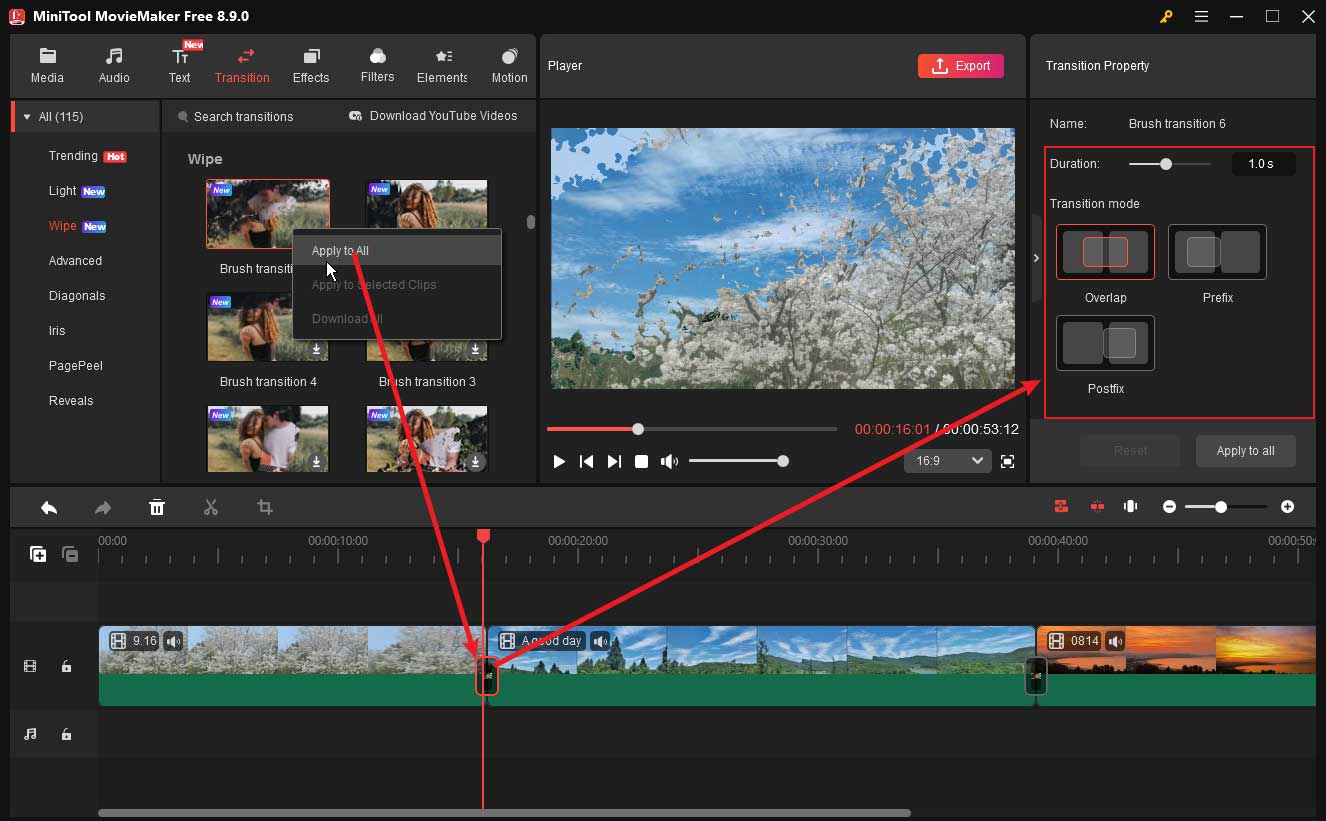
Click on one transition on the video track and show the Transition Property section in the upper right. There, you can make some specifications of the selected transition. Change the transition duration and transition mode. You can also apply your settings to all transitions on the timeline with the Apply to all button. If you make a wrong setting, just click the Reset button to cancel all changes.
4: Add Filters
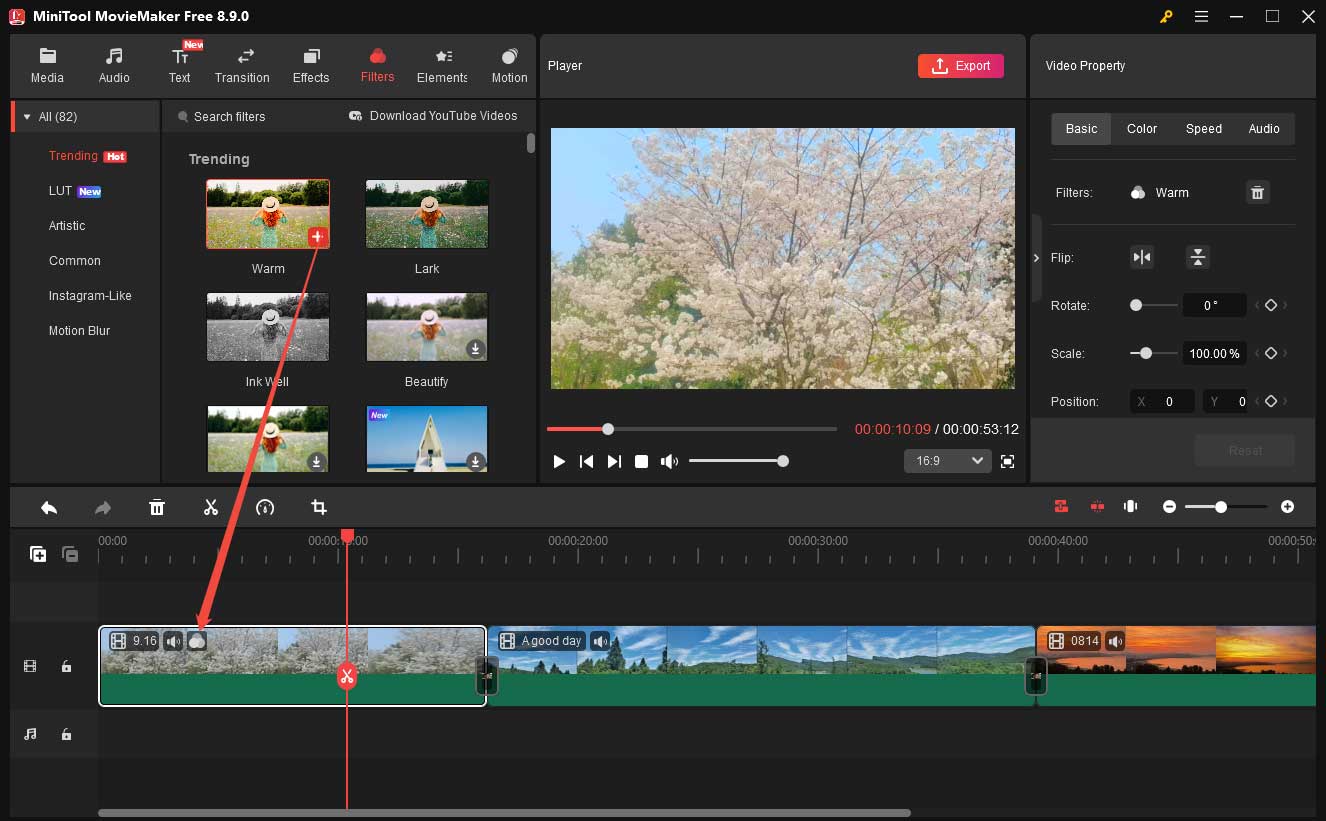
Move to the next Filters tab, choose a suitable filter, and add it to the target video clip. You may need to first click the download icon on the target effect to get it from the online server before you can add it. One video clip can only add one effect.
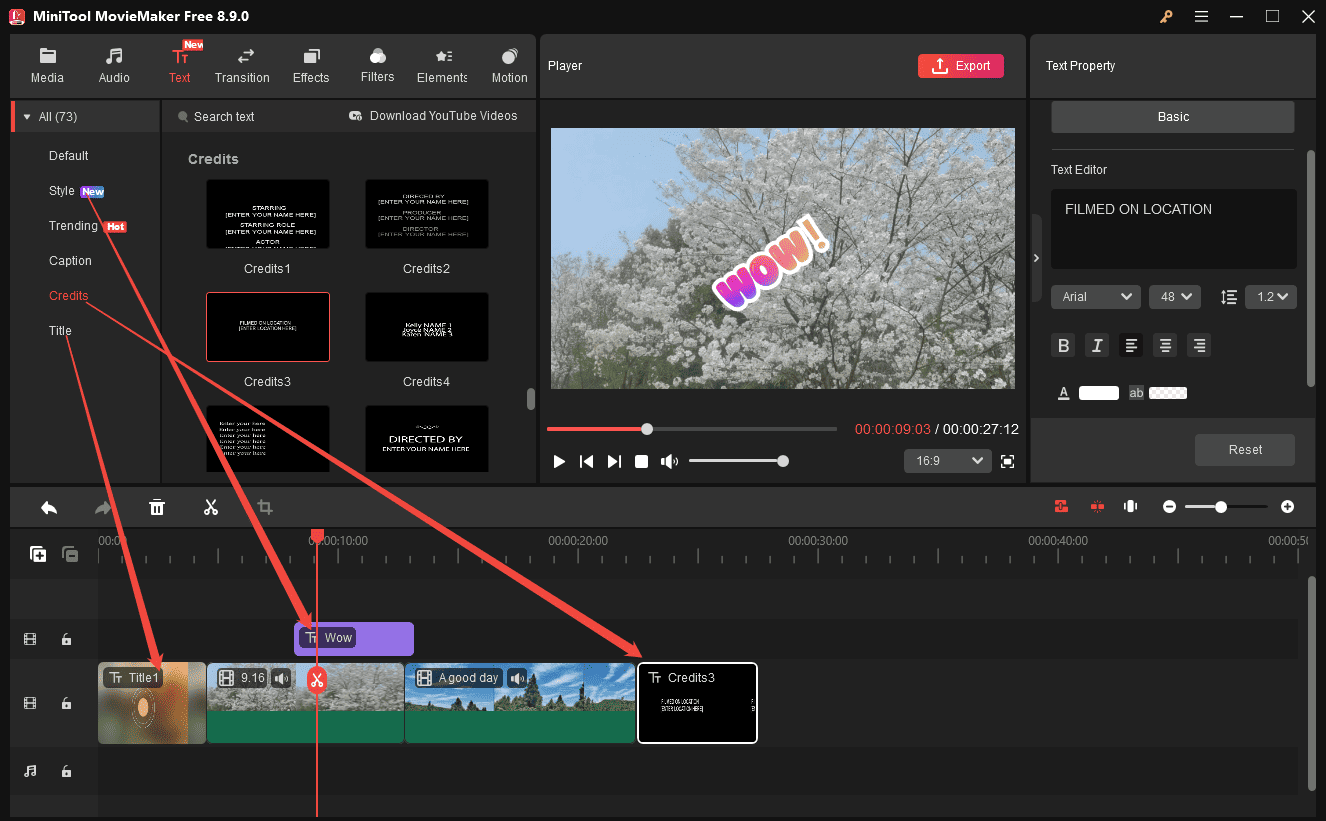
5: Add Text
Switch to the Text tab. There, you can add captions, title, and credits to your video. You can customize the font, size, line spacing, alignment, color, opacity, and so on for the added text in the Text Property area.
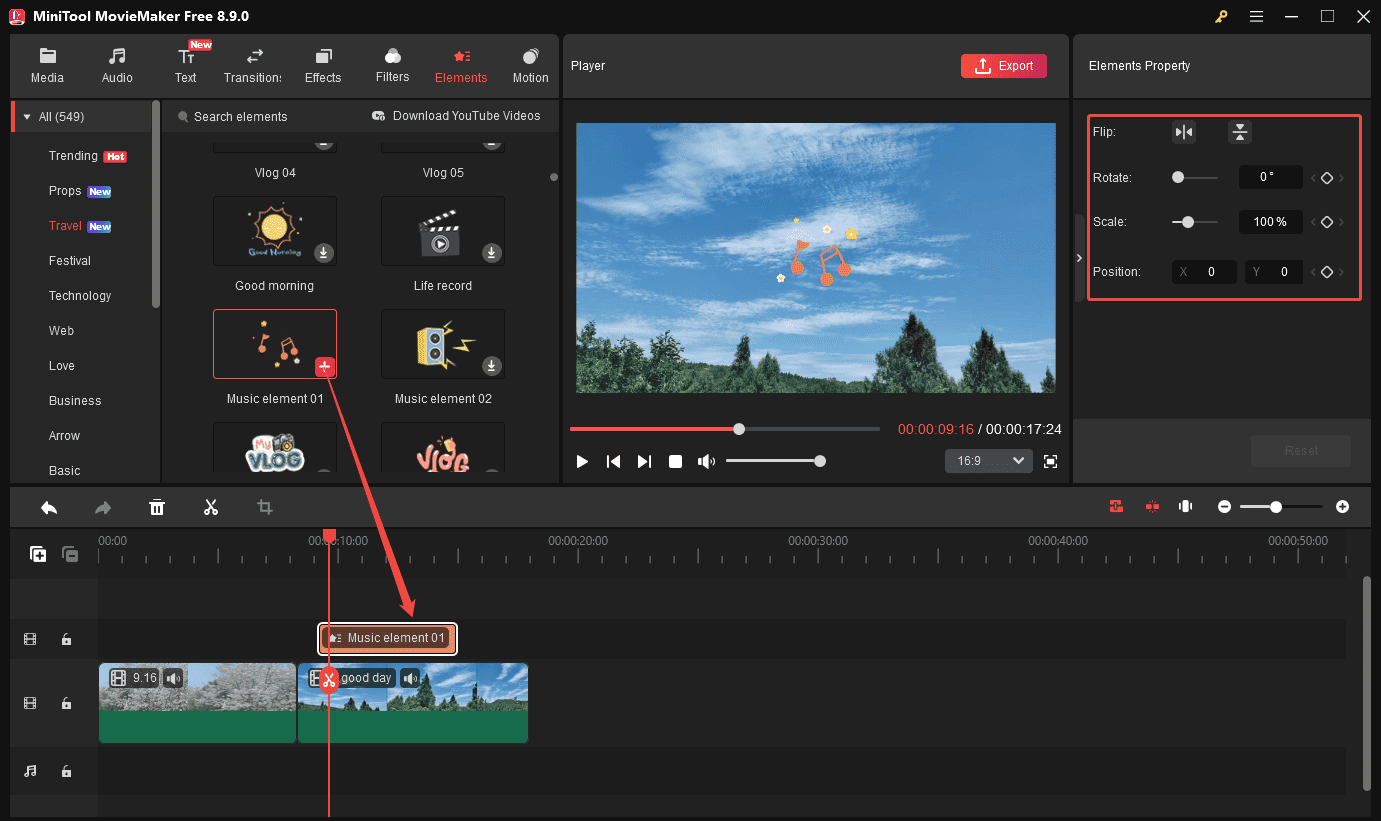
6: Add Elements
In the Elements tab, find a lovely, animated sticker to put into your video. You can flip or rotate the video and change its scale and location on the screen.
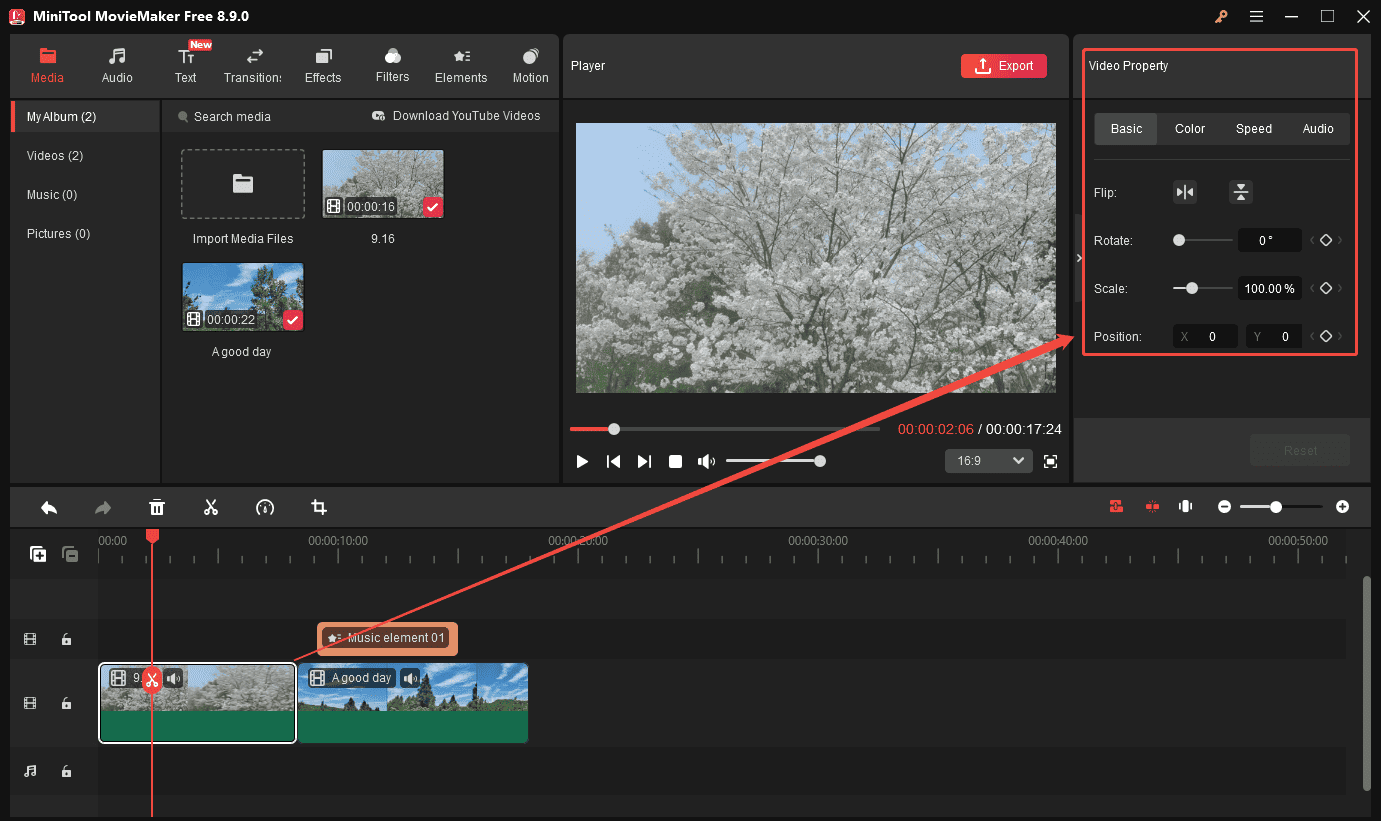
7: Edit the Video
Besides, you can do some edits to the video clip itself. Click on it to select it and show its property. Then, you can change its contrast, saturation, brightness, and speed; reverse the video; add a 3D LUT filter to it; as well as rotate/flip the video.
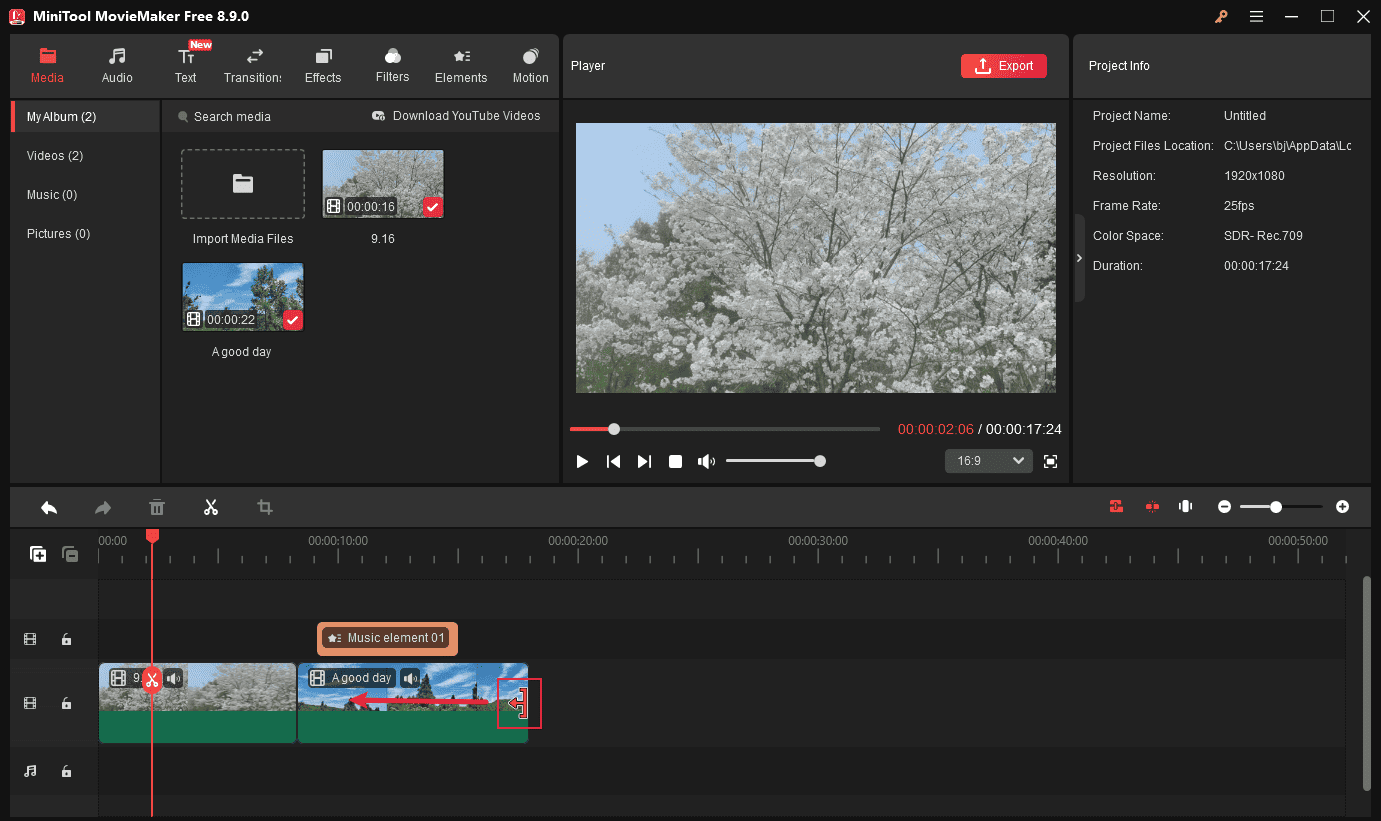
8: Trim the Video
Select a video clip on the timeline and hover over either end until the Trim icon appears. Then, drag the icon inward to trim away any unwanted footage from the start or end of the clip.
9: Crop Your Video
Select a video and click the Crop icon on the toolbar to trigger the Crop window. There, you can manually shrink the video clip in eight directions or choose a preset aspect ratio.
10: Add Audio
If you want to add some audio effect to your video, just go back to the Media tab and select the Music subtab. There, pre-listen to the songs in the library and find a proper one to add to the audio track on the timeline. You can fade in or fade out the background track or change its volume.
11: Export Video
Finally, export the video without any watermark. Click the Export option in the upper right to launch the Export popup. In the popup, you can rename your video, change its format, and alter its save location. You can save the video in a format that is compatible with Windows 7 PC or other devices.
But for anyone who wants a simple, clear way to join some video clips with transitions, place overlaid objects and text, add music, and bling it all up with some effects, MiniTool MovieMaker may be just the ticket.https://www.pcmag.com/reviews/minitool-moviemaker

Conclusion
That is all about the video editors for Windows 7. If you have problems using MiniTool MovieMaker, send an email to [email protected] for help.
People Also Ask
About The Author

Position: Columnist
Cora is a tech writer specializing in digital media workflows, with over six years of hands-on experience in video post-production, media transcoding, and screen capture. Her writing is always clear and practical. Cora also produces in-depth software reviews for users across skill levels to help them find the right tool and enjoy video editing.
User Comments :