People always get used to cropping video on PC because it’s a delicate work and PC software offers many advanced features. However, losing quality and changing formats may often happen to you when cropping videos. The below Windows 10 video croppers can help you solve it.
How to Crop a Video Windows 10 with MiniTool MovieMaker
MiniTool MovieMaker is an easy-to-use video editing software that can help you split videos, trim videos, merge videos, crop videos, rotate videos, etc. What an important fact is that MiniTool MovieMaker is a free video editing application without watermark, ads, and bundles.
MiniTool MovieMaker is useful and reliable for cropping a video Windows 10. You can crop a piece of video with the assistance of the video editor. How to crop a video Windows10 with MiniTool MovieMaker? You are able to complete it by following detailed operations:
Step 1. Download and Install MiniTool MovieMaker
Download MiniTool MovieMaker from the official website, and install it on your PC. Run it and close the promotion window to enter the main interface.
MiniTool MovieMakerClick to Download100%Clean & Safe
Step 2. Import the Video
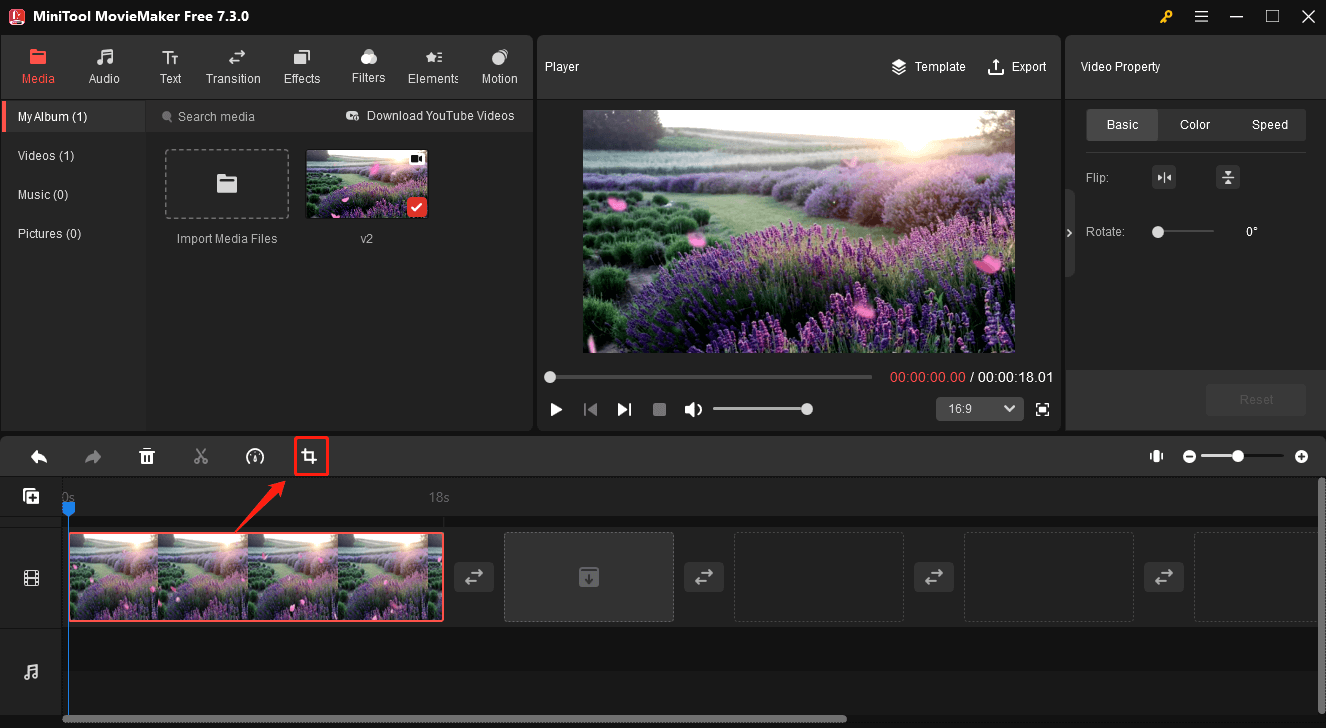
Tap on Import Media Files to import your video to the media library, click the + icon in the lower right corner to add the video to the timeline.
Step 3. Crop the Video
Click the video on the timeline, then tap on the Crop option in the toolbar.

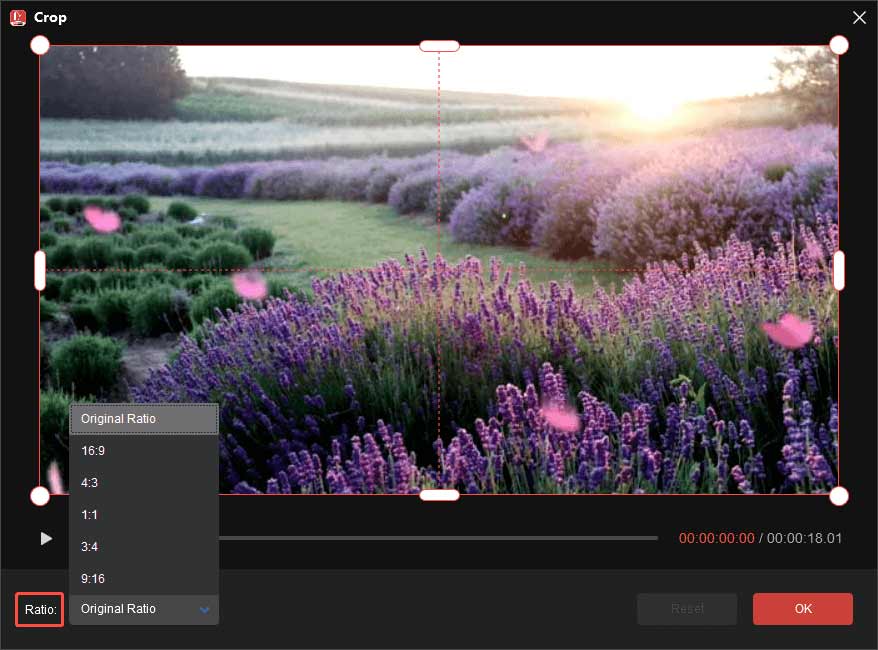
After that, it will appear a Crop window. Then crop your video in the Crop window. You can put the mouse in one of the eight directions (north, northeast, east, southeast, south, southwest, west, and northwest). When the mouse turns into a double-headed arrow, drag it inwards to a proper location. You can also drag the red rectangular border until cropping out the desired part. Or you can click the Ratio button in the lower left corner, and select a ratio set to crop the video.

In the end, click the OK button, this free video cropper already cropped the video.
Step 4. Export the Video
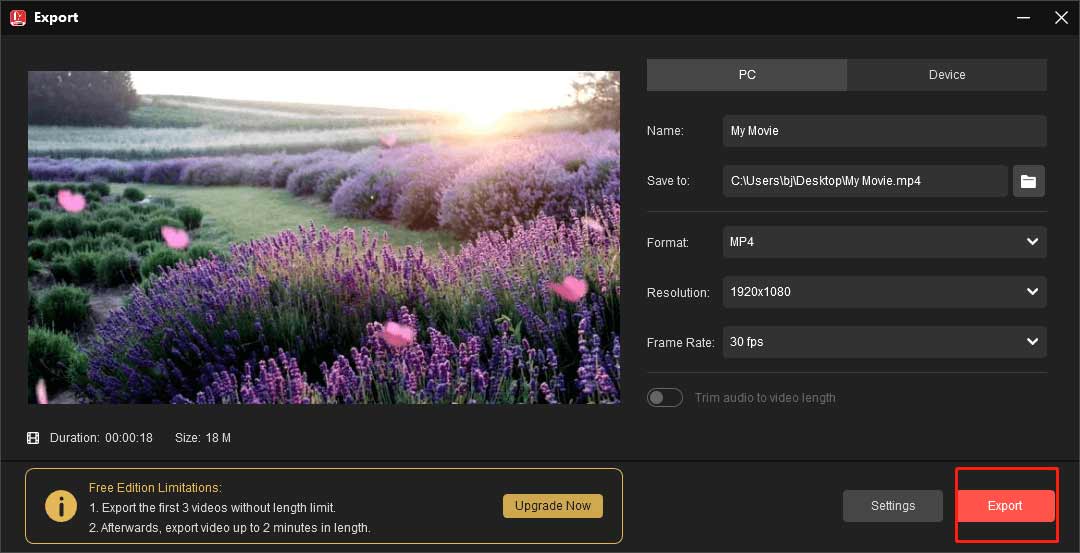
Select the Export button in the player window to export your video, then you will get into the Export window right now. Here you can rename your video, specify the output folder, change the output format, and adjust the resolution and frame rate of the video. Lastly, tap on the Export button.

How to Crop a Video Windows 10 with Windows Movie Maker
Many Windows users may regard Windows Movie Maker as their enlightenment in the video editing aspect. Nowadays, it’s still free and available for Windows 10. But how to crop a video Windows 10 with it? You can find the answer in the following step-by-step guide.
Step 1. Download Windows Movie Maker on your computer and launch it.
Step 2. Drag the video to the white window, and then click the Project tab in the top menu.
Step 3. There are two options of aspect ratio to crop the video. Choose one and preview the video.
Step 4. After finishing, click the Save icon and share this cropped video on social media.

How to Crop a Video Windows 10 with Handbrake
Handbrake is an open-source, multi-platform transcoder that supports format conversions and offers video editing features, which is also a free video cropper. If you download a video from YouTube, it also can serve as a YouTube video cropper to help you seize the special part and get rid of the unwanted section, which can be called re-create.
Here’s a simple guide to how to crop a video Windows by using the Windows 10 video cropper Handbrake.
Step 1. Launch Handbrake and upload the video you want to crop.
Step 2. Then click the Preview button to open the window, and then go to the Dimension tab to adjust the dimension and resolution.
Step 3. There are four fields marked Top, Bottom, Left, and Right to set the value in pixels.
Step 4. Once you have cropped it already, save the cropped video to your computer.
How to Crop a Video Windows 10 with VSDC
VSDC, a free video cropper, offers professional editing features to help crop a video easily. You can freely customize your video cropping until the size of the video fits your needs. The following part is to help you master the operation step.
Step 1. Launch the VSDC, and then click the Add object button to upload the video you want to crop.
Step 2. Tap on the Crop icon, and then choose one of the options, either Custom region or Auto cropping.
Step 3. Once you click the Custom region option, a pop-up new window allows you to crop video. You can set the zoom in motion, and drag forward or backward to select the zone.
How to Crop a Video Windows 10 with Online Video Cutter
Using an online video cropper is also a good choice for Windows 10 users. Apart from cropping video, Online Video Cutter, a Windows 10 video cropper, provides other video editing features with you, such as rotating video, trimming video, etc. And it’s very easy to use and just needs a few steps to crop video, not requiring installation.
Step 1. Click the Choose File button to upload the target video.
Step 2. Tap on the Crop icon to pop up some optional aspect ratio. Choose one, or choose Custom to crop the video by yourself.
Step 3. Once you finish, click the Save button.
Bottom Line
The above are 5 video croppers to solve how to crop a video Windows 10. You can try them one by one, and find the most suitable one that can meet your needs. It’s a pleasure to help you go through it.
If you have any questions or suggestions about MiniTool MovieMaker, please let us know via [email protected].


User Comments :