In this post from the Windows video editor - MiniTool MovieMaker will explain several ways to trim video on Windows 11 and tips to fix Windows 11 trim video not working issue.
Windows 11 offers multiple features and applications that make it easy to edit your videos. If you’re a Windows 11 user, you’ll be able to use the built-in apps or many third-party video editing software applications to edit and enhance your video. In this post, we’ll explore different options to trim video on Windows 11 and solutions to Windows 11 video trim greyed out issue.
Trim Video on Windows 11 Using Built-in Tools
Windows 11 provides you with many options to view, edit, and manage your videos and photos. With Windows 11 Photos app, Photos Legacy, and Microsoft Clipchamp, trimming a video is easy and convenient.
Trim a Video with the Photos App on Windows 11
Follow the steps below to quickly trim a video using the Photos app on Windows 11.
Step 1. Launch File Explorer and locate the video you want to trim. Right-click on it and select Open with > Photos to open the video in Photos.
Step 2. Click the Video trim button on the top or press Ctrl + E on your keyboard.
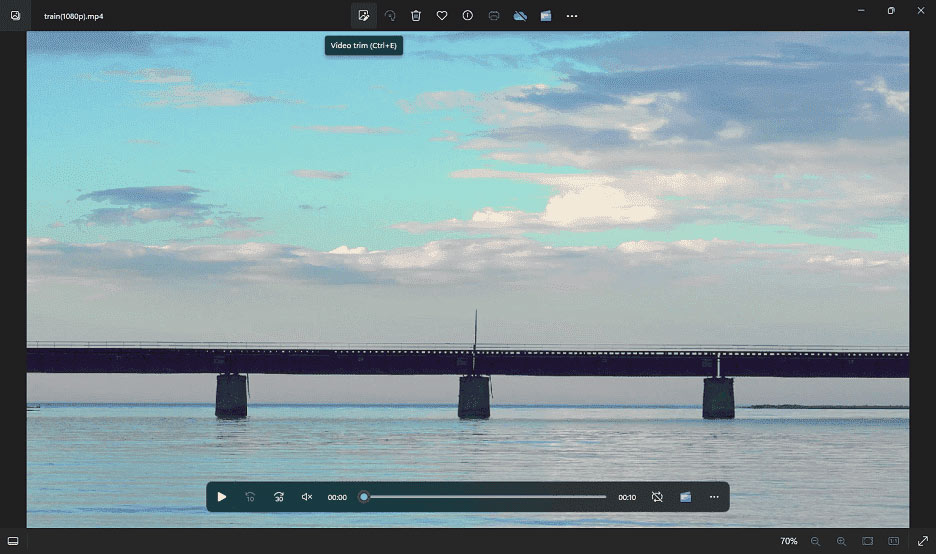
Step 3. At the bottom of the Trim window, drag the slider at the beginning or end of the video toward the center to remove unnecessary parts.
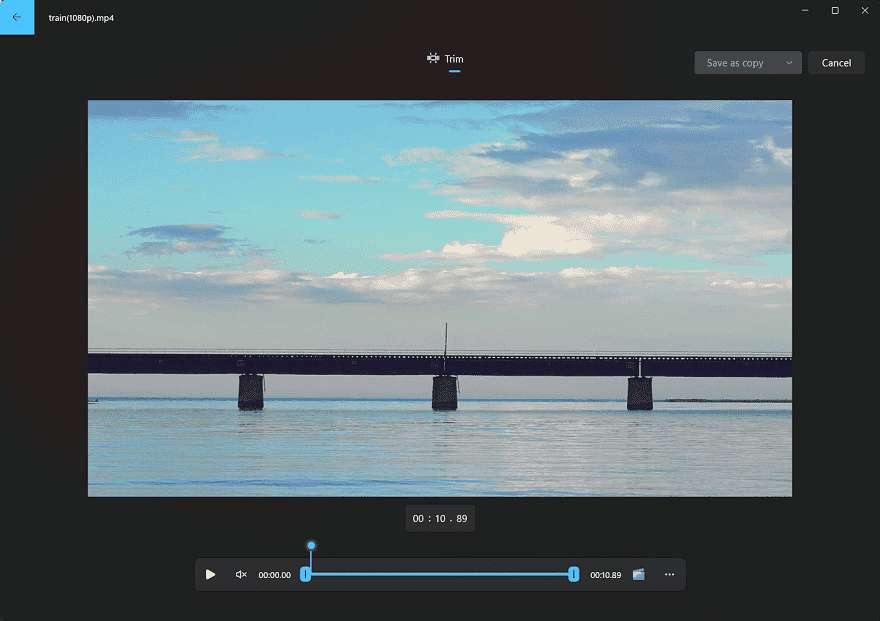
Step 4. Then, click the Save as copy button to process the video and select the destination folder to save the trimmed video.
Trim a Video with Windows 11 Photos Legacy
Windows 11 Photos Legacy app includes a Video Editor that allows you to trim, and rotate video, change video playback speed, and more.
Step 1. Click the Search icon in the taskbar, type “photos legacy”, and click Photos Legacy to open this app.
Step 2. Go to Video Editor at the top and click New video project.
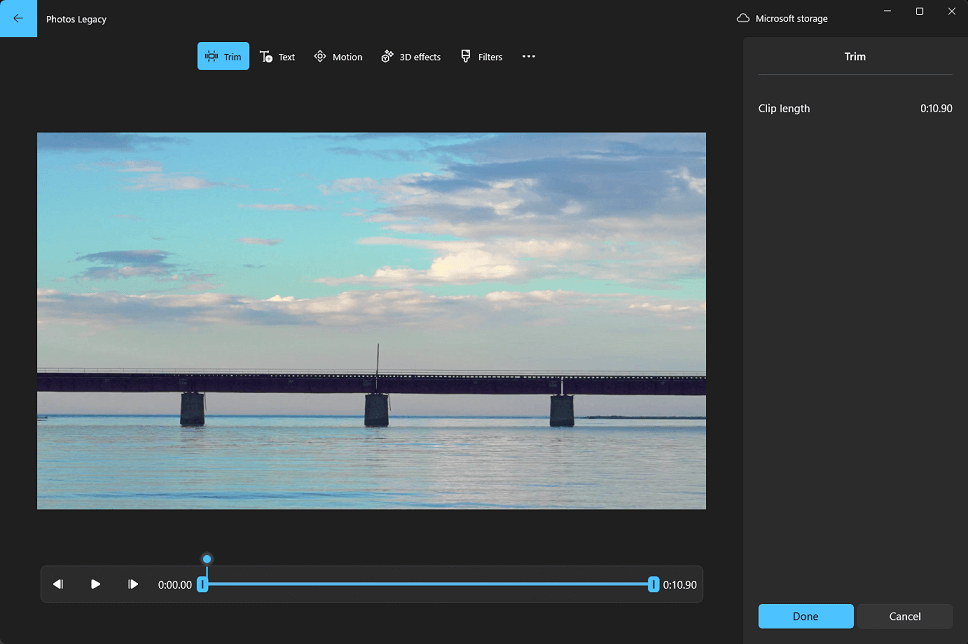
Step 3. Click the + Add button to import your video. Then, drag the video to the Storyboard and click the Trim button.
Step 4. Drag the sliders to choose the portions of the video you want to keep and everything outside the slider will be deleted. Click Done to trim the video.
Step 5. Click Export video in the upper right corner, then choose the video quality, click Export, choose the output folder, and click Save.
Trim a Video with Clipchamp on Windows 11
Clipchamp is the official video editor recommended by Windows 11, offering users a wide range of editing features to create high-quality videos. Here’s how to trim MP4 video on Windows 11 using Clipchamp.
Step 1. Open Clipchamp on your PC, then sign in with your account and click Create a new video.
Step 2. Click Import media in the upper left corner to open your video and drag it onto the timeline.
Step 3. Select the clip on the timeline to highlight it. Then, use your cursor to drag the sidebars left and right to trim the video.
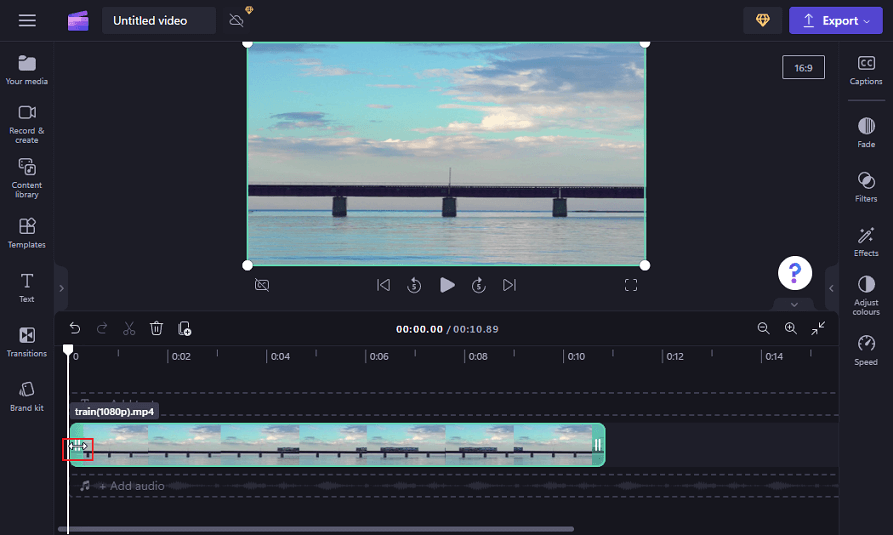
Step 4. Click Export and choose a resolution to start exporting the video.
An Alternative Way to Trim Video on Windows 11
In addition to the pre-installed video editing tools on Windows 11, sometimes you may need a third-party video editor for something extra. Among them, MiniTool MovieMaker is one of the best video editing software for trimming videos on Windows 11. This application has a user-friendly interface and is simple to use, especially suitable for beginners without editing experience.
Follow the steps below to use MiniTool MovieMaker to trim a video on Windows 11.
Step 1. Download and install MiniTool MovieMaker on your PC.
MiniTool MovieMakerClick to Download100%Clean & Safe
Step 2. Launch this application and close the promotion window to access the main user interface.
Step 3. Click Import Media Files to open your video and drag it to the video track on the timeline.
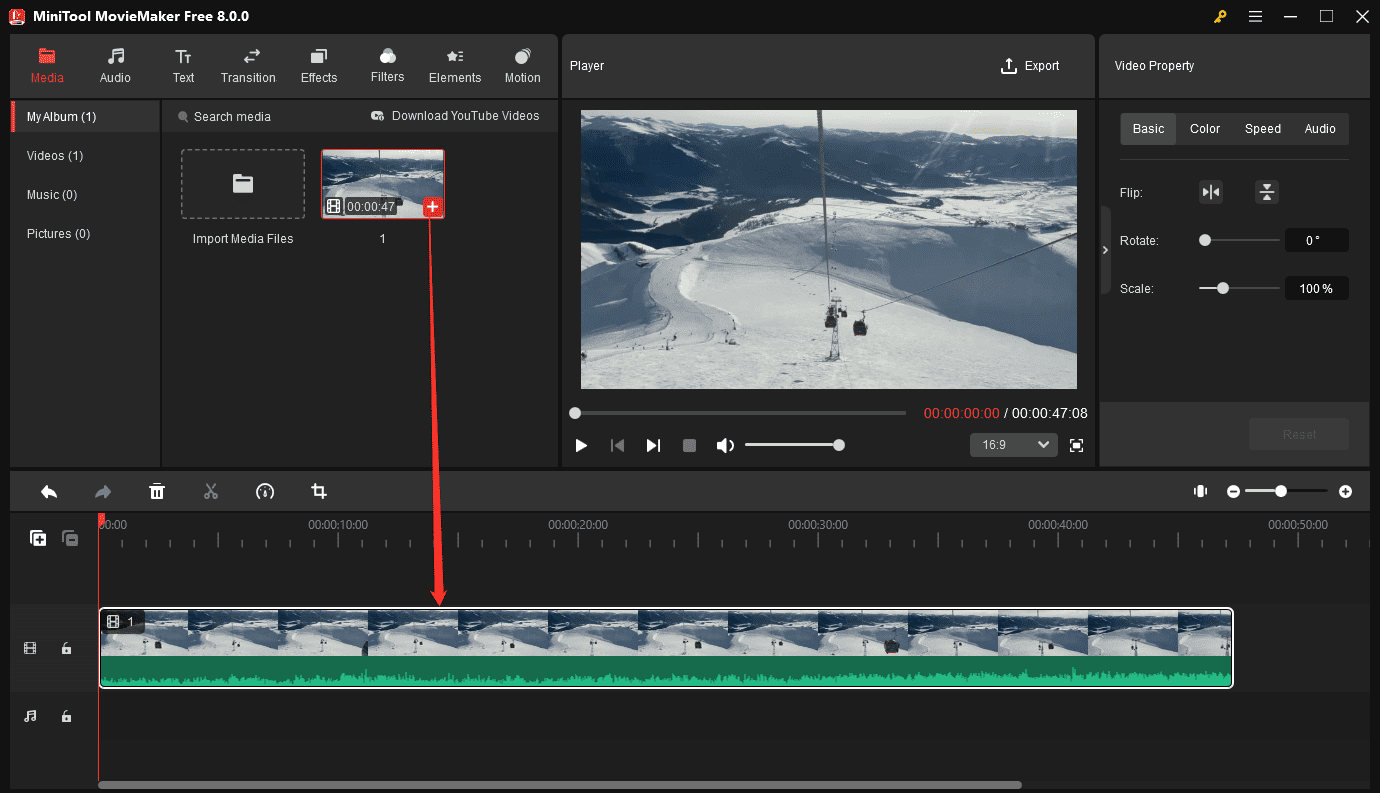
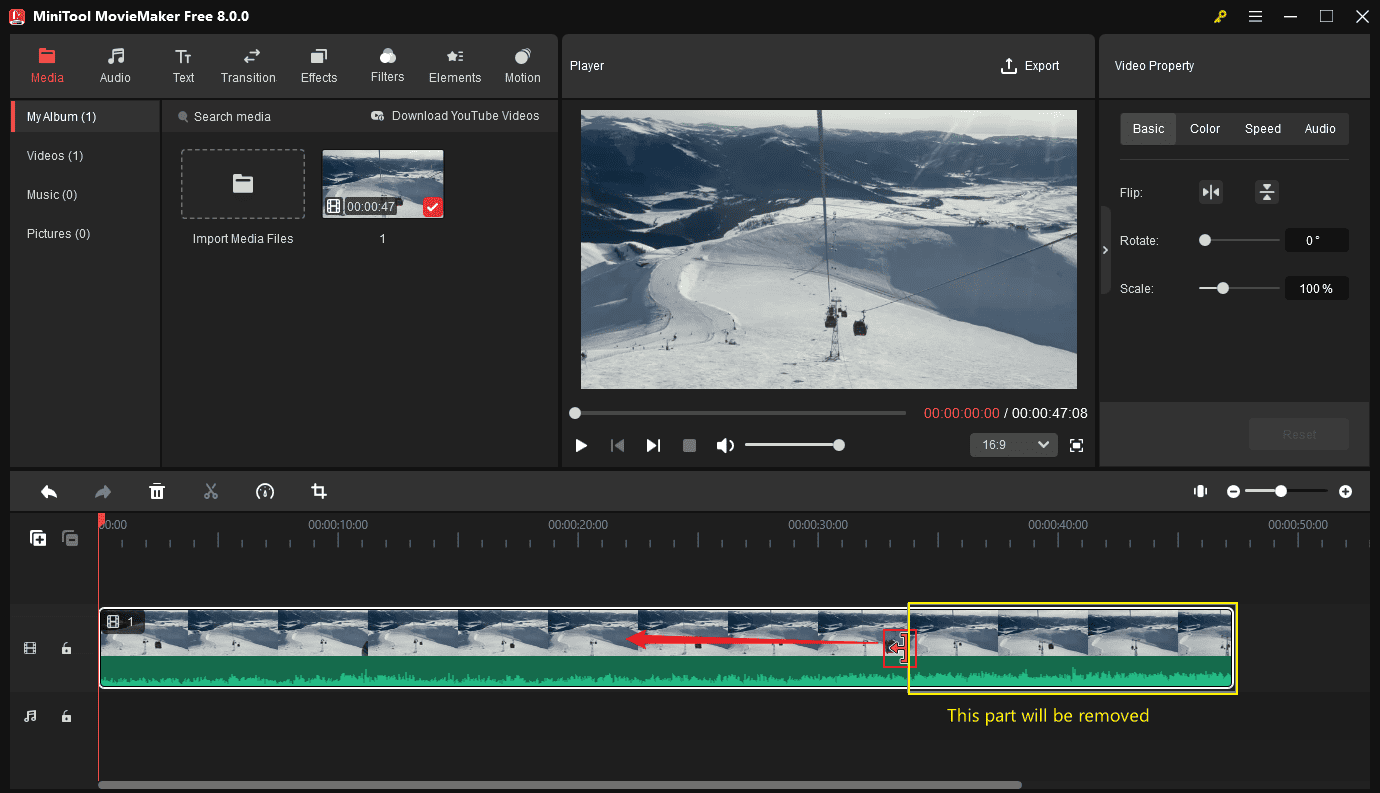
Step 4. Highlight the video clip by selecting it on the timeline. Hover your mouse cursor over the start or end point of the clip and you’ll see the Trim icon appear. Drag the icon toward the middle of the clip to remove unwanted portions of the clip.
Step 5. Click Export to open the output settings window. Then, select the destination folder, video format, resolution, frame rate, and more, and click Export to save the video.

Other Key Features of MiniTool MovieMaker:
- Supports up to 9 video tracks and 2 audio tracks to layer videos, pictures, text, effects, animations, and audio.
- Easily create picture-in-picture and split-screen effects.
- Split, rotate, flip, crop, speed up, slow down, and reverse videos.
- Add titles, captions, and end credits to the video with pre-designed templates.
- Offer a variety of video transition effects.
- Add some trending special video effects.
- Use various filters to adjust the tone of your video.
- Provide a rich library of different animated stickers.
- Capable of changing the video aspect ratio.
- Popular motion effects to enhance still images in the video.
- Several video templates to quickly create video from images.
- Trim audio to video length when exporting.
- …
Benefits of MiniTool MovieMaker:
- Free and easy to use, with no ads, and no bundles.
- Export videos up to 1080p for free and without watermarks.
- Support importing popular video, image, and audio file types.
How to Trim Video in Windows Media Player Windows 11
You can’t trim videos or make other edits in the new Windows 11 Media Player or Windows Media Player on Windows 11. If you desire to turn your Windows Media Player into a multimedia editor, download and install the SolveigMM Trimmer Plugin on your device. Then, you can trim videos/audio, extract audio from video, add voice-over to your videos, and more.
Please refer to this post for detailed steps: Solved – How to Trim an MP3 File in Windows Media Player.
What to Do If You Can’t Trim Video in Photos on Windows 11
Recently, some users reported that they couldn’t trim video in Photos on Windows 11 as the video trim sliders greyed out. What to do if you encounter this problem? Here are several troubleshooting tips for Windows 11 trim video not working.
#1. Restart the Photos app
When you can’t trim video in Photos on Windows 11, first, cancel this step and save your video, and then close the Photos app. After that, open your video with the Photos app and try trimming again.
#2. Run the Windows Store apps troubleshooter
- Press Win + I to open the Settings app.
- Select System >Troubleshoot > Other troubleshooters.
- Click Run next to Windows Store Apps.
#3. Repair and reset the Photos app
- Click the Start menu and open Settings.
- Go to Apps > Apps & features > Microsoft Photos.
- Click the three-dot menu and choose Advanced options.
- Click the Repair or Reset button.
#4. Get updates for apps in Microsoft Store
The Photos app may not work properly due to an outdated app version. When the Windows 11 video trim greyed out, check if a new update is available for this app. A new update brings bug fixes and performance improvements. To do this, go to Start > Microsoft Store > Library > Get updates.
#5. Reinstall the Photos app
- Click the Start menu > All apps and search for Microsoft Photos.
- Press and hold the Photos app and select Uninstall.
- Restart your PC and go to Microsoft Store to install the Photos app.
#6. Access the Trim tool via Movies and TV
- Close the Photos app.
- Open your video with the Movies and TV app, click the pencil button at the bottom, and choose Trim.
- Then, attempt to trim the video.
#7. Try another video trimmer
Apart from the Photos app, you can also trim videos in the Photos Legacy app or Clipchamp on Windows 11. Additionally, you can also choose another free video trimmer like MiniTool MovieMaker.
MiniTool MovieMakerClick to Download100%Clean & Safe
Another Way to Trim a Video on Windows 11
You’re also able to trim videos on Windows 11 without Clipchamp, the Photos app, or Photos Legacy. That’s PowerPoint. Now, let’s see how to make a video shorter in PowerPoint on Windows 11.
Step 1. Launch PowerPoint and create a new presentation.
Step 2. Open this presentation and add a slide. Then, click Insert > Video. Select Video on My PC or This Device to locate your video and click Insert.
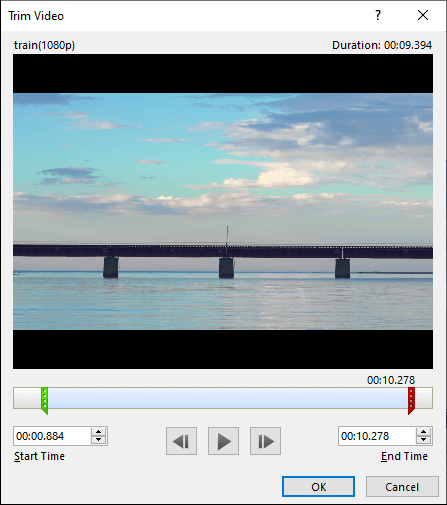
Step 3. Select your video in the slide, go to the Playback tab, and choose Trim Video.

Step 4. In the Trim Video dialog box, you can drag the green handle to the right and the red handle to the left to cut the beginning and end of the video. Click OK to save your changes.
Step 5. To save the trimmed video as a separate clip, it’s best to compress it first. Go to File > Info, expand the Compress Media menu, and choose a resolution.
Once the compression is finished, return to the presentation, right-click on it, and choose Save Media as. Then, enter a name and storage location for it and click Save.
Tip: Differences Between Trimming and Cropping
Trimming and cropping are two important tools in video editing and are included in most video editing programs. Although they involve deleting parts of a clip, they are completely different.
Trimming a video allows you to remove unwanted parts of it from the beginning, end, or both. This will shorten the duration of a clip and procure a smaller file size.
Cropping a video means the removal of unwanted outer areas from the video frame. In other words, it deletes details on the top, bottom, right, and left corners of a video. Cropping will adjust the dimension and aspect ratio of the video and not change the length.
Conclusion
Trimming videos on Windows 11 is easy, right? You can access trimming tools in the Photos, Photos Legacy, and Clipchamp apps. These apps are easy to use and free, allowing you to make basic edits quickly. Additionally, you can use stable third-party video editing applications such as MiniTool MovieMaker to shorten videos on Windows 11.
However, the Photos app may sometimes fail to trim your video. Fortunately, this problem can be easily solved by the methods mentioned above. Furthermore, you can explore Microsoft Photos alternatives for a better experience and other options.
Finally, if you encounter any problems while using MiniTool MovieMaker, you can contact us at [email protected] for instant help.
You may also like:




User Comments :