You might experience the videos keep stuttering problem when upgrading or Windows 10 from Windows 8. How to solve the problem? In this case, I’ve compiled 6 ways to fix the video stuttering on Windows 10 problem.
Why My Video Is Not Playing Smoothly on Windows 10?
Why my video is not playing smoothly on Windows 10? Following are the causes of video stuttering on Windows 10:
- Outdated driver
- Incorrect hardware configuration
- An old version of Windows
- Corrupt video files
- Malware infection
- Outdated media players
- …
Now, let’s see how to fix video stuttering on Windows 10 (To edit the video or change the video format, you can try MiniTool MovieMaker).
How to Fix Video Stuttering problem on Windows 10
Here are 6 methods to fix video stuttering when you play videos on Windows 10.
#1. Update Your Graphics Driver
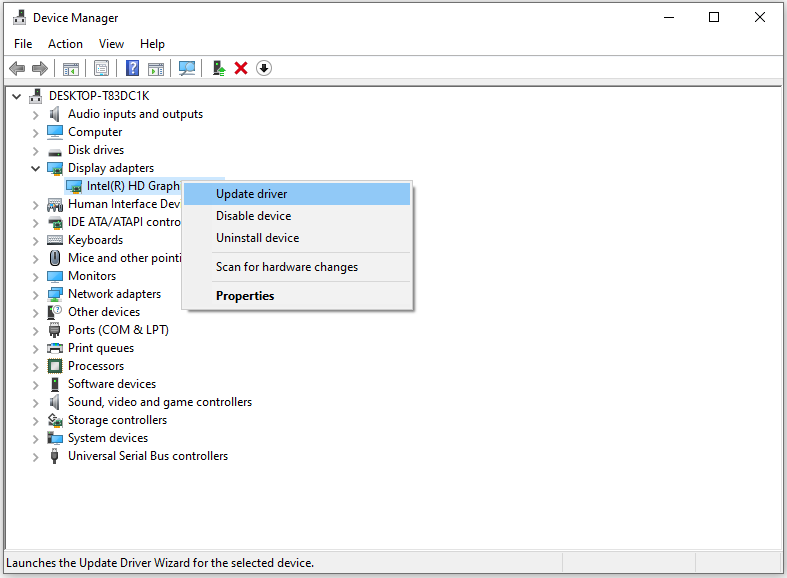
Outdated graphics driver can cause the video playback choppy problem, so you should update your graphics driver first. Here’s how:
1. Click the search icon, enter “device manager” and open the Device Manager app.
2. Find Display adapters and double-click on it.
3. Right-click on the graphics driver and select the Update driver option.

4. On the Update Drivers window, choose the Search automatically for drivers option to search for the available driver and install it on your computer.
5. After you update the driver, reboot your computer and check if the problem is solved.
#2. Scan for Hardware Changes
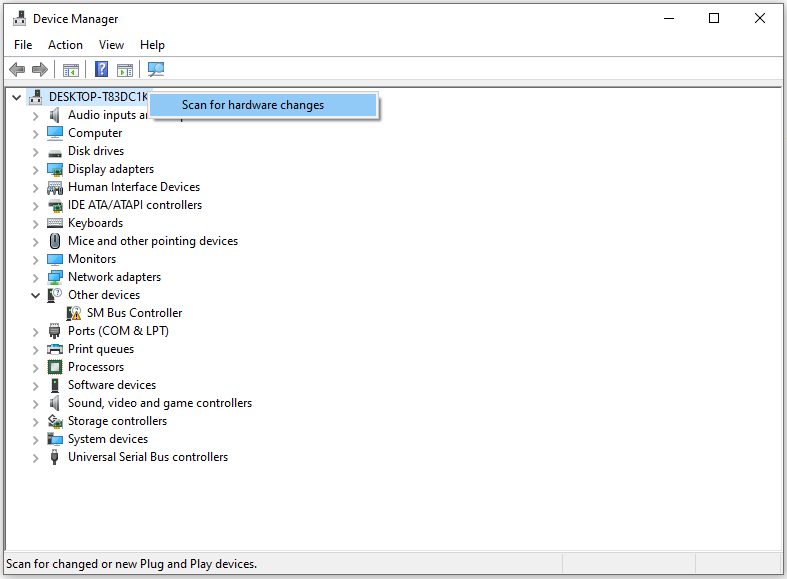
Hardware changes also can lead to the video lagging or stuttering issue. You can scan for hardware changes via Device Manager. Here’s how:
1. Press “Win + R” to open the Run command dialog.
2. Type “devmgmt.msc” and click on OK.
3. On the Device Manager window, right-click on DESKTOP-XXX and select Scan for hardware changes.

4. When the process is complete, you can play the video and see if it still stutters.
#3. Install Windows Updates
Usually, the latest updates fix bugs and errors. If the problem is caused by bugs, you should check for updates.
1. Press “Win + I” to open the Settings window.
2. Click on Update & Security and tap on Check for updates on the right pane.
3. If the update is available, download and install it. Once done, restart your computer.
Related article: Solved – Facebook Videos Not Playing on Phone/Chrome
#4. Restore the Default Power Plan Settings
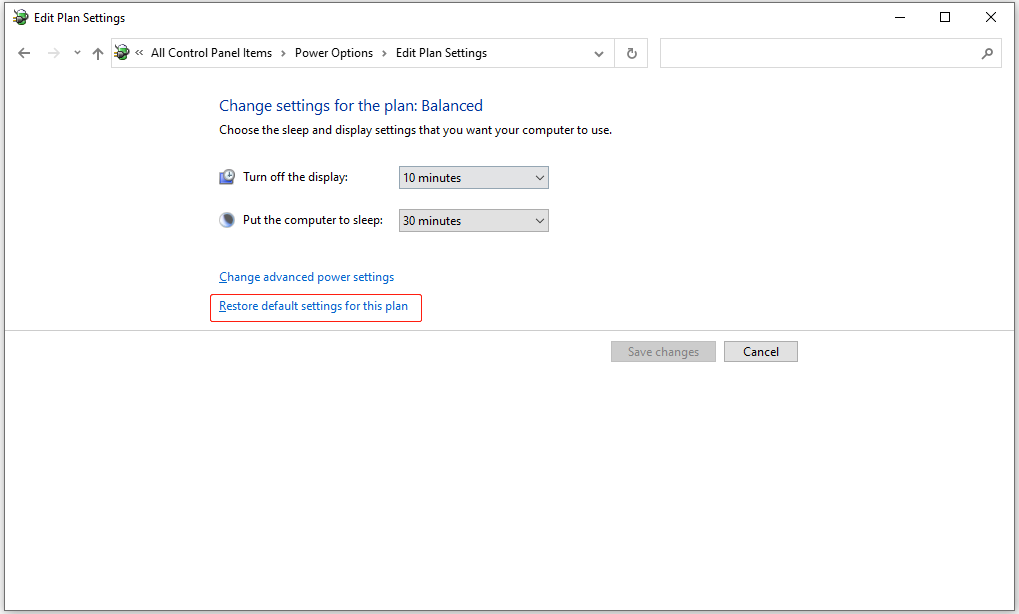
Restoring the default power plan settings is another method to fix the error video lagging on Windows 10. Here’s how:
1. Open the Control Panel.
2. Find and choose Power Options.
3. Click on Change plan settings next to the selected power plan.
4. Choose Restore default settings for this plan and confirm the operation.

5. Then restart your PC.
#5. Change the Wallpaper Settings
When you enable slideshow for your desktop background, every time the background change, the video you are playing skips a frame. To fix it, you can modify the wallpaper settings.
1. Open the Settings app in the Start Menu.
2. Head to Personalization and change background from Slideshow to Picture or Solid color.
Also read: Solved! – How to Fix Windows 10 Can’t Play MP4
#6. Change the Number of Processors in MSConfig
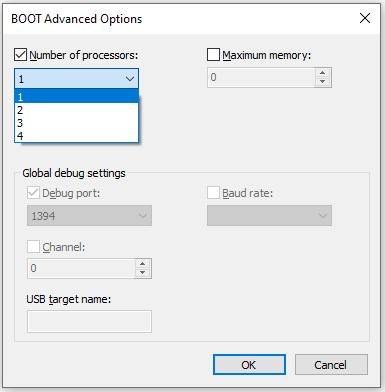
Changing the number of processors also can fix the video stuttering issue. Here’s how:
1. Press “Win + R”, enter “msconfig” in the dialog box, and hit the Enter key.
2. Switch to the Boot tab and click on Advanced options…
3. Check the Number of processors box and select 1 or 2 from the drop-down list. Click OK to apply the changes.

Conclusion
This post lists 6 methods to fix the video stuttering on Windows 10 or video not playing smoothly on Windows 10 problem. Try the above-mentioned methods and check if the problem is solved.


![[9 Ways] How to Fix the VLC Error “Your Input Can’t be Opened”](https://images.minitool.com/moviemaker.minitool.com/images/uploads/2021/07/vlc-your-input-cant-be-opened-thumbnail.png)
User Comments :