Screen recording is the easiest way to make video tutorials or share your screen information with others. How to trim a screen recording to eliminate unnecessary parts at the beginning or end of the video? This post from MiniTool free movie maker will take you through various methods to trim screen recordings.
Screen recording is a convenient and useful method used by creators, professionals, teachers, game masters, and more to simplify communications by sharing exactly what you see on your screen. Screen recording can be used for multiple purposes, including tutorials, online meetings, project feedback, software demonstrations, gameplay, presentations, team collaboration, etc.
Creating a professional screen recording requires editing; trimming is the most commonly used tool. You need to trim a screen recording to remove unnecessary silences, pauses, and extra parts at the beginning or end parts of the video.
However, many screen recording apps don’t have any editing features. Therefore, you need a video trimmer to trim and enhance your screen recording.
How to Trim a Screen Recording on Windows
Although Windows computers have built-in screen recording options, none of them have editing tools. So, how to trim a screen recording on Windows 10/11? Here are 3 methods for you.
#MiniTool MovieMaker
MiniTool MovieMaker is an easy-to-use and feature-rich video editor designed for everyone to make video from images, video clips, and music. To help create stunning videos, this software offers all the necessary tools and trendy effects. For instance, you can use it to trim, split, and crop videos.
If you need to trim screen recordings on a Windows PC, MiniTool MovieMaker is worth trying. It’s a watermark-free video editor, so you don’t have to worry about your screen recordings getting watermarked after editing.
Here’s how to trim a screen recording on Windows 10/11 via MiniTool MovieMaker.
Step 1. Click the button below to download MiniTool MovieMaker.
MiniTool MovieMakerClick to Download100%Clean & Safe
Step 2. Once the installation is complete, launch this video trimming tool and close the promotion window to access the main user interface of the application.
Step 3. Click the Import Media Files button to browse for your screen recording and import it into MiniTool MovieMaker. Alternatively, drag and drop the video from your desktop into the application.
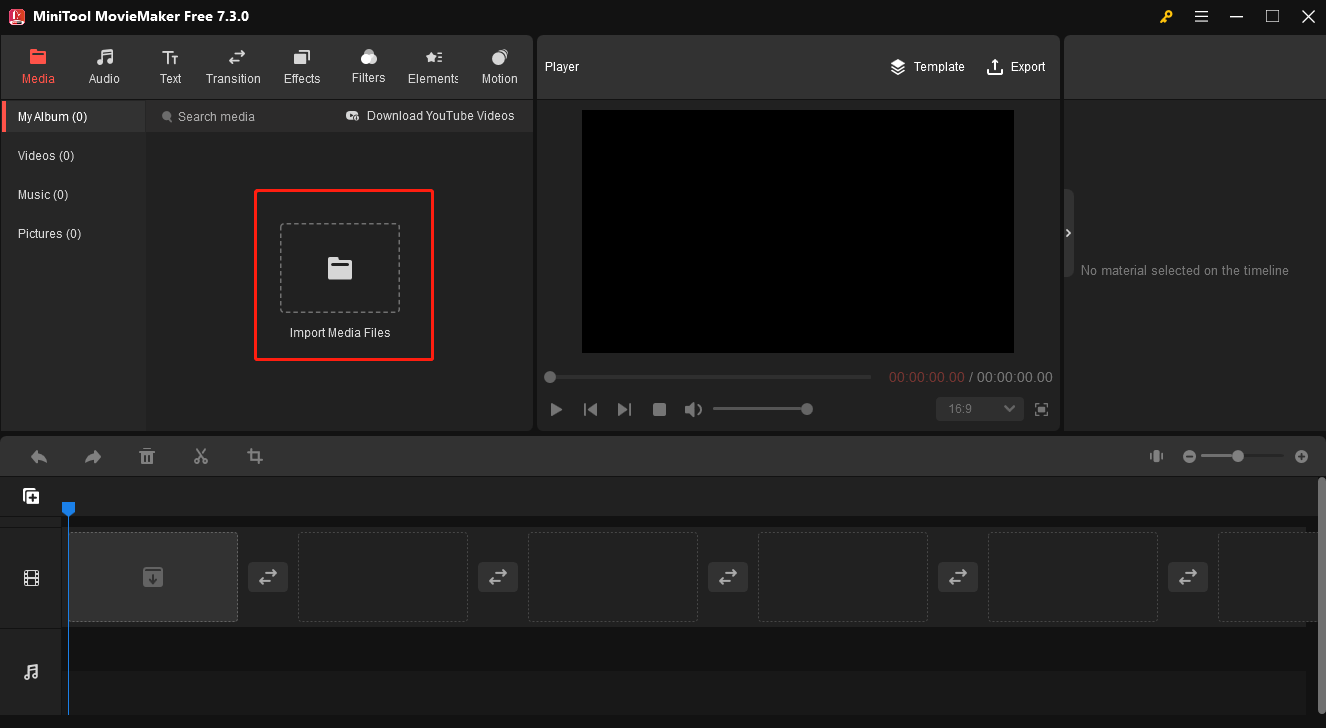
Step 4. Click the + icon on the video clip or directly drag and drop it into the video track on the timeline.
Step 5. To trim the video, select the clip on the timeline; hover your mouse cursor over the clip’s start or end point and you’ll see a double-headed arrow appear; drag the arrow inwards to remove unwanted parts of the clip.
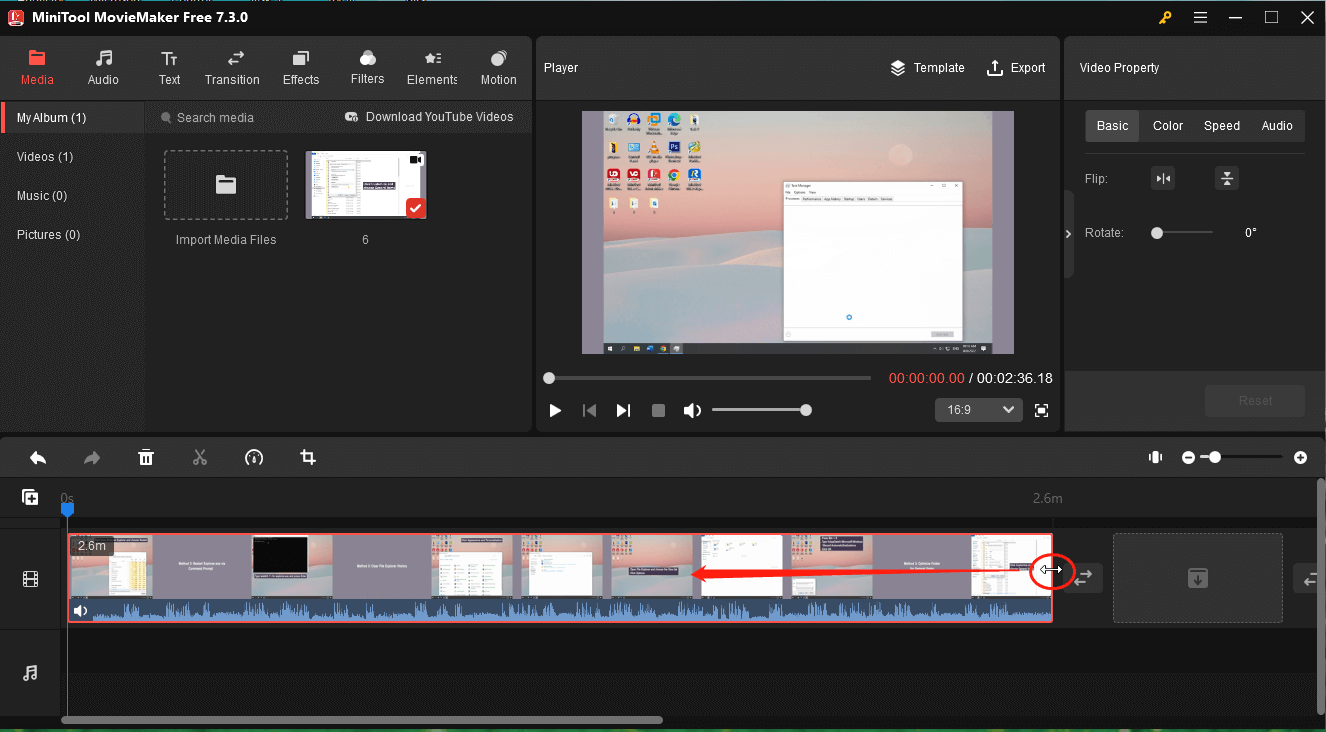
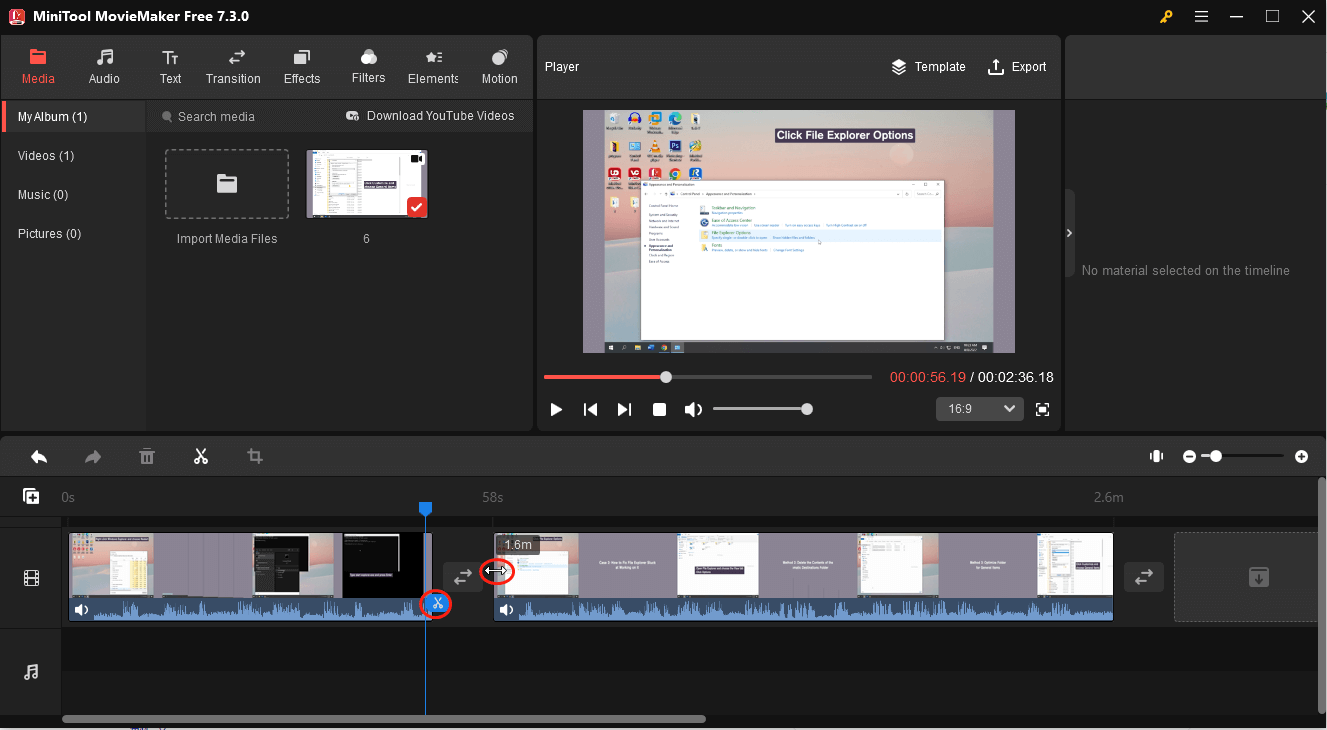
If there are unwanted parts during screen recording (such as a frozen screen), you can delete them from the video in this app as well.
Drag the blue playhead to the start point of the clip you want to delete, and click the scissors icon to split the video into two clips. Then, hover your mouse cursor over the second clip’s start point and trim the unwanted parts.
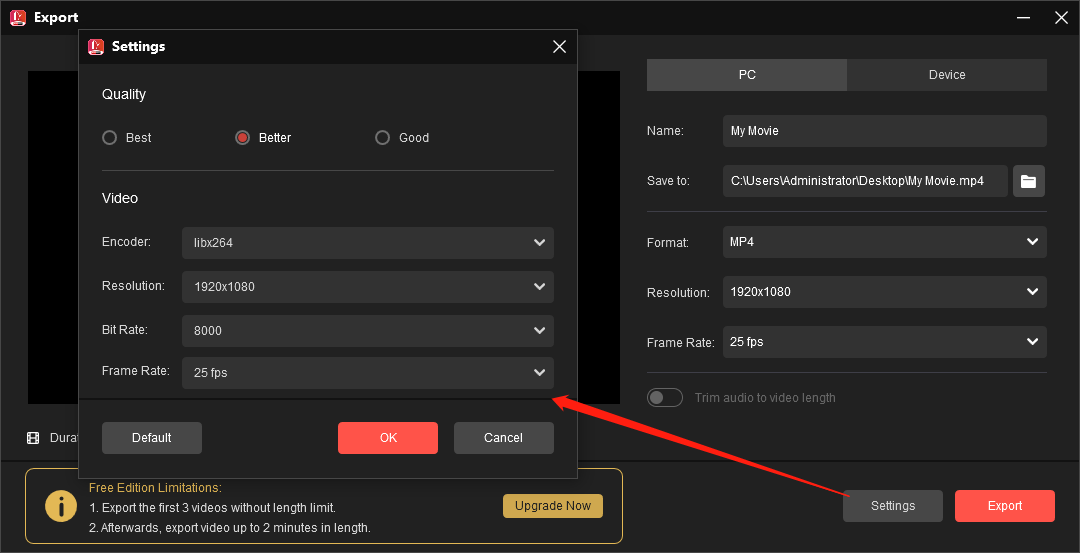
Step 6. To export the edited screen recording, click Export in the upper right corner to open the output settings window. By default, MiniTool MovieMaker uses the MP4 file format to save your videos, but you can change it by clicking the Format menu. Additionally, you can select the output folder, resolution, and frame rate, or click Settings for more options. Finally, click Export to start saving and exporting your screen recording.
Other features of MiniTool MovieMaker:
- Speed up or slow down videos and reverse videos.
- Change the aspect ratio of your video project.
- Rotate and flip videos.
- Add title, captions, and end credits to the video.
- Apply filters, special effects, and motion effects.
- Add a transition between two video/image clips.
- Decorate videos with a variety of animated stickers.
- Edit audio in the video.
- Adjust the color of videos and images.
- Supports many popular video file formats.
- …
#Microsoft Clipchamp
Microsoft Clipchamp is the recommended video editor for Windows 11, providing a variety of tools and effects that enable creators to create professional videos. You can easily trim videos in this app with just a few clicks.
#Microsoft Photos Leacy
In addition to Microsoft Clipchamp, there’s a hidden video editor in Photos Legacy in Windows 11. This application includes a Video Editor app that allows you to trim videos, add text, apply filters, change video speed, and more. Windows 10 users can find the Video Editor in the Photos app.
How to Trim a Screen Recording on Mac
How to trim a screen recording on Macs? The good news is that you can use the bundled apps on Mac to trim your screen recordings without installing any third-party software.
#QuickTime Player
QuickTime Player on Mac not only allows users to record the screen but also edit the recording by trimming, splitting, deleting audio, etc. How to trim a screen recording on Macs using QuickTime Player? See as follows:
Step 1. Open your screen recording in QuickTime Player, click the Edit option on the top menu bar, and select Trim.
Step 2. You can see a yellow handle in the video clip at the bottom. Drag the yellow handle to select the portions you want to keep.
Step 3. Click the Trim option to delete the area outside of the yellow handle.
#iMovie
In addition to QuickTime Player, you can use Mac’s built-in video editor – iMovie to trim your screen recording or further optimize your video. iMovie is a free video editing program for Mac, iPhone, and iPad. Although it has many tools and effects for video editing, such as color correction and image stabilization, it is intended for people with little or no video editing knowledge.
Here’s how to use iMovie to shorten a screen recording on your Mac.
Step 1. Launch iMovie on your Mac, click the Create New button, and select the Movie option to create a new project.
Step 2. On the main UI, click File > Import Media to import the recorded video and add it to the timeline.
Step 3. Press and hold the R key and drag over the clip on the timeline to select the range of frames you want to save.
Step 4. Control-click the video and select the Trim Section option. Then, save and export your video.
How to Trim a Screen Recording on Android
Nowadays, smartphones have completely changed our lives and provided us with various conveniences. You can record your screen with audio using the Android built-in screen recorder. But how to shorten the recording on your Android device? The easiest way is the Google Photos app.
In addition to storing and viewing photos and videos in the Google Photos app on your Android device, you can also edit them using some simple features. You can trim, mute, stabilize, crop videos, and more.
To trim a screen recording on Google Photos, open it in the app, tap the Edit button, then tap and drag the Trim handles to choose the portion of the clip you’d like to save.
If you want more powerful video editing apps to edit your screen recording, try CapCut, YouCut, InShot, and others.
How to Trim a Screen Recording on iPhone
Similar to Android phones, the iPhone also includes a screen recording feature that allows you to capture your screen and sound. But how to trim a screen recording on iPhone to remove unnecessary parts at the beginning or end of the clip after stopping recording? The Photos app is the best solution.
iPhone Photos app lets you view, manage, and share photos and videos. Although this app does not include many common video editing tools, luckily, it allows you to trim a recorded video to change its start and end points.
Therefore, if you need to shorten a screen recording, open it in the Photos app, click Edit, drag either end of the frame viewer below the video to select the portion of the video you want to keep, then click Done. Next, click Save Video to save only the trimmed video, or select the Save Video as New Clip option to save both versions of the video.
Additionally, you can try some third-party video editors to trim your screen recordings, such as Splice, VN Video Editor, and many more.
How to Trim a Screen Recording on Chromebook
If your computer runs Chrome OS, you can also screen record on your Chromebook with the built-in feature. To trim the recorded videos or make other edits, you can use OpenShot, Clipchamp, PowerDirector, WeVideo, and many more.
If your Chromebook runs Windows, you’ll have more options for recording your screen and editing your recordings. For example, you can trim your screen recording using MiniTool MovieMaker by following the instructions in the first part.
MiniTool MovieMakerClick to Download100%Clean & Safe
Tip: How to Record Your PC Screen for Free and Without Time Limit
Do you want a free PC screen recorder with no time limits and watermarks to create high-quality screen recordings? MiniTool Video Converter is recommended here. It enables you to capture any activity on your PC screen along with system audio or a microphone.
Step 1. Click the button below to download MiniTool Screen Recorder. Install it and then open this application.
MiniTool Video ConverterClick to Download100%Clean & Safe
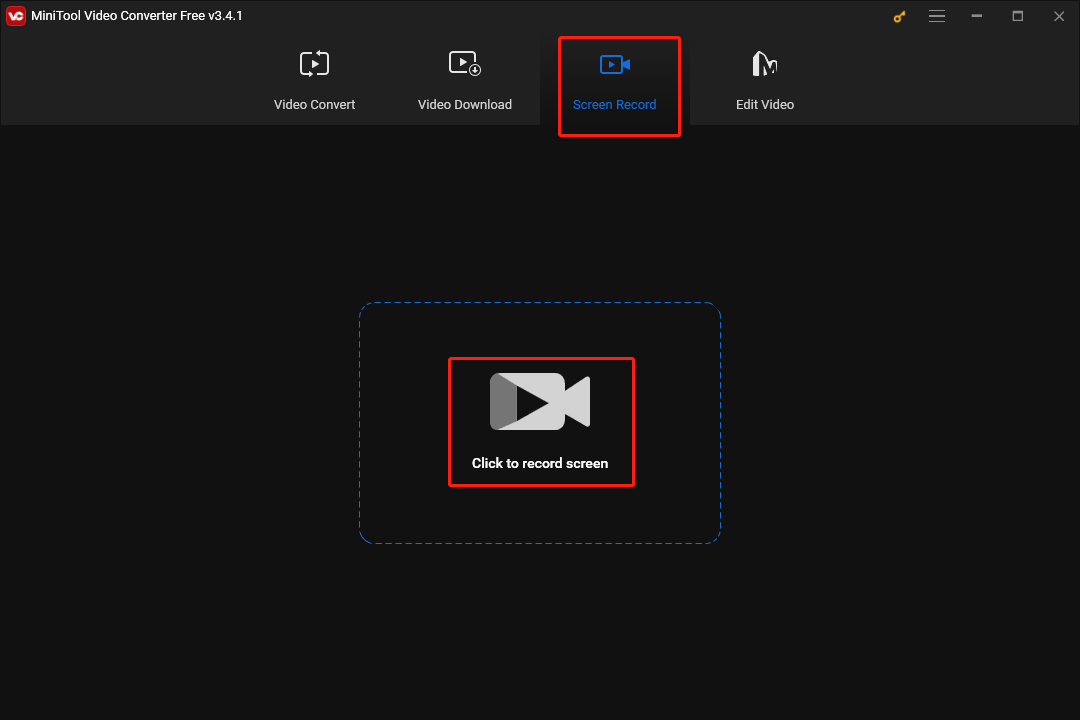
Step 2. Click the Screen Record tab at the top, and click the Click to record screen area to launch MiniTool Screen Recorder.
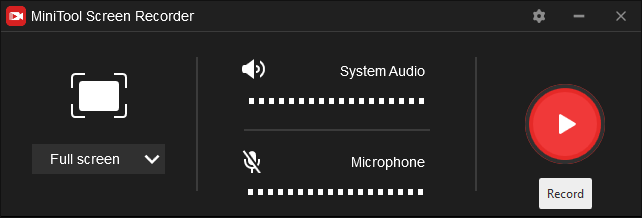
Step 3. Open the Full screen drop-down list to select the area you want to record and determine whether you want to record system or microphone sound.
Step 4. Click the Settings icon in the upper right corner of MiniTool Screen Recorder to open Settings, where you can choose the destination location, recording format, frame rate, mouse settings, and more. Click OK to apply your changes.
Step 5. Click the Record button or press F6 to start the recording.
Step 6. To stop the recording, press F6 again.
Conclusion
This post provides you with a list of tools for trimming screen recordings on various platforms. You can easily trim a recording to remove unwanted parts to make it better. Additionally, you can continue to edit the video in these apps, adding text, music, etc,. to make your screen recording professional.
Finally, if you encounter problems using MiniTool MovieMaker or Video Converter, please contact us via [email protected].
Also read:


User Comments :