Need a free video resolution converter to reduce video resolution? Now, this post lists several tools. You can select a suitable one, like MiniTool MovieMaker, to change video resolution in Windows, change video resolution Android and iOS, change video resolution Mac, and others.
As most of us know, when you watch a video YouTube will change video resolution automatically depending on your internet connection. Now, some of you might be wondering:
“Is it possible to change video resolution on a Mac/PC/Android/iPhone?”
Of course. The answer is positive.
This article lists several ways to help you change video resolution.
Let’s begin with some information about video resolution.
What Is Video Resolution?
Resolution refers to the number of distinct pixels each dimension can display. Video resolution is usually expressed as width × height, with the value given in pixels. For example, 1024 × 768 means this video has 768 lines that are each 1024 pixels wide.
Common Types of Video Resolutions
4320p: 7680×4320
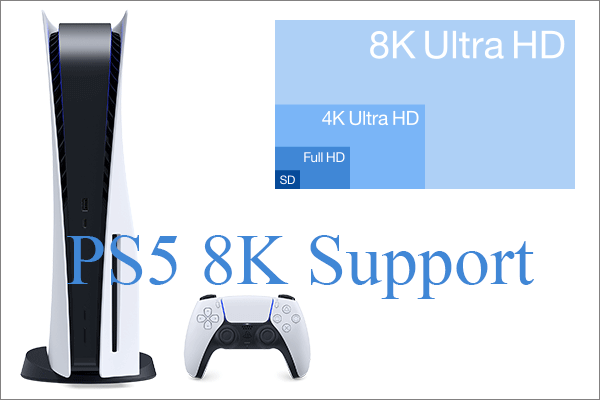
7680×4320 pixels is known as 8K or 4320p. It offers 16 times more pixels than the regular 1080p FHD or Full HD resolution. However, right now, you can only see 8K on expensive TVs like Samsung and LG.
2160p: 3840×2160
2160p, a very large display resolution, is commonly known as 4K or UHD (Ultra-High Definition) resolution. 2160p offers four times the resolution of 1080p. 4K resolution mainly exists in the digital television and cinematography industry.
1440p: 2560×1440
1440p is commonly known as QHD or Quad HD resolution. Typically, you can see it on gaming monitors and on high-end smartphones. 1440p is four times the resolution of 720p HD or HD ready.
1080p: 1920×1080
It is usually known as FHD or Full HD resolution. It is suitable for HDTV high definition video with a widescreen aspect ratio of 16:9.
720p: 1280×720
720p is usually known as HD or HD Ready resolution. Most television channels broadcast at this resolution. 1080p is developed based on 720p.
Standard Definition (SD)
The most popular standard resolutions are 640 x 360 and 640 × 480 for video, and 720 × 480 and 720 × 576 for DVD.
Reading here you might think that the higher the resolution the better. However, in fact, to get a better viewing experience, you need to consider the video resolution as well as the aspect ratio.
For instance, if you put a 720p (1280 x 720 pixels) video in an iPhone 6 Plus, you might find there are some black bars. Therefore, it is necessary to change video resolution to avoid the black bars.
If your video has black bars, don’t worry as you can find answers from this post “Tutorial: How to Remove Black Bars – Windows Movie Maker.”
Do you know how to change video resolution? Here, fortunately, this post lists several tools to help you complete this task on different platforms.
1. Change Video Resolution Windows via 3 Free Video Resolution Converters
As we know, changing video resolution may be a frequent requirement.
For instance, you might have to reduce video resolution when uploading a video on a computer to your mobile phone.
Or you have to convert low resolution video to high resolution when burning a low-resolution video (for example a 320×240 video shot on your cell phone) to a DVD because DVD standards require the video to have a resolution of at least 720×480.
A free Video resolution converter can help you complete this task.
Windows Movie Maker
Many users said on forums, “how can I change the resolution of videos using Windows Movie Maker?”
For example, you can see the following message.

Now, you can try the following steps to change the resolution in Windows Movie Maker.
Step 1. Download and install Windows Movie Maker and then launch this tool to get its main window.
Step 2. Import video files. In general, there are 3 different ways to import video files to Microsoft Movie Maker. Now, read this post “How to Add Pictures and Videos to Windows Movie Maker” to find the detailed steps.
After importing files you can split/trim video to remove some unwanted parts, you can also add video transitions as well as filters to create a cool movie, you can add text to video, etc. Here, you might be interested in this post “How to Use Movie Maker | Step-by-step Guide for Beginners.”
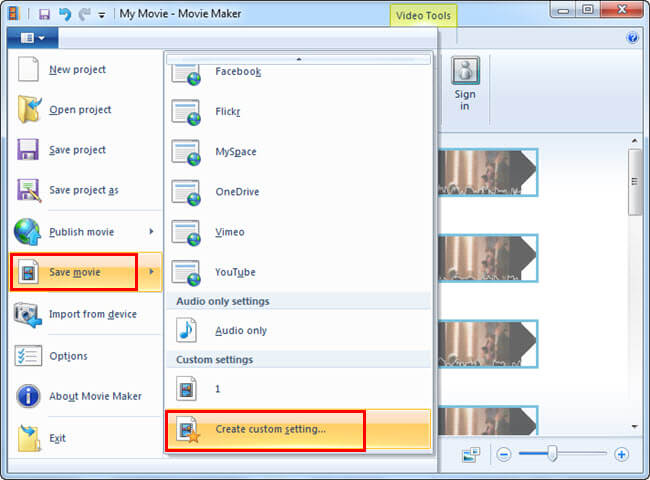
Step 3. Click on File, choose the Save Movie option and select the Create custom setting button located at the bottom of the list.

Step 4. Type the name of the video. Then, enter the resolution settings you want to use (width, height, etc.) under the Video settings category.

Step 5. Click the Save button to create your video with custom resolution settings.
Recommend article: Windows Movie Maker: How to Save Movie Maker Project.
In summary, you can easily change video resolution free in Windows Movie Maker. However, some users reported that they could not complete this task because Windows Movie Maker was not working.
In this case, you could try another free video resolution converter.
MiniTool MovieMaker
MiniTool MovieMaker, the best Windows Movie Maker alternative, can help you change the resolution of video without any difficulty.
MiniTool MovieMaker, an easy and intuitive Windows movie editor, is available for Windows 11/10. This video resolution changer supports the most popular video formats including .wmv, .mp4, .avi, .mov, .mkv, .3gp, .mpeg2, .webm, and more.
Now, you can take the following steps to change video resolution free.
Step 1. Launch this free video resolution converter and close the promotion window to enter its main interface.
MiniTool MovieMakerClick to Download100%Clean & Safe

Step 2. Click the Import Media Files button and then select the video file you want to change and click the Open button to import it to this free video resolution converter.
Step 3. Drag the video file to the storyboard. Next, you can edit your video as you like.
- Split/trim video: you not only can split this video into multiple parts, but can also remove the unwanted frames from the start or end of this video.
- Add text to video: you can add title, caption or end credits to this video as you like.
- Add filter to video: you can change the color of your video by using the Filters feature provided by this free video resolution changer.
Related article: Add subtitles to video.
Step 4. Click the Export button to enter the following window.

Step 5. Open the drop-down list of Resolution and then select which kind of resolution you want to change to. Finally, click the Export button to begin converting your video.
VLC
Have you heard about VLC? Did you hear about “VLC change video resolution”?
VLC is famous for its powerful support in playing all kinds of media files. Here, if you have installed the VLC media player, you can use it to increase video resolution or decrease video resolution.
The steps are:
Step 1. Launch VLC.
Step 2. Hold Ctrl and R on the keyboard to open the open media window.
Step 3. Click Add to add video file(s).
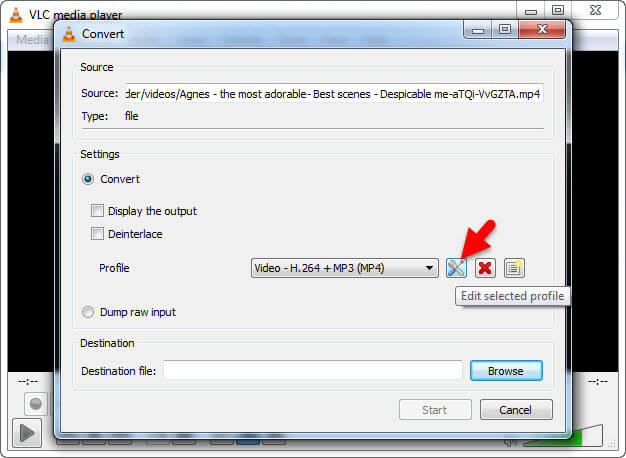
Step 4. Next, select Convert/Save and then choose the Convert option to get the convert window as follows.

Step 5. Select the Edit selected profile in the Settings section to enter into the Profile edition window.
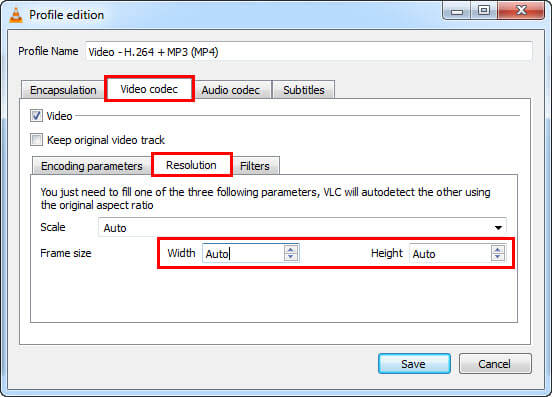
Step 6. Select Video codec and then choose Resolution.

Step 7. Type in figures in the Width and Height.
Step 8. Press the Save button to go back to the Convert window.
Step 9. Select a folder to place the video and give it a file name.
Step 10. When all changes have been completed thoroughly, click the Start button to create the file.
See! VLC changes video resolution easily.
2. Change Video Resolution Mac
If you are running MAC OS X, you don’t need to install any software. The QuickTime Player on Mac can help you. How to use this free video resolution converter?
The steps are:
Step 1. Open the file you wish to convert in QuickTime.
Step 2. Choose File, then mouse down to Export, and choose an option from the Export menu.
Here, you will see 3 video resolution options and 3 other options:
- 1080p: QuickTime movie using H.264 or HEVC (H.265), up to 1920×1080 resolution.
- 720p: QuickTime movie using H.264, up to 1280×720 resolution.
- 480p: QuickTime movie using H.264, up to 640×480 resolution.
Step 3. Choose a size based on where you will view your movie and click the Save button to continue.
Step 4. Enter a name for your exported file, choose a destination, and click Save button.
Now, QuickTime begins the process of changing the video resolution on the Mac.
Reading here, I guess you might be wondering:
“Is it possible to change video resolution Android or iPhone?”
Of course, we can.
Keep reading to find out more information.
Also read: Top 2 Best Video Resizers to Resize Video Online
3. Change Video Resolution Android/iOS
To change video resolution on your iPhone or Android you can try using the Udemy app. With this video resolution converter app you can quickly adjust the video quality to a suitable resolution on both the Android and iOS, depending on your needs.
Here, we take how to change video resolution on an iPhone for example.
Step 1. Open the Udemy app, find the target video, and then tap on the 3 lines icon at the top right hand side of the screen.
Step 2. Select the Video Quality option and then select either 360p, 480p, 720p, 1080p or Auto for the video resolution.
You need to choose 1080p if you want to watch the video in the best resolution possible. However, you need to choose a lower resolution if you are in an area with a weak Wifi connection or cellular signal.
If you don’t know which one to choose, you can select the Auto option. Then, the video resolution converter app will automatically select the resolution based on the internet bandwidth that’s available.
4. Change Video Resolution Online
Last but not least, we want to share how to change video resolution online with a step-by-step tutorial.
If you don’t want to install any video resolution converters, you can try OnlineVideoConverter to change video resolution online.
The steps are:
- Enter the link of the video that you want to convert or choose a file from your device or cloud storage.
- Select the video format you want to convert to.
- Select the video resolution.
- Click the Start button to start the conversion process.
- Finally, you can download your video file after the conversion is completed.
See! It is very easy to increase video resolution online.Click to tweet
Now, It Is Your Turn
Need to change video resolution?
Now, try the above different ways to change the resolution of your video for better viewing on different video platforms.
Well, if you have a good suggestion about how to change video resolution for free, please let me know and we’d glad to add it here. Thanks in advance.
Like this post? Share it with more people.
Video Resolution Changer FAQ
- Import your 1080p video into MiniTool MovieMaker.
- Drag and drop this video into the timeline.
- Click the Export button.
- Select video resolution 1280 X 720.
- Click the Export button to convert the 1080p video to 720p.
- Open the video resolution changer app like Udemy.
- Find the video you want to change.
- Select the 3 lines icon at the top right-hand side of the screen.
- Select the Video Quality option.
- Select either 360p, 480p, 720p, 1080p.
- Adjust brightness and contrast automatically to create a more delightful video.
- Add transitions, text, and animations to improve video quality.
- Change video resolution.
- MiniTool MovieMaker
- Windows Movie Maker
- iMovie
- Adobe Premiere Pro CC
- Corel VideoStudio Ultimate
- CyberLink PowerDirector
- Final Cut Pro X


User Comments :