Black Bars
Have you ever seen a video with black bars? These distracting black bars may appear on both sides, or along the top and bottom of the video, which will disturb you when you are watching a movie on your PC or TV. Now, you might be wondering: “how to remove black bars from video?”
“I have the newest version of Movie Maker available and my current operating system is Windows 7 but every time (no matter what aspect ratio I use) when I make a video Movie Maker put black bars on the side of my video. I have searched the internet and no one has been able to answer my problem. People keep saying they have but they haven’t.” This example is from Microsoft Community.
See! Black bar is a common problem. Many users have encountered this issue according to a study. However, most of them don’t know why this problem occurs, and how to get rid of black bars from video.
Why Black Bars Appear on Video?
As we know, black bars are set to protect videos whose aspect ratios are different from the TV at home from being stretched when we show the whole picture on the TV.
In the world, there are two most popular aspect ratios, and they are 4:3 and 16:9. (Note: 4:3 is a standard TV format, while 16:9 is a format of high-definition TV and monitors.) Videos followed a 4:3 aspect ratio everywhere before the days of HD television. However, the standard now is 16:9 widescreen.
What will happen if you watch a video created in the old aspect ratio of 4:3 on a screen that’s made for 16:9?
BLACK BARS!
If the video saved on 4:3 ratio is played on a 16:9 TV, the video will be added to the black bars automatically to fill up the empty spaces. You guessed it.
In a word, black bars will appear in your video for two reasons:
- The aspect ratio of your saved video such as a .WMV file does not match the aspect ratio of the display on which you are viewing it.
- The aspect ratio of the source video does not match the aspect ratio that you chose in your video editing software like Windows Movie Maker.
Beware of third-party plugins: You have to confirm that the aspect ratio of the video as it appears on your site matches your original embed code if you are using any third party plugins for your site. You are supposed to keep an eye on your video because some videos can be “automatically” resized.
You can ensure that the aspect ratio of your .WMV file matches your source video as closely as possible although you can’t always anticipate the aspect ratio of the display on which your video will be viewed.
If there is an aspect ratio mismatch, you will immediately be able to see black bars in your video. Thus, you don’t actually have to know what aspect ratio your source files are in. All you have to do is to choose which aspect ratio looks best.
Don’t worry if your movie has black bars at the bottom and top, left and right sides, you can remove black bars from video and enlarge the video picture to fill the whole TV screen.
Best Video Movie Maker Software to Remove Black Bars from Videos
When it comes to getting rid of black bars, you can try using Windows Movie Maker. The best video editing software is a part of Windows Essentials software suite allowing Windows users to create and edit videos as well as to publish them on OneDrive, Facebook, Vimeo, YouTube, and Flickr.
Here, you can read this post “Windows Movie Maker Free Download + 6 Things To Know” to know more information about the best video editing software.
If you want to easily and quickly remove black bars from video, you can try this free and professional tool. Now, you can click the following button to get the best free video editing software to get rid of black bars.
MiniTool MovieMakerClick to Download100%Clean & Safe
Next, we will show you how to remove black bars from video without any quality loss by using Windows Movie Maker.
How to Set Aspect Ratio in Windows Movie Maker
Launch Windows Movie Maker, and then import your files to it.
Here, you can read this post “How to Add Pictures and Videos to Windows Movie Maker” to learn how to import photos and videos from computer hard drive, Photo Gallery, a DVD, a digital camcorder or a smartphone to Microsoft Movie Maker.
Expand the Project tab if you notice black bars in your Windows Movie Maker preview pane.
In the Aspect ratio section, you are able to choose either Widescreen (16:9) or Standard (4:3).

Check the preview pane to see if the black bars have been removed or reduced. Note, please simply switch back if it looks worse.
Warning: This setting affects the entire video. You cannot set the aspect ratio to 16:9 for one clip and then switch it to 4:3 for the next.
For most video files, the above solution works. However, black bars become more problematic with some photos that are 3:2 or 5:4. Therefore, no matter which one you choose, you will get black bars. In this case, what should you do?
Now, keep reading to find how to remove black bars in Windows Movie Maker!
How to Remove Black Bars from Video in Windows Movie Maker
When you are editing pictures to make a video, you need to crop your photos to the right aspect ratios before importing them into Movie Maker. However, how to crop pictures to 16:9 or 4:3?
The steps are:
Step 1. Open Windows Photo Gallery.
Step 2. Choose the target picture and then double-click it.
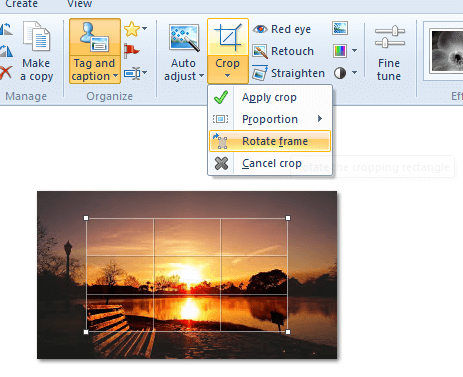
Step 3. Expand the Crop menu and then choose the Proportion section.
Step 4. You will find that there’s already a preset there for Widescreen (16:9). If your Movie Maker video is set to widescreen, you should select the16:9 setting. However, you have to choose the 4:3 setting if your Movie Maker aspect ratio is set to 4:3.

Step 5. Crop the frame in landscape mode. You should click Rotate frame in the Crop menu to rotate the frame.

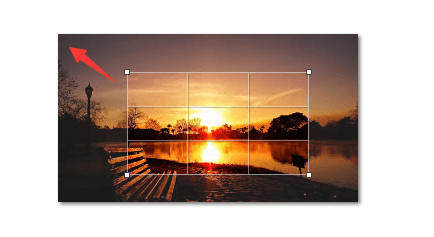
Step 6. Position the cropping square over the area that you’d like to include in your photo. And, you also can drag the corner to scale the crop without altering the aspect ratio.

Sep 7. Click the Crop button when you are ready.

Step 8. Now close the editing window. Do this for all of the photos you want to include in your project before adding them into Movie Maker.
Step 9. Finally, select the photos you want to add to Movie Maker, click the Create button and then choose Movie.

Preview your photos in Windows Movie Maker. Now, you will see that they won’t have black bars.

If you want to reduce or eliminate black bars in your final product, you need to make sure that your source videos or source photos are of the same aspect ratio as your Movie Maker project. You cannot remove the black bars completely if your video files are shot in an aspect ratio other than 16:9 or 4:3.
Further Reading – How to Remove Black Bars from Existing YouTube Videos
After learning how to get rid of black bars from video in Windows Movie Maker, let’s see whether we can remove black bars from existing video which has been uploaded in social media platforms like YouTube, Facebook, Vimeo, etc.
Aspect Ratios for Social Media
Uploading the proper aspect ratio to the platform you’re working with is the easiest way to make sure you’re not seeing black bars. Most social media platforms are going to be 16:9, but some newer social media platforms cater to many different types of video formats.
Here’s a quick breakdown of all the ideal aspect ratios for major social media platforms:
- YouTube: 16:9 (max upload 4k – 3840 x 2160)
- Facebook: 16:9 or 9:16 (max upload 4k – 3840 x 2160)
- Twitter: 16:9 (max upload 1080p)
- Instagram: 16:9 or 9:16 (max upload 1080p)
- Snapchat: 9:16 (1080 x 1920)
Here, we take YouTube for example to show how to remove black bars from video.
Guide: Remove Black Bars from Existing YouTube Video
The most convenient option to remove the black bars and make other changes quickly is to use the YouTube formatting tags.
The steps are:
Step 1. Prepare a YouTube account and add a profile picture to access the video formatting features.
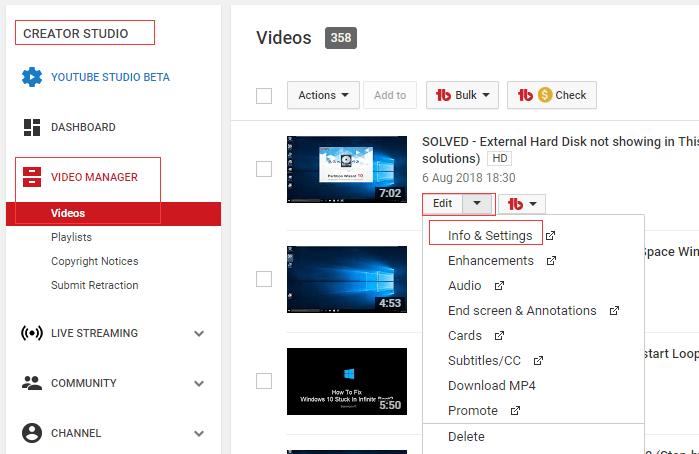
Step 2. Sign in to your account, click on your profile picture, and click CREATOR STUDIO.
Step 3. In the CREATOR STUDIO, click on VIDEO MANAGER and choose Videos.
Step 4. Select the video requiring editing.
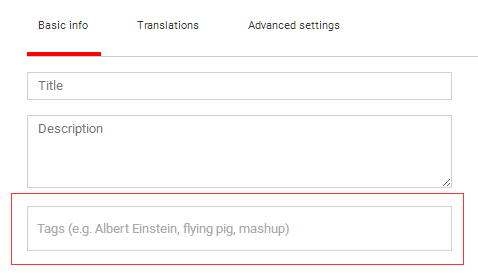
Step 5. Click on the Edit button, choose the Info and Settings to reach the Basic Info dialog box.

Step 6. Add the most suited instruction in the Tag bar below:

1.Make High-quality the Default Format
If you want to play the video by default in HD, you can type the following tag:
yt:quality=high
This parameter should be used carefully. If you force a video to playback in high-quality and the viewer has a very slow internet connection, it could lead to a lot of buffering for them.
2.Remove Black Bars around a 4:3 Video
If you want to tell YouTube to “zoom in” to the picture, you can type the following tag:
yt:crop=16:9
This tag removes black bars around video by zooming in on the video area.
3.Stretch Video to Fit Wide-screen
If you want to view the video in wide-screen format, type the following tag:
yt:stretch=16:9
This tag stretches the video in the aspect ratio of 16:9, removing vertical black bars lines from the top and the bottom of the video.
4.Remove Wide-Screen Ratio
If you want to make your video display in 720 by 480 pixels when your video is appearing in wide-screen format (16:9 aspect), you can apply this tag (yt:stretch=4:3) to scale down the video 4:3 aspect.
yt:stretch=4:3
This tag fixes 720×480 content that is the wrong aspect ratio by scaling to 4:3.
5.Revert Changes, Deactivate
If you want to deactivate these cropping effects, you can type the following tag:
yt:crop=off:
Step 7. Finally, click Save changes button to save changes made to this video.
Thus, you have successfully removed black bars from existing YouTube video.
Summary
I hoped you enjoyed my solution about how to remove black bars from video in Windows Movie Maker. Are you going to use Windows Movie Maker to get rid of black bars from video?
If you have any question about how to make a video fit the screen Windows Movie Maker or how to remove black bars from existing YouTube video, let me know by leaving a quick comment or sending email to [email protected].
Remove Black Bars from Video FAQ
- Open Windows Photo Gallery.
- Choose the target picture and then double-click it.
- Expand the Crop menu and then choose the Proportion section.
- Choose the correct aspect ratio.
- Click Crop, Rotate frame to rotate the frame.
- Position the cropping square over the area.
- Click the Crop button.
- Save the photos in Windows Movie Maker.


![[SOLVED] 8 Solutions for YouTube Black Screen Are Here](https://images.minitool.com/moviemaker.minitool.com/images/uploads/2020/08/youtube-black-screen-thumbnail.jpg)

User Comments :