How to overlay videos or other items onto videos and composite them to create PIP effects? If you need a cost-effective Windows video editor to get the job done, consider using MiniTool MovieMaker. You will also learn how to make a video overlay online. Let’s dive in!
Are you looking for a free and easy-to-use video overlay maker? How to overlay video on video on Windows and online? You’ve come to the right place!
In this post, we will recommend MiniTool MovieMaker and Microsoft Clipchamp to you as they are both fantastic video overlay editors that help you overlay videos, images, text, and other visual effects onto videos. Read on for the details.
The Definition of a Video Overlay
The term “video overlay” (sometimes referred to as the “picture-in-picture effect”) occurs when two video segments are simultaneously displayed on the same screen, with one segment being noticeably smaller than the other. You can use video overlay effects to put additional videos or images onto the main videos to improve your videos’ quality.
How to Overlay Videos on Windows?
How to make a video overlay on Windows? MiniTool MovieMaker is the ideal option for people who want to add free overlays for video editing with ease.
Introducing MiniTool MovieMaker
MiniTool MovieMaker is a special video overlay maker that you can use to place a video or image in the corner of another clip. It also allows you to add text overlays to your videos, including titles, credits, and captions.
With the help of this video editing software, you will be able to create amazing transitions between two images or video clips. Its transition library includes CrossZoom, Morph, Dissolve, Light leaks, etc., which are available for you to use for free.
In addition, MiniTool MovieMaker supports overlaying effects, filters, elements, and motions on videos and photos. The effects library contains Hearts, Film frames, Sparkles, Shakes, and more. Besides, you can use filters like Cool, Black & White, Outdoor action, Indoor action, FilmGrain, and so on. There are different types of animated elements to choose from, including Snowflakes, Smokes, Fires, Lens flares, and Flowers, among others. The motion library covers Pan only, Zoom in, and Zoom out categories.
On top of that, users can leverage MiniTool MovieMaker’s extra features to make their projects more spectacular:
- Bring in common video, photo, and audio formats.
- Pack multiple video tracks and audio tracks.
- Change the video aspect ratio.
- Make video from images and soundtracks.
- Remove audio from the video.
- Fade in or out music.
- Split, trim, and crop video footage.
- Speed up or slow down video clips.
- Make the video play in reverse.
- Flip or rotate video segments.
- Scale the image or video clips.
- Adjust the color of the clip.
- Undo or redo while editing.
- Preview the created video in full screen.
- Export media files with customizable parameters.
How to Overlay Video on Video with MiniTool MovieMaker
How to overlay videos on Windows using MiniTool MovieMaker? Let’s take a look at the specific steps below.
Step 1. Run MiniTool MovieMaker and import media files
Click the button below to download MiniTool MovieMaker for free. Installing it on your computer requires opening the installation package and following the directions.
MiniTool MovieMakerClick to Download100%Clean & Safe
Run this video editing application and select the New Project option to access the editing interface. Drag and drop or click the Import Media Files area to import two videos or a video and a photo into MiniTool MovieMaker.
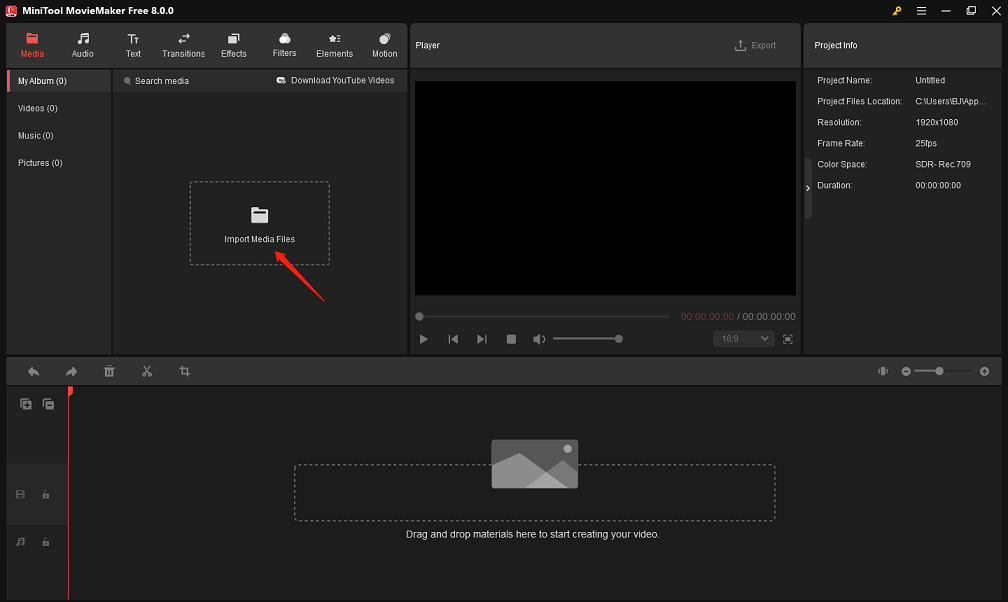
Step 2. Place a video or image on top of another video
First, drag and drop the video you want to place underneath onto the main video track. Then, click the Add tracks icon and select Add video track to create a new blank track. At this point, drag the video or image you want to place above and drop it onto the new video track.
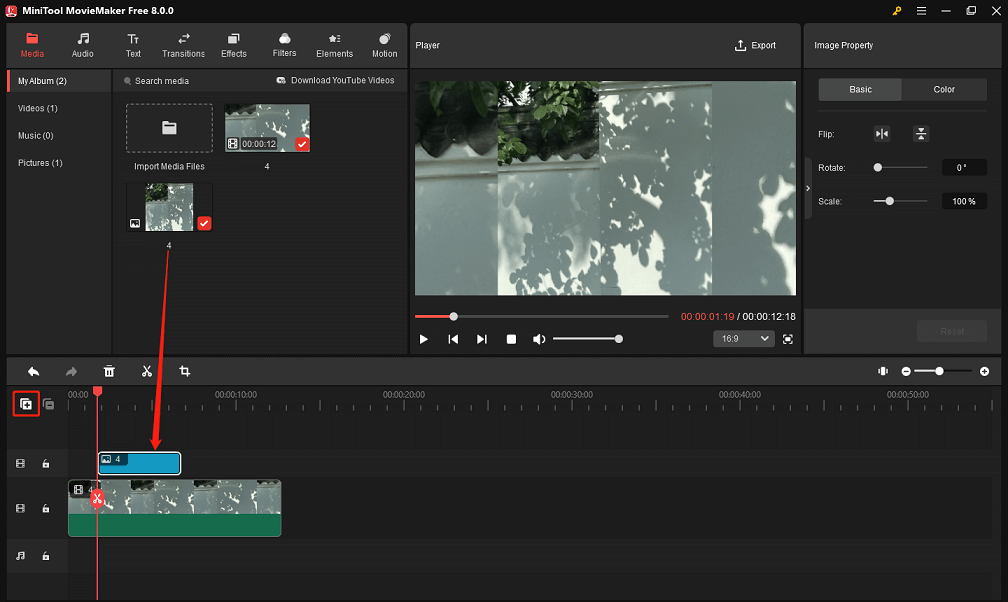
Step 3. Edit either the video overlay or image one
To flip or rotate the video or image overlay, click on it on the new video track, go to Video/Image Property, hit the Flip Horizontal / Flip Vertical icon, or move the Rotate slider from the Basic tab. Here, you can also move the Scale slider to make the video or image overlay smaller or larger on the screen.
In the Color tab, you have the option to adjust the target overlay’s contrast, saturation, and brightness or apply a 3D LUT to it.
Furthermore, you can change the video overlay’s speed by heading to the Speed tab. Optionally, edit its built-in audio from the Audio tab.
Likewise, you can highlight the video on the main video track and go to Video Property to make the required edits to it.
Apart from that, place the mouse cursor over the target overlay in the preview window, and move it to one of the four corners of the clip frame when the cursor changes to an arrow with four directions. This will make the PIP effect appear in the upper left/right corner or the lower left/right corner.
You may need to alter the duration of the video or image overlay as well. Put the mouse cursor at either end of the target overlay in the timeline, and when the cursor changes to a directional arrow, drag it left or right to adjust to the desired length.
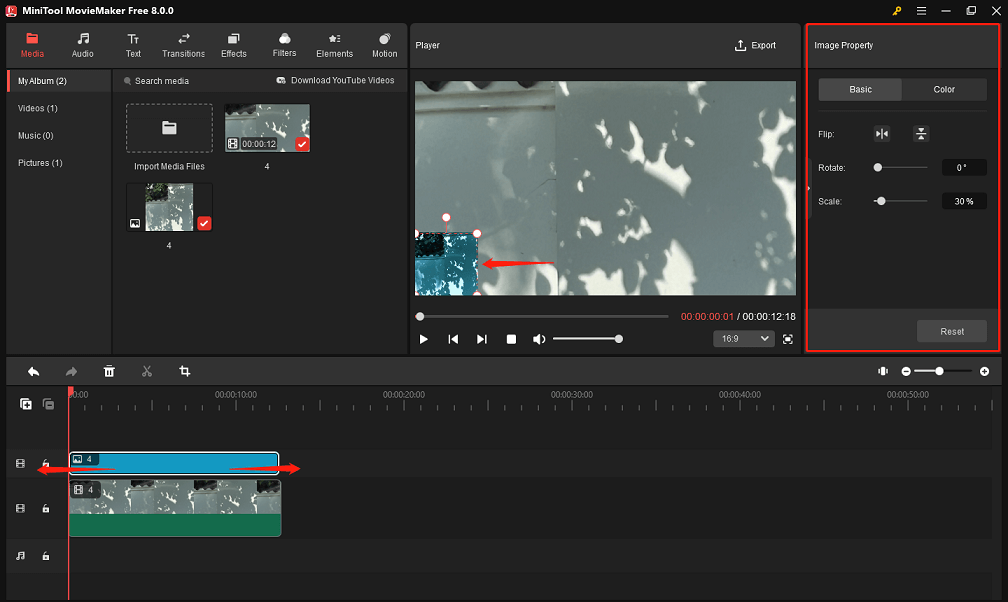
Step 4. Overlay other visual effects on top of the video
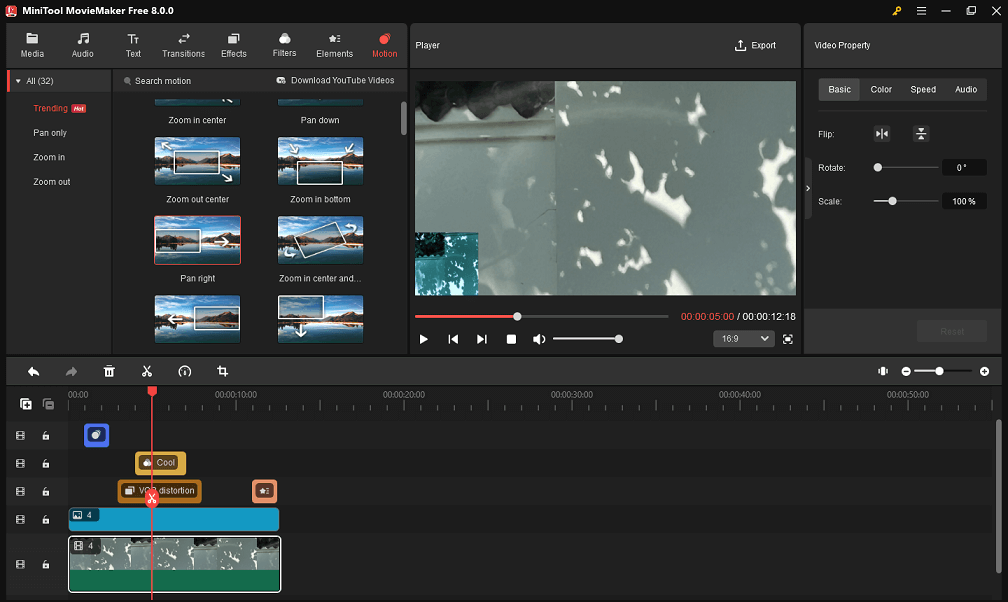
MiniTool MovieMaker gives you the ability to overlay effects, filters, elements, and motions onto the clip in the main video track. Do the following:
- Select the Effects/Filters/Elements/Motion tab at the top of the interface.
- Download the visual effects that you like in the corresponding library.
- Move the playhead to the point where you want the downloaded overlay to begin appearing.
- Click the + icon on the target overlay to add it to the timeline.
- You can opt to use the Split or Trim tool to make the appropriate adjustments to these visual effect overlays.
Step 5. Add and edit the text overlay for the video
Adding and editing the caption overlay for the video is described here as a reference.
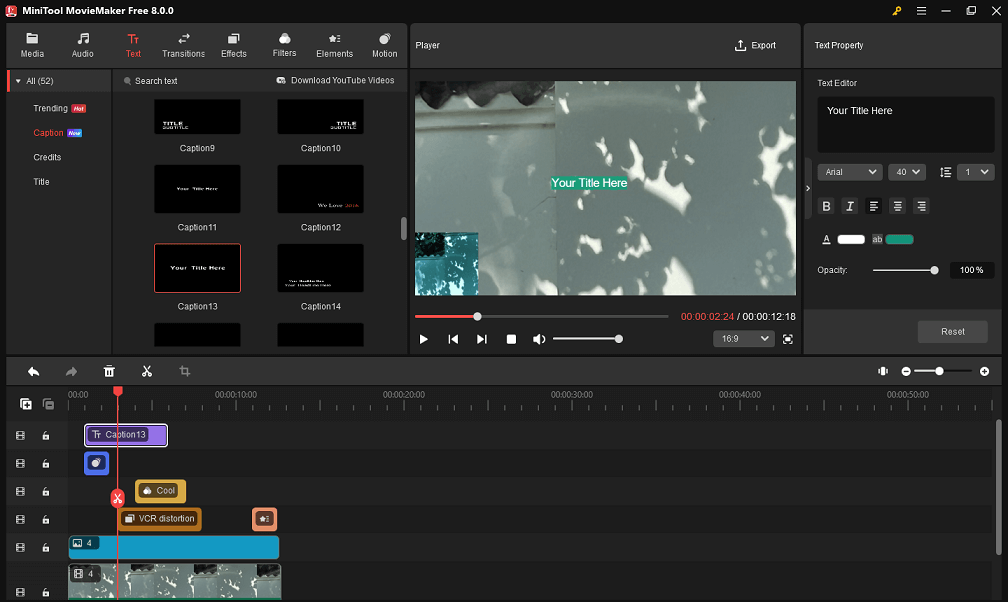
Go to the Text tab, select the Caption subtab, and download the caption style you like. After that, move the playhead to the point where you want the downloaded caption overlay to start appearing, and click the + icon to add it to the timeline.
Keep the caption overlay highlighted in the timeline. In the Text Property area, enter your caption under Text Editor and edit the font, size, alignment, color, highlight color, opacity, etc.
Step 6. Export the project you edited
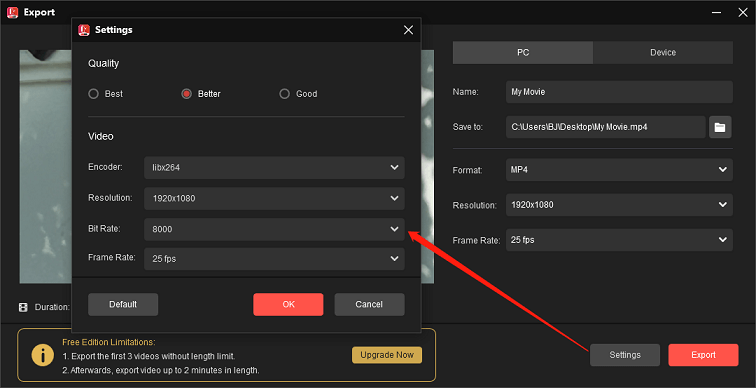
After all of your edits are accomplished, click the Export option in the top right-hand corner to bring up the output settings window.
From there, you can give the edited project a name, choose where to save it and customize the file format, resolution, and frame rate.
Even, you can click the Settings button to configure additional output parameters, such as quality and bitrate.
Finally, click the Export button at the bottom to save your edited project to your computer.
How to Overlay Videos Online?
How to make a video overlay online? Clipchamp is the go-to app for individuals looking to make their videos more impactful by adding creative video overlays.
Introducing Clipchamp
Clipchamp is a free video overlay editor offering distinctive video overlay effects, such as stock videos, images, animated graphics, webcam recording overlays, and more.
For example, you can edit various stock footage here like 2d Hearts Overlay, Vintage Film Strip Overlay, or Color Overlay Tunnel, and make a professional-looking video within minutes. Plus, you can use the audio visualizer overlay to make your music come to life.
It can also act as a video trimmer, video splitter, video converter, video combiner, webcam recorder, and so on. Try using Clipchamp to layer and elevate your projects today!
How to Overlay Video on Video with Clipchamp
You can refer to the following steps to learn how to overlay videos online using Clipchamp.
Step 1: Access Clipchamp’s official website via your web browser. Once there, click Try for free and create or log in to your account.
Step 2: In the newly appeared web page, select Create a new video to open the editing interface.
Step 3: Upload videos and images to the media box by clicking Import media or dragging and dropping.
Step 4: Click the + icon on the uploaded video and image files to add them to the timeline below. Make sure that two video clips or one video and one image are overlaid and aligned with each other.
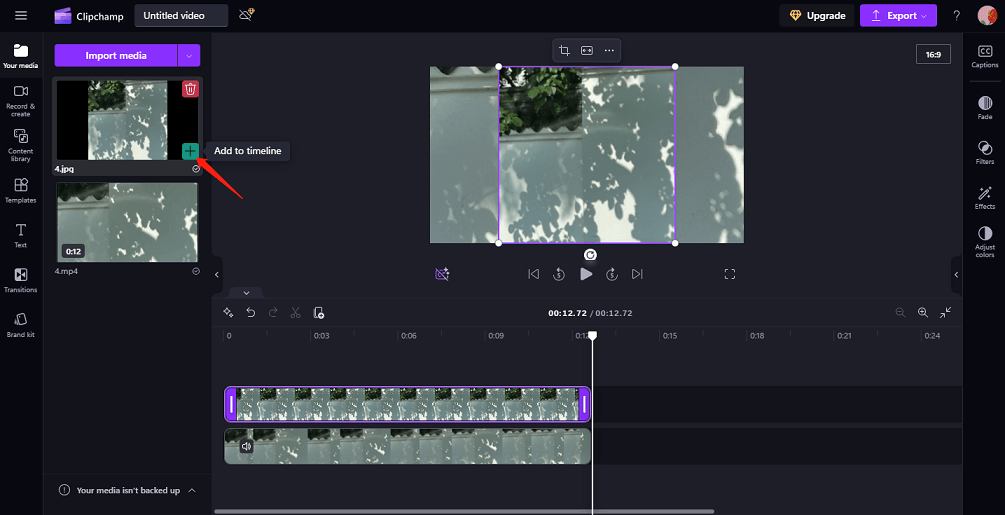
Step 5: In the timeline, choose the image or video clip that you want to change the size of the on-screen display. In the preview window, drag the target clip inwards or outwards to make it smaller or larger on the screen. You can also use the Crop tool for that purpose.
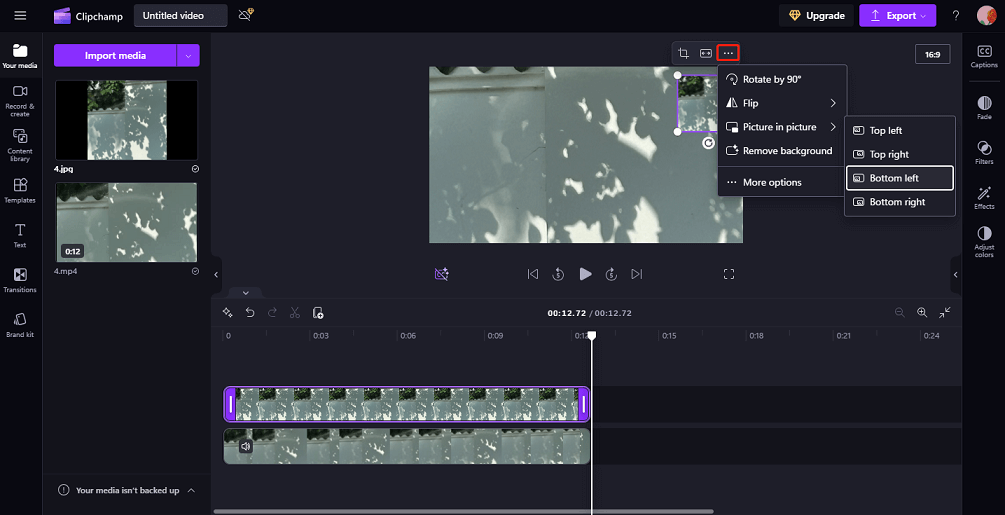
Step 6: Further, you can select the More option (3-dot arranged horizontally) above the target clip to rotate it 90°, flip it horizontally or vertically, and make the picture-in-picture effect appear in the top left/right or bottom left/right corner.
Step 7: You can even perform other editing operations, such as adding text, transitions, filters, effects, and adjusting colors.
Step 8: After all of your modifications are completed, click the Export button to select the output resolution and save the project to your device.
Bottom Line
The instructions listed above can be used to easily create a video overlay or picture-in-picture effect. You can choose a Windows-based or online solution depending on your needs and preferences.
If you have any questions or suggestions about MiniTool MovieMaker, please let us know via [email protected].
Explore these related posts:




User Comments :