Desire to transform your videos with a stunning snow effect to make them look enchanting? In this article created by the Windows video editing software - MiniTool MovieMaker, in particular, we will provide you with a complete guide on how to add snow effect to videos on Windows or online. Plus, there is a step-by-step guide on how to add snow effect to pictures for your reference. Dig deeper right this second!
Incorporating the snow effect into videos can turn them into magical winter wonderlands instantly, creating a compelling visual experience for the audiences. Whether you’re a vlogger, filmmaker, or social media enthusiast, such an effect can add excitement and charm to your video footage.
Within this tutorial, we’ll explain the snow effect, its benefits, and when to use it. Also, we’ll guide you on how to add snow effect to videos using several handy video editing software. Or if you need to add snow effect to pictures, a popular photo editing program comes into play. Let’s get started!
What’s the Snow Effect?
The snow effect, also referred to as snowflakes or snowfall, is a common video effect that mimics falling snow. It overlays your video footage with animated snowflakes, creating an enchanting winter atmosphere. By modifying parameters such as opacity, background color, and blend mode, you can personalize the appearance and intensity of the snowfall effect.
What Are the Benefits of the Snow Effect?
In the digital age, video effects have reached a whole new height. And, the “Snow Effect” stands out as a fascinating marvel among them. This type of effect works excellent for promoting:
- Captivating ambiance. The snow effect adds a magical touch to media resources instantly. It makes them visually appealing and compelling.
- Seasonal charm. The inclusion of the snow effect can be a great way to evoke a cozy winter feeling. This makes it ideal for winter vlogs, holiday videos, or New Year intros.
- Visual improvement. The snow effect can improve the overall aesthetic of the videos. It gives them a professional, polished appearance.
When Is the Snow Effect in Use?
The snow video effect, a popular technique, is utilized in diverse forms of media, including movies, TV shows, and commercials. By digitally applying falling snowflakes to scenes, the visual effect creates a whimsical, magical ambiance. It evokes feelings of nostalgia and wonder.
Although mostly associated with winter-themed content, like projects related to Winter, Christmas, or New Year celebrations, snow video effects go far beyond their seasonal appeal. If you’d like to create a nostalgic or romantic atmosphere, this kind of effect can evoke emotions tied to snowy landscapes.
You can also use the snow effect to add a distinctive artistic touch to your videos. This allows you to play around with different visual themes and styles.
How to Add Snow Effect to Video on Windows?
Applying the snow effect can give your home or professional videos a different mood. First, let’s see how to add snowflakes to video on the desktop of your Windows PC.
#1. MiniTool MovieMaker
To create a video with animated falling snowflakes, a convenient video editor without watermark, MiniTool MovieMaker, is certainly the go-to choice. It’s also packed with other breathtaking types of animated elements, such as arrow stickers, fireworks effects, explosion effects, emojis, love stickers, smoke effects, social media effects, and so on.
Currently, there are 50+ built-in songs with different durations for you to use for free. The video editing app lets you add a transition effect between two separate segments, too.
When you want to enhance the look of your video materials, you can experiment with its extensive library of wonderful filters. Meanwhile, it delivers a variety of motion effects, the most popular of which are: zoom in center, zoom out center, pan down, pan right, etc.
With MiniTool MovieMaker, you can add text to your videos using its one-click or drag-and-drop editing tool. Apart from that, it enables you to split or trim video, crop the video, flip or rotate video, reverse a video, change the speed of a video, and more.
Here’s how to add snow effect to video using MiniTool MovieMaker.
Step 1: Download the MiniTool MovieMaker application and install it on your Windows PC.
MiniTool MovieMakerClick to Download100%Clean & Safe
Step 2: Launch this application and close the pop-out window to get access to the main user interface.
Step 3: Click Import Media Files to import the video file you want to add the snow effect to.
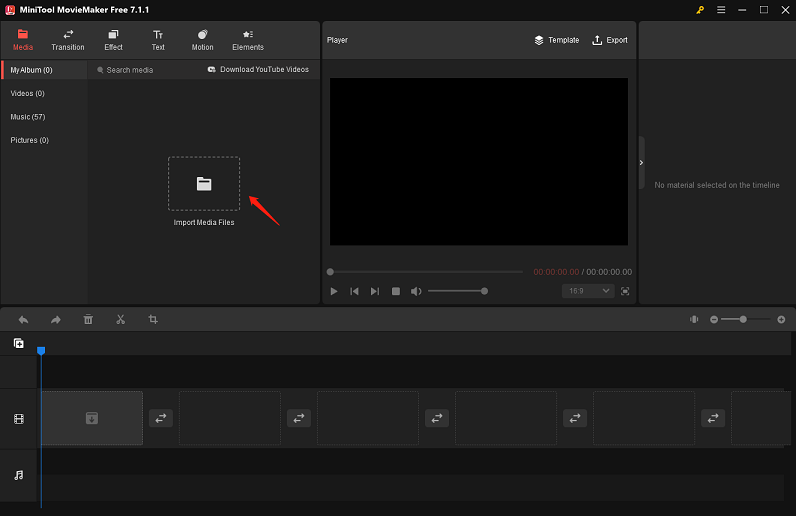
Step 4: Click the + icon on the imported video file to automatically add it to the timeline below. Alternatively, drag and drop the imported video file onto the video track on the timeline.
Step 5: Select the added video on the timeline and move the playhead to where you want the snow effect to start. To find this type of effect, there are two methods:
- Directly access the Elements tab on the top and select the Festival sub-tab on the left-hand side.
- Click Elements on the top, type “snow” into the search box in the top left corner, and press the Enter key.
Step 6: To get the snowflake effect you want, simply click on the Download icon in the bottom right corner of the element’s thumbnail. Next, click the + icon to incorporate the downloaded snowflake effect into the video on the timeline.
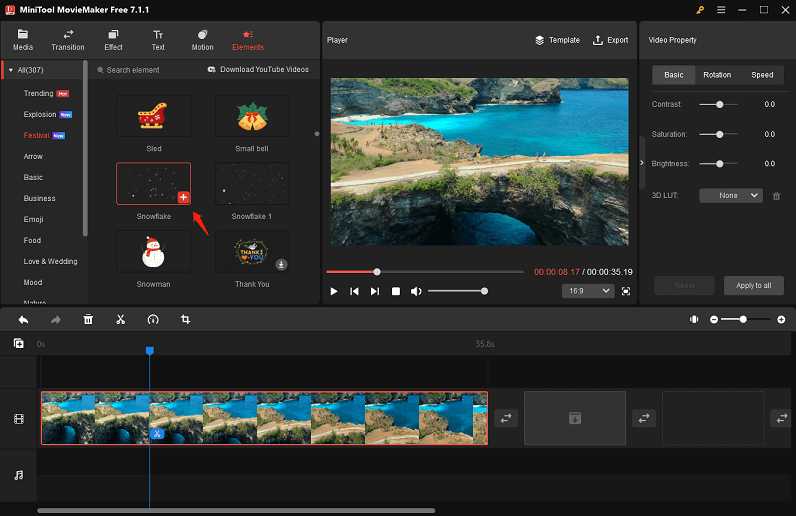
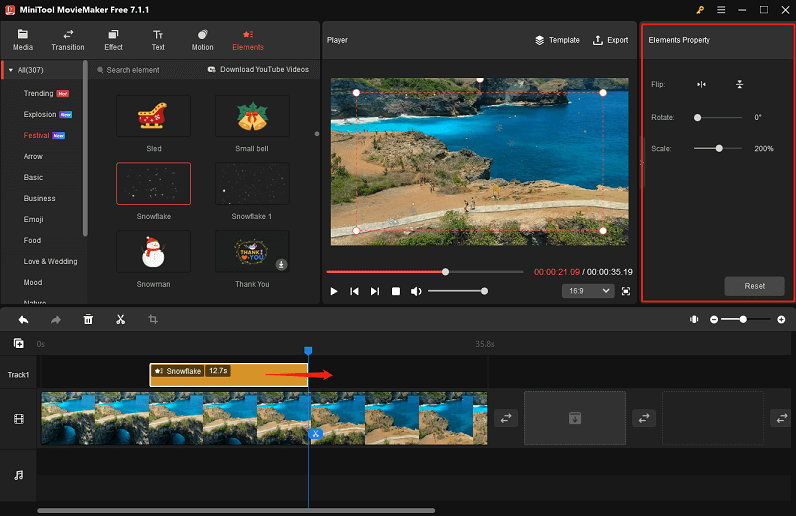
Step 7: Drag the right edge of the snowflake element to the right/left to make it appear longer/shorter in the video. Further, you can go to the Elements Property section in the upper right corner to flip, rotate, or scale the snowflake effect.
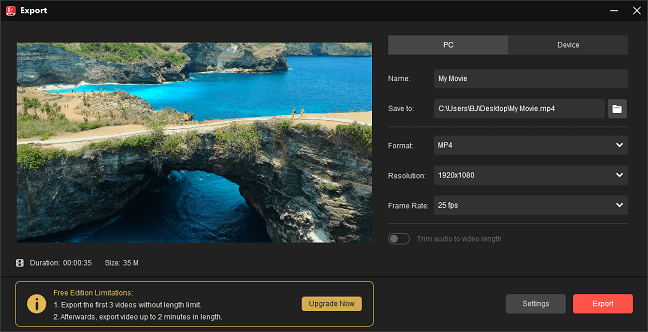
Step 8: When finished, click Export on the toolbar to open the output settings window. Here, you can give the edited video a name and specify the save path.
Optionally, expand the Format, Resolution, or Frame Rate drop-down list to choose the suitable export parameters.
Finally, click the red Export button to save the edited video to your Windows PC.
#2. Wondershare Filmora
Wondershare Filmora is another handy app to add snow to video without the need for editing experience. It comes with powerful tools to help you get the most out of your videos. Some of the functions that can take your videos to the next level include noise removal, audio mixer, color tuning, text editor, and so on.
Here’s how to add snow effect to video using Wondershare Filmora.
Step 1: Visit the official Wondershare Filmora website to download the app and install it on your Windows PC.
Step 2: Start the Windows video editor and click New Project to enter its editing interface. From the upper left side of the interface, click Import > Import Media Files to import the video file to which you want to add the snow effect.
Step 3: Drag and drop the imported video file onto the timeline below.
Step 4: Click the Stickers bar on the top and select the Winter sub-bar from the left side. As well, you can find this kind of effect by typing “snow” into the search bar on the top left side and pressing the Enter key.
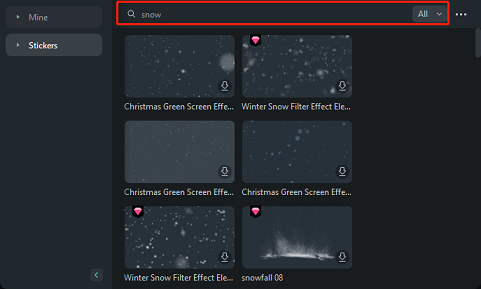
Step 5: To obtain the snowfall effect you want, just click on the Download icon in the bottom right corner of the sticker’s thumbnail. Then, drag the downloaded snowfall effect to where you want it to appear in the video on the timeline.
Step 6: Drag the right edge of the snowfall sticker to the right/left to customize its duration.

Step 7: Click the Export button at the top right to set some export options. Lastly, save the edited video to your Windows PC.
How to Add Snow Effect to Video Online?
Second, let’s find out how to add snowflakes to video online right now. FlexClip is a convenient online video editor that cannot be ignored. It has many snow effects as well as powerful editing tools.
Equipped with pre-made elements, it can give a fine-tuned touch to your videos. In addition to snow elements, there are loads of other amazing element templates, including flare elements, fire elements, old film elements, and so on.
Here’s how to add snow effect to video using FlexClip.
Step 1: Visit https://www.flexclip.com/ on your web browser. When you’re here, click Start from Scratch to get access to its edit page.
Step 2: Click on anywhere inside the dotted box under Import Media to upload the video file you would like to add the snow effect.
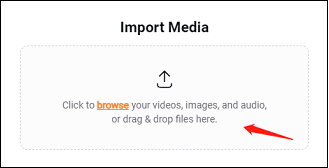
Step 3: Drag and drop the uploaded video file onto the timeline section.
Step 4: On the left sidebar, click the Elements tab. Type “snow” into the search box in the upper left corner and press the Enter key to find this type of effect.
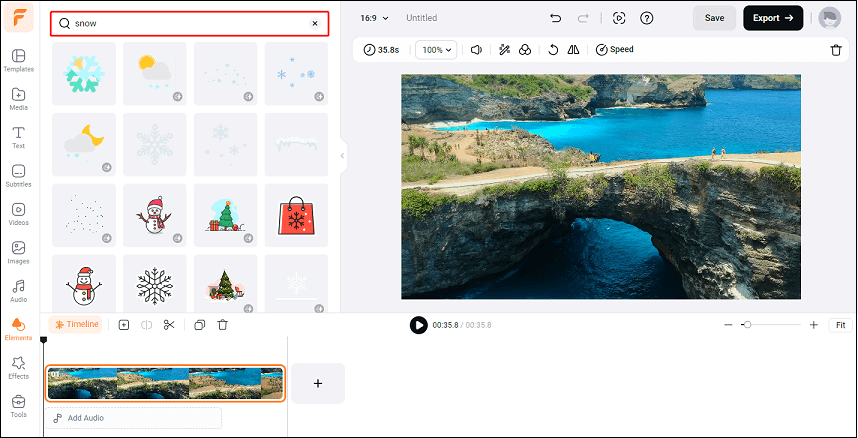
Step 5: Directly click on the snow element you want in order to add it to the video in the timeline section.
Step 6: Modify the duration of the snow element and resize it as you like.
Step 7: Click the Export button in the upper right corner to adjust the export format and resolution. At Last, click Export With Watermark or Remove Watermark to download the edited video to your local folder.
How to Add Snow Effect to Picture?
Taking a picture is simple but sometimes it’s difficult to capture both the falling snows and the subject. To make your pictures look magical and snowy, Photoshop is the ideal tool for you to add light snowfall or full-blown blizzard to still pictures. See how to do this below:
- Open Photoshop on your PC and add the picture that you’ll use for the snow effect. Locate the Layers Palette and click the + icon to create a new layer.
- To turn the image black, select layer > Edit > Fill > Contents > Black.
- Enable Noise to create a snow scene. Go to Filter > Noise > Add Noise and move the line to select the amount of noise. Then, click Gaussian > Monochromatic to make a snow-looking effect. Access the Filter and utilize Blur to reduce clarity, if you wish to make the noise more snow-like.
- In the top menu, click Image > Adjustments > Levels, and below the Input Levels box, you’ll need to change the black and white slider values.
- Enter Layers Palette again and choose the Screen in the drop-down menu. You can now see snow scattered in your picture.
- Use the Blur and adjust the Angle easily to make the snow look more natural. Moreover, if your subject’s face is obscured by snow, use the eraser tool to wipe away a little of it.
- Export and save the edited project to your PC.
Bottom Line
Please read the instructions above carefully to learn how to add snow effect to videos and pictures using the right editing application. Once you get the hang of it all, making your videos look more appealing and intriguing is a piece of cake.
Please contact us at [email protected] if you have any questions about using MiniTool MovieMaker.


![Top 6 VFX Software [Free & Paid]](https://images.minitool.com/moviemaker.minitool.com/images/uploads/2021/04/vfx-software-thumbnail.png)
User Comments :