Whether you work with images or videos as a novice or a professional, you may be wondering about the easy way to create a lens flare. Luckily, today we are sharing with you the best free movie maker, MiniTool MovieMaker, to help you easily add lens flare to your photos and videos. Let’s get started!
What Is the Lens Flare Effect?
The lens flare effect happens in photography and videography when the bright light strikes the camera lens directly, causing lens flares in the shape of starbursts, circles, or soft haze over your images or videos.
In particular, the lens flare effect is suitable for backlit portraits, travel vlogs, movie montages, outdoor drone footage, romance films, wedding scenes, and more. You can also take advantage of the dreamy softness and warm color temperature of lens flares to add cinematic touches to photos and videos.
How to Catch Lens Flare in Real Shots?
To catch the lens flare in outdoor shots, using a zoom lens can create better lens flare effects than a prime lens. This is because a zoom lens has more lens elements, resulting in more internal reflection as the strong sunlight passes through the camera lens.
In addition, the older lens with less anti-reflective coating typically can produce better lens flare effects than the latest camera lens. And, you have to remove the UV filter and lens hood, utilize the biggest aperture available, as well as capture lens flare during the golden hours of sunrise or sunset manually.
You may also be interested in: Creating Cinematic Videos – Tips & Best Cinematic Video Makers
How to Add Lens Flare to Photos and Videos?
If you have missed the prime time to capture the dreamy lens flare for your footage, a terrific workaround is to add lens flare to image or video footage in order to generate the iconic lens flare effect. For this purpose, MiniTool MovieMaker, a free video editor without watermark, can serve as your go-to option.
Besides the dramatic lens flare effects, the application also offers other types of basic stickers, like air-ground elements, happy birthday elements, mosaic effects, smoke effects, etc.
There are currently over 50 text styles available for you to choose from and apply to your original footage. With the help of MiniTool MovieMaker, a content creator has the possibility to add the transition he or she prefers between two photo or video segments.
At the same time, as a photo editor, you can use it to add cool filters to make your masterpieces wow the audiences. Furthermore, MiniTool MovieMaker allows you to apply pan and zoom effects to your creations, giving them a more dynamic look.
MiniTool MovieMaker’s Key Features
- The user interface (UI) is straightforward.
- Supports importing multiple video, picture, and audio formats.
- Packed with customizable movie templates.
- Effortlessly sync music and videos with one click or drag and drop.
- Features some popular aspect ratios, like 16:9 or 4:3.
- Includes color correction feature.
- Adjusts the video playback speed.
- Functions as a video trimmer, splitter, and cropper.
- Flip, rotate, or reverse a video however you want.
- Configurable quality, resolution, bit rate, frame rate, and so on.
Add Lens Flare to Photos/Videos in MiniTool MovieMaker
Now, follow the simple steps to learn how to create a lens flare for your artwork using MiniTool MovieMaker.
Step 1: Download the MiniTool MovieMaker application and install it on your computer.
MiniTool MovieMakerClick to Download100%Clean & Safe
Step 2: Open this program and close the promotion window to enter the main user interface.
Step 3: Click Import Media Files to import the photos and videos you plan to edit.
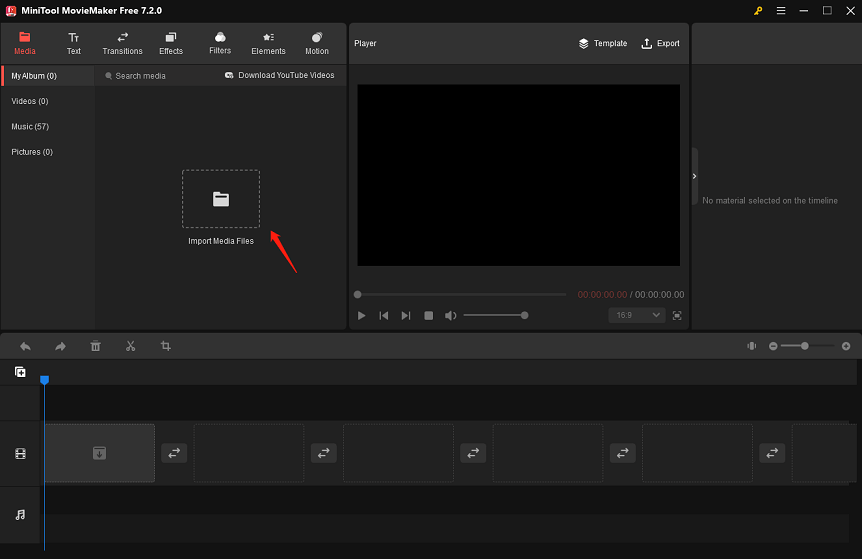
Step 4: Drag and drop the imported photos and videos onto the video track on the timeline.
Step 5: Select the image or video clip on the timeline to which you wish to add the lens flare effect.
Step 6: Go to the Elements tab at the top. Type or copy and paste “lens flare” in the search bar in the upper left corner, then press the Enter key. This will bring up all the options for the lens flare effect.
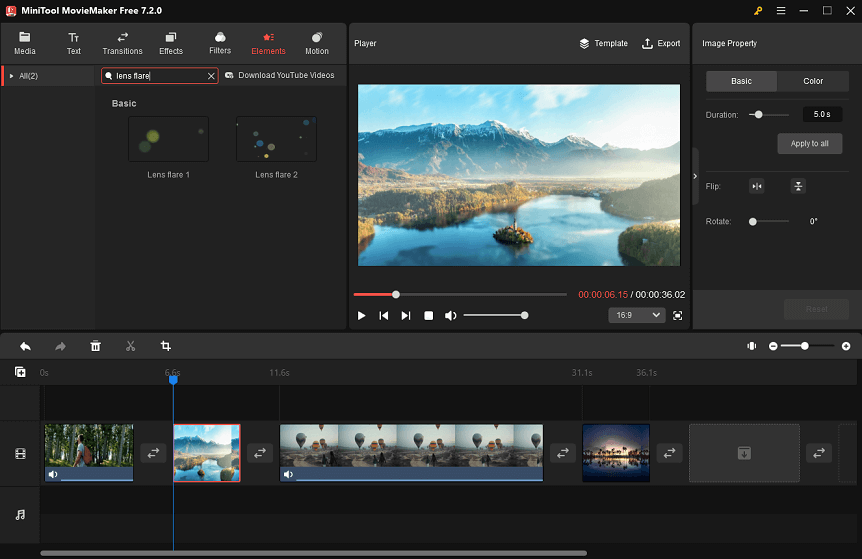
Step 7: To get the lens flare element you want, click on the Download icon on it. Then, click the + icon to add the downloaded lens flare element to the target image or video clip on the timeline.
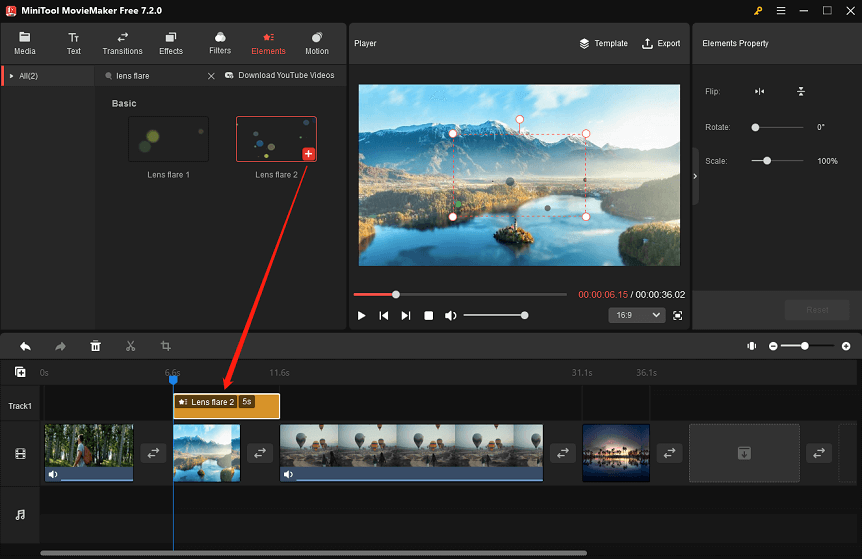
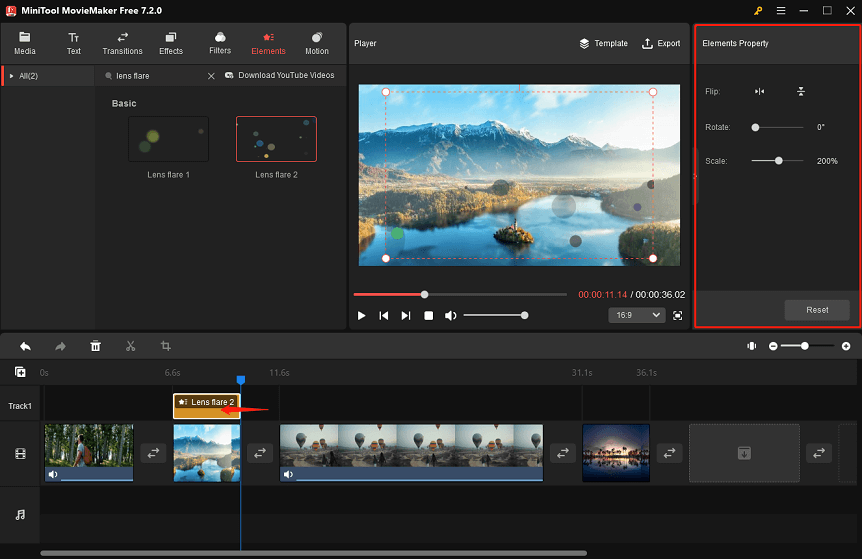
Step 8: Edit the added lens flare effect as needed, for example:
- Place the mouse cursor over the right edge of the lens flare element on the timeline until it changes to a double-headed arrow. Drag to the left to the point where you want it to stop playing.
- In the Elements Property area, flip the lens flare element by clicking the Flip Horizontal or Flip Vertical icon. Move the Rotate or Scale slider to rotate the element or make it larger/smaller.
Step 9: When finished, click Export at the top right of the main interface to access the output settings window. From there, give the artwork a name, specify the destination folder, and change its format, resolution, frame rate, and so on.
Step 10: Save the masterpiece to your computer by clicking the red Export button for the export process.
Conclusion
You now know both how to catch amazing lens flare in outdoor shots and how to add lens flare to photos and videos after reading the easy guide above. Share this article with your friends on Instagram, Twitter, or Facebook if you find it useful.
Finally, please contact us at [email protected] if you have any problems using MiniTool MovieMaker.


User Comments :