This post from MiniTool MovieMaker will focus on how to do picture in picture Premiere Pro. If you are interested, you can read the following content to give you a comprehensive understanding.
What Is the Picture in Picture Effect?
Picture-in-picture effect is a function that allows multiple full shots to be displayed on the screen at the same time. In other words, users can play two or more videos simultaneously. And, they can find one on the home screen, one on the embedded screen, and the audio they hear is usually playing on the home screen.
Related post: What’s Picture in Picture and How to Use It in Different Cases?
How to Do Picture in Picture Premiere Pro?
If you want to figure out how to create a picture in picture effect in Premiere Pro, just pay attention to the following steps:
Step 1: Import two or more videos.
Open the Premiere Pro application and import the videos to be used for the picture-in-picture effect.
Step 2: Rearrange the main clip.
Use the Scale and Position tool in the Effects Control panel to arrange the position of the main clip.
Step 3: Drag and drop another shot.
Select the shot for the footage card and place it two layers above the original footage in the timeline.
Step 4: Choose the effects to use.
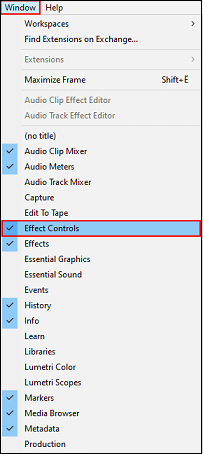
Open the Effect Controls panel and find the effects that you can use for your video.

If you want to change the interface for editing effects, you can do the following: Window > Workspace > Effects.
Step 5: Resize the image.
The Effects Control panel includes tools for image resizing, thus you can put it in the right-hand corner. It’s recommended to make it around 35-40% smaller. By doing this, you can have a bit of buffer room around the footage card.
After understanding how to make a picture in picture effect in Premiere Pro, you can learn to add additional items to make your video more professional.
Step 6: Create a text layer.
Create a Text layer between the two shot layers in the timeline and make sure that the new text layer extends over the entire duration of the footage card.
Step 7: Add a colored border.
Open the Essential Graphics panel and remove the text inside it in order to have an empty graphics box. Click the Page icon and add a new rectangle box. And, you can resize the rectangle box to be slightly larger than the footage card and change its color from the Essential Graphics panel.
Further, you can nest your clips to make the border and footage as a single unit and then animate the clips.
Step 8: Nest your clips into a unit.
Highlight your two clips, right-click to select Nest, and give it a name.
Step 9: Animate the clips.
Add an animation, resize it to 0, keyframe it, and resize it back to 102, which is just a bit larger than the original. Again, add the remaining keyframes with alternating sizes, making them closer and closer to the original size. Finally, highlight all keyframes and right-click to select Bezier.
How to Add a Full-Screen Effect in Premiere Pro (Optional)?
Once you have created a picture-in-picture effect, you also have the option to add a full-screen effect so that the smaller screen will fill the entire screen and then you can shrink it back down. The steps are as follows:
- Use the same resolution to create a Color Matte element with a default length of 5 seconds.
- Use keyframes to move it back to where you want it to be.
- Add two keyframes at the beginning for Size and Position. Copy the Size and Position keyframes and paste them to the end, then reverse their order.
- Select any Easy In or Easy Out setting you like.
- Click the Effect Controls menu and select the Save Preset option to save it as a preset.
If you're looking for an easy-to-use video editor to preview videos in full-screen mode, MiniTool MovieMaker is recommended.
MiniTool MovieMakerClick to Download100%Clean & Safe
Conclusion
Now, you know how to do picture in picture Premiere Pro. This is a useful effect to give your video a stylish look. Let us know in the comments below if you have any other questions.


User Comments :