It is now easier than ever to create visually appealing videos. From real-time editing to fantastic filters, as filmmaking technology evolves, so does the craft of making films. If you are interested in learning how to add aesthetic overlays for edits in post-production, you will need professional video editing software, like MiniTool MovieMaker. Discover more! Keep reading!
The majority of filmmakers are in pursuit of perfection in their videos. Because art is subjective, it’s not “perfect” in the literal sense, but rather “matches the picture in my head” sense. However, approaching a creative project with this mindset can lead to a cycle of never being happy with what we create.
This is one of the main reasons why filmmakers are always on the lookout for ways to save time, energy, and (or) money. If you can find a shortcut that does not compromise the quality of your work, it may be a technique or tool worth incorporating into your creative process.
Overlays are essentially the gold standard for “things that save you time and effort,” particularly if you find yourself investing too much time in post-production.
Of course, edits are an important aspect of video production. However, that doesn’t mean it’s necessarily something you’re afraid of.
If you make use of resources such as aesthetic overlays, you’ll most likely get the best of both worlds – Footage that looks what you desire, without having to spend 10 hours experimenting to get that one scene just right.
Understanding Overlays in Video Production
The term “overlay” means a different thing to a different person, based on your background in the video. For the sake of this article, however, we use the term “aesthetic overlay” since it is specific enough to truly reflect what most filmmakers mean when they talk about overlays.
Now, let’s break this down into three short and easy-to-remember questions.
1. What Are Overlays?
Overlays are technically visual effects (or even LUTs) that change the appearance of footage without actually altering the footage itself.
2. Where Can You Find Overlays?
You can find aesthetic overlays in all kinds of places, whether it is a free download, a storefront of creative assets found on Google, or a Patreon link from your favorite YouTube channel.
3. Are Overlays Available for Free Use?
As long as you comply with the usage rights and guidelines, you’re free to download as many as you want and put them into your own projects at any time.
In all such cases, using an aesthetic overlay is similar to placing a new visual layer on top of the timeline without having to key in all of the changes yourself manually. But as far as aesthetic overlays go, we’re discussing things such as smoke effects, light leaks, glitch effects, and even film grains.
Actually, there are plenty of different overlays out there (beyond what we can cover in one sentence). Different filmmakers have different tastes in looks. This makes it difficult to summarize such a wide category, even if the manner you use them is quite clear-cut.
But two very clear examples you’ve seen before or perhaps used yourself are a film grain overlay or a black and white overlay.
Why Do Aesthetic Overlays Help?
Even if you wish to shoot a film in complete black and white, you might not have the equipment or experience to achieve it. Constantly checking exposure, making ISO adjustments, desaturating footage in post, and even lighting a scene from a whole new perspective, it’s a ton.
Do you know what’s not tedious? Shoot your video as usual and include a black and white aesthetic overlay into the footage on your project timeline.
Sometimes a popular video editor that you use frequently has these visual filters built in. When it comes to the easy inclusion of aesthetic overlays for edits, a drag-and-drop edit is often the best way to go.
Film grain is an extremely popular example of aesthetic overlays. That’s because not a lot of filmmakers have the resources to shoot it all on 16mm film, let alone make edits to all of those things in the old-school scissors-and-tape manner.
Even though you spend many hours getting the locations, lighting, costumes, and camera settings lined up to produce a 1970s-era short movie, you cannot simply press the “film grain” button on your camera and achieve the ideal classic look for your project.
Now, it’s difficult to picture even the most avant-garde filmmaker applying unique grains of noise to every frame of a project. Still, overlays offer a new, simplified approach that nearly feels like magic.
Creatives can style their movies without acquiring a new technique or having access to expensive equipment. You can download a film grain overlay now, drop it on top of the existing footage on your project timeline, and you’re done.
That’s it, you’ve simply brought cool vibes to the video. And you’ve probably spent less time doing it than making a cup of coffee.
How to Use Aesthetic Overlays in Post-Production?
Video Editors
You can apply aesthetic overlays on any non-linear video editing software that allows post-production movie editing, like Adobe Premiere Pro, Final Cut Pro, Lightworks, and Avid Media Composer. Go for quality raw footage – The better your foundation is, the better your overlay will look. And after that:
- Create a new project by importing your footage.
- Add your clip(s) to the project timeline and make it a new track.
- Use the software’s native feature to search for stock overlays or import the overlay you would like to use.
- Use the overlay editing menu to change the opacity of the overlay until it is the level you want.
Social Media
If you want to promote your videos on social media, platforms like WeVideo, Adobe After Effects, and iMovie let you preview multiple social media template options quickly.
Or, services like Motion Array, Storyblocks, and Pixabay offer pre-sized and revised aesthetic overlays for edits. Social media platforms like Instagram and Snapchat even enable users to edit videos using their native built-in functions. To accomplish this:
- Use the platform’s recording feature to record a video.
- Allow filters to gain access to overlays and additional special effects.
- Select the graphic overlay/filter that matches your desired look.
- Adjust the transparency, include a few hashtags, and you’re ready to publish.
Wherever you are posting your footage with aesthetic overlays, do your due diligence to make sure that you are not using someone else’s work without permission.
Search for Free Overlays Online
If adding an overlay to your footage manually, find free overlays online, download them to your PC, and use your video editing app to insert them into your project. You can find these stock overlays on sites like Videezy and Pixabay, and you can work with anything that’s under free use regulations, creative commons, or open source.
Buy Copyrighted Overlays
Also, buy existing aesthetic overlays on sites like Upwork and Fiverr, or hire graphic designers to create overlays for your project.
Make Use of Integrated Features
Online video editing software and social media platforms often provide a library of stock overlays or may credit the creator in the overlay itself (especially Snapchat).
Create Your Own Overlays
If you are feeling particularly creative, you can always create your own aesthetic overlays without having to worry about copyright and usage issues.
Aesthetic overlays give your videos a unique look that can make them shine, whether those videos are for your first film or social media. Experiment with different overlays to make different looks and determine what feels perfect for your project.
How to Use Aesthetic Overlays for Video Editing Through MiniTool MovieMaker?
MiniTool MovieMaker is one of the most popular professional video editing software free download if you’re looking to learn how to add aesthetic overlays for edits in post-production. In addition to the aesthetic frame overlay and aesthetic heart overlay, it also packs other sorts of aesthetic overlays, such as the sparkle overlay, black & white overlay, and film grain overlay.
There are a number of stunning effects that you can use in your video editing, including distortions, openings & closings, particles, etc. Apart from that, the video editing app features a wide variety of animated elements, such as emojis, explosion stickers, arrows, festival elements, web stickers, and so on.
You will also be able to add its various text overlays (captions, credits, and titles) to enrich your project. For filmmakers, the app allows you to add the transition you want between two video or photo clips.
To increase the artistic possibilities of your films, you can do this by having fun with the different filters and 3D LUTs MiniTool MovieMaker offers. Alternatively, you can use it to add appropriate motion effects to make what you’re creating look more dynamic.
MiniTool MovieMaker’s Salient Features
- Has integrated movie templates and music assets.
- Supports four common aspect ratios.
- Manually crops videos or uses the preset values for results.
- Splits or trims your video files.
- Color corrects video or image footage.
- Sets the video playback speed.
- Flip or rotate video.
- Reverses a video file.
- Incorporates drag-and-drop and single-click features.
- Exports media files with configurable parameters.
Steps to Add Aesthetic Overlays for Edits via MiniTool MovieMaker
MiniTool MovieMaker’s built-in aesthetic overlays can be placed on the original footage to help your work stand out even more. The exact process is as follows:
Step 1: Click the download button below to acquire MiniTool MovieMaker and install the app on your computer.
MiniTool MovieMakerClick to Download100%Clean & Safe
Step 2: Launch the video editor and click on the New Project button in the Promotion window to begin a new project.
Step 3: After entering the main interface, click on Import Media Files under the Media tab to import your original material.
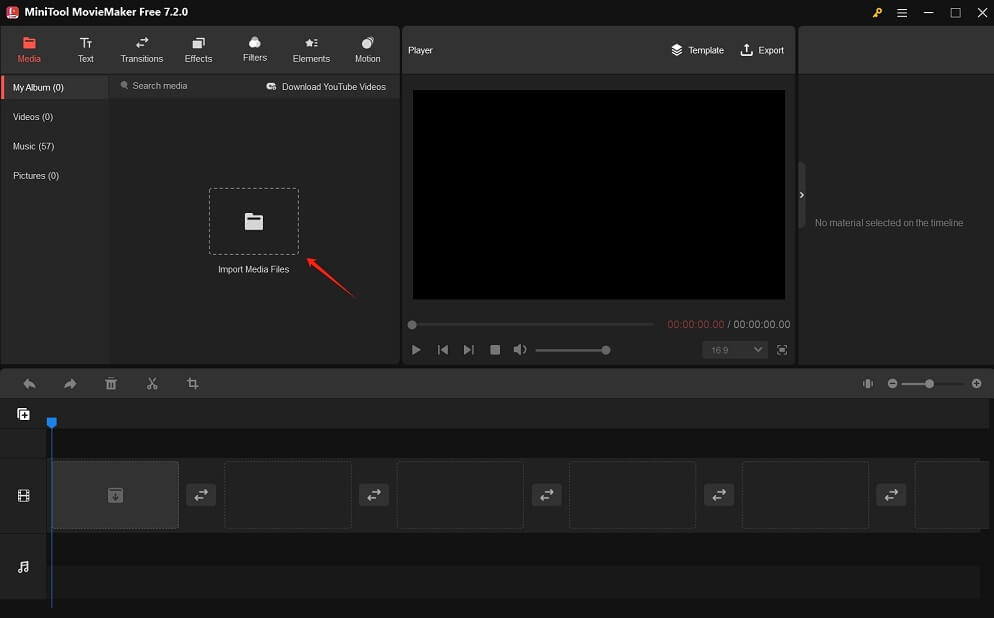
Step 4: Drag and drop the imported raw footage onto the video track in the timeline below in a specific order.
Step 5: Highlight the clip in the timeline to which you want to add an aesthetic overlay. Go to the Effects tab at the top and select the Overlay sub-tab on the left-hand side.
Step 6: Click on the Download icon on the overlay you’d like to get. A few seconds later, click on the plus icon. This will add the downloaded aesthetic overlay to the highlighted clip in the timeline.
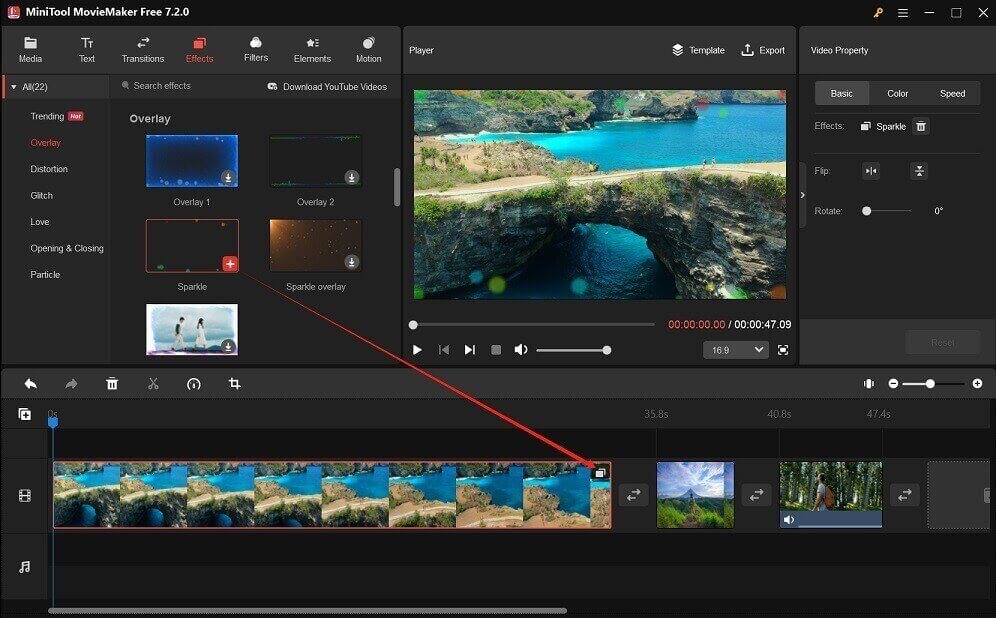
Step 7: Leave the clip with the added overlay highlighted. Perform the following edits:
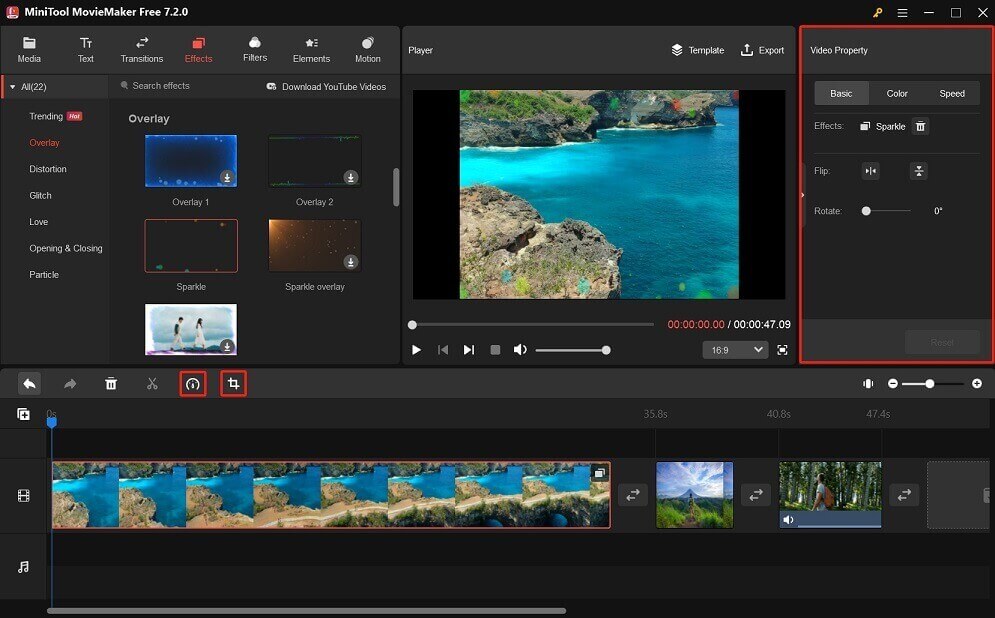
- To slow down, speed up, or reverse the clip, click the Speed icon on the toolbar to select the corresponding option as needed.
- Crop the clip. You’ll have to click the Crop icon on the toolbar and retain the crucial parts of the clip by dragging manually or using preset aspect ratios.
- Make further edits in the Video Property panel, such as flipping or rotating the clip, changing its contrast, saturation, brightness, applying the 3D LUT, and more.
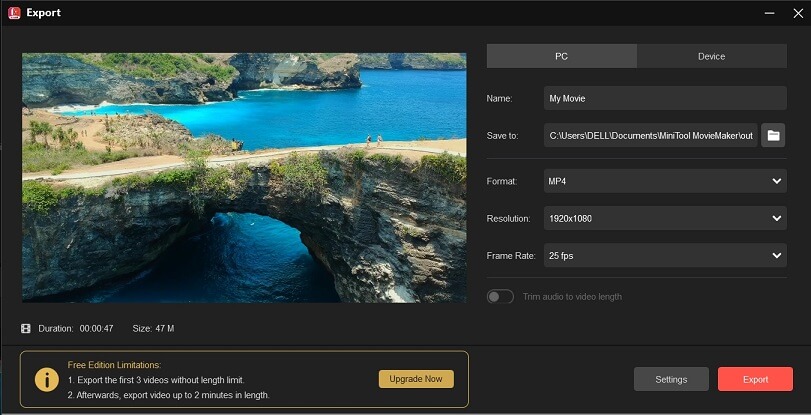
Step 8: When you’re happy with each edit, click on Export at the top to open the output settings window. Under the default PC tab, give your project a name, choose where to save it, and configure the output format, resolution, frame rate, etc. Finally, click the Export button at the bottom to save the final project to your computer.
Conclusion
Speaking of aesthetic overlays for edits is just a scratch on the surface of what you can do in the post-production process. But researching them is an indication that you’re working smarter, instead of harder. And that’s the type of next-level filmmaking that gives you the freedom to focus on the things you love.
If you have any problems using MiniTool MovieMaker, you can contact us at [email protected] for assistance.



User Comments :