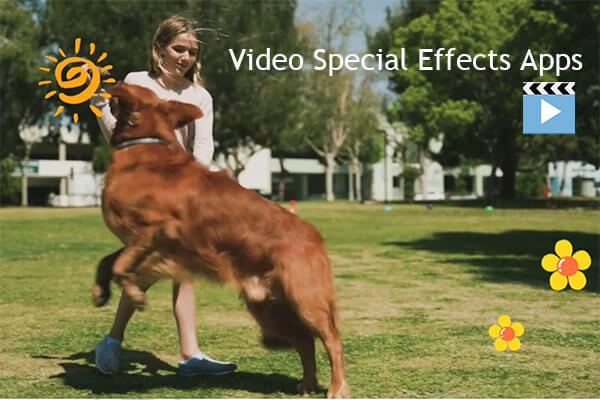
Are you trying to find out how to add a heart to a photo or video on your Windows PC? In this article, we will provide you with a powerful video editor, such as MiniTool MovieMaker, Microsoft Photos, and Microsoft Clipchamp, which allows you to add a heart overlay for edits to make your work more attractive.
Heart overlay is nothing new. Since the creation of the love film, the heart overlay has been commonly used for highlighting the romantic atmosphere and making the video look more aesthetic. Even if you do not have the ambition to create a professional video about love, it’s still fun to add a heart to a photo or video.
MiniTool MovieMaker is a great Windows video editor to help make all types of video edits, not to mention a simple edit such as the addition of a heart overlay. Besides that, you also have the option of adding this kind of effect on your Windows PC using Microsoft Photos and Microsoft Clipchamp. See each section for more details.
How to Add and Edit Hearts in Videos or Photos with MiniTool MovieMaker?
Get to Know MiniTool MovieMaker
MiniTool MovieMaker is a must-try video editing software free download if you wish to apply heart effects or stickers to media footage (videos or photos) freely and effectively. In the meantime, you can customize the added heart overlays whatever you like.
It’s worth mentioning that the software features other incredible sorts of effects, such as distortions, openings & closings, and particles. Also, it is packed with a diverse range of animated stickers, like emojis, explosion effects, food elements, mood elements, nature stickers, etc.
There are many adjustable text templates for you to choose from. The application can also be used to add the transition of your choice between two video or image clips.
To increase the creative potential of your films, you can do so by applying filters using this movie maker. Or you can add matching motion effects to make them look more dynamic.
With its built-in movie templates and music assets, you can create professional-quality videos in just a few minutes. MiniTool MovieMaker now supports four popular aspect ratios: 16:9, 9:16, 4:3, and 1:1.
On top of that, it allows you to perform various video editing tasks, such as split or trim video, crop a video, merge the video, color correct video, control video playback speed, rotate or flip the video, reverse a video, and so on.
The Most Important Features of MiniTool MovieMaker
- Its user interface (UI) is clear and easy to operate.
- It includes single-click and drag-and-drop capabilities.
- Supports importing various video formats (e.g. MP4, 3GP, MPG, WMV, etc.).
- Supports importing multiple audio formats (e.g. MP3, M4A, M4R, WAV, etc.).
- Supports importing several photo formats (e.g. PNG, JPG, JPEG, GIF, etc.).
- Add captions, movie credits, and titles to picture or video segments.
- Add the light leaks or brush transition between two image or video clips.
- Apply the black & white, film grain, and motion blur filter to a video.
- Apply pan and zoom effects to still images and video clips.
- Provides configurable parameters for exporting media files.
Steps on How to Add the Heart Overlay for Edits in MiniTool MovieMaker
Now, let’s see how to add hearts to a photo or video with the help of MiniTool MovieMaker.
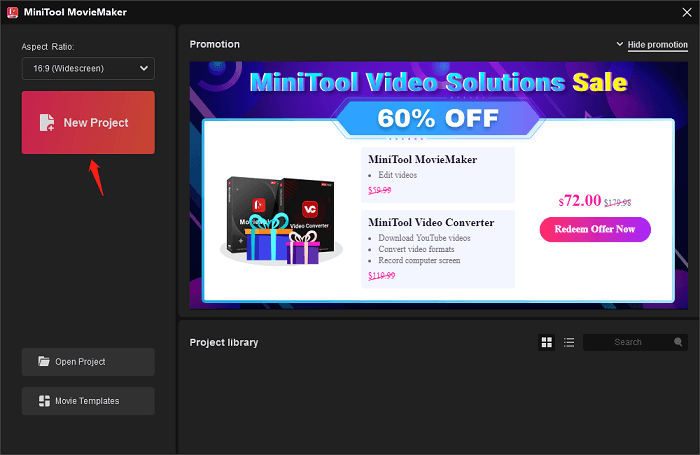
Step 1: Click the download button below to get the MiniTool MovieMaker application and install it on your Windows PC.
MiniTool MovieMakerClick to Download100%Clean & Safe
Step 2: Launch the application and click the New Project button from the Promotion window to start a new project.
Step 3: When you’re in its main interface, click Import Media Files under the Media tab to import your original video and photo footage.
Step 4: To add a video or photo to the timeline below, click the + icon on its thumbnail. Or drag and drop the imported video or photo footage directly onto the timeline.
Step 5: As mentioned above, you’ll be able to add heart effects or stickers to video or photo clips. The following two examples are for your reference:
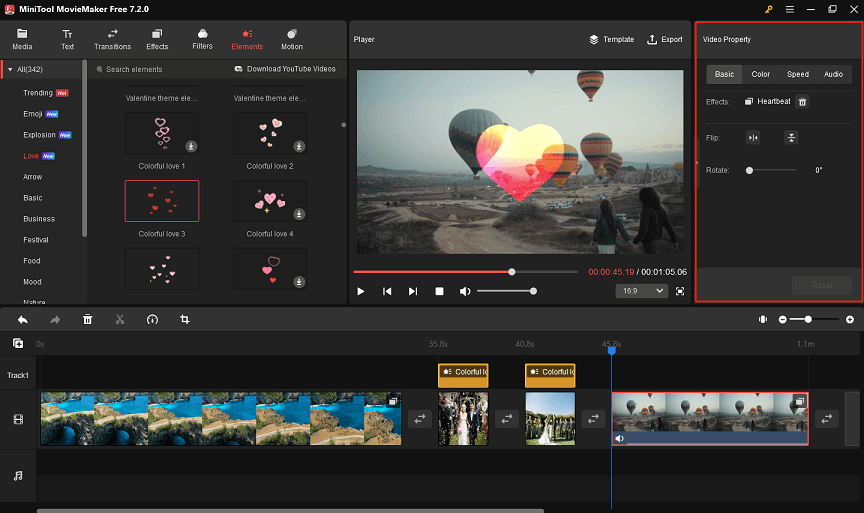
Option 1: Add Heart Effects to Videos
- Click on a video clip on the timeline.
- Go to the Effects tab on the top.
- Select the Love sub-tab from the left.
- Just click the Download icon on the Heartbeat effect to get it.
- Hit the + icon to add it to the video clip.
- Use the same operation to add the heart effect to other target video clips.

Option 2: Add Heart Stickers to Photos
- Click on a photo clip on the timeline.
- Go to the Elements tab on the top.
- From the sub-tabs on the left, select Love.
- To get the desired heart sticker, just click the Download icon on it.
- Hit the + icon to add the downloaded heart element to the photo clip.
- Do the same to add any other heart sticker you want to other target photo clips.
Step 6: After that, highlight the video or photo segment on the timeline you want to edit.
While highlighting a video clip, you can make these edits under the Video Property panel:
- In the Basic tab, click the Trash icon to delete the added heart effect if you want to change one. And, click the Flip Horizontal or Flip Vertical to flip the target video clip and rotate it from 0° to 360° depending on your needs.
- Switch to the Color tab and then adjust the contrast, saturation, and brightness of the target video clip by easily moving the corresponding sliders. Additionally, expand the 3D LUT drop-down menu to select an appropriate one.
- Switch to the Speed tab, move the Speed slider to speed up or slow down the target video clip, and check the Reverse speed option to reverse it.
- In the Audio tab, move the Fade in and Fade out sliders to fade the audio in the target video clip and change its volume (including mute or unmute).
While highlighting a picture clip, besides adjusting its duration, you can perform similar edits to the target photo clip in Image Property, including flipping, rotating, and color correction.
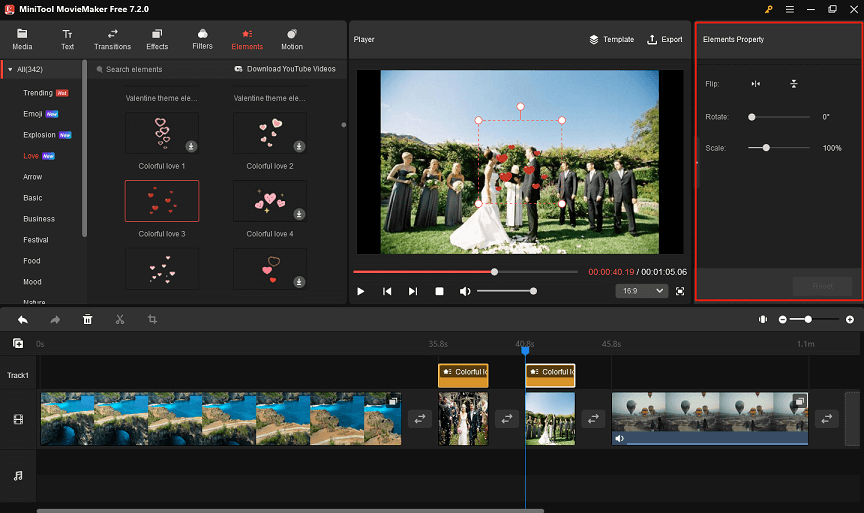
Step 7: Edit the target heart element on the timeline by highlighting it to open the Elements Property panel. Carry out the following operations:
- Flip the heart sticker by clicking the Flip Horizontal or Flip Vertical icon.
- Rotate it to any angle by moving the Rotate slider.
- Move the Scale slider to make it larger or smaller.
Step 8: Once done, click Export on the top to access the output settings window. Under the default PC tab, name your final video, specify an output path, and configure its output format, resolution, frame rate, etc. To save the final video to your Windows PC, click the Export button to complete the export process.

How to Add and Edit Hearts in Videos or Photos with Microsoft Photos?
Introduction to Microsoft Photos
Microsoft Photos is a Windows photo management program, that lets you view, edit, and share photos across devices. Its latest version includes a video editor that can generate videos from your selected pictures and video footage.
You can work with the video editor within it to add music and special effects (like hearts, snowflakes, and explosions) to videos.
In terms of compatibility, the new Microsoft Photos app supports all major image and video formats, including PNG, JPEG, GIF, MP4, WMV, etc.
Even more, the program allows you to import media files from connected external devices, such as smartphones, cameras, and USB flash drives. After the import, you can organize them into albums, collections, or folders with it.
In general, Microsoft Photos is an excellent, feature-rich photo and video editor for Windows that you’ll want to use.
Steps on How to Add the Heart Overlay for Edits in Microsoft Photos
Here’s how to add a heart effect to your video using Microsoft Photos.
Step 1: Download and install Microsoft Photos from the Microsoft Store on your Windows PC.
Step 2: Run the software, go to the Video Editor section, and start a blank project.
Step 3: Give your video a name and click OK to enter the main interface.
Step 4: Click + Add > From this PC to import your picture and video files.
Step 5: Place the imported media files onto the storyboard below.
Step 6: On the storyboard, select the target media clip to which you want to add the heart effect.
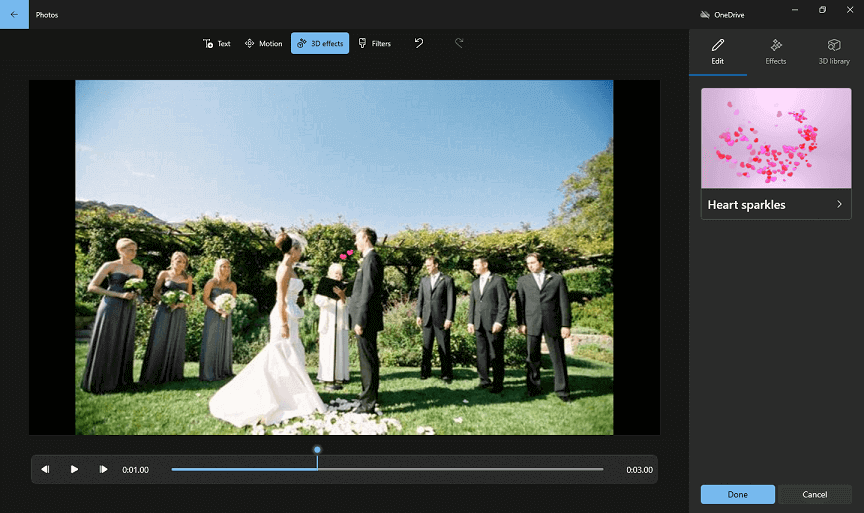
Step 7: A new window will appear when you click 3D effects on the toolbar. From there, type “heart” into the search bar to find this type of effect.
Step 8: Click on the heart effect of your choice to add and edit to your liking. Save your changes by clicking the Done button.
Step 9: Follow the same procedure to add any heart overlay to other media clips.
Step 10: At the top right corner of the main interface, click Finish video to make export settings and save the final video to your Windows PC.
How to Add and Edit Hearts in Videos or Photos with Microsoft Clipchamp?
Introduction to Microsoft Clipchamp
Microsoft Clipchamp is a decent video editing app that enables you to add heart stickers, shapes, or overlays to videos. Also, it is available as a Windows app for personal Microsoft accounts. Meanwhile, you can have access to the online version.
There are amazing transitions and filters to pick from as well. Moreover, you can use the app to add text overlays, record webcam or screen, trim or combine video recordings, and more.
One thing to keep in mind, though, the majority of Clipchamp resources require a paid membership. The subscription plan is priced at $11.99 per month.
You may also like: Top 10 Free Webcam Recorders to Record Video from Webcam
Steps on How to Add the Heart Overlay for Edits in Microsoft Clipchamp
Here’s how to add a heart effect to your video using Microsoft Clipchamp.
Step 1: Download Microsoft Clipchamp from the Microsoft Store and install it on your Windows PC.
Step 2: Start up the app and click Create a new video to access the main interface.
Step 3: Click Import media to import your video and image files.
Step 4: Drag and drop the imported media files onto the timeline below.
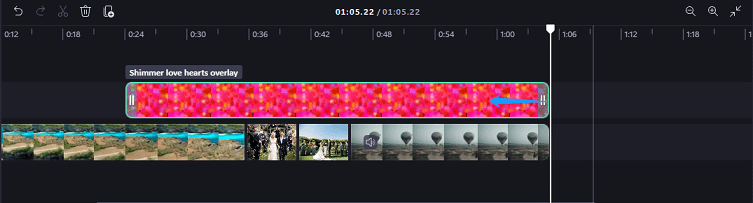
Step 5: On the timeline, move the playhead to the point where you want the heart effect to start.
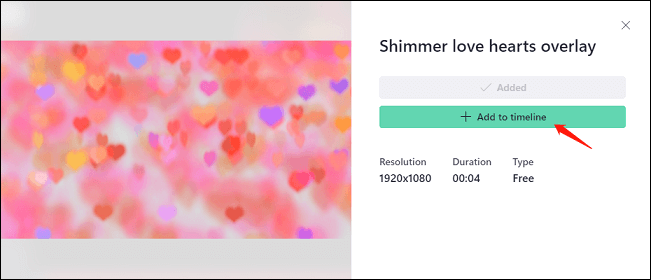
Step 6: Access the Content library tab on the left. By using the search tool here, quickly find the heart overlay you like. A new window will pop up if you click on it, then hit the + Add to timeline button to add it to your footage.
Step 7: Put your mouse cursor to the right of the heart overlay on the timeline. When the double-headed arrow appears, drag left to the point where you want it to end.
Step 8: After you are satisfied with your edits, click Export at the top right to adjust export settings and save the final video to your Windows PC.

Concluding Remarks
All in all, we explain three effective ways to add the heart overlay for edits on your Windows PC. No expert editing skills are required to use any of the video editors presented in this article. Pick one of your own to try out!
If you encounter any problems while using MiniTool MovieMaker, you can contact us at [email protected] for help.
User Comments :