This post from the Windows video editing software - MiniTool MovieMaker will provide you with a step-by-step guide on adding image to video for creating a picture-in-picture video.
Adding image to video means overlaying an image on a video in the same video frame. Sometimes, you may need to place a photo in the corner of the video to use it for a logo, watermark, or other purposes.
Add Image to Video with MiniTool MovieMaker
MiniTool MovieMaker is an easy-to-use and feature-rich video editor designed to help beginners create videos from pictures in minutes. It can trim, split, crop, and reverse videos, change the video speed, correct the clip’s color, etc. In addition to these basic features, this application has an advanced multitrack editing feature, supporting up to 9 video tracks for layering photos, videos, animations, stickers, filters, and other resources, as well as 2 audio tracks.
So, if you want a tool to add an image overlay to your video, MiniTool MovieMaker is a good choice. Besides, this software supports many popular video and image formats, such as MP4, MOV, MKV, WMV, AVI, PNG, JPG, BMP, GIF, ICO, etc. Furthermore, MiniTool MovieMaker exports videos up to 1080P or 4K resolution for free without watermarks.
Here’s how to add image to video using MiniTool MovieMaker.
Step 1. Click the button below to download and install the software on your computer.
MiniTool MovieMakerClick to Download100%Clean & Safe
Step 2. Launch MiniTool MovieMaker and close the project library window to enter the main interface. Then, click the Import Media Files button to open your video and image.
Step 3. Click the + icon on the video to add it to the main video track on the timeline. Then, drag the image on top of the video.
Step 4. Go to Image Property, drag the Scale slider to the left to resize the image, and move it on the player to adjust its position. Then, drag any edge of the image layer on the timeline to change its duration. You can add up to 8 image overlays to your video.
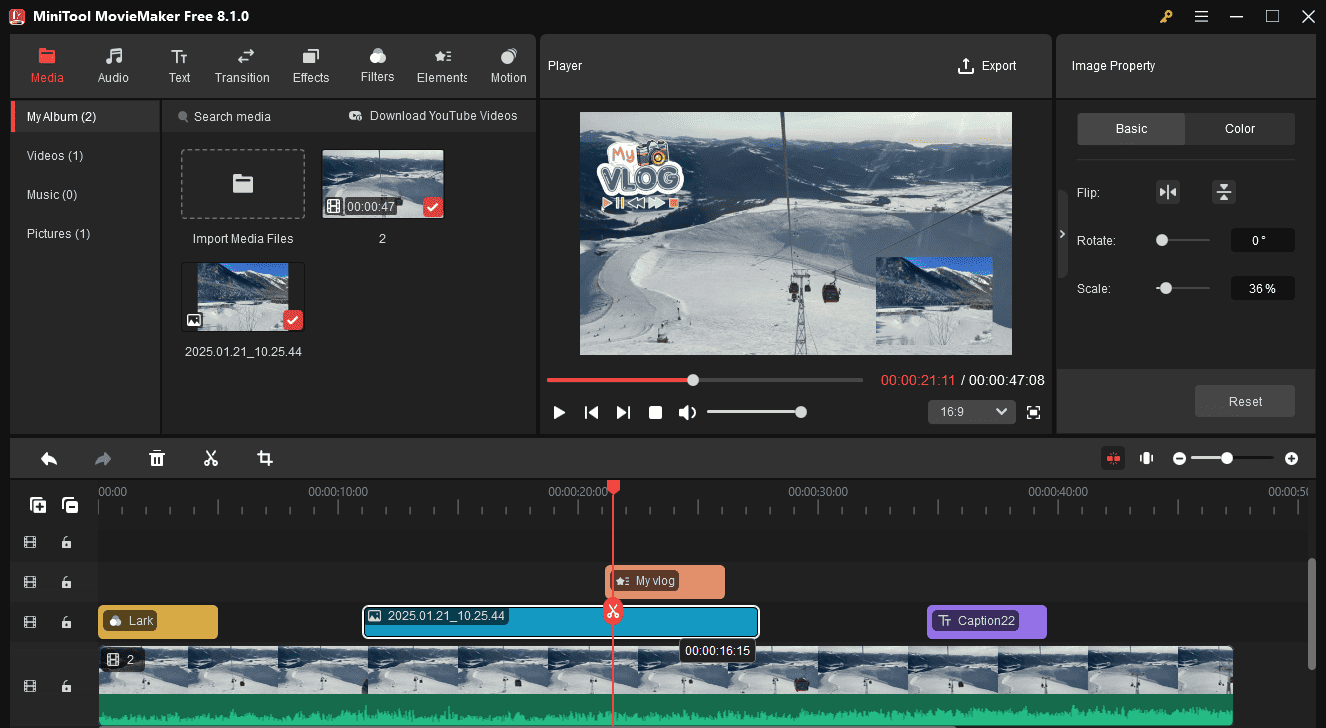
Step 5. Next, you can overlay more assets on top of the video, such as filters, frames, stickers, captions, etc.
Step 6. Preview your video. If you’re satisfied with the result, click the Export button to export your video.
Add Image to Video with Canva
Canva is an online graphic design tool for creating social media posts, presentations, posters, videos, logos, and more. As an online video editor, Canva offers many basic editing tools, such as video filters, speed adjustments, color correction, and more.
Additionally, it allows you to add image to video to create picture-in-picture effects. How to overlay a picture on a video using Canva? Follow the steps below.
Step 1. Go to the Canva website and sign in with your account.
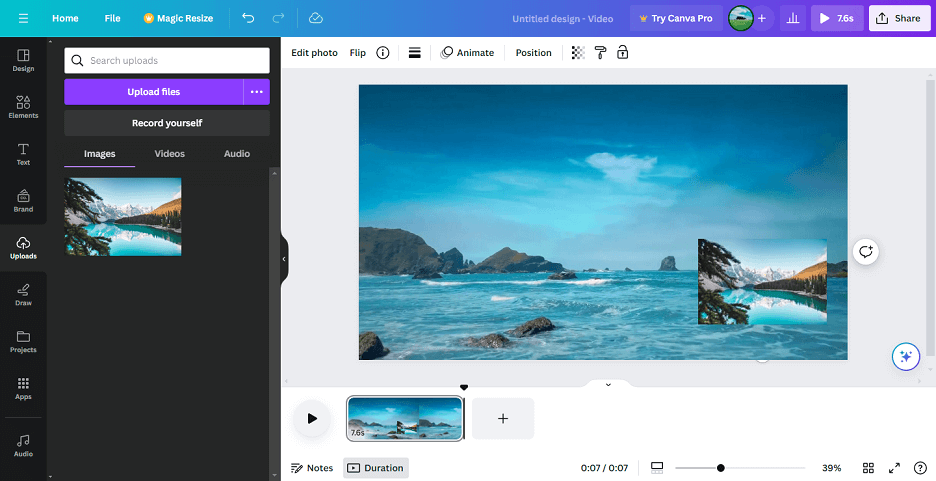
Step 2. Click the Create a design button in the top right corner and choose Video from the list.
Step 3. Click File on the top menu bar and go to Import files > Choose files to upload your video and image.
Step 4. First, drag and drop the video to the timeline. Then, add your image to the video. Select the image on the image frame and drop and drop to resize it. Also, you can change its position on the video frame.
Step 5. Once done, click Share > Download > Download to save the video as an MP4 file.
Add Image to Video with Online Video Cutter
123Apps’ Online Video Cutter is a video editing suite that comes with various tools. You can use it to merge videos, add audio to video, trim videos, add image to video, loop videos, resize videos, and more.
Here’s how to put a photo on a video using 123Apps’ Online Video Cutter.
Step 1. Navigate to the 123Apps’ Online Video Cutter website.
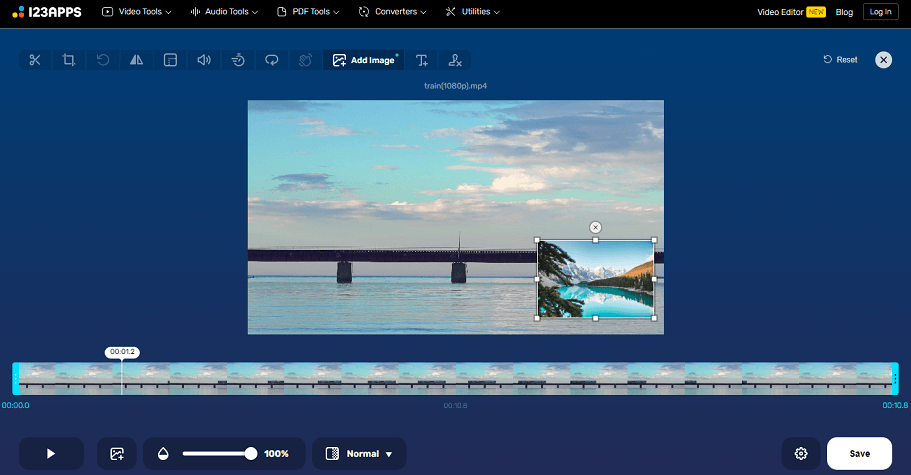
Step 2. Expand the Video Tools menu on the top and then select Add Image to Video from the drop-down list.
Step 3. Click the Open file button to upload your video.
Step 4. Click the Image button at the bottom to import your photo. Then, adjust the size of the image overlay and move it to the right place.
Step 4. Click the Settings button to choose a format for the resulting video and click Save to start encoding the video.
Add Image to Video with Clipchamp
Clipchamp is an effective video editor for Windows 11/10 computers and can still be accessed in a web browser. This application is equipped with rich editing features and gives you various options to edit and enhance your footage. Here’s how to add an image overlay on video with Clipchamp.
Step 1. Open Clipchamp on your PC or visit the Clipchamp website.
Step 2. Sign in with your account and then click the Create a new video button.
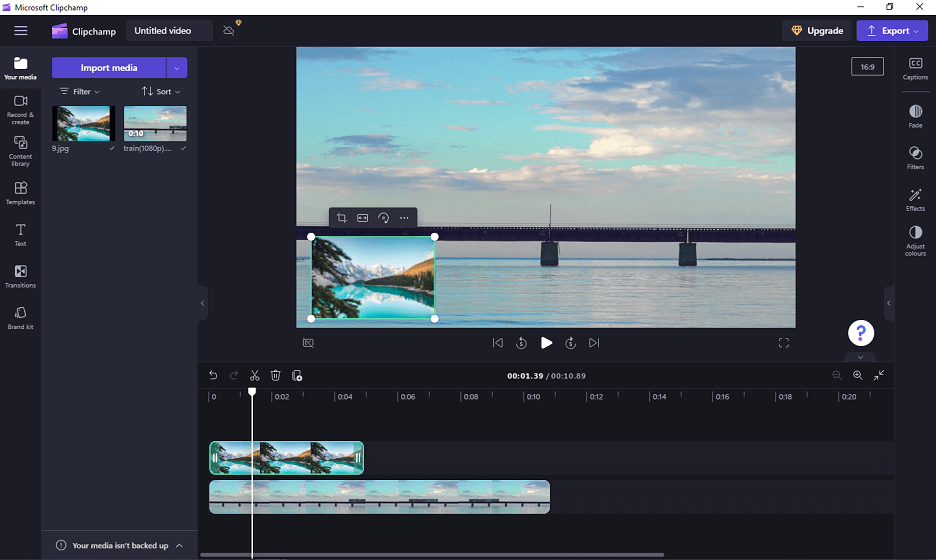
Step 3. Click Import media to upload your video and image.
Step 4. Drag your video to the timeline and then add your picture to the timeline.
Step 5. Select the image on the timeline, and you can resize it and change its position. Also, you can change the duration of the image overlay by dragging the start or end point of the clip on the timeline.
Step 6. Click Export in the top right corner and choose a resolution to start exporting the video.
MiniTool MovieMakerClick to Download100%Clean & Safe
Conclusion
It’s simple to overlay an image on a video. Now, it’s your turn. Choose one method and follow the steps to put a photo on your video to make it unique.
About The Author

Position: Columnist
Cora is a tech writer specializing in digital media workflows, with over six years of hands-on experience in video post-production, media transcoding, and screen capture. Her writing is always clear and practical. Cora also produces in-depth software reviews for users across skill levels to help them find the right tool and enjoy video editing.
User Comments :