In many of the photographs and movies, film grain gives a weathered, textured look. Interested in learning more about this effect? In this article offered by MiniTool video editing software, we will walk you through the definition of film grain, the difference between film grain and digital noise, the causes of film grain, how to create the film grain effect digitally, why film grain is important for video production, and how to add a film grain filter to your video. Delve in now!
Film Grain Meaning
Film grain refers to an optical effect that is similar to a large area of tiny particles in the images that are developed from a celluloid film. The film captures pictures through an emulsion of light-sensitive silver halide crystals. These particles generate a grainy visual texture.
Because motion images run at 24fps and no two frames have an identical grain arrangement, the movement of the 35mm film frame creates a changing granular texture, giving a certain aesthetic quality to the picture.
Nowadays, the majority of movies are shot with digital cameras, graininess is therefore no longer an omnipresent feature of movies. Filmmakers can use editing tools to simulate the look of film grain without having to shoot on photochemical film.
Film Grain vs Digital Noise: How Do They Differ?
Sometimes, “film grain” and “digital noise” are used interchangeably, however, these seemingly similar effects are not the same. In the early years of digital cinematography, picture sensors’ lower light sensitivity and resolution meant that some of the images included digital noise. Instead of actual silver halide crystals, the second effect represents incomplete digital information as pixels. It also happens much less these days, since digital sensors have become far more sensitive.
What Causes Film Grain?
Because celluloid film is an analog technology, film grain is organic and cannot be perfectly calibrated. Many variables can cause film grain. These include:
- Exposure: Significant underexposure and overexposure will both increase the graininess of the film. Typically, underexposure, which occurs when you take pictures in low light, is more likely to cause the grain. However, overexposure will bring out a similar effect, especially in midtones and highlights.
- ISO setting: The ISO setting, also called the film speed, is the film stock’s light sensitivity and is indicated by a number. Film companies such as Kodak provided an array of options: higher ISO film (also called “faster”) is more sensitive to light, yet has bigger and more obvious grain, whereas low ISO film is far clearer, and the grain is less noticeable.
- Development time: Leaving the film in the developer longer than the standard time during photochemical film processing, known as “pushing” the exposure, will increase the grainy appearance of the completed product as well.
Three Methods to Create a Film Grain Effect Digitally
In the age of digital picture capture, film grain is no more a physical part of the picture itself, but it’s a stylistic option. Grain gives the picture a “film look”, contrasting with the ultra-crisp and clear pictures produced by high-resolution digital cameras. You can create the film grain effect using digital photography software, post-production software, or film overlays:
- Noise filter: Digital photography software such as Photoshop often contains a noise filter that you can move up and down to add a more or less film grain effect to still images.
- Post-production software: Original material almost always goes through various changes and can be manipulated and color-corrected on set to allow the director and cinematographer to preview the finished product. In the video editing software, Adobe After Effects and Adobe Premiere Pro usually have plug-ins that apply film grain to the picture. Editors can calibrate the grain size, texture, and structure to achieve the effect they want.
- Film grain overlay: It is often necessary to download a film grain overlay to make the effect in cinema editing. Download a film grain overlay plug-in, add it to a video editor, and then utilize it in conjunction with a blend mode to generate the effect.
For some filmmakers, the clarity of digital video is preferable. Others prefer the texture and softness that grain can bring. Highly grainy pictures may have an effect on the mood of gritty realism, while fine-grain texture can assist in softening contrasting regions of brightness and darkness, even producing a subtle glowing effect. This can lead to a dreamy or nostalgic quality of the experience.
Why Is Film Grain Important in Video Production?
The answer is plain to see: film grain makes the video have a classic feel. Oddly enough, what used to be just a hit-or-miss now creates the impression of higher production values.
Not so obvious reason, however, is that film grain has a specific sense of emotion associated with it. That is also the real reason why film grain is crucial for content creators.
There is a level of grittiness tied to film grain. If utilized properly, that type of noise gives a more natural feel to a video, almost as if that footage is unaltered and unedited. Plus, it makes the movie more authentic which helps pull the viewer into the reality you are attempting to create in your video.
Of course, historical dramas usually integrate film grain. This type of visual “roughness” makes sense in war films, yet these directors are trying to make viewers feel like they’ve traveled back in time as well. Recreating the tied visual style assists in selling that.
There is an instinctive and unconscious nostalgia that film grain evokes in us. Film grain also makes a video or image feel like a shared memory. When you evoke this kind of intimacy, each motion is hit harder, giving you more control over how your video tells its story.
How to Apply a Film Grain Filter to Your Video Using a Good Movie-Making App?
Over the past few years, film grain has gained popularity due to its capability to create an organic aesthetic with minimal fuss. You can add a film grain effect to any video or photo using one of the best free video editing software download available on your computer, tablet, mobile phone, or online.
Today, we’d like to introduce you to a free movie-making app that is loved by many content creators, and it’s called MiniTool MovieMaker. It is perfect for beginners and professionals alike, with a well-designed and uncluttered user interface.
With the help of its beautiful embedded movie templates, you can make personal slideshows with photos and music in just a few taps. There are 4 common aspect ratios from which you can choose, including 16:9 (Widescreen), 9:16 (Portrait), 4:3 (Standard), and 1:1 (Instagram).
You can use it to import video, image, and audio files, apply various elements, make necessary adjustments to the footage, and then export the final video to your computer without any watermarks. And, this free movie-making app is available for Win 7/8/8.1/10/11.
Before learning how to create a film grain filter for video, let’s take a look at MiniTool MovieMaker’s basic and advanced features and tools.
Highlights of MiniTool MovieMaker
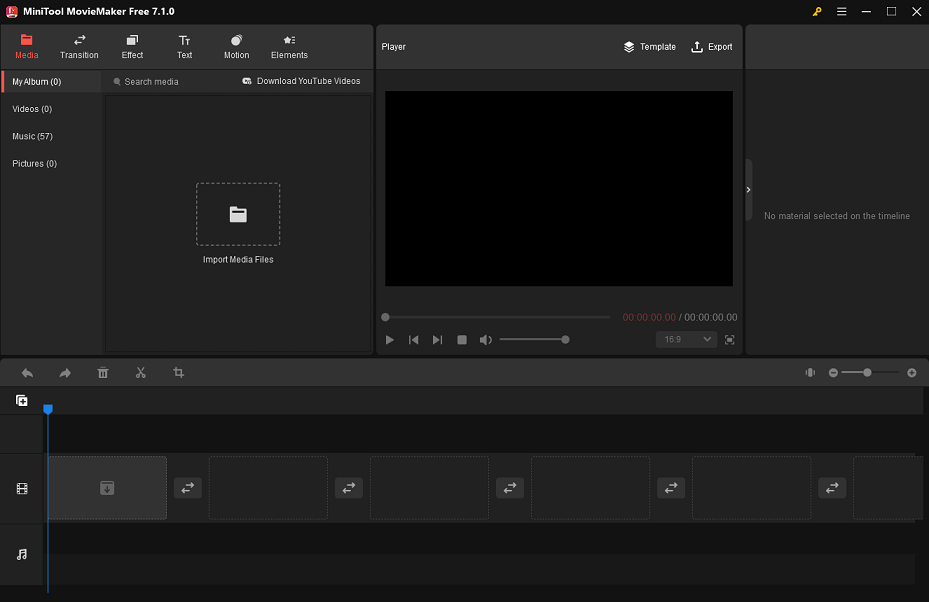
- It offers several types of movie templates, like Travel, Love, Family&Friends, and Festival.
- Under the Media tab of MiniTool MovieMaker, you can access the Music sub-tab to download your preferred music for free and use it to make your video more appealing.
- In the Transition tab, you can gain access to the sub-tabs (Light, Wipe, Advanced, Diagonals, Iris, PagePeel, and Reveals) to choose your favorite transition effect and apply it between two video or image clips.
- Go to the Effect tab > Artistic sub-tab and you’ll see the unique “FilmGrain” filter inside. There are also a variety of filters in the Common, Instagram-Like, MotionBlur, and LUT sub-tabs that you might like.
- Currently, this video editing app is packed with 30+ pan and zoom effects, such as the trending “Zoom in center”, “Zoom out center”, “Pan down”, “Zoom in bottom”, “Pan right”, “Zoom in the center and rotate left”, and so on.
- MiniTool MovieMaker allows you to add multiple captions and animated elements to a video or image clip by dragging and dropping or by using one-click buttons.
- In order to further edit your video, the following handy editing tools are also worth a try: video merger, video splitter, video trimmer, video cropper, video rotator, video flipper, video reverser, and video speed controller.
- If you need to preview what you’re editing on a larger screen, you can click the Full Screen icon located in the bottom right corner of the Player section.
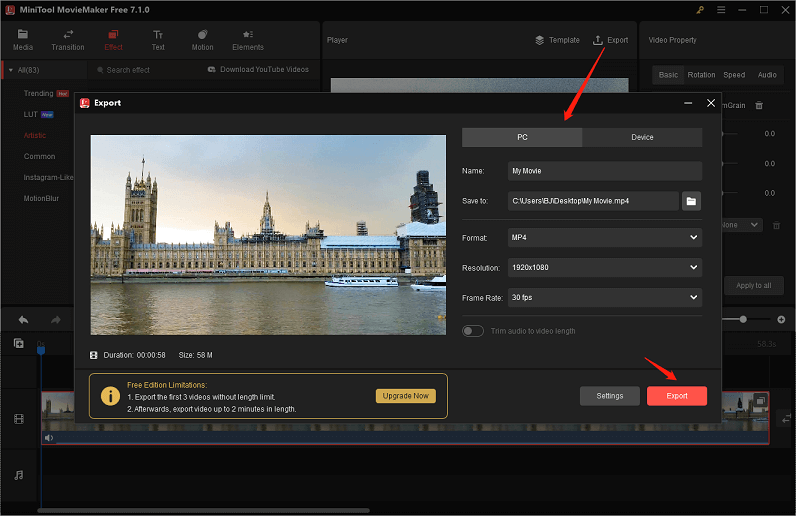
- After making some output settings, like naming the video, selecting the destination folder and output format, and adjusting the video’s quality, resolution, bitrate, and frame rate, you can save the final video to your PC.
- …
How to Add Film Grain to Video
Now, let’s check out the step-by-step guide on how to apply a film grain effect to your video with MiniTool MovieMaker.
Step 1: Download and install MiniTool MovieMaker on your computer.
MiniTool MovieMakerClick to Download100%Clean & Safe
Step 2: Launch MiniTool MovieMaker and close the promotion window to enter its main interface.
Step 3: Click the Import Media Files button to import the video to which you want to add the film grain effect.
Step 4: Instantly drag and drop the imported video into the timeline below.
Step 5: As mentioned above, go to Effect > Artistic to find the “FilmGrain” effect. Click on the Download icon located in the bottom right corner of this effect thumbnail to get it. Next, click the + button to apply the acquired film grain effect to the video on the timeline.
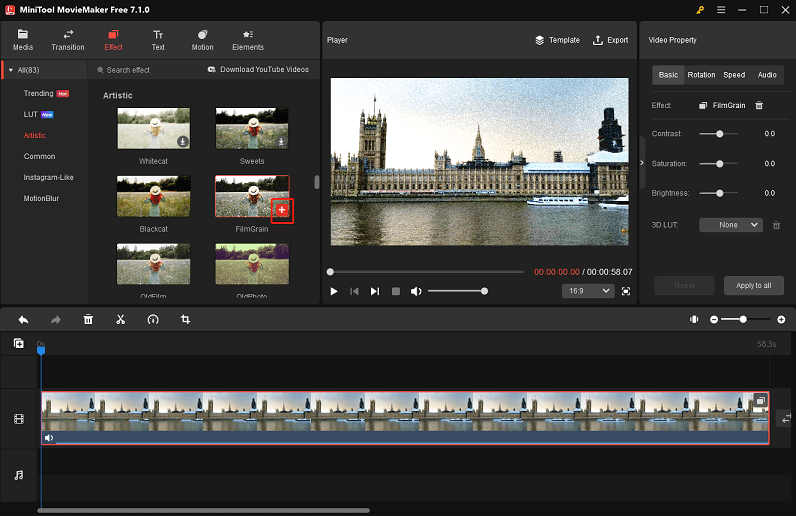
Step 6: Click Export in the top right corner to open the export settings window and customize the output parameters as needed. Finally, click the red Export button to save the edited video to your computer.
Closing Remarks
To summarize, in addition to discussing the film grain definition, this article describes the distinction between film grain and digital noise, what causes film grain, how to create the film grain effect digitally, why film grain is critical for video production, and how to add a film grain filter to your video. Hopefully, all of this about film grain will make it easier for you to improve the look and feel of your project.
Please contact us at [email protected] if you have any questions while using MiniTool MovieMaker.
Read More




User Comments :