

This post explains how to trim videos using MiniTool MovieMaker and Windows Photos. Select the right video editing software, import the target video, and drag the trim handle to remove unnecessary parts.
Why Do We Need to Trim Video?
Quick answer:
- Capture viewers’ attention quickly.
- Reduce unnecessary content.
- Get straight to the point.
- Improve viewer engagement.
There is no doubt that the first seconds of a video are very important. Most viewers judge a video based on the first 15 seconds of content. Thus, we are constantly competing for people’s attention.
In the past, movies used to have long opening credits. However, things changed. Movies start right into the action.
In a word, if you want your videos, like YouTube videos, to have more traffic, you should hook viewers as soon as they start watching. If you want to get more tips for increasing traffic, you can read this post: 8 Powerful Secrets of Increasing YouTube Traffic (100% Works).
The lesson for us is that we need to trim the fat and get to the purpose of the video. Now, the question is how to trim video effectively and quickly.
Don’t worry if you don’t know how to trim video. This post will show you several ways to help you trim video easily and quickly.
How to Trim Video on Windows
Fast Track Steps:
- Download and install a video trimmer.
- Import the target video.
- Drag the trim handles to trim the video.
- Export the trimmed video.
When it comes to trimming videos, you can try video cutter software. However, which one is the best video cutter? Here, we will show you the 2 most commonly used tools: MiniTool MovieMaker and Microsoft Photos.
Method 1: Use MiniTool MovieMaker
MiniTool MovieMaker is a free video editor without watermark for Windows. It offers essential editing tools and various effects to edit and enhance your footage. It lets you trim, split, merge, rotate, reverse, and crop videos, add text, apply transitions, adjust the clip’s color, and more. The software has an intuitive interface, making it suitable for beginners.
 MiniTool MovieMaker
-
 Split and trim videos to remove redundance.
- Change video aspect ratio to match screen sizes.
- Add bubble texts, bgm, transitions, and more effects.
- Create PiP or split-screen videos by multitrack editing.
1. Install the video trimmer
Download and install MiniTool MovieMaker on your computer.
2. Import the desired video
Launch this free video editing tool, then close the Project Library window to enter its main interface. Next, click Import Media Files to open File Explorer, select your video, and click Open. Click the + icon at the bottom of the thumbnail to add the video to the timeline.
3. Trim the video
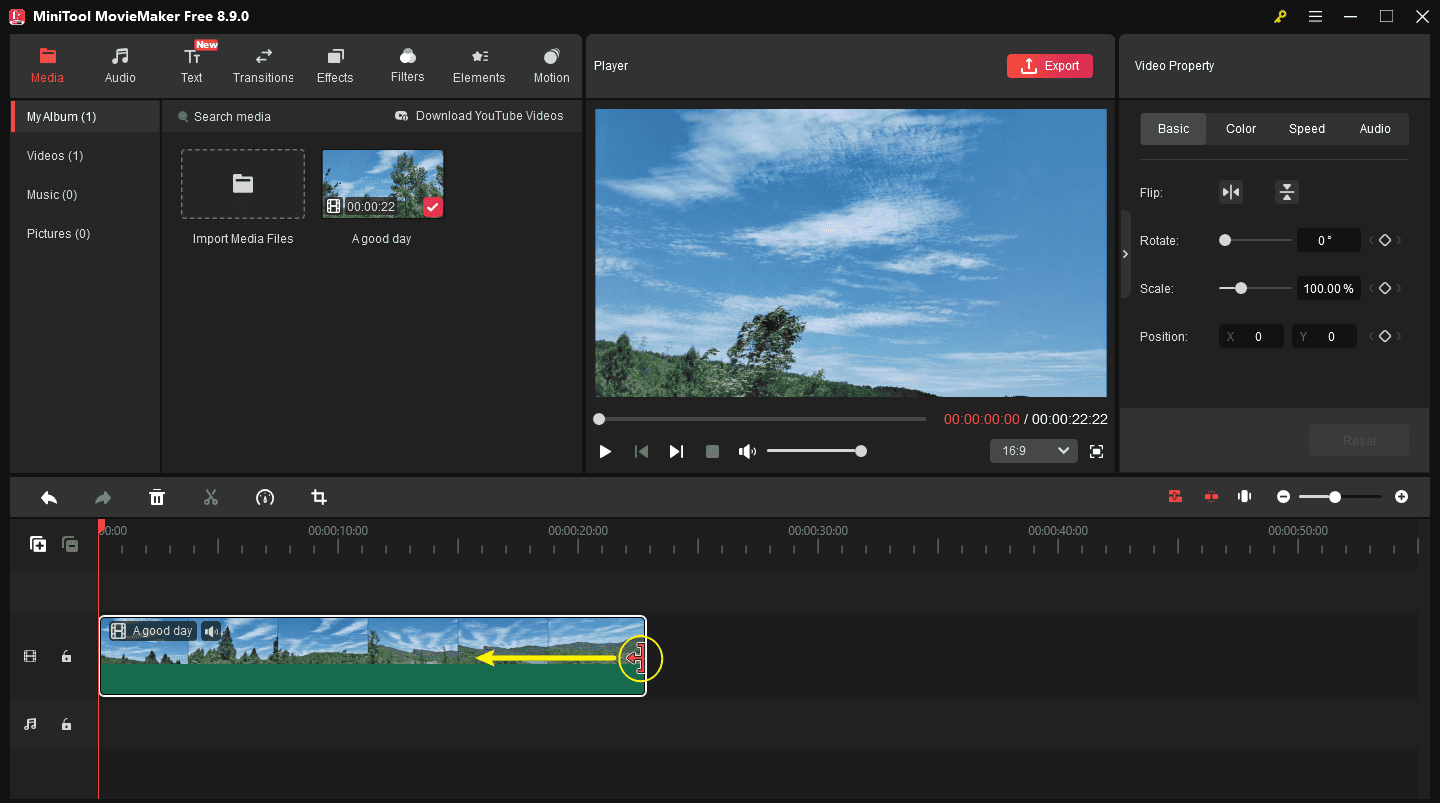
First, click the target video clip on the timeline to select it. Move your mouse over the beginning of the clip until the Trim icon appears, then drag it to the right to trim the unwanted beginning.
Next, hover over the end of the clip until the Trim icon appears again, and drag it to the left to remove the unwanted ending. Adjust both edges until only the desired portion of the video remains.
4. Export the video
Click Export in the upper right of the main window. In the Export pop-up, you can customize the file name, output path, video format, resolution, and frame rate. You can further personalize video Quality (better, best, or good), Encoder, and Bit rate by going into Settings. Click OK and Export to export your file.
The bottom line is that MiniTool MovieMaker is a good tool for us to trim video. Besides, the best video cutter tool has so many other powerful functions. For instance, it can rotate video, it can help to add video transitions into clips, it can help to add text to pictures as well as videos, it can help to convert video into GIF, and it can help to add a filter to photos.
Trimming is intuitive. You drag the left or right edge of your clip in the timeline to shorten it, or you can use the Split tool to cut it at the cursor location. There’s no chance of having empty space in your video, since the clips always snap together after you make a trim.https://www.pcmag.com/reviews/minitool-moviemaker
Method 2: Use Microsoft Photos
If you are running Windows 10 or 11, you can trim a video in the Photos app without installing any software. The Photos app is primarily designed to view pictures and videos, and it also includes a video trimmer. You can only trim videos in the Photos app. If you want more features, such as text and filters, download and install Photos Legacy to access the Windows 10 hidden video editor.
1. Open the video with Photos
Right-click the video file, select Open with, and then select the Photos option from the dropdown menu.
2. Trim the video
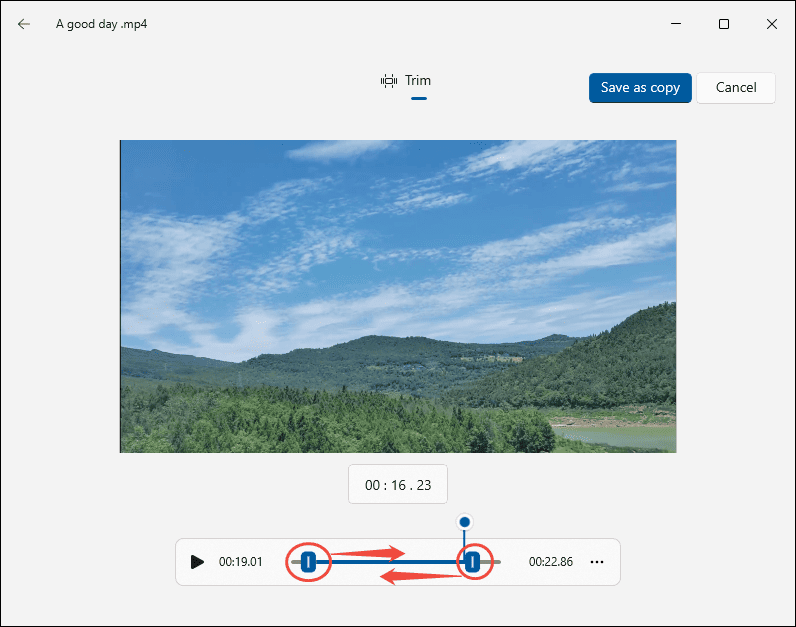
Click the Trim option in the top-left corner of the Photos app. Next, drag the trimming handles at both ends to adjust the start and end of the desired clip.
3. Save the trimmed video
Finally, you can click the Save as button to store the trimmed video on your PC. It might take some time to create a copy of it depending on the file size, quality, and resolution.
The video trimming capability is basic but functional: You set an in point and an out point, and that's pretty much it.https://www.pcmag.com/reviews/microsoft-photos
How to Trim a YouTube Video
Fast Track Steps:
- Visit YouTube Studio and find the target video.
- Open YouTube’s built-in video editor.
- Trim and cut the video.
- Save the edits.
If you need to trim your YouTube video, you don’t have to save it to the device and trim it using a third-party tool. YouTube Studio offers a built-in editor for quick edits. In other words, you can trim and cut a YouTube video, add music, and blur the face or other objects directly on the platform.
1. Open the editor
Open YouTube Studio and select Content from the left sidebar. Find the video you want to edit and click its title or thumbnail. Then, select Editor from the left-hand menu to access YouTube’s built-in video editing tools.
2. Trim and cut the video
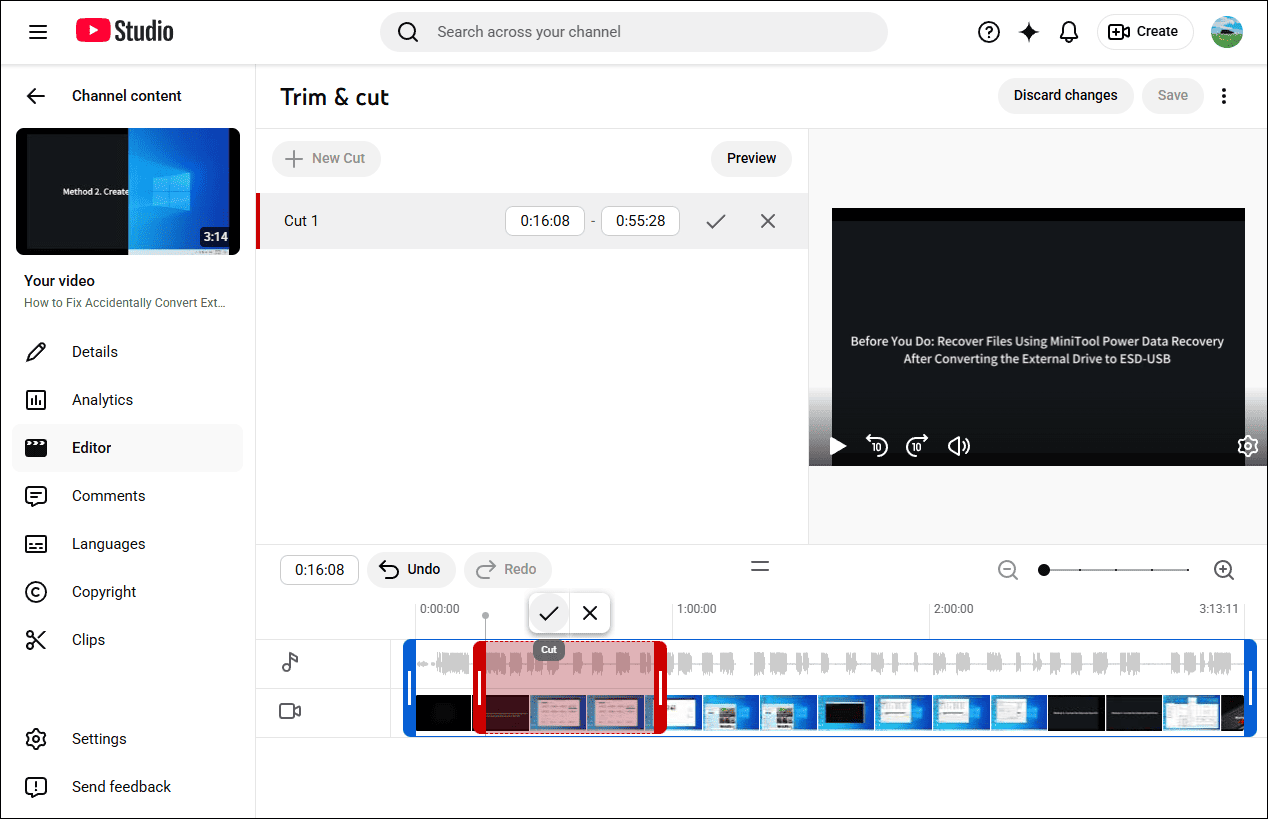
Select Trim & cut at the top of the editor to display a blue selection box on the timeline. Drag either edge of the box to define the section of the video you want to retain; any footage outside the selected area will be removed. Once you’re satisfied with the selection, click Save to trim the video.
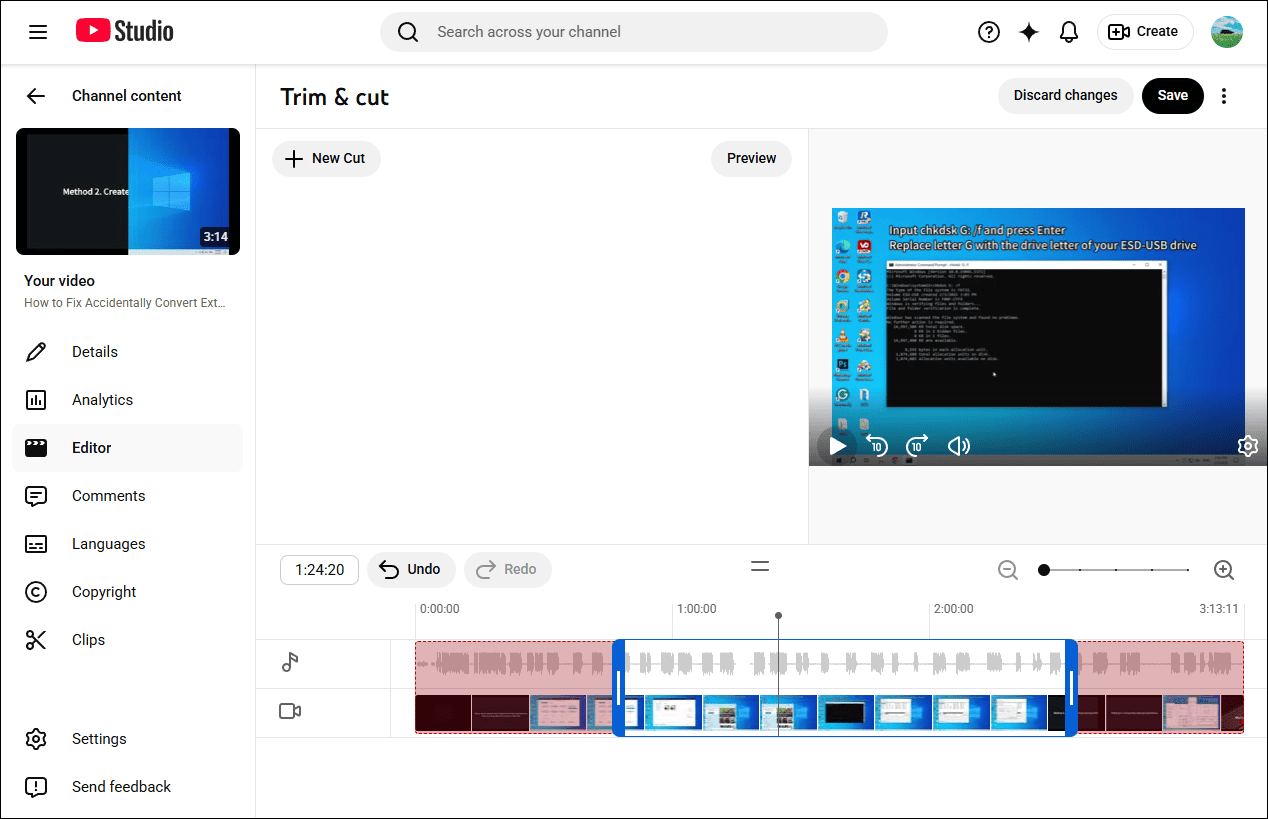
To remove a section from the middle of a video, click Trim & cut, then select + New cut to display a red selection box on the timeline. Drag the edges of the red box to select the portion you want to delete. The footage outside the selected area will be kept. Click the Cut icon (checkmark) to apply the edit, then select Save > Confirm changes to save your edits.
Although it could be argued that if you realise part of your video is in error, trimming it is a solution after the fact.https://www.techradar.com/reviews/youtube-studio
Final Thoughts
It is easy to trim videos on your desktop. You can trim a video before uploading it to YouTube using MiniTool MovieMaker or the Windows 10/11 Photos app. You can also trim a video on YouTube using the built-in editor.
Finally, if you have any problems while using MiniTool MovieMaker, contact the support team at [email protected] for help.
People Also Ask
2. Import the video file you want to trim.
3. Add the video file to the track.
4. Hang your mouse at the edge of the video clips until the trim icon shows up.
5. Drag the trim icon forward or backward to the ending points of the unwanted part to trim it out.
6. Save video.
2. Click Videos, select the video you like to edit.
3. Click Editor.
4. Select Trim. A blue box will appear in the editor.
5. Click and drag the sides of the blue box to trim the YouTube video.
6. Click Save.
2. Choose the View option and select Advanced Controls.
3. Open up the video file you want to edit.
4. Play the video to the starting point from where you want to trim, and then click the Record button.
5. Click the Record button again when you reach the ending point.
6. Save the video.
2. Import your files, drag and drop file to the timeline.
3. Split or trim video.
4. Add video transitions.
5. Apply visual effects to video.
6. Add text to video.
7. Add music to video, or remove the background noise from the original video.
8. Save video.
About The Author

Position: Columnist
Cora is a tech writer specializing in digital media workflows, with over six years of hands-on experience in video post-production, media transcoding, and screen capture. Her writing is always clear and practical. Cora also produces in-depth software reviews for users across skill levels to help them find the right tool and enjoy video editing.
User Comments :