What Is YouTube Video Editor?
A YouTube video editor refers to the video editing software that can edit and beautify the videos that are going to be uploaded onto YouTube online platforms or videos downloaded from YouTube. In most cases, a YouTube video editor applies to the former situation since there are requirements when you try to upload a video to YouTube.
YouTube Video Requirements
The following are the requirements for videos that are planned to be uploaded to YouTube.
# Optimal File Format
MPEG-2
- Audio codec: MPEG Layer II or Dolby AC-3
- Audio bitrate: 128 kbps or better
MPEG-4
- Video codec: H.264
- Audio codec: AAC
- Audio bitrate: 128 kbps or better
# Video Resolution
YouTube prefers high-definition videos. So, you are recommended to upload videos in the highest resolution available to offer the maximum degree of flexibility in the encoding and playback processes.
For videos intended to sell or rent, you need to provide a minimum resolution of 1920x1080p with a 16:9 aspect ratio. For content with or without advertisements, YouTube doesn’t set a resolution limitation but recommends a minimum of 1280x720p for a video that is of 16:9 aspect ratio and a minimum of 640x480p for a video that has a 4:3 aspect ratio.
# Video Bitrate
There is no recommended minimum value for video bitrate since it is greatly dependent on codec. Usually, the common bitrates are 50Mbps or 80Mbps for videos intended for sale or rental.
# Frame Rate
The target videos should be in their native frame rates without resampling. For movie sources, a 24 or 25 FPS (frames per second) progressive master generates the best results. Usually, you need to set the frame rate at 24, 25, or 30 FPS.
You are not recommended to take advantage of resampling techniques for they can result in images to shudder and low-quality videos. Examples of undesirable techniques include upsampling and transfer processes like Telecine pulldown.
Aspect Ratio
Videos to be uploaded to YouTube should be in their native aspect ratios. They mustn’t contain pillarboxing or letterboxing bars. The YouTube player automatically frames videos to make sure that they are displayed correctly without stretching or cropping, regardless of the size of the video or player.
Also read: How to Change the YouTube Video Player Size?
- If the video’s native aspect ratio is 1.77:1 and the total frame size also has a 1.77:1 aspect ratio, use 16:9 matting with square pixels and no border.
- If the video’s native aspect ratio is 1.77:1 and the total frame size doesn’t have a 1.77:1 aspect ratio, use 16:9 matting with square pixels and a single-color border with no variations over time.
- If the video’s native aspect ratio is 1.33:1 and the total frame size also has a 1.33:1 aspect ratio, use 4:3 matting with square pixels and no border.
- If the video’s native aspect ratio is 1.33:1 and the total frame size doesn’t have a 1.33:1 aspect ratio, use 4:3 matting with square pixels and a single-color border with no variations over time.
If the theatrical releases have a pan-and-scan version as well as the original 16:9 version, just upload both versions separately.
# Minimum Audio-Visual Duration
Excluding black and static images in the video channels and silence and background noise in the audio channel, there should be at least 33 seconds for a video.
If you can’t encode your videos according to the above-preferred specifications, you are still able to submit them in .WMV, .AVI, .MOV, or .FLV formats. If so, you are recommended to upload the highest quality video as possible as you can. Then, YouTube will reencode your video files as necessary. Yet, your video quality may not be good. Your videos may be ineligible for HQ encoding.
Does YouTube Have a Video Editor?
Yes, YouTube does have a built-in video editor. Relying on that self-contained video editor, you are able to trim and cut your video, enhance it with music, as well as blur some areas in the video. Although the YouTube embedded video editor only has simple video editing features, it is enough for most common YouTubers.
How to Do Video Editing on YouTube?
Now that YouTube has its own video editor, let’s see how to make use of it.
You can cut out the start, middle, or end of your video when it is already uploaded to YouTube. There is no need to trim it offline and reupload it. So, the URL link address, views, and comments of the video will not be cleared. Yet, this utility is only for videos shorter than 6 hours.
If your video has more than 100K views, you may not be able to save changes to it except to blur faces. Yet, this restriction doesn’t apply to channels that are in the YouTube Partner Program.
How to Trim a YouTube Video?
Where is the YouTube video editor and how to crop a video with it? Let’s have a look!
Step 1. Sign in to YouTube Studio.
Step 2. Select Content in the left menu.
Step 3. Click the thumbnail or title of the target video.
Step 4. Then, choose Editor from the left panel.
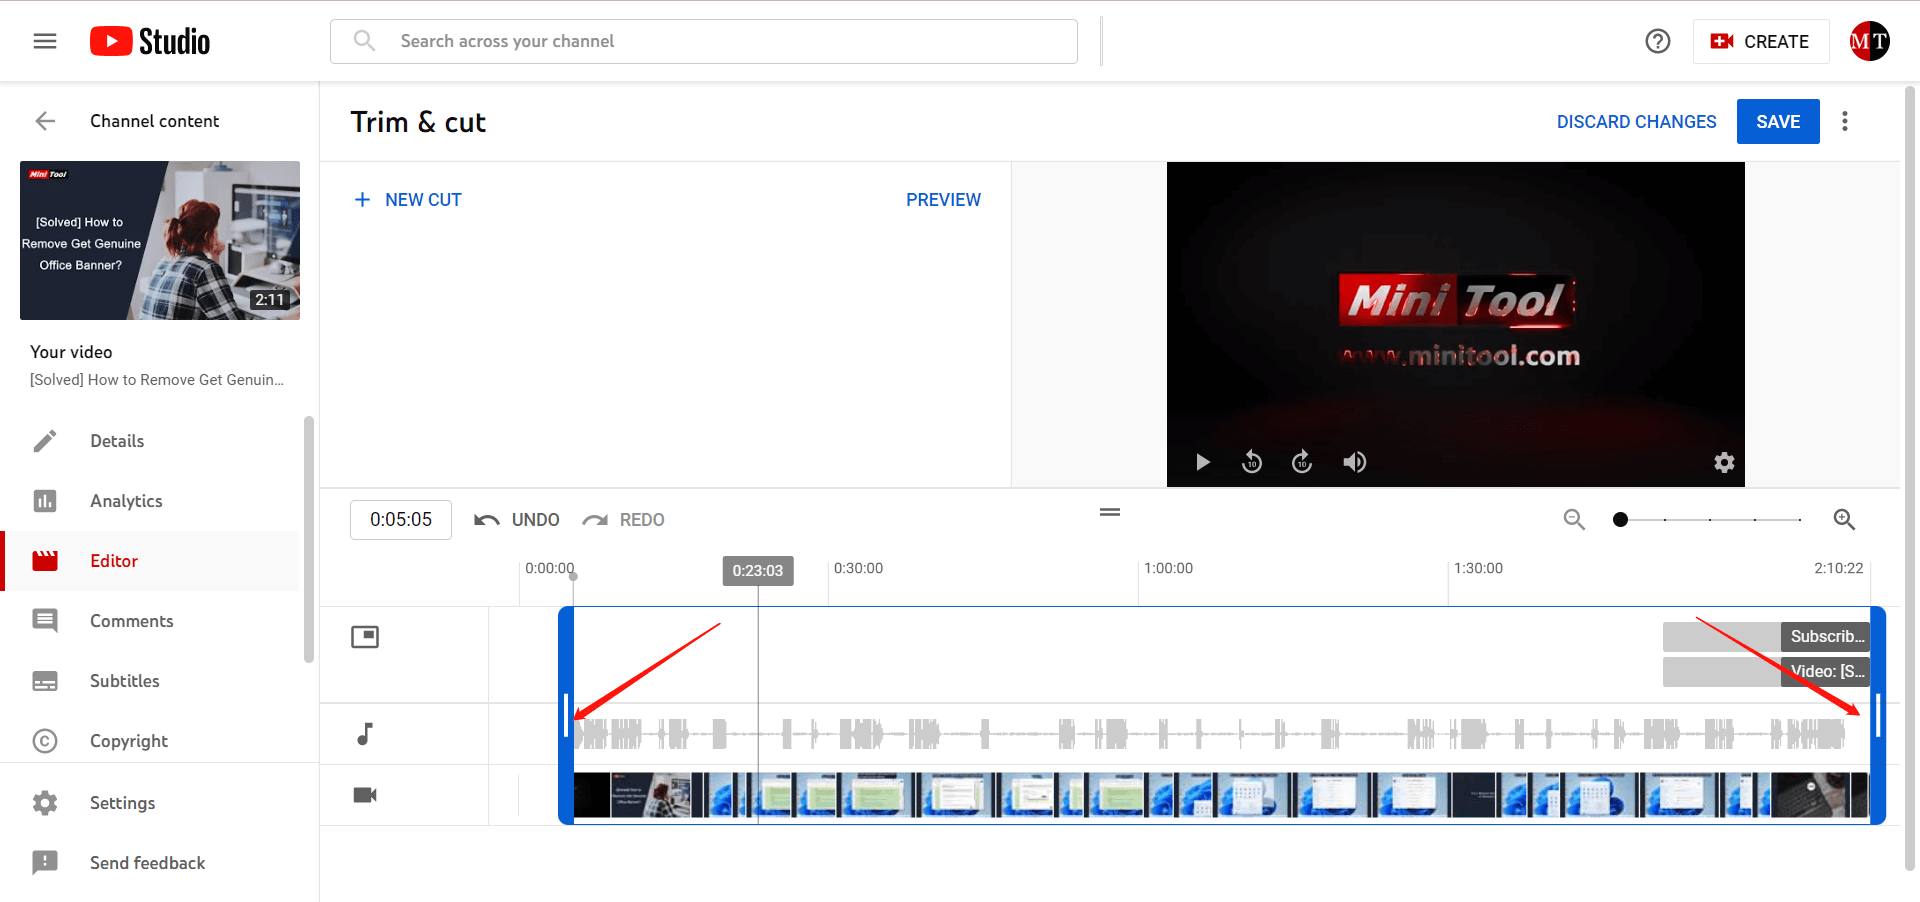
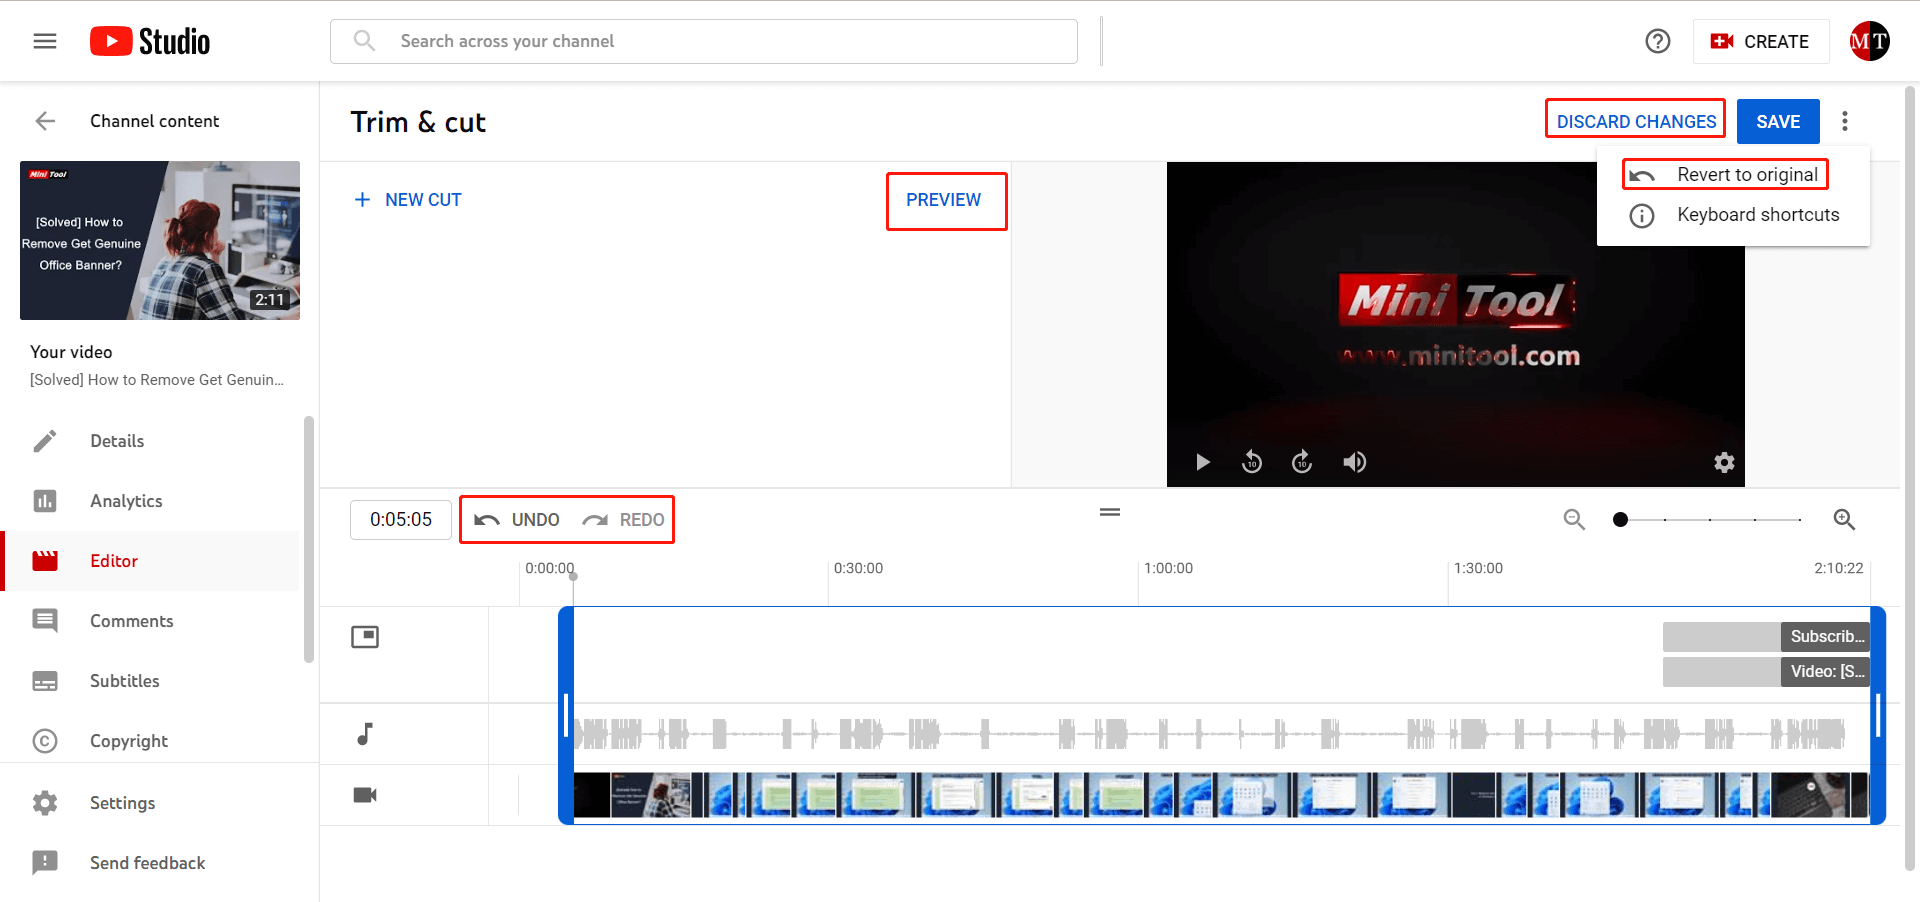
Step 5. Select the Trim & cut option on the next screen. Then, a blue box will appear in the below timeline/track.
Step 6. Drag the left side of the blue box rightward until the start of the section that you want to keep.
Step 7. Drag the right side of the blue box leftward until the end of the portion that you want to keep. That is to say, the clip that is covered by the blue box will be retained while the parts outside the box will be removed.
Step 8. Click the Save button from the upper right to save the changes.
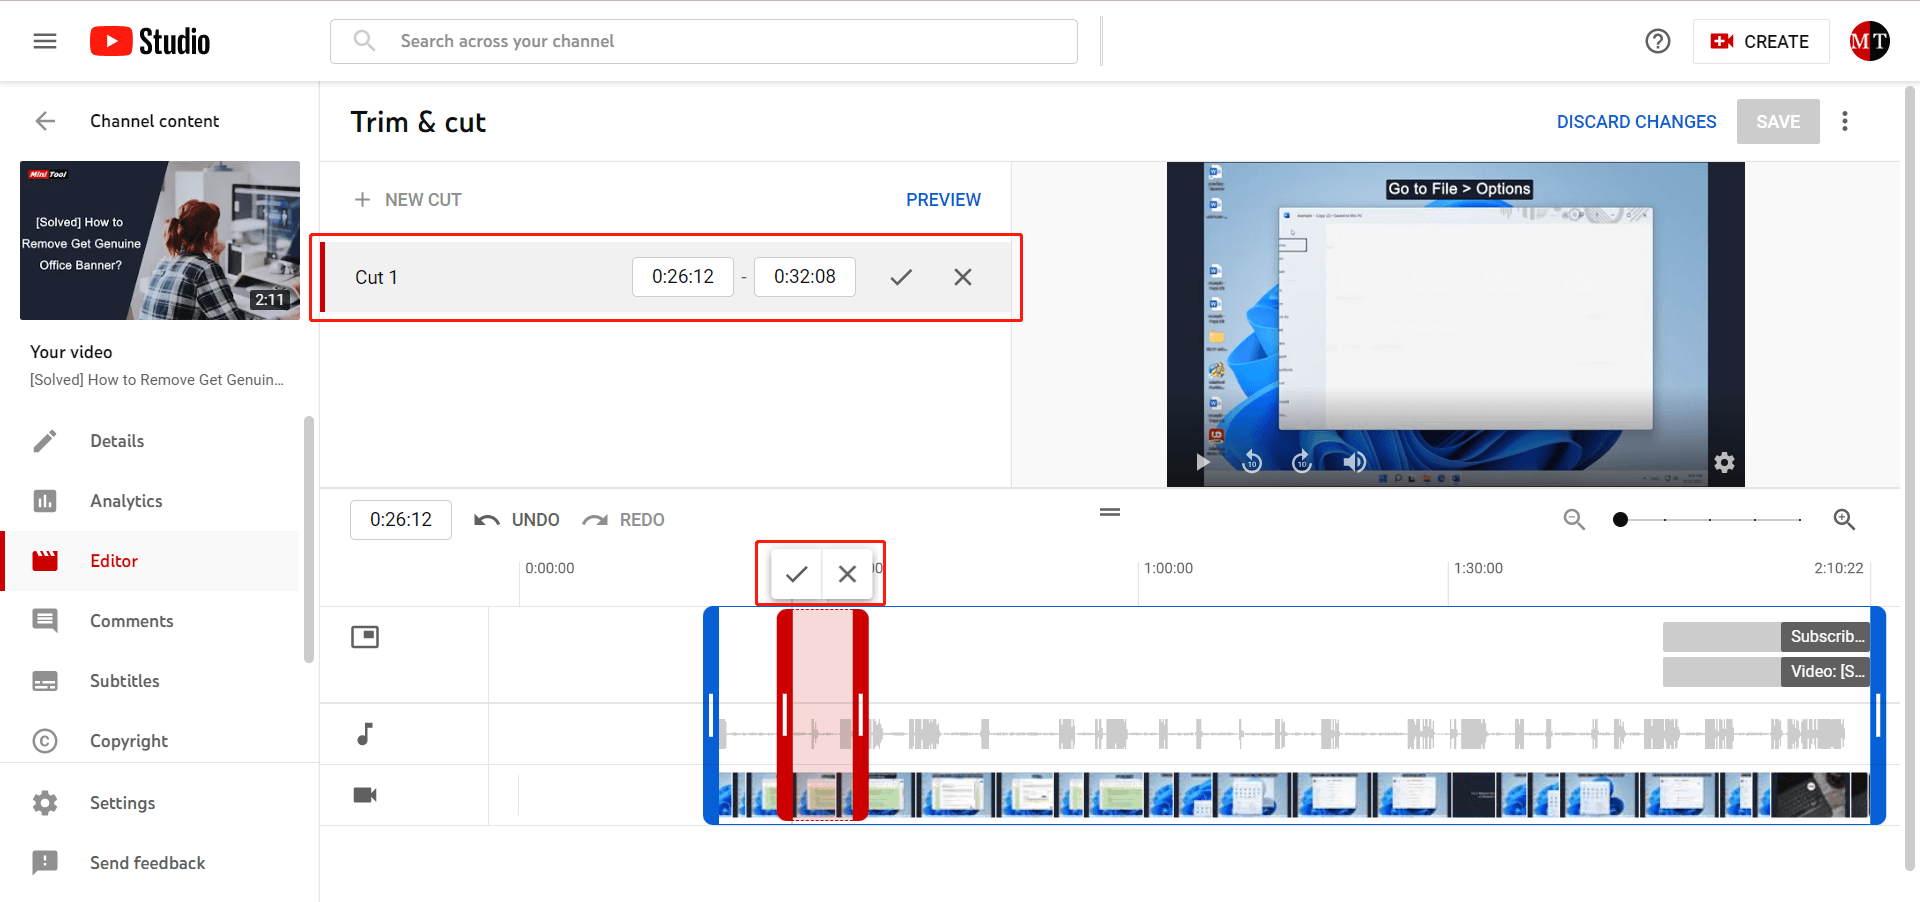
How to Cut a YouTube Video?
When you successfully reach the editor screen in YouTube Studio. You can take out a section of your video with the following steps.
- Select Trim & cut and choose NEW CUT. Then, a red box will appear on the track.
- Drag the sides of the red box until the red box cover the section on the video that you plan to delete. You can make a precise selection by inputting the start and end time points of the unwanted part under the NEW CUT option.
- Click Cut (hook icon) to confirm the selection. Or, click Cancel (cross icon) to discard the selection.
- Click Save.
How to Blur a YouTube Video?
You can blur parts of your video on a computer in YouTube Studio. After reaching the video editor in YouTube Studio, click Blur and then select Face blur or Custom blur.
Face Blur
If you choose Face blur, YouTube will start processing your video to detect human faces. Once detected, select the faces you’d like to blur and click APPLY. Then, click and drag the box to adjust the blur. Finally, click SAVE.
Custom Blur
If you select Custom blur, you can specify the period where you’d like to put the mask, from which time point to which time point. Also, you need to select Blur Shape (Rectangle or Oval) and Blur Behavior (Track object or Fix blur position). After clicking and dragging the box in the preview section to adjust the area in the video where you’d like to put the mask, click Save to save changes.

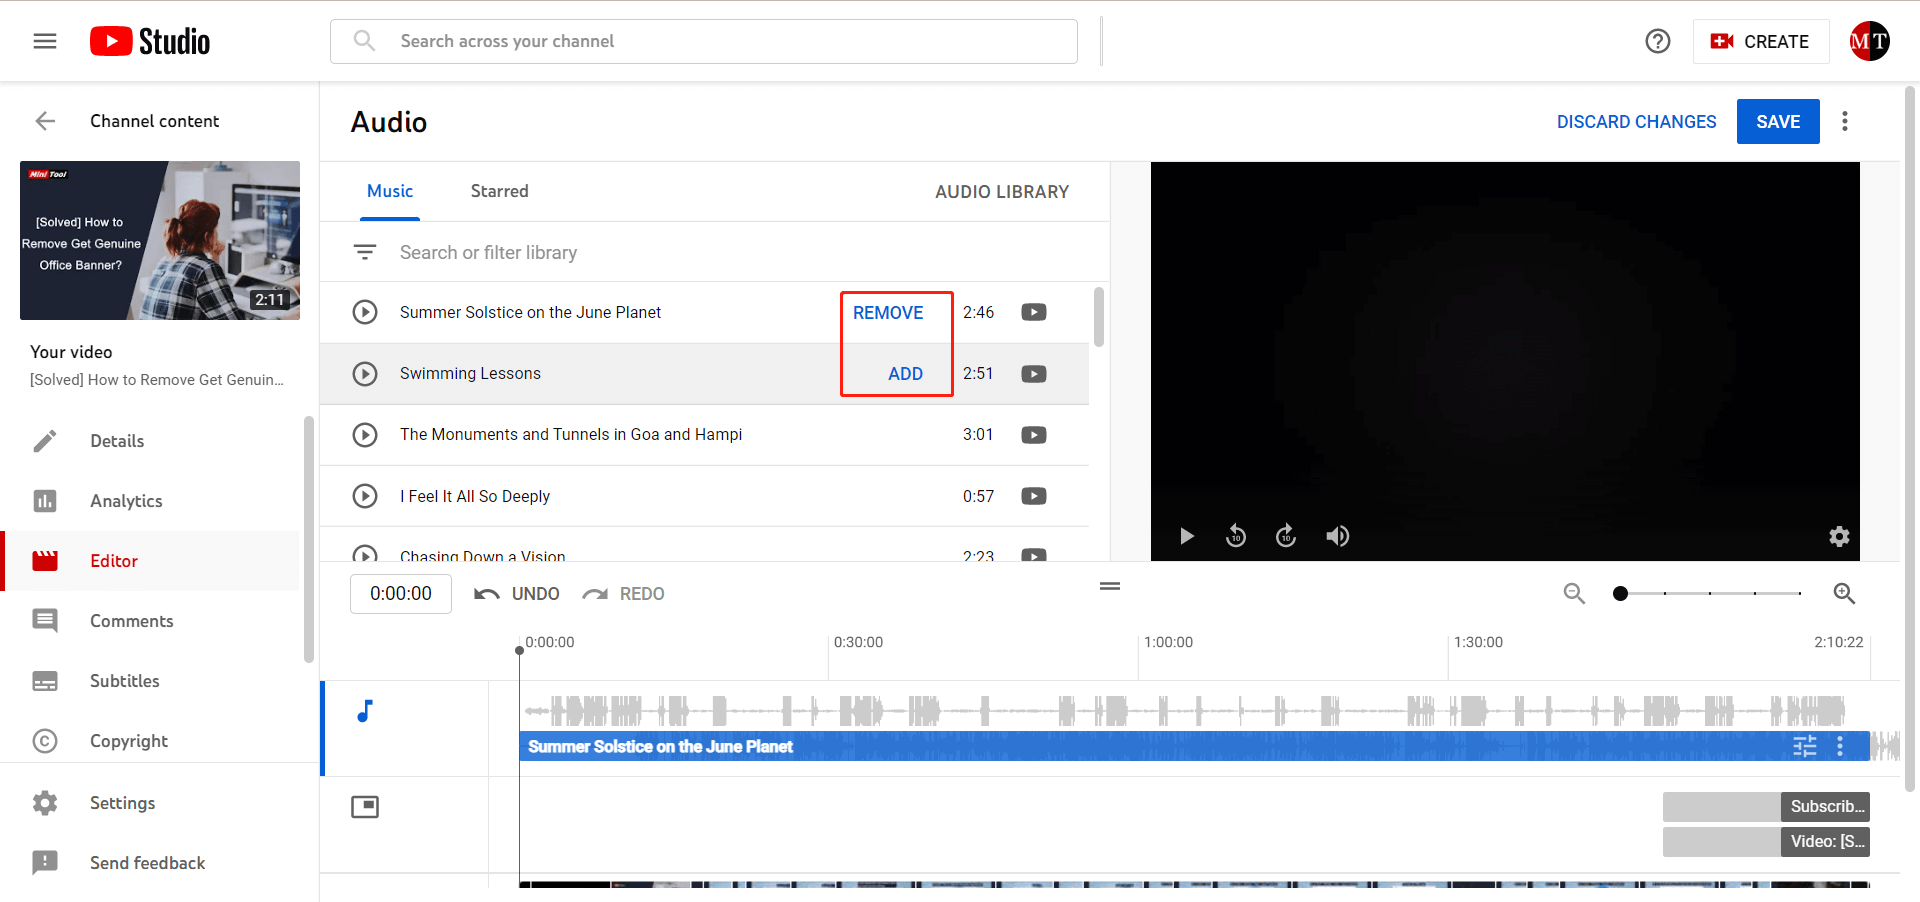
How to Add an Audio to a YouTube Video?
When you are on the editor page of YouTube Studio, click Audio. Then, it will give you a list of music and a list of Starred audios for you to choose from. You can use those audio tracks in any of your videos freely including videos that you monetize. You can add more than one audio track to a single video.
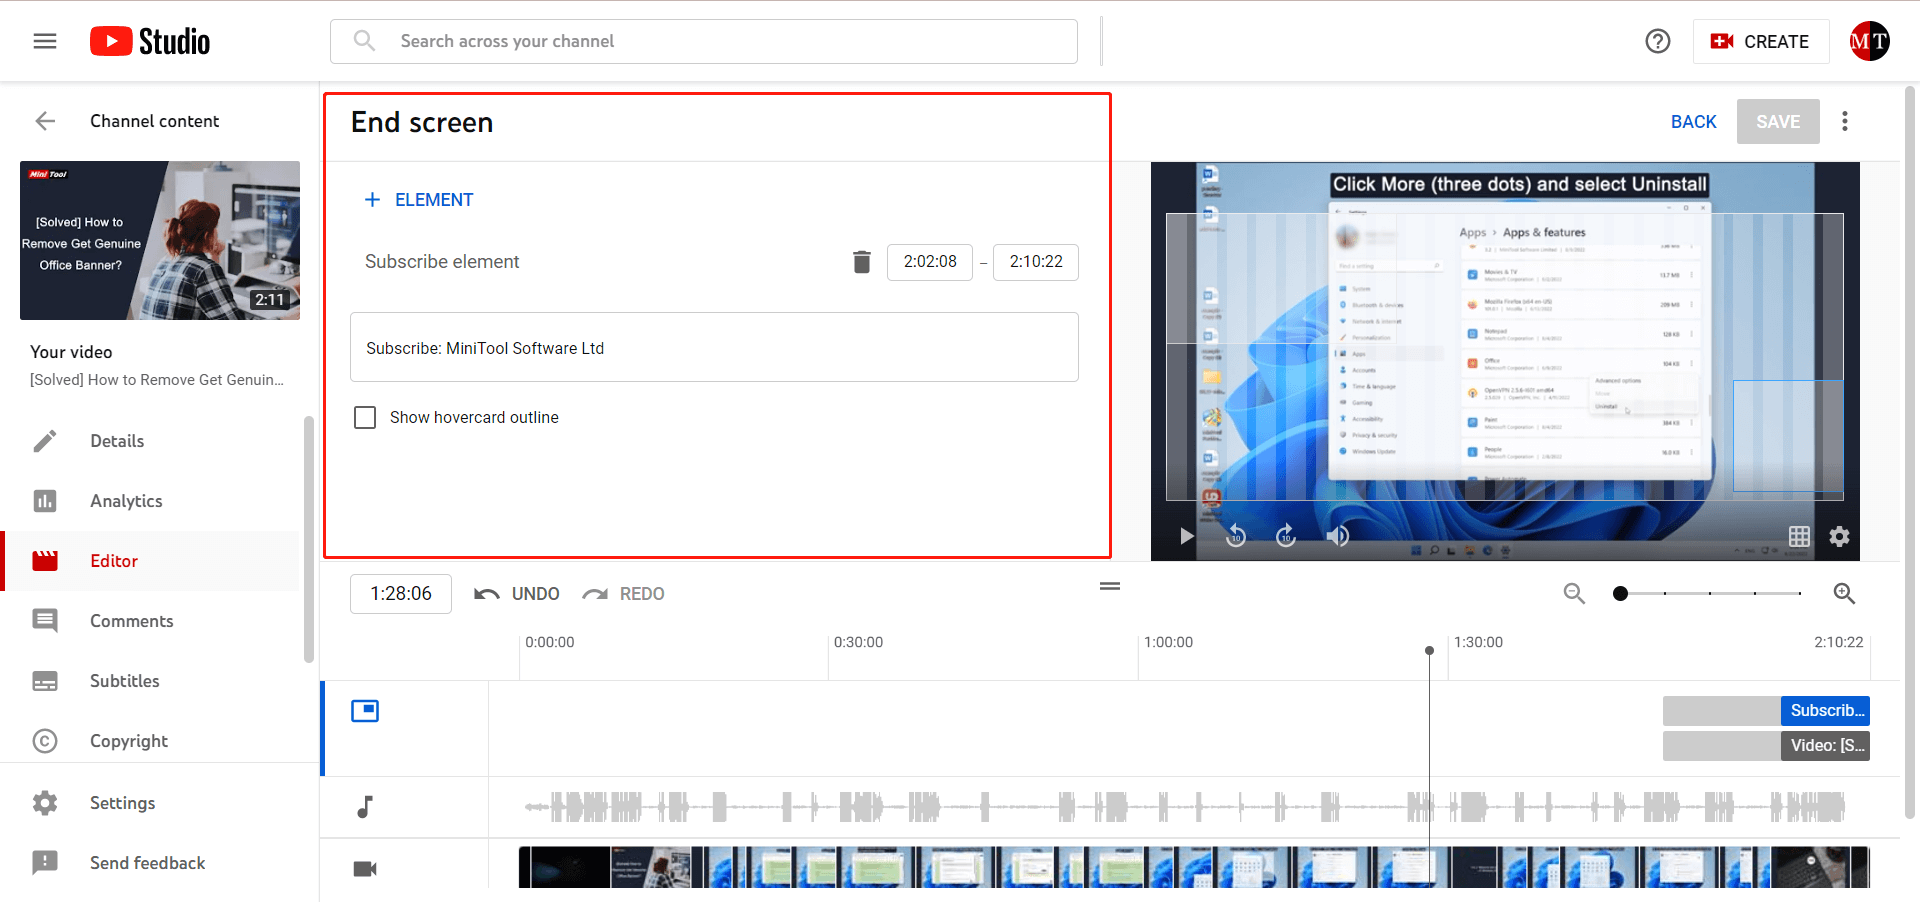
How to Add an End Screen to a YouTube Video?
Similarly, click the End screen in the video editor. Then, click ELEMENT to pick up a type (video, playlist, subscribe, channel, or link). You can personalize the element duration.
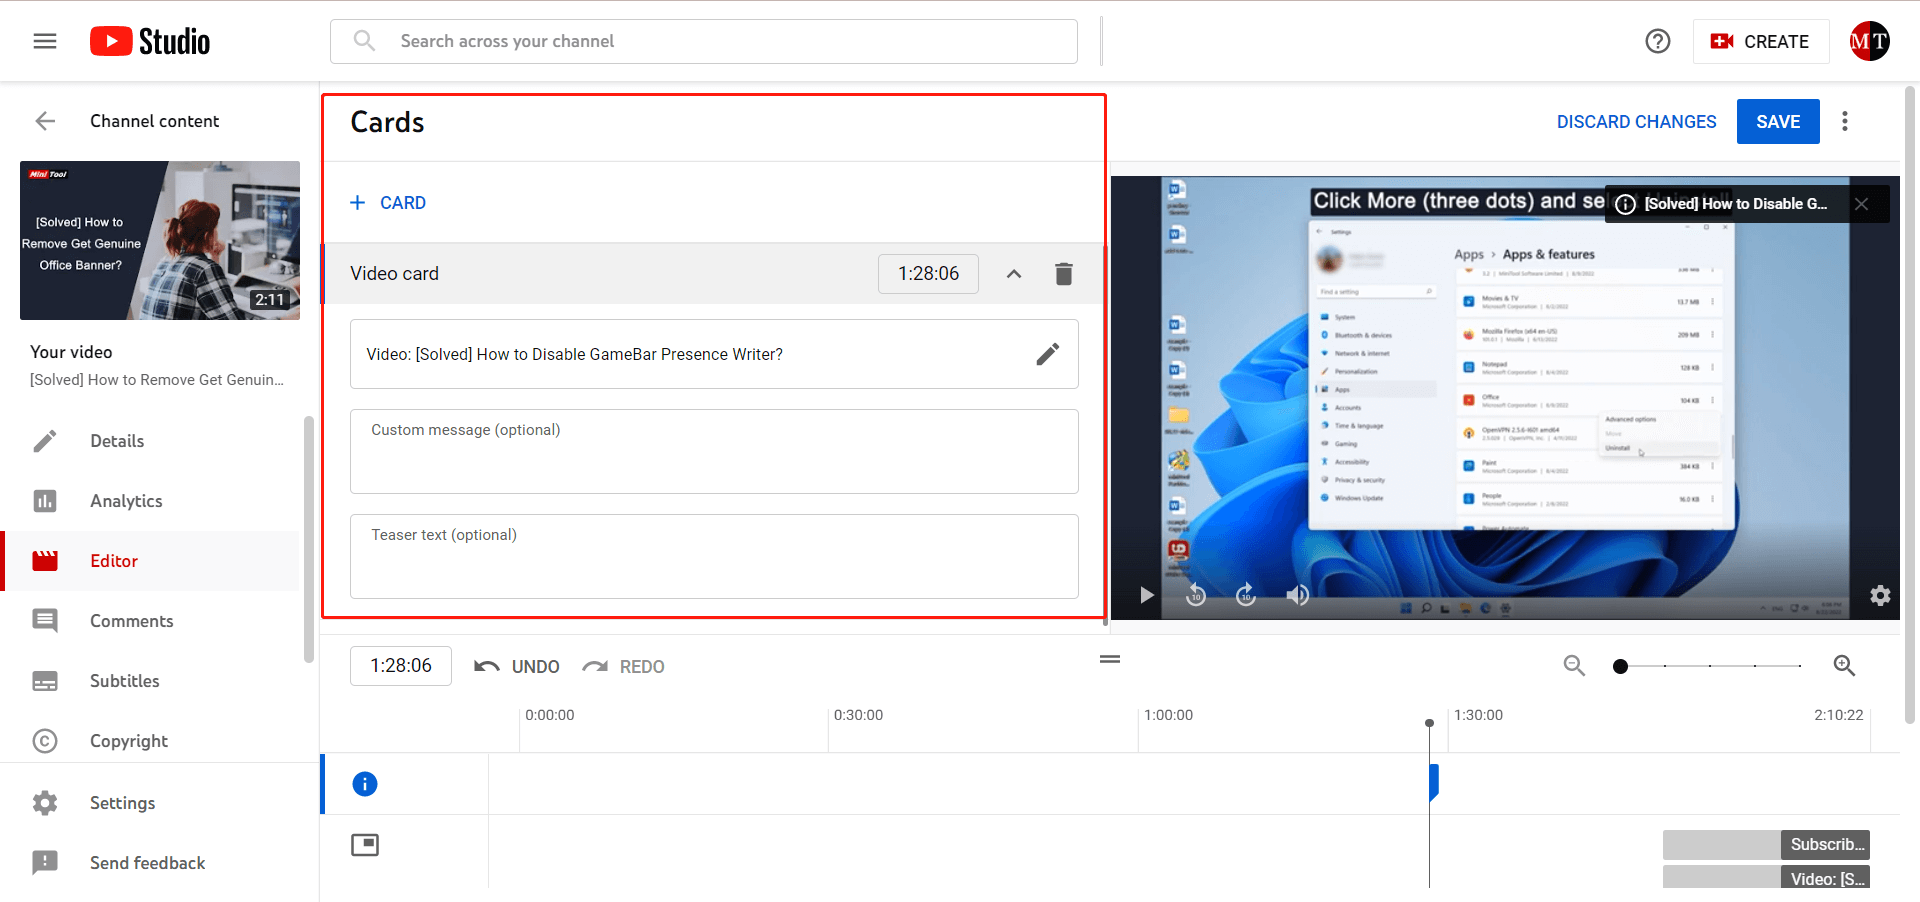
How to Add Info Cards into a YouTube Video?
Lastly, let’s see how to add info cards to your video. It is just a piece of cake. Just click Info cards and choose a type: video, playlist, channel, or link; and then follow the instruction.
Other Options in YouTube Video Editor
- PREVIEW: preview your edition.
- UNDO: cancel your last edition.
- REDO: cancel your last cancelation and redo your canceled operation.
- DISCARD CHANGES: remove your edition any time you want before saving.
- Revert to original: remove any unsaved changes that you made to your draft. Click the More (three dots in the upper right) icon and you will see this option.
Until now, you have learned all the features of the YouTube video editor service. It can satisfy your simple needs for video editing. Yet, if you want to truly liven up your work with titles, effects, motions, transitions, stickers, or other elements, you need professional and reliable YouTube video editing software.
Best Video Editing Software for YouTube Beginners
What is the best video editing software for YouTube? It is called MiniTool MovieMaker. MiniTool MovieMaker is a good video editor for YouTube. It can not only edit your videos with similar features mentioned above but also offer you more advanced functions.
YouTube video editor download:
MiniTool MovieMakerClick to Download100%Clean & Safe
How to use the YouTube video editor? See the below guide!
- Download, install, and launch MiniTool MovieMaker on your Windows PC.
- Click Import Media Files to add your video that is going to be uploaded to YouTube.
- Click the + icon on the bottom right corner of your video to add it to the below timeline.
- Click on the video on the track and select the element you’d like to add to your video.
- Transition: merge two video clips.
- Effect: cover a video with a special tone.
- Text: describe a special moment in a video.
- Motion: display a video in a set routine, for example, from upper right to lower left.
- Elements: add stickers to a video.
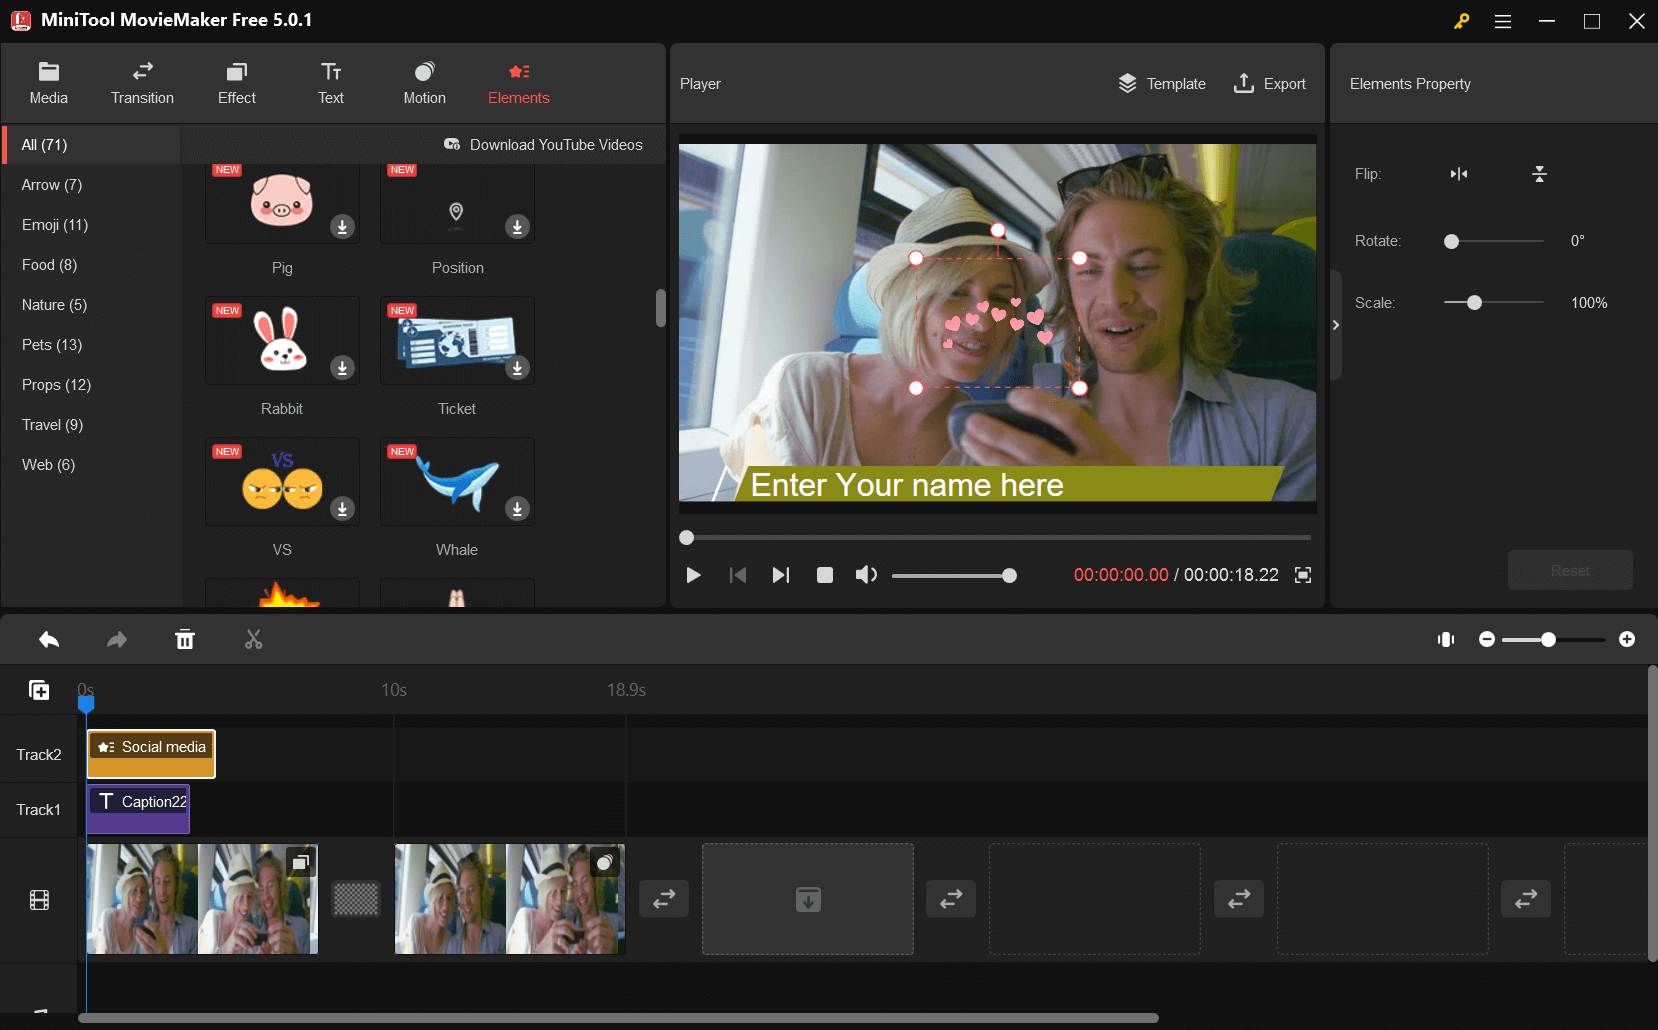
Besides, you are able to manage the source video itself by changing its contrast, saturation, brightness, and playback speed; adding a 3D LUT to it; flipping or rotating the video; as well as reversing the video. If the source video has a sound, you can further fade in/out the sound or change its volume.
Finally, when all settings are done, click the Export option in the upper right to save your edition. Don’t forget to choose a file format, encoder, resolution, and bitrate within the above YouTube video requirements.
Moreover, if your video isn’t the eligible file format to be uploaded to YouTube, you need to first convert its format. MiniTool Video Converter can help you convert most file formats to the YouTube accepted ones, including resolution, codec, bitrate, and frame rate.
If you want to watch a YouTube video posted by others offline, or further change its quality to watch offline, you can rely on MiniTool uTube Downloader, which is a YouTube video downloader editor, to get that video and convert its formats with the program’s Video Convert feature.
Conclusion
Until now, you have learned the eligible video formats to be uploaded to YouTube, the built-in YouTube video editor, as well the free video editing software for YouTube – MiniTool MovieMaker. If you have anything related want to share, please leave a comment below. If you encounter any problems while using MiniTool products, please contact [email protected].
Also read:
- [Review] A Full Introduction to Web Browser Video Editors
- A Collection of iPad Video Editors: Free/Paid or Simple/Advanced
- Video Editor Reviews Windows 7 – Edit Videos Without Watermark
- Does Windows 11 Have a Video Editor – Yes, It Has Many!
- Windows 11 Video Editor Transitions: Full Review + User Guides
About The Author

Position: Columnist
Helen is a tech writer with over 10 years of experience. She specializes in creating easy-to-follow guides for video editing, media file conversion, and computer performance. Helen doesn't just write—she tests every software herself and listens to feedback from users and experts. Her goal is to make complex programs simple so that everyone can solve their tech problems with confidence.
User Comments :