This post will teach you how to add text to photos using the Windows built-in Paint app and third-party applications, such as Adobe Photoshop and the movie maker from MiniTool. Whether you want plain captions, bubble text, or curved text to transform your images, you can find a solution here.
A picture is worth a thousand words, but sometimes it needs text to convey more messages or add personalization. Although it’s simple to add text to photos, this post revisits the topic to help you enhance your images by adding personalized text.
In this post, you’ll learn about the power of text, basic principles to add appropriate text, and step-by-step tutorials on putting creative text on your pictures.
Why Add Text to Photos
First of all, let’s take a quick look at the importance of text on images, or in other words, the power of text.
1. Provide Background Information
A photo can capture beautiful moments, but sometimes it can be ambiguous because it lacks essential information, including “who, what, when, where, and why”. Adding text can provide supplementary information to the picture, compensating for the inability of a still image to tell stories.
For instance, you can add captions to give the specific date, names of all participants, or the place of an event to help you better preserve precious memories. For a product image, add text to highlight its key features.
2. Enhance Storytelling and Emotion
Text on images also serves as a symbol of your current feelings or anything else you want to express. It also guides the viewer’s emotional response and strengthens the narrative of the photo, helping audiences better understand the significance of the moment captured.
3. Protect Your Work
Text can also function as a watermark to protect your images. Nowadays, photos can easily be saved and shared. If you don’t want your picture to be stolen or used, you can put text on it for copyright protection or branding.
4. Improve Social Media Engagement
Eye-catching text can make photos stand out on social media feeds, attracting viewers’ attention and encouraging shares. Additionally, you can add a strong call-to-action to drive engagement for marketing purposes.
Text acts as an important tool that bridges the gap between the visual, context, and emotion of the image to drive better understanding. To help you add effective and appropriate text to your pictures, let’s continue learning several basic principles of text design.
Design Principles of Adding Text to Photos
Take the following considerations into account when inserting text to elevate your images.
1. Choose the Right Font and Size
First, choose a font that matches the overall effect and tone of your image. Second, consider readability. Ensure the text is clear and easy to read; otherwise, it loses its purpose. Furthermore, avoid using multiple fonts on a single image. Generally speaking, a picture is better to have at most 2 fonts. To highlight important information, you can bold or italicize certain text.
2. Select the Appropriate Color
To make text stand out from the background, you must choose the right color that ensures both readability and aesthetics. Whether you prefer a solid color or a gradient, make sure that the color matches the overall tone of your image. If necessary, you can add a subtle stroke or drop shadow to the text to make it noticeable.
3. Place Text Wisely
It’s also crucial to place text in an appropriate position on the image. Text doesn’t necessarily have to be centered. For instance, if you just want to leave a date, it can be at the bottom or corners of the image. If your text is important, such as a title and key features of a product, then it must be centered or placed at the top.
4. Simplify Your Content
Simplify your words and don’t cram text into every corner of your picture. Give text and the image room to breathe. Excessive lines of text will obscure the details of the image and make it less appealing.
Text provides context and emotions behind an image. After knowing the effective tips for creative text, let’s see how to add text to a photo on your Windows PC.
How to Add Custom Text to Photos
Microsoft Windows has developed several applications that make it easy to edit your photos. While the primary Photos app does not have a text tool, there are still two built-in apps to add text to photos.
Method 1: Use Paint
Paint is a simple raster graphics image editor that allows you to resize, rotate, flip, and crop images, and add text.
Step 1: Open the Target Photo with Paint
Right-click on your image, then select Open with from the dropdown list, and click Paint.
Step 2: Add Text
Click the Text icon (a letter A) at the top and click the desired area on the image to add a text box. Enter your words and adjust the font, size, color, and other settings.
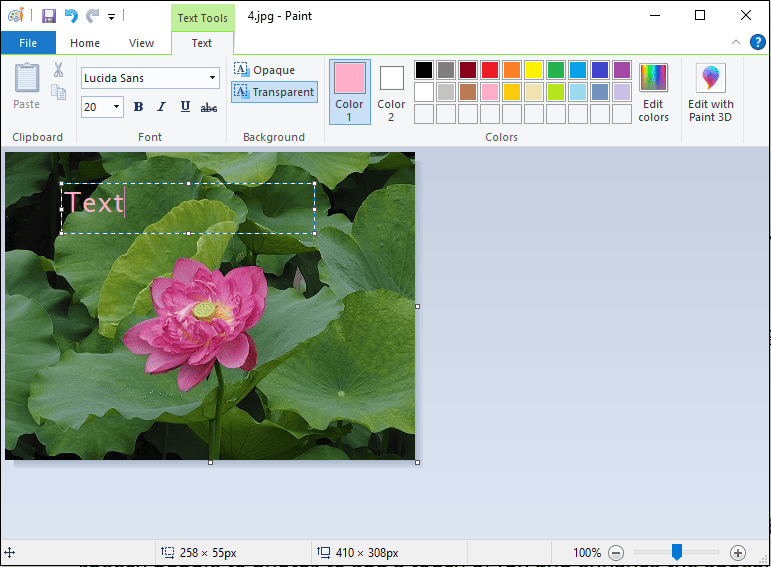
Step 3: Save the Picture
Click File in the upper-left corner and choose Save or Save as to save the edited photo.
Method 2: Use Paint 3D
Paint 3D is also a free and beginner-friendly application for raster graphics. However, it won’t be available in the Microsoft Store or receive further updates starting on November 4, 2024. If it’s still available on your PC, you can try this application to insert text into your picture.
Step 1: Add Your Photo to Paint 3D
Type “Paint 3D” in the search box and open the matching result. Then, click Open > Browse files to open your picture.
Step 2: Insert Text
Click the Text option at the top toolbar and drag a box on the image. Type your content and then customize text by adjusting the font, size, color, and other settings.
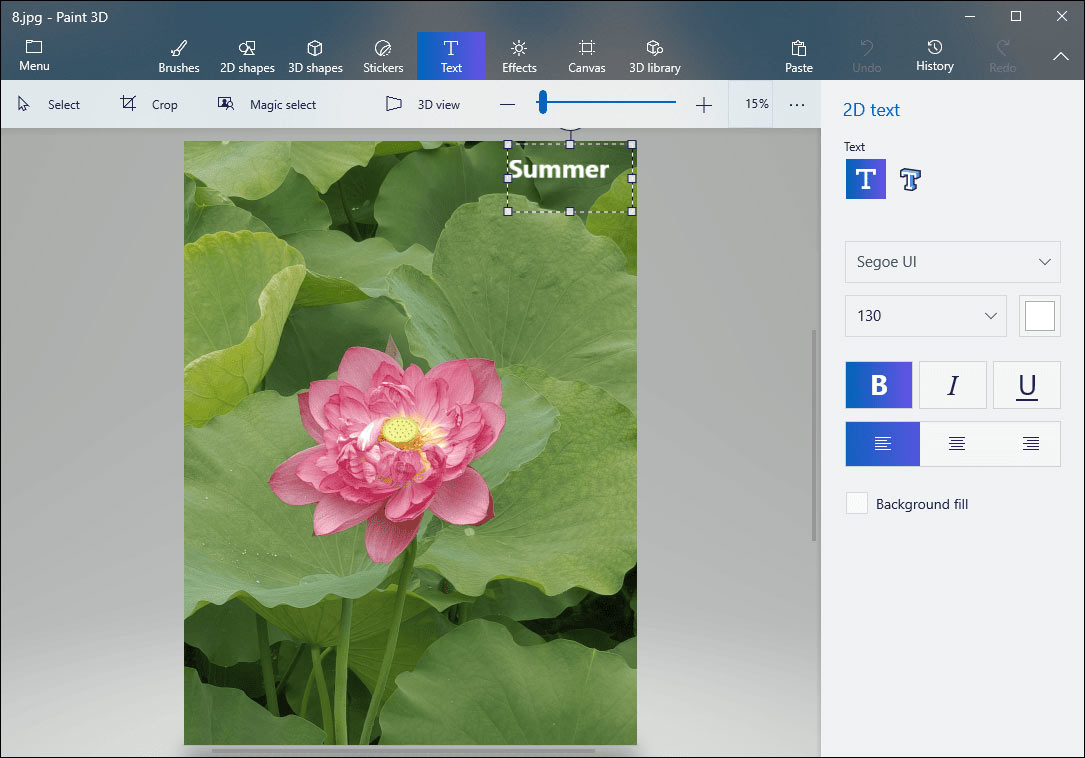
Step 3: Save the Image
Once done, click Menu, then select Save or Save as to save your photo.
Paint and Paint 3D can be accessed easily to add text to photos. During my test, I found that after confirming the text, I was unable to select it for further editing. Sometimes this can be not very pleasant. The good news is that the following tools will break this limit.
How to Add a Speech Bubble to Photos
Sometimes plain text can be dull, while a speech bubble makes things different. You can add a speech bubble to a photo to add a touch of fun and enhance the appeal of your text, make text stand out on the screen, and catch the eyes of viewers.
How to add speech bubble to photos for free? MiniTool MovieMaker is your best solution. As the name suggests, it is primarily a video editor without watermark designed for everyone to create video from images in minutes. Beyond that, it can work as a simple photo editor that enables you to add text, stickers, filters, and more to enhance your images.
Benefits of MiniTool MovieMaker
Why does this application come to the first choice for adding bubble text to photos? Here are the reasons.
- An intuitive interface makes it suitable for entry-level users.
- It’s free to use and doesn’t have watermarks.
- Flexible layers and drag handles for editing text.
Follow the steps below to add speech bubble to photo using MiniTool MovieMaker.
Step 1: Download and Install
Click the download button below to download and install the photo text editor on your computer.
MiniTool MovieMakerClick to Download100%Clean & Safe
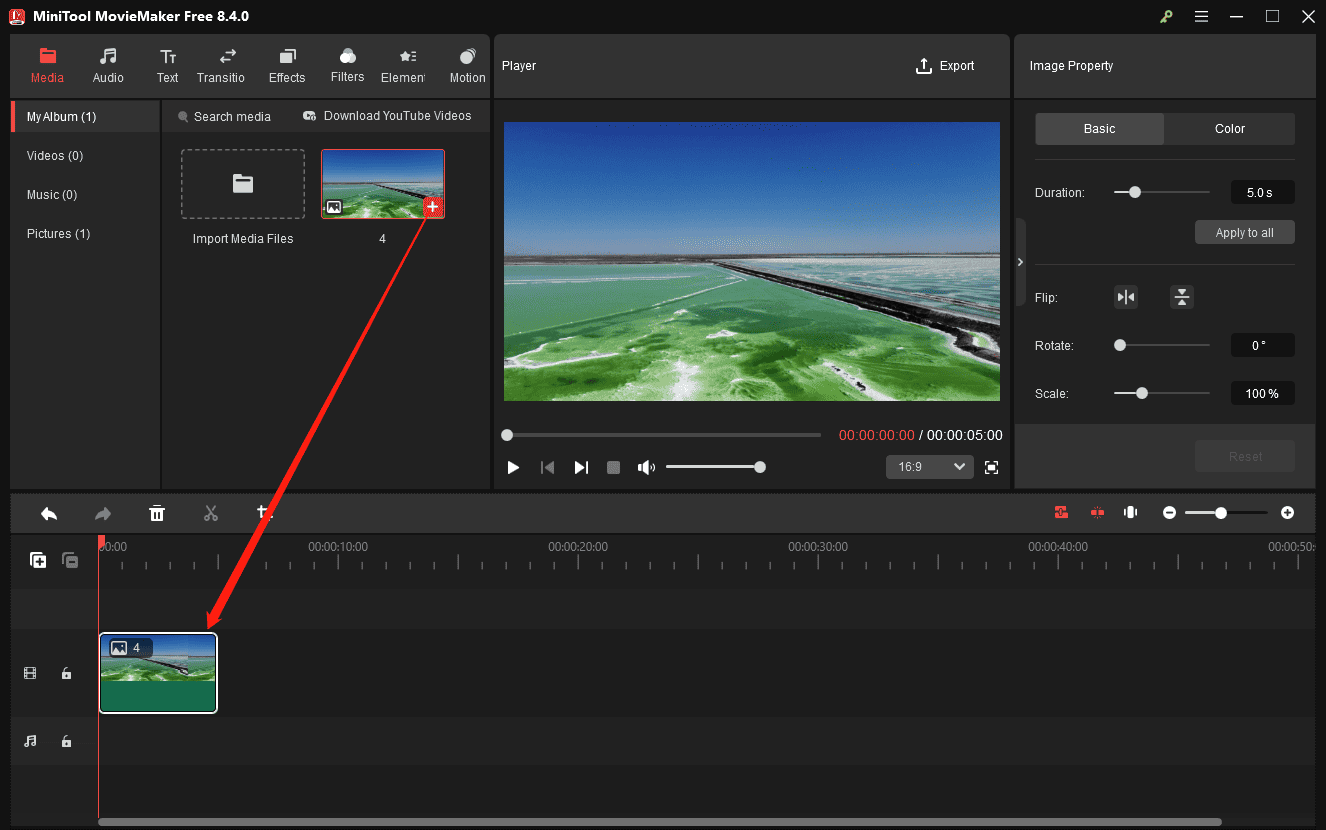
Step 2: Import Your Photo
Launch the application and close the pop-up window to enter the main interface. Then, click the Import Media Files button to import your target picture from your PC. Next, click the + icon on the photo or drag it to the timeline.
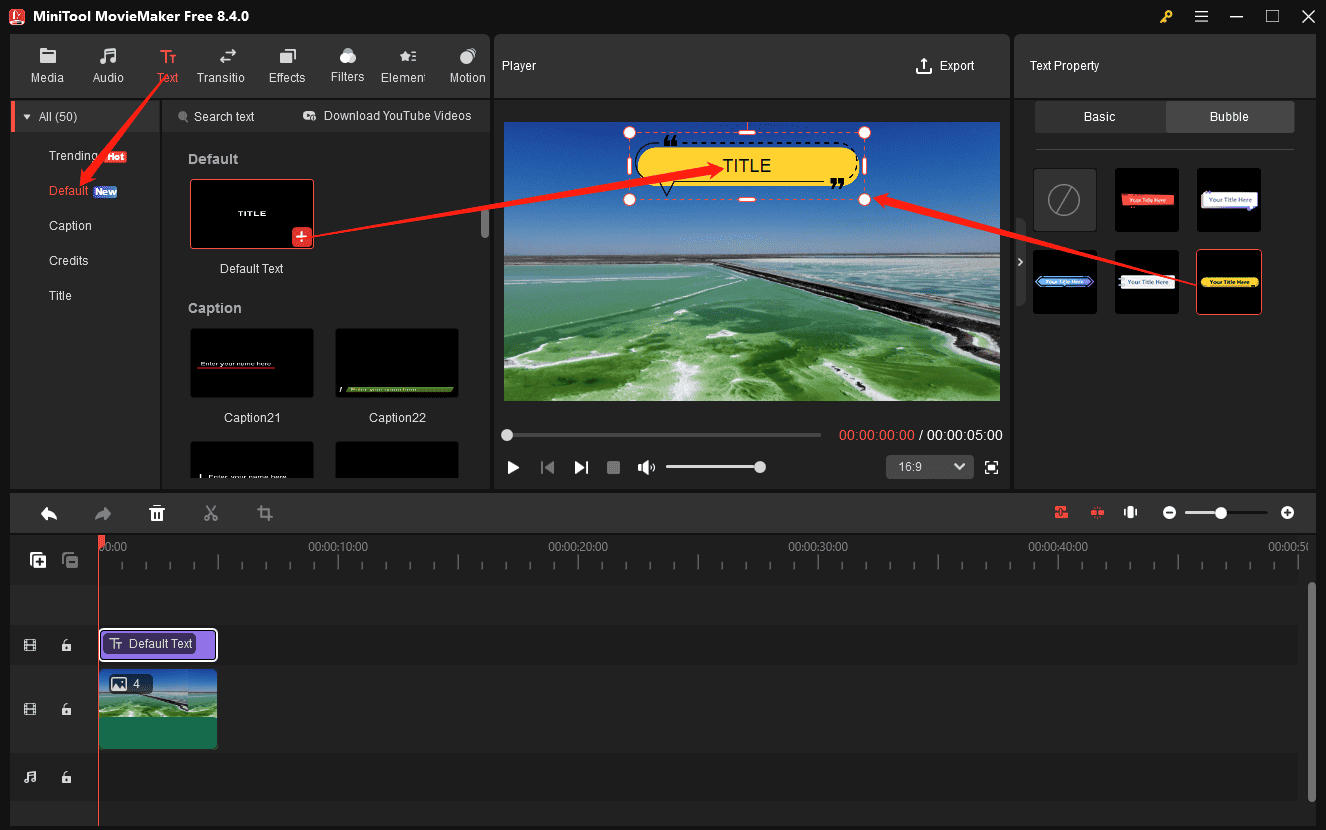
Step 3: Add a Speech Bubble
Click Text at the top toolbar and then select the Default option on the left sidebar to add the Default text template to your photo. Next, switch to the Bubble option in the Text Property on the right panel. Click the desired speech bubble to add it to the picture.
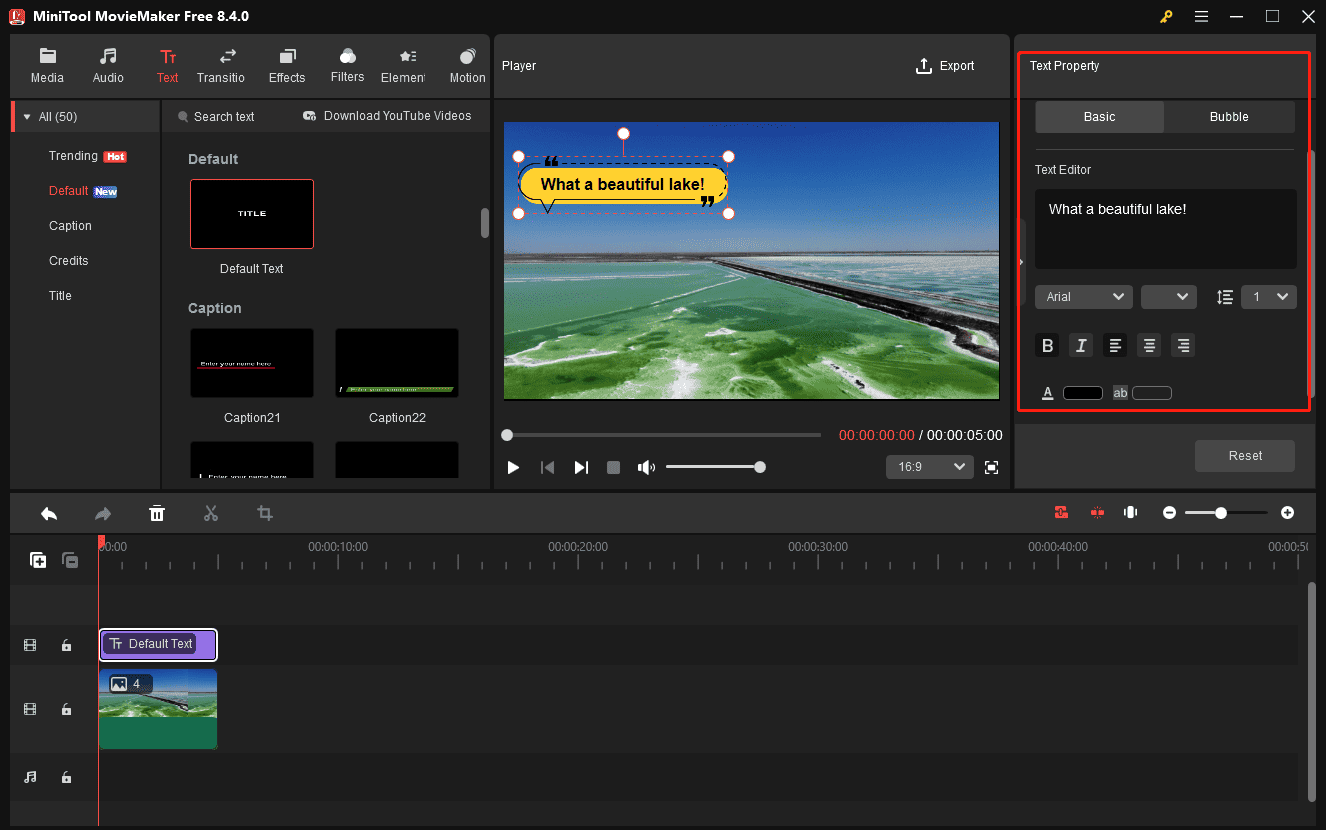
Step 4: Edit Text and the Bubble
On the video player window, you can change the bubble’s size by dragging the white sliders and reposition the bubble. Then, go back to the Basic tab in the Text Property to enter your text and adjust its boldness, italics, alignment, color, background color, and opacity.
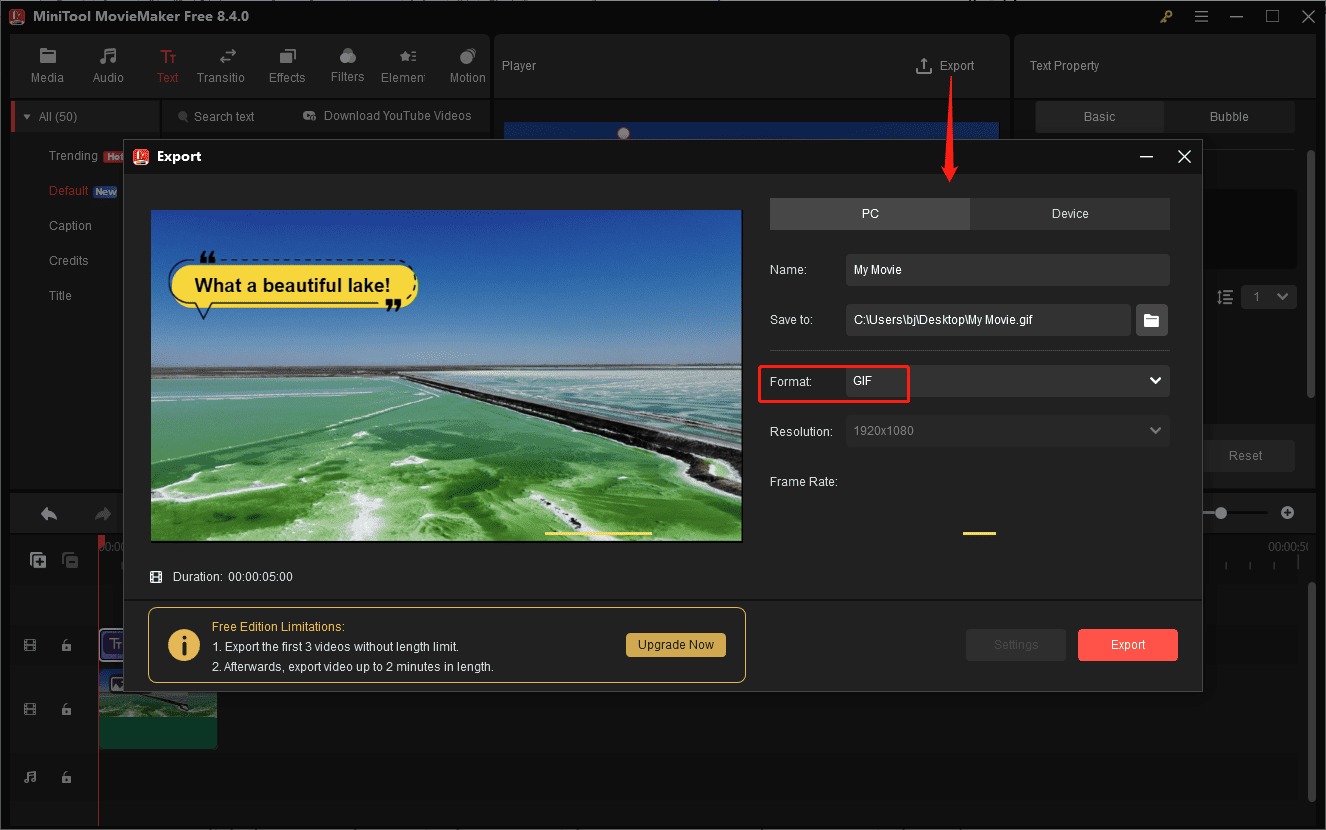
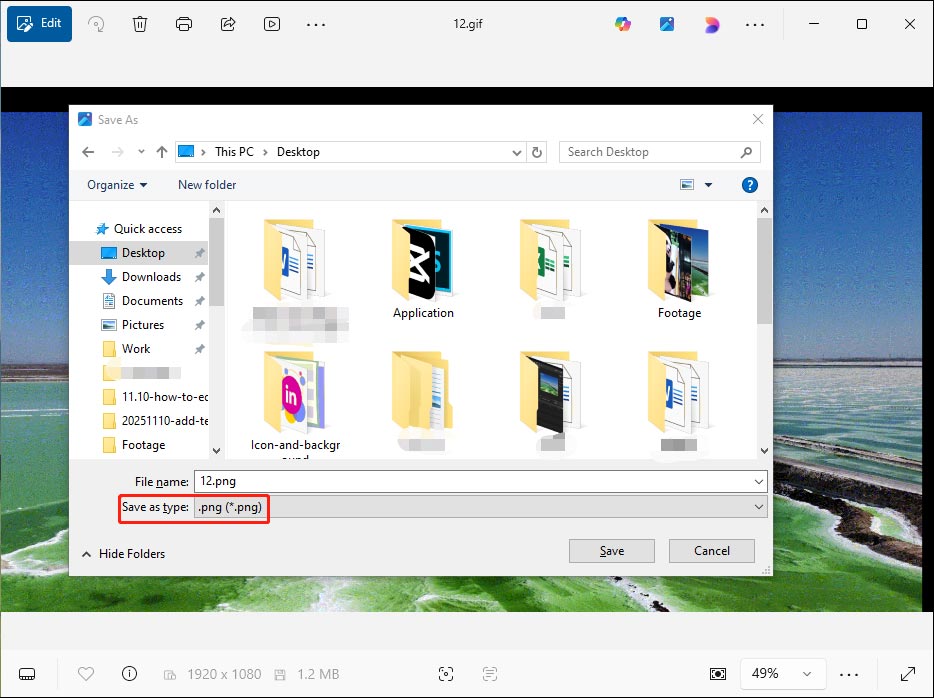
Step 5: Export Your Photo with a Speech Bubble
Click the Export button in the upper-right corner to open the Export window. Then, set Format to GIF, choose your save path, and click Export again to start exporting the picture.
Key Editing Features of MiniTool MovieMaker
As one of the best free video editing software programs, MiniTool MovieMaker provides a rich variety of tools and effects to make amazing videos.
- Easily crop, flip, reverse a video, and change video speed.
- Precisely rotate, split, and trim video clips.
- Adjust the video aspect ratio to suit different platforms.
- Correct the clip’s color by contrast, saturation, and brightness adjustments.
- Add title cards, captions, and end credits to videos.
- Create picture-in-picture effects and video collages.
- Apply transitions, filters, and effects to enhance footage.
- Enrich your content with overlays, frames, and stickers.
- Add background music and sound effects to evoke motions.
- Create GIFs from videos and vice versa.
- Support 4K video editing and export videos in high quality.
- …
How to Add Curved Text to Photos
Speech bubbles can easily highlight and enhance text on images. Sometimes, you may want to curve text to enhance the visual appeal and make it more engaging. In contrast with flat and straight text, curved text can add personality to your design and create a more refined and professional visual effect.
How to add curved text to photos? Photoshop is a fantastic choice. As the industry-leading image editing software, Photoshop comes equipped with comprehensive tools and effects to create, edit, and enhance your images.
Step 1: Open Your Image with Photoshop
After launching the application, click Open on the left panel of the home page to open your desired picture.
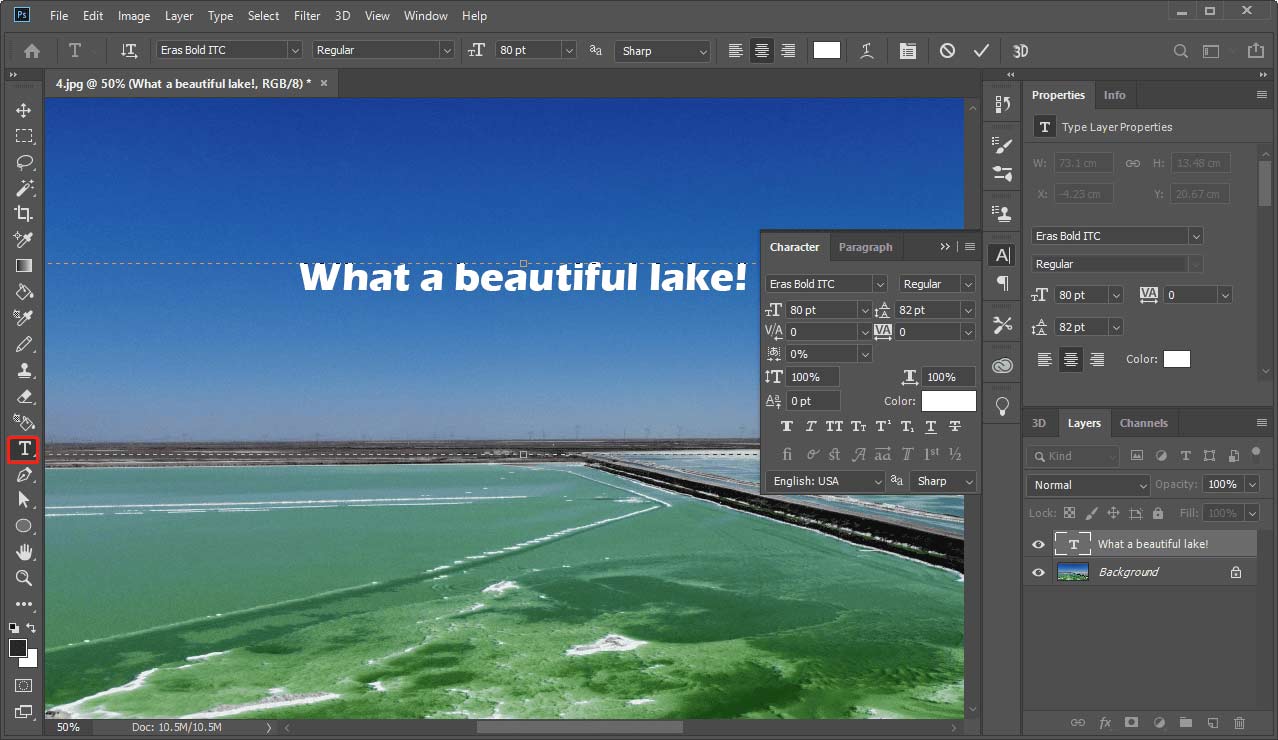
Step 2: Add Your Text
Click the T icon on the left sidebar, drag and drop a box, and type your text. Then, change the font, size, color, line spacing, and other settings to customize your text.
Step 3: Curve Text
Click the Create warped text icon to enable the Warp Text window. Then, expand the Style menu and choose a style like Arc, Arc lower, Arc upper, Arch, etc. Next, drag the sliders to adjust the Bend, Horizontal Distortion, and Vertical Distortion settings.
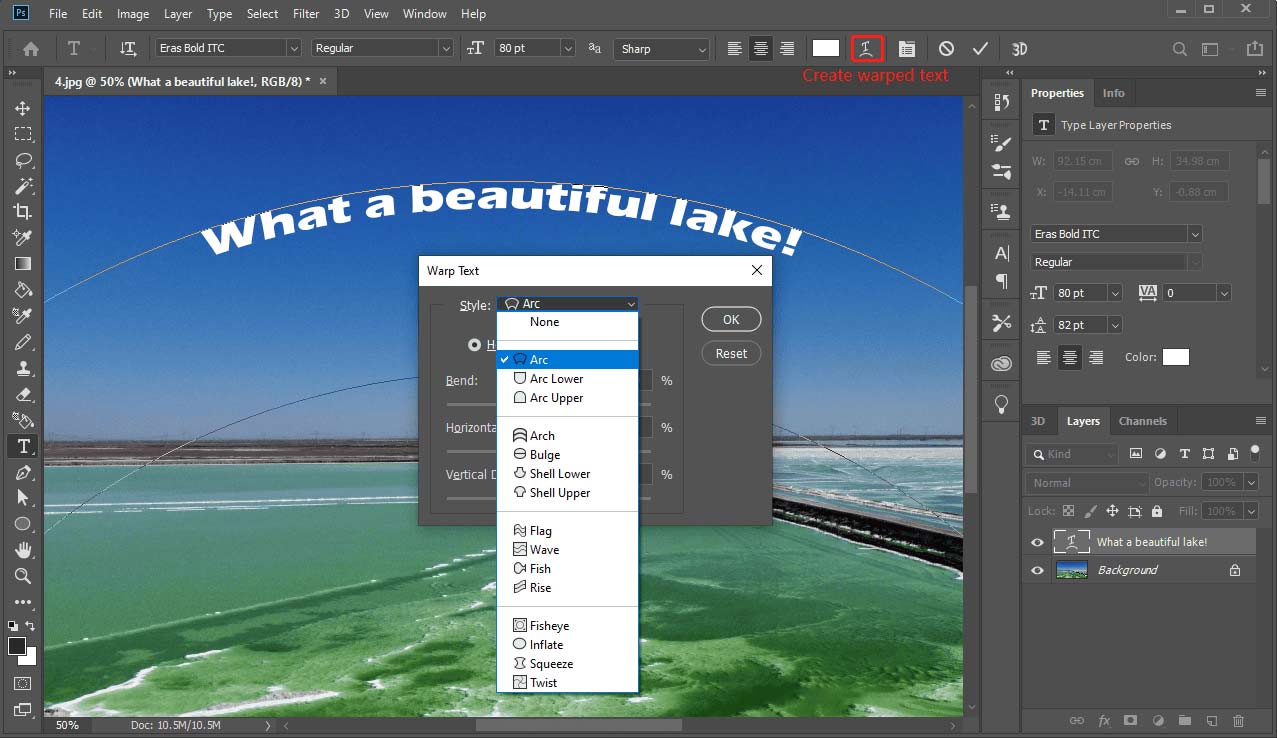
If you’re satisfied with the result, click OK to save changes.
Step 4: Export the Image
Click File in the upper-left corner and select the Save for Web option from the Export dropdown list. On the next window, select the image format and adjust the export quality. Finally, click Save.
Conclusion
This post provides a complete walkthrough on adding text to make your images stand out. You can follow the steps above to add plain captions, attention-grabbing bubble text, and professional-looking curved text. No matter your skill level, you can find the perfect tools and techniques here to transform your photos into powerful and expressive visual works.
Now it’s your turn to add text to photos. You can experiment with different styles of text until you achieve the perfect effect.
Finally, if you encounter problems while using MiniTool MovieMaker, please contact us at [email protected] for help.
About The Author

Position: Columnist
Cora is a tech writer specializing in digital media workflows, with over six years of hands-on experience in video post-production, media transcoding, and screen capture. Her writing is always clear and practical. Cora also produces in-depth software reviews for users across skill levels to help them find the right tool and enjoy video editing.
User Comments :