Are you curious about how to put 4 videos in one screen with ease? You have come to the right place! I strongly recommend that you use the best free video editing software - MiniTool MovieMaker - to accomplish this task. Continue reading this article for detailed instructions on the online solution I describe.
How to make 4 videos into 1 screen at no cost, with no hassle? Top-notch video editors like MiniTool MovieMaker and Clideo will come in handy. Scroll down to learn the basics of both apps and explore the exact steps to put 4 videos in one screen.
How to Put 4 Videos in One Screen with MiniTool MovieMaker
Let’s start by learning about MiniTool MovieMaker before we get into how to put four videos on one screen in it.
Meet the Best and Pro-Level Video Editor – MiniTool MovieMaker
MiniTool MovieMaker is a feature-rich, professional video editing application aimed at video enthusiasts. It is great for creating visually stunning videos because of its easy-to-navigate interface, clear editing tools, and strong multi-track editing capabilities.
With MiniTool MovieMaker, you can manually resize and reposition images or video clips to create picture-in-picture or split-screen effects. Moreover, this best free video editor empowers you to select the aspect ratio for your whole project so that you can share it on social media like YouTube, TikTok, Instagram, Facebook, Snapchat, and so on.
Other interesting video editing options in MiniTool MovieMaker that you might like include:
- Support for virtually all popular video, audio, and image formats.
- Trim or split media files quickly.
- Crop an image or video clip manually or proportionally.
- Make video from images, video segments, and audio.
- Flip, rotate, or scale video footage.
- Adjust the contrast, saturation, and brightness of your video.
- Apply a 3D LUT to a video.
- Speed up, slow down, or reverse the video.
- Remove audio from a video file.
- Fade in and fade out background music.
- Add the caption, title, and credit to the video.
- Create transitions between video or picture segments.
- Overlay effects and filters on top of videos.
- Include animated elements in several videos.
- Overlay motions onto videos.
- Undo or redo the last action if necessary.
- Export your creation in high resolution with no watermark for free.
- …
Combine 4 Videos into One Screen in MiniTool MovieMaker
You can follow the steps elaborated below to learn how to put four videos on one screen using MiniTool MovieMaker.
Step 1. Import 4 Videos into MiniTool MovieMaker
Click the button below to download and install the best free video editor for Windows on your computer.
MiniTool MovieMakerClick to Download100%Clean & Safe
Open MiniTool MovieMaker. Click on the New Project button in the project library window to enter the editing interface.
Drag and drop your prepared 4 videos from the file explorer or click the Import Media Files button within the application to import them.
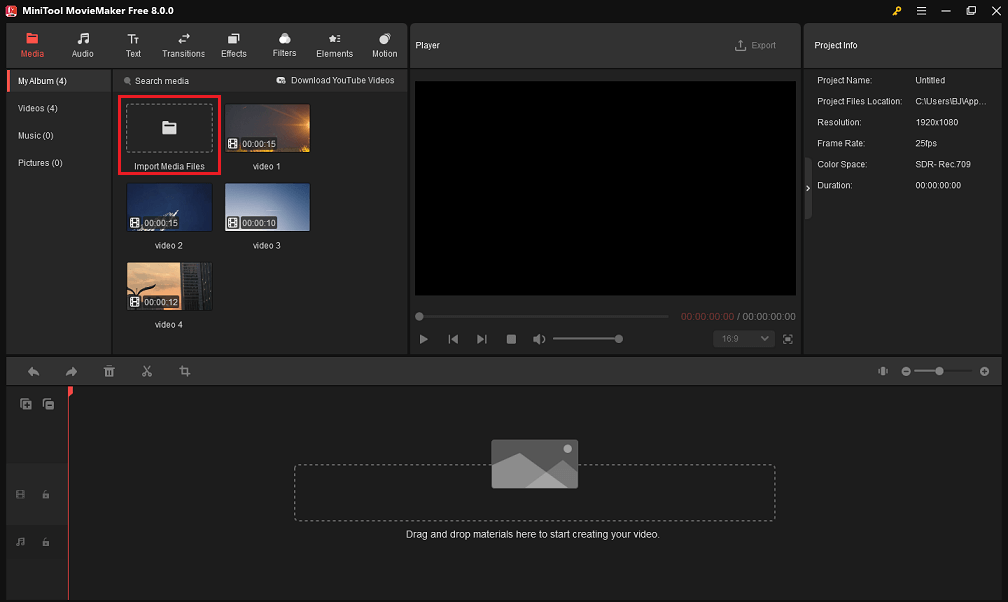
You will see the imported videos in the Media tab. Optionally, the software allows you to sort them by name, type, or date created.
Step 2. Put 4 Videos in One Frame
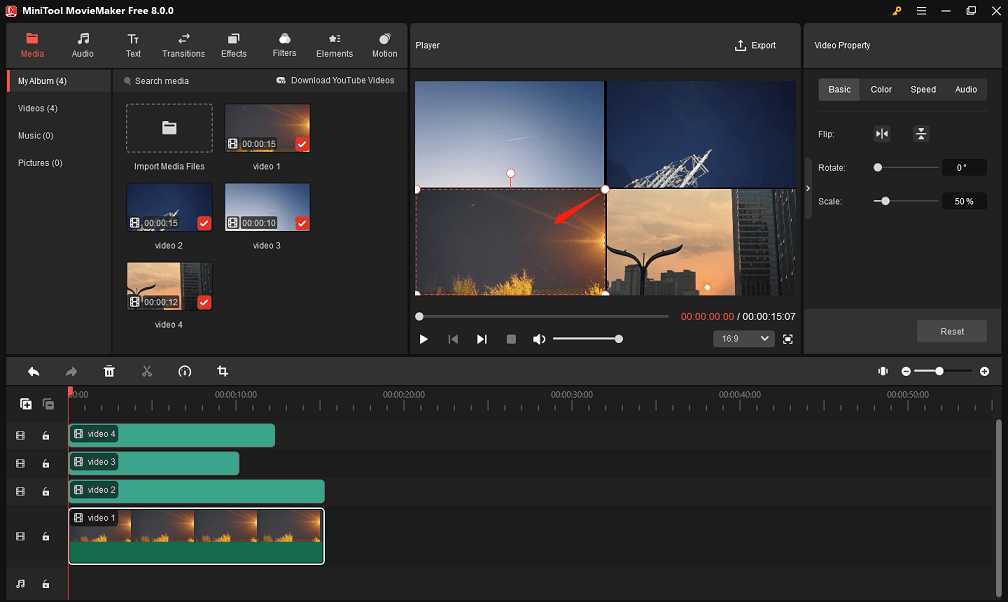
Now, drag and drop the 4 videos individually onto the 4 video tracks in the timeline below and place their start positions at 00:00. When you put the next video on top of the previous video, the next one appears on a new video track that is automatically created.
You can change the whole project’s aspect ratio in the lower-right corner of the preview area.
Then, in the preview window, scale the 4 videos by dragging any corner in or out, then reposition them to fit into one frame.
Step 3. Split or Trim Videos
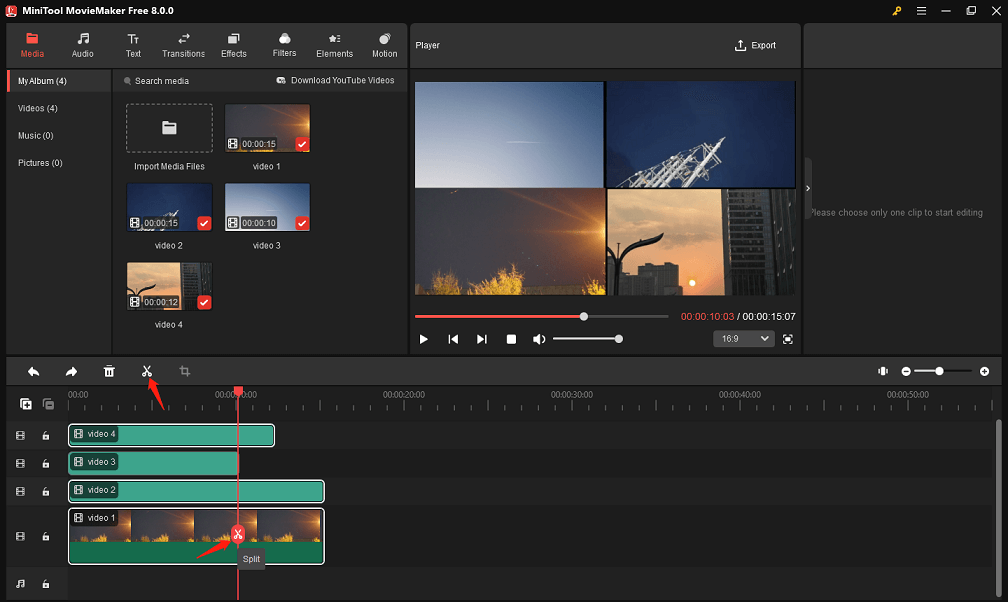
To split several videos at the same time, perform the following operations:
- Hold down the Ctrl key on the keyboard and click on the target videos on the timeline to highlight them.
- Move the playhead to the point at which you would like the split to take place.
- Click the Split icon on the playhead or the timeline toolbar.
- To remove undesired video clips, right-click on them and select Delete.
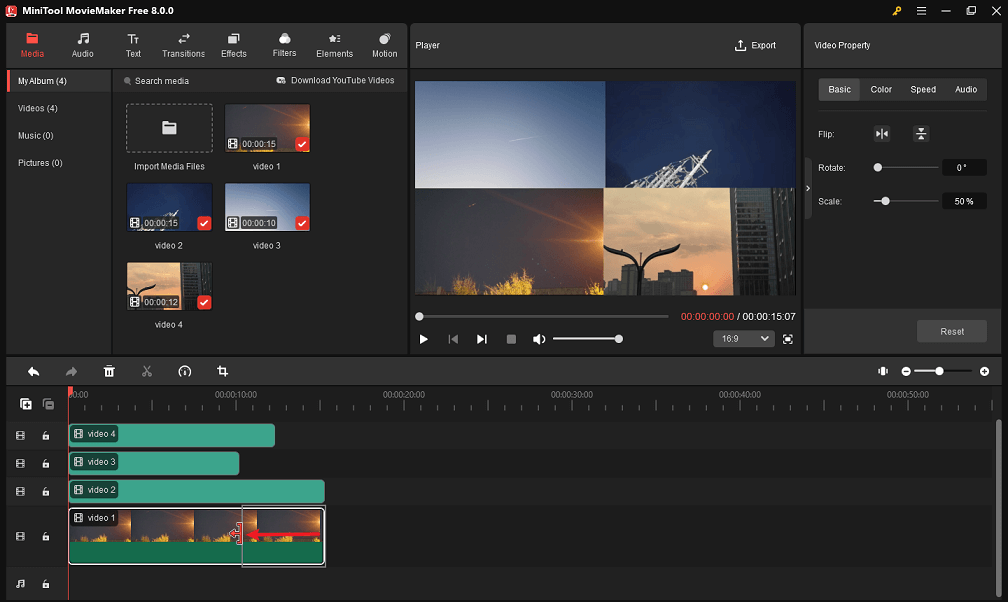
To cut out unnecessary beginning or end portions of videos, carry out the following actions:
- Click on the target videos on the timeline to highlight them.
- Move the mouse cursor to the beginning or end of the videos until the Trim icon appears.
- Drag the edges inwards to remove unwanted beginning or end portions of the target ones.
Step 4. Overlay Effects or Filters onto Videos
You can change the look of videos using MiniTool MovieMaker’s fantastic effects or filters.
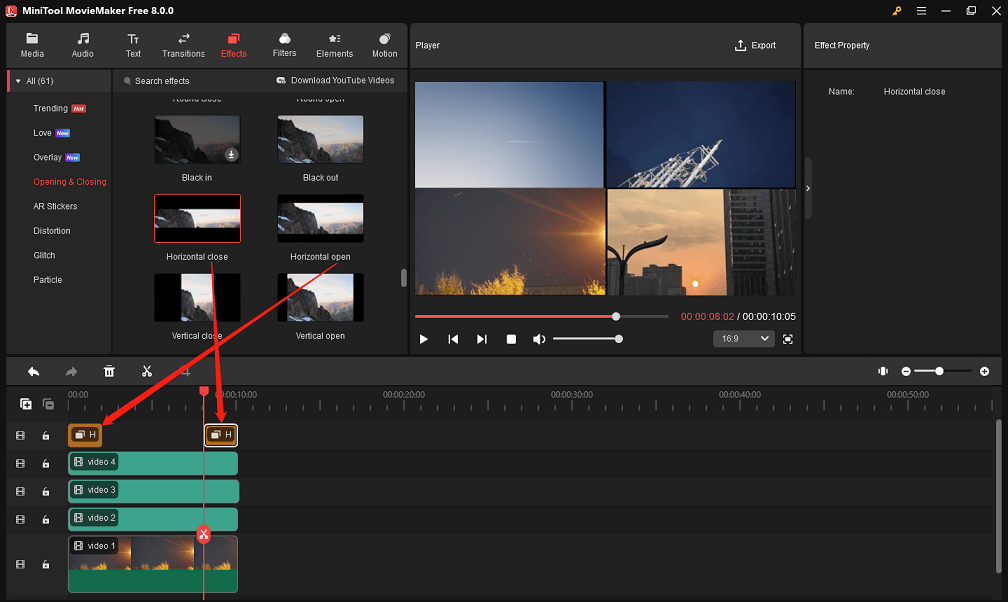
For overlaying effects on videos, select the Effects tab at the top, find and download the desired effects, and then drag and drop the downloaded ones on top of the videos in the timeline.
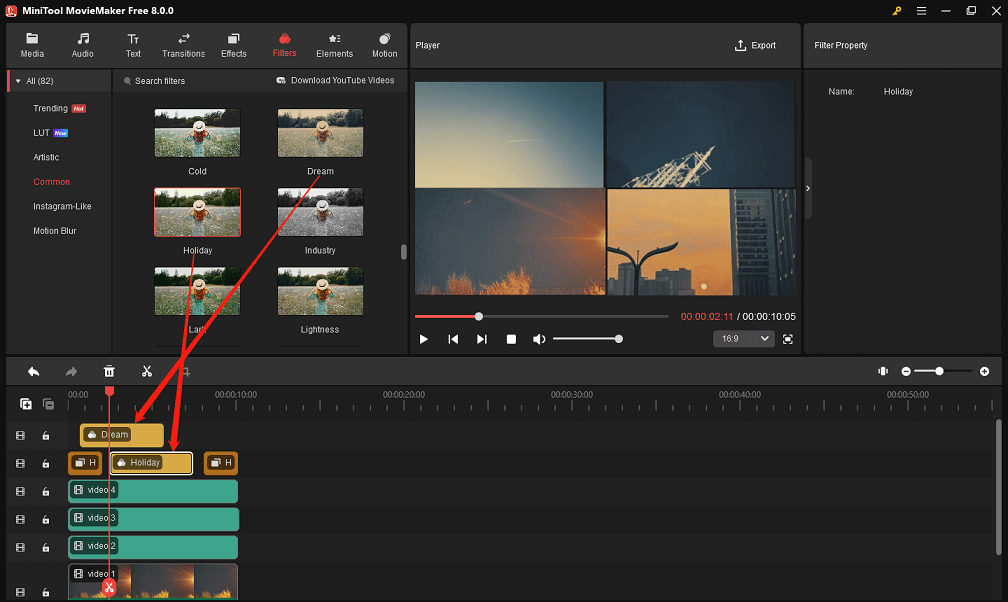
For overlaying filters on videos, select the Filters tab at the top, find and download the required filters, and then drag and drop the downloaded ones over the videos in the timeline.
Step 5. Add Captions to Videos
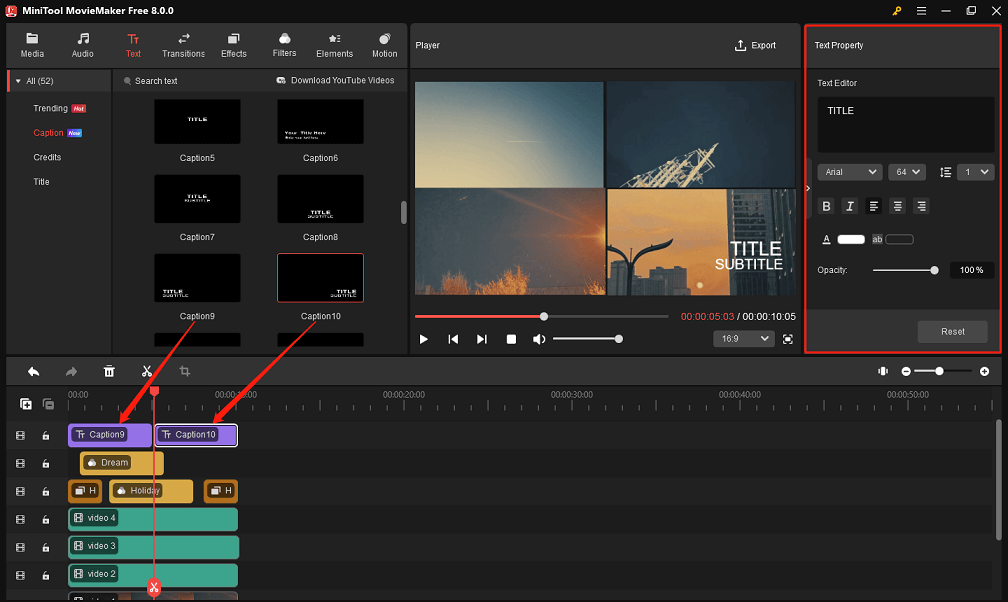
To do this, head to Text > Caption to find and download the caption templates you like, then drag and drop the downloaded ones above the videos in the timeline.
In the Text Property panel, this pro-level video editor lets you enter the captions under Text Editor and customize the font, size, line spacing, boldness, color, opacity, etc.
Step 6. Enhance the Project Using Audio
Add audio to take your project one step further.
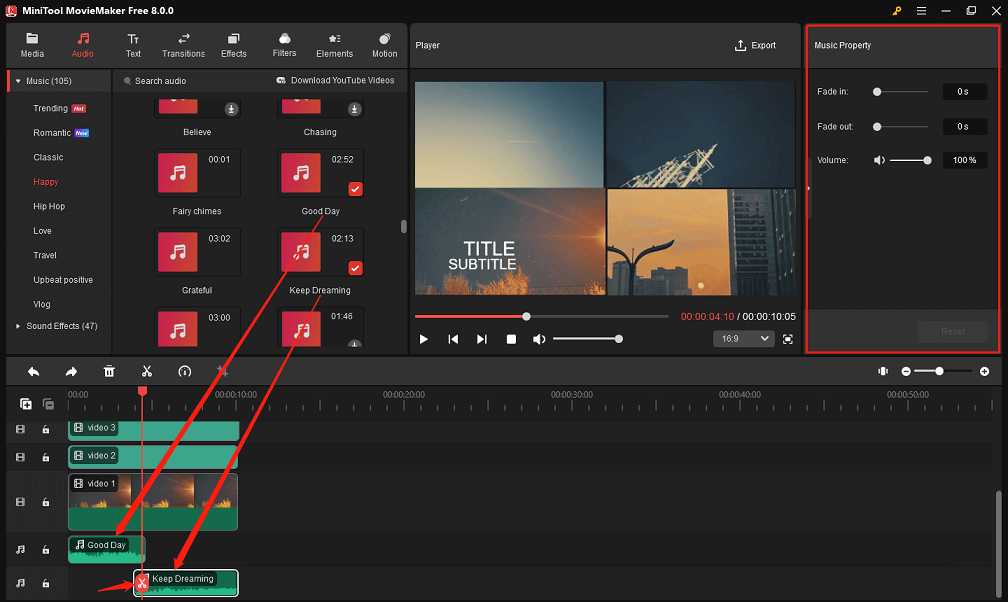
Navigate to Audio > Music or Sound Effects to find and download the royalty-free soundtracks you want. Move the playhead to the start of the whole project, and click the + icon on the downloaded ones to add them to the audio track in the timeline.
You can take advantage of the Split or Trim tool to eliminate any undesired bits of the added soundtracks, too.
In the Music Property panel, this free video editor lets you fade in and out audio and control volume by dragging sliders or input values.
Step 7. Export the Project
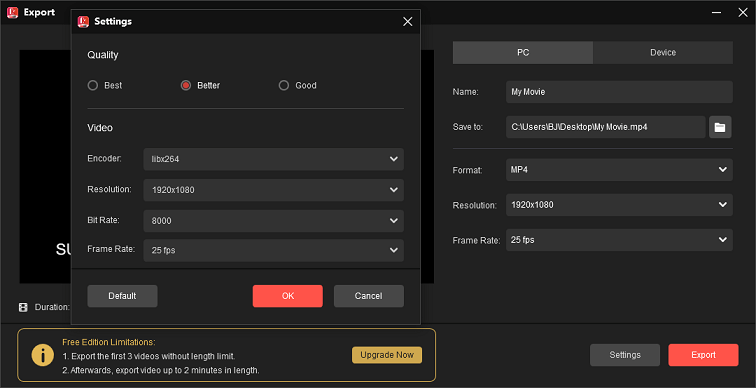
After finishing all edits, click the Export button in the upper right corner. This will bring up the output settings window. From there, you can give the project a name, choose where to save it and configure the file format, resolution, and frame rate.
As well, you can click the Settings button to select the appropriate quality and bitrate for the file to be exported.
Finally, click the Export button at the bottom to save the edited project to your computer.
How to Put 4 Videos in One Screen with Clideo
Before mastering how to put 4 videos in one frame in Clideo, let’s first learn about it.
Get to Know the Online Video Editor from Clideo
Clideo is a full-featured online video editor. With it, you can create your own videos from the ground up and edit them all on a single screen. It enables you to handle the added clip effortlessly using the multi-track timeline.
This online video editor gives you the power to manually adjust the position of videos and photos to make a split-screen, a picture-in-picture effect, or any other creation collaged together. Clideo is also a good option if you plan to make a video square, landscape, or vertical to share on social media platforms like Instagram, YouTube, Facebook, Twitter, and more.
Other video editing features in Clideo that you might find useful:
- Upload the majority of popular media formats.
- Split and trim video and audio as required.
- Merge several videos, photos, and music in a project.
- Change the video’s brightness, contrast, saturation, etc.
- Modify the video’s built-in audio volume.
- Make your video clip faster or slower.
- Make your video more unique with text.
- Adjust the size and position of the elements to your liking.
- Undo your modifications at any time.
- Export your project in 480p, 720p, 1080p, etc.
- …
Combine 4 Videos into One Screen in Clideo
Here are the exact steps you can follow on how to put 4 videos in one frame using Clideo.
Step 1. Upload Every Video to Clideo
Visit https://clideo.com/video-editor using any web browser. Click on the Get started button from the new web page that appears.
When you get to the editing interface, drag and drop the prepared videos from your computer folder or click the Upload button to load them into the online video editor.
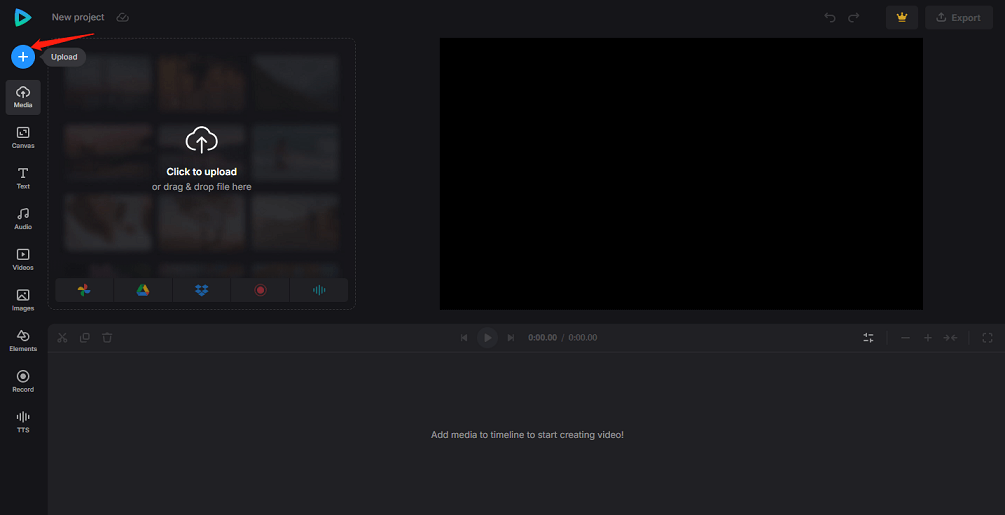
View your uploaded videos in the Media tab. They will also be automatically placed in the timeline area.
Step 2. Put 4 Videos in One Screen
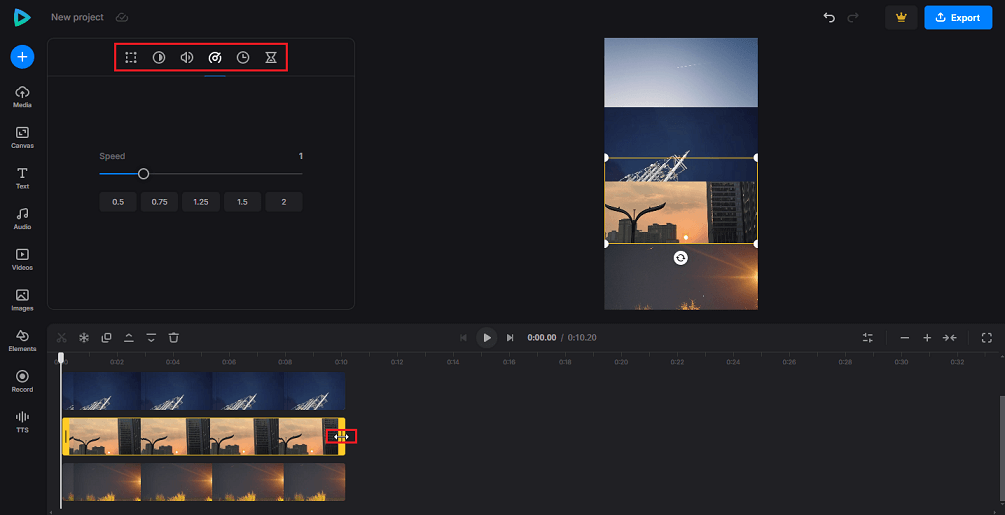
At this point, arrange 4 videos on 4 tracks and align the beginning. If you need to adjust the background color or aspect ratio of the entire project, select the Canvas tab to do so.
Next, drag any corner of the 4 videos in the preview window to resize them and then move them as needed to fit one screen.
You can even change the duration of these videos by dragging the yellow handles on the timeline inwards or outwards.
To edit each video separately, click on the target one on the timeline to highlight it, then change different settings in the top left corner, such as color, speed, etc.
Step 3. Save the Project
When you’re happy with your edits, click the Export button in the top right corner. This will allow you to select one of five export parameters. Three of them are free. But if you would like to export your project in 1080p or 2160p, you need to upgrade to Clideo Pro.
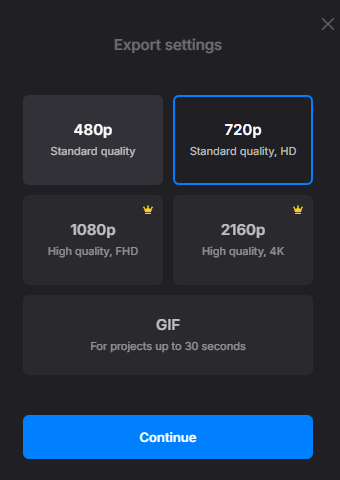
After that, click the Continue button to complete the export process. Finally, click the Download button to save the project to your computer.
Bottom Line
To sum up, I’ve given two excellent methods for learning how to put 4 videos in one screen. It is recommended that you use MiniTool MovieMaker as it can help you combine 4 videos on a single screen without a watermark and free of charge.
If you have any questions or suggestions about MiniTool MovieMaker, please let us know at [email protected].
Browse these popular posts:


![[Fixed]How to Make a Split Screen Video on iPhone/PCs](https://images.minitool.com/moviemaker.minitool.com/images/uploads/2023/06/how-to-make-a-split-screen-video-on-iphone-thumbnail.png)
User Comments :