In some cases, the most popular video and image aspect ratios are 16:9 and 4:3. An aspect ratio is a relationship between the width and height of a video or image. It determines how a video or image will appear on the screen. As an editor, you should know the difference and use of aspect ratio 16:9 vs 4:3. Plus, we’re going to show you how to use the 16:9 or 4:3 aspect ratio in a decent video editing software - MiniTool MovieMaker. Learn everything in this tutorial.
What Is Aspect Ratio 4:3 vs 16:9?
The aspect ratio is used to define the size and shape of digital media, including videos, images, screens, and monitors.
It’s represented as two numbers separated by a colon. First the width, then the height. If the first number is larger, you will have a horizontal image, while if the second number is larger, you will end up with a vertical shot.
For example, here’s what the 4:3 aspect ratio means: there are 3 units of height for every 4 units of width. Another example would be 16:9: there are 9 units of height for every 16 units of width.
Aspect Ratio 16:9 vs 4:3: What’s the Origin?
The Origin of Aspect Ratio 16:9
Movie theaters intended to entice customers to watch movies rather than watch them on their home screens. Thus, they altered their ratio overall in order to make the experience of watching the film more immersive and compelling. It also worked!
Slowly yet surely, the aspect ratio began to expand over time. Before you know it, the 16:9 aspect ratio was utilized in almost all films.
Besides, this aspect ratio is usually referred to as widescreen, even though it is also known as 1.77:1 or 1.78:1 aspect ratio. 16:9 is commonly used in modern TV and computer monitors as it provides a wider viewport than 4:3. This means that you can fit more information horizontally on the screen.
A broader aspect ratio will make it simpler to view what’s going on in the scene that you’ll be able to notice details even if multiple actors or actions are displayed at the same moment.
The Origin of Aspect Ratio 4:3
Remember when the television in your house used to be square? That’s because the aspect ratio of the screen was 4:3. In the 1940s, it was the standard aspect ratio for American TV sets and computer monitors.
Just think of silent movies of yore if you’re discovering it hard to imagine what that was like. Still, screens got wider with the addition of sound.
What Happens If You Use the Wrong Aspect Ratio?
The issue arises as soon as you use the wrong aspect ratio for your project. Once this occurs, you may need to redo the whole video or photo as it will not look right on the screen or other social media platforms.
First of all, you have to ask yourself where you’d like to showcase your video or photo. This is significant since you must create content that is appropriate for the screen on which it is projected.
Also, any content that is not expressly created for this format will be stretched or squeezed to fill the whole screen. That can result in distorted images.
For instance, if you try to display a video or photo with an aspect ratio of 4:3 on a 16:9 screen, the image will have borders. In contrast, if you try to display a 16:9 video or photo on a 4:3 screen, your image will be distorted or visibly cropped in ways you don’t intend. Additionally, if you would like to show a 16:9 photo in a 4:3 layout, your image will be stretched (only think of what occurs if you are willing to print a photo in a different aspect ratio).
Aspect Ratio 16:9 vs 4:3: What’s the Difference?
The main difference between 16:9 and 4:3 aspect ratios is in the proportional relationship between width and height.
The 16:9 aspect ratio produces a wide rectangular-shaped image or screen. In comparison, the 4:3 aspect ratio produces a relatively taller and more square-shaped image.
In percentage terms, the 16:9 aspect ratio is 78% wider than tall, while the 4:3 aspect ratio is 33% wider than tall. So, the former aspect ratio can accommodate more information in the horizontal direction, while the latter aspect ratio has more vertical space.
The size difference between these two aspect ratios influences how they can be utilized to display videos and images.
Due to these characteristics, the 16:9 vs 4:3 aspect ratios are used for different purposes. Usually, most videos are in a 16:9 ratio, and the 4:3 ratio is great for photos. For details, see the next section.
4:3 vs 16:9 Aspect Ratio: Which One Is Best for Videos & Photos?
There is no single proper aspect ratio. People can use a 4:3/16:9 aspect ratio while they take photos or shoot a video, and neither option is wrong. And this decision comes down to what you wish to fit in the frame, the ultimate support for your artwork, and finally your style.
Now, let’s look at the 4×3 vs 16×9 aspect ratio options for videos and photos.
Video
As mentioned above, the 16:9 aspect ratio is more commonly used in the video, as it is often the most popular aspect ratio for TVs, tablets, computer monitors, smartphones, etc.
That’s not always the norm. You’ll notice that home TVs are almost square, with an aspect ratio of 4:3, if you’ve ever watched one before the early 21st century.
Therefore, when you watch an old television show on a new television set, you’ll notice black bars at the top and bottom of the screen. Also, you can notice the black bars when filmmakers shoot in a 4:3 aspect ratio for artistic reasons.
After the 1960s, the widescreen format became the norm, as well as the 16:9 aspect ratio became the standard definition of digital HDTV in both full HD and SD (that’s why all displays these days are like this).
Because you can fit more content horizontally, it’s great when you shoot video building up scenes and groups with more people.
Furthermore, that means when you have one element or person in the frame, there will appear a ton of background. To get around this, you can work with set design and composition, like frame-within-the-frame or over-the-shoulder shots.
Are most TVs 4:3 or 16:9?
Previously, TVs had a 4:3 aspect ratio. They appear almost squared if you recall seeing one of them. But most TVs sold these days are a 16:9 aspect ratio.
Is YouTube 4:3 or 16:9?
YouTube features the 16:9 aspect ratio to fit the majority of smartphones and computer screens. Although you can upload the video with a different aspect ratio, it will be changed to fit the audience’s device automatically. And this means that important parts of an image may be cropped. It’s perfect if you directly upload it at 16:9.
Photo
Even though 3:2 is the standard for a 35mm movie, and thus a full-frame sensor, the 4:3 aspect ratio is more commonly used for taking photos. This is the aspect ratio of Micro Four Thirds cameras and some of the compact ones.
Some cameras let you select which aspect ratio you desire. One of the best methods to determine is to know what you will do with your photos. What size will you print them if you do? Which social media channel will you use to share them?
For instance, if you plan to share them on Instagram, then lean towards a 1:1 format. As such, something squarer, such as a 4:3 aspect ratio, would be better. In the end, this will enable you to crop less content.
The same occurs when you want to print an image and the original photo includes a different aspect ratio to the frame and the paper. The distinction in width or height can be resolved in one of two methods:
The first method is to keep the entire image as well as have two white stripes at the top and bottom or left and right of the image (depending on whether it is vertical or horizontal).
Talking about the aspect ratio 16:9 vs 4:3, you should also consider what you are shooting. 4:3 is better for shooting close-ups and one-person portraits. Other than that, it is well suited for two-person portraits, particularly if they are a couple, as it makes for intimate shots.
In addition, it’s a nice format that gives a sense of depth since you can accommodate more information vertically.
Meanwhile, you can always take photos at your camera’s full resolution and crop the image in post-processing to fit the platform or paper you’re going for.
Nevertheless, this can mess up your original composition, and if it’s close to the edges, you may lose some important information.
How to Use 16:9 or 4:3 Aspect Ratio in MiniTool MovieMaker Properly?
MiniTool MovieMaker is a free, clean, no-watermark video editor for Windows users. It is a handy video aspect ratio changer that allows users to select a proper aspect ratio before starting the video creation or change the current aspect ratio while editing the video.
After launching this video editor, a small window will pop up asking you to perform the initial operation. Within the Project library window, you can choose the following aspect ratios: 16:9 (widescreen), 9:16 (portrait), 4:3 (standard), and 1:1 (Instagram).

It’s worth mentioning that MiniTool MovieMaker is a powerful video creation tool in the field of multimedia editing. The tool is equipped with an intuitive user interface and useful tools to help you apply video transitions/filters/stickers, insert text, add pan and zoom effects, change video speed, do color correction, split/trim videos, crop videos, flip/rotate videos, or reverse videos, among other things.
What’s more, this Windows video editor provides users with the optimal functions to create captivating videos for different scenes, such as electronic photo albums, online courses, vlog videos, game commentary videos, unboxing videos, square videos, explainer videos, and so on.
Now, let’s see how to use the 16:9 or 4:3 aspect ratio in MiniTool MovieMaker:
Step 1: Download, install, and launch MiniTool MovieMaker on your Windows PC.
MiniTool MovieMakerClick to Download100%Clean & Safe
Step 2: Keep the default 16:9 (widescreen) option or select the 4:3 (standard) option from the Aspect Ratio dropdown list in the Project library window. Click on New Project to enter the editing interface and you will see the Player section displayed in exactly the selected aspect ratio form.
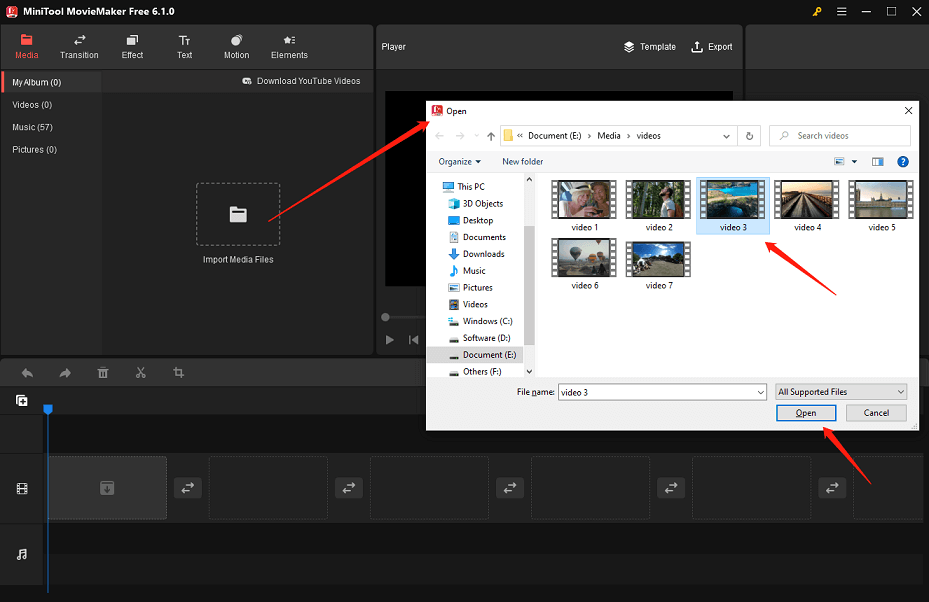
Step 3: Click on Import Media Files under the Media tab to locate your video files, select the desired video, and tap on Open to import it to this video creation tool. Drag and drop the imported video into the below timeline.
Step 4: Go to the Effects tab. Click the Download icon at the bottom right corner of the wanted effect and drag and drop the downloaded effect to the target video clip on the timeline.
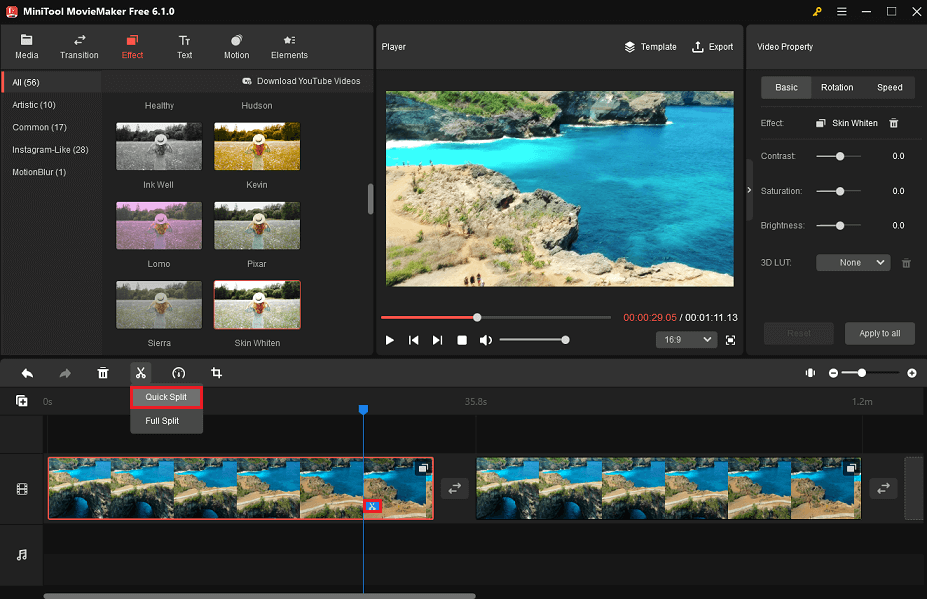
Step 5: Select the target video clip to highlight it, drag the playhead to the position where you want to split, and click the scissors icon on the playhead or click the scissors icon on the timeline toolbar to select Quick Split. Then, you can right-click on the unwanted part clip to delete it or add new video items between the divided clips.
Step 6: Click on Export above the Player window to set up the export settings and save the edited video to your PC or device.
Conclusion
Many aspect ratios can be utilized to accommodate the individual needs of showing content, media, and consumers. We hope by now, you know the difference and use of aspect ratio 16:9 vs 4:3 as well as how to use them effectively and confidently with MiniTool MovieMaker!
If you have any doubts or questions when using MiniTool MovieMaker, please feel free to contact us by sending an email to [email protected].





User Comments :