Want to add black bars to your video to give it a cinematic look? How to add black bars to video? This post from MiniTool video editing software will give you 7 methods.
What Are Cinematic Black Bars
When we watch movies in the cinema, we sometimes find that there are black bars on the top and bottom of the video. Why are there black bars? Cinematic black bars (also known as letterboxing) appear when a video shot in a wide aspect ratio is resized to fit a standard-width video player. Common film aspect ratios include 2.35:1, 21:9, 2.85:1, and more.
When playing a wider aspect ratio video on a different size screen, the video player automatically shrinks the size of the content so that the widest edge fits the frame and adds black bars to fill the blank areas. To sum up, the black bars in movies are caused by the screen size not matching the original aspect ratio.
Adding black bars is a useful way to give your video a cinematic look, impress your audience, and add a new level of authenticity to your creation.
How to get cinematic black bars? Shoot using cinematic aspect ratio or crop your video to different aspect ratios in the editing stage. Additionally, some video editors provide quick and easy ways to add black bars to video. Now, let’s dive into this topic.
How to Add Black Bars to Video in CapCut
CapCut is not only a popular video editing app for smartphones but also a useful video editor for computers. This application offers various tools and effects, such as speed ramping, filters, color adjustments, transitions, cropping, etc.
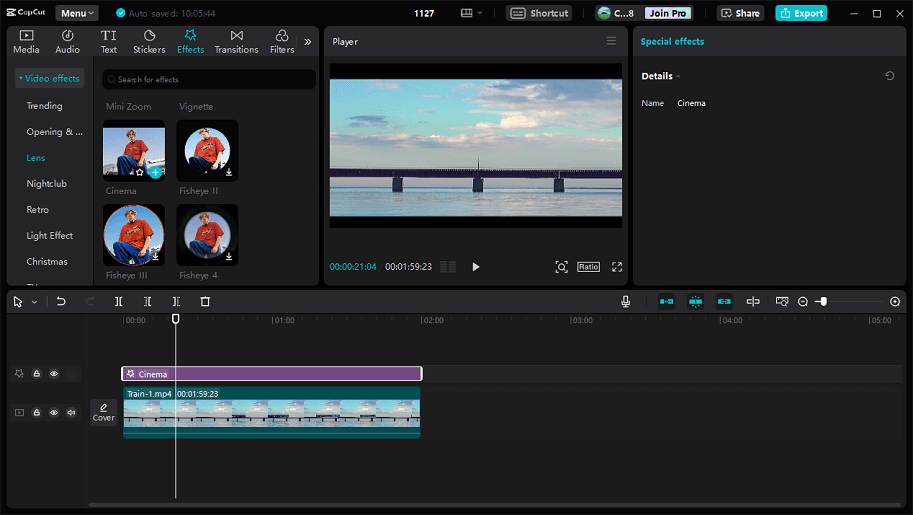
Apart from that, CapCut comes with various video effects, such as zooming effects, light effects, and lens effects. Under the lens category, you can find a cinema effect that can add black bars to video. Here is how to add black bars in CapCut.
Step 1. Download and install the CapCut desktop app on your Windows PC or Mac.
Step 2. Open CapCut and register with your account. Click the + Create project button at the top to create a new project and enter the edit page.
Step 3. Click Import to open your video and drag it to the timeline.
Step 4. Go to the Effects tab, expand Video effects, select Lens, scroll down, find and download the Cinema effect, and add it to your video.
Drag the Cinema effect track’s end to increase its duration. Repeat this step to add the cinematic black bars to multiple clips on the timeline.
Step 5. Click the Export button in the top right corner, select output settings and destination folder, and click Export to export the video.
How to Add Black Bars to Video in Premiere Pro
Adobe Premiere Pro is one of the best video editing software, especially for professional levels. This application provides almost all basic and advanced editing features for creating amazing videos, such as the precise trimming tool, hundreds of built-in video effects and transitions, powerful video color correction and grading tools, and advanced audio tools.
Adobe Premiere Pro gives you a variety of options for editing, enhancing, and retouching your footage. In this post, we’ll learn how to add black bars in Premiere Pro.
Step 1. Open Premiere Pro and click File > Open Project to open your project. Or, create a new project, import your video clips, and add them to the timeline.
Step 2. Now, you need to create an adjustment layer. Premiere Pro lets you add adjustment layers to add the same effects to multiple clips on the timeline.
To add an adjustment layer, click the New Item button (a small folder-like button) in the bottom left of the project panel, select Adjustment Layer, and click OK. Then, drag the adjustment layer from the Project panel to the timeline and drag its end so that its duration covers all the clips you want.
Step 3. To add cinematic bars, go to the Effects panel, search for “crop”, and drag the Crop effect onto the adjustment on the timeline. Select the adjustment layer, go to the Crop section, and set the value of Top and Bottom as 12 or smaller or bigger number.
Step 4. You can continue to edit your video. After editing, click File > Export > Media to open Export Settings, finish the export settings, and click Export to export the cinematic video.
![[10 Ways] How to Fix Adobe Premiere Pro Playback Lagging Issue](https://images.minitool.com/moviemaker.minitool.com/images/uploads/2023/03/premiere-pro-playback-lag-thumbnail.jpg)
How to Add Black Bars to Video in DaVinci Resolve
DaVinci Resolve is the one-stop solution for color grading, color correction, visual effects, motion graphics, and audio post-production, compatible with Windows, macOS, Linux, and iPadOS. It offers a free version and a paid Studio version.
DaVinci Resolve comes with rich editing capabilities, such as speed adjustment, video stabilization, Chroma Key tool, keyframe animation, voice-over, freeze frame, and more. Also, it allows you to add cinematic black bars to video.
How to add black bars in DaVinci Resolve? Here is the guide.
Step 1. Open DaVinci Resolve, create a new project, right-click on the Media Pool section, and choose Import Media to upload your media.
Step 2. Add your videos to the timeline and move to the Color page.
Step 3. At the top right corner, expand the Clip dropdown menu, and choose Timeline.
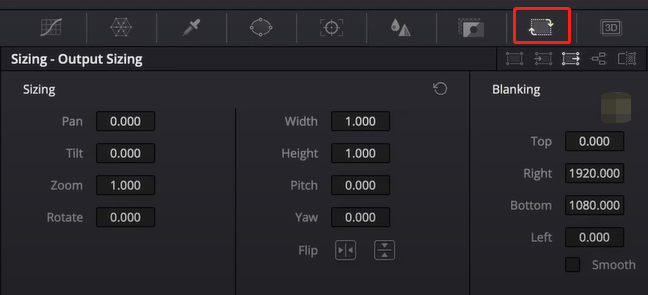
Step 4. Click the Sizing button, go to the Blanking section, and change the value of Top and Bottom to adjust the size of the black bars. Switch to the Edit page, and you’ll find that your clips have black bars without cropping.
On the Edit page, you can also add black bars. With a timeline open, click Timeline on the top menu bars, select Output Blanking at the bottom of the list, then you’ll see several aspect ratio bars, including 1.33, 1.66, 1.77, 1.85, 2.0, 2.35, 2.39, and 2.40. Try these options until you add the desired black bars.
Step 5. Go to the Deliver page to export your video.

How to Add Black Bars to Video in MiniTool MovieMaker
MiniTool MovieMaker is one of the best free video editors to help you make stunning videos on your PC with its easy operation and rich features. It allows you to crop, split, rotate, flip, reverse, speed up, slow down, and trim video. This application also provides various transitions, filters, and motion effects to enhance your footage, and plentiful animated elements to spice up your video.
What’s more, MiniTool MovieMaker gives you options to change the video aspect ratio, add title cards, captions, and end credits to the video, apply 3D LUT effects, etc. It supports multiple export formats and can export videos up to 1080p for free and without watermarks.
Now, let’s see how to add black bars to video using MiniTool MovieMaker.
Step 1. Download and install MiniTool MovieMaker on your PC.
MiniTool MovieMakerClick to Download100%Clean & Safe
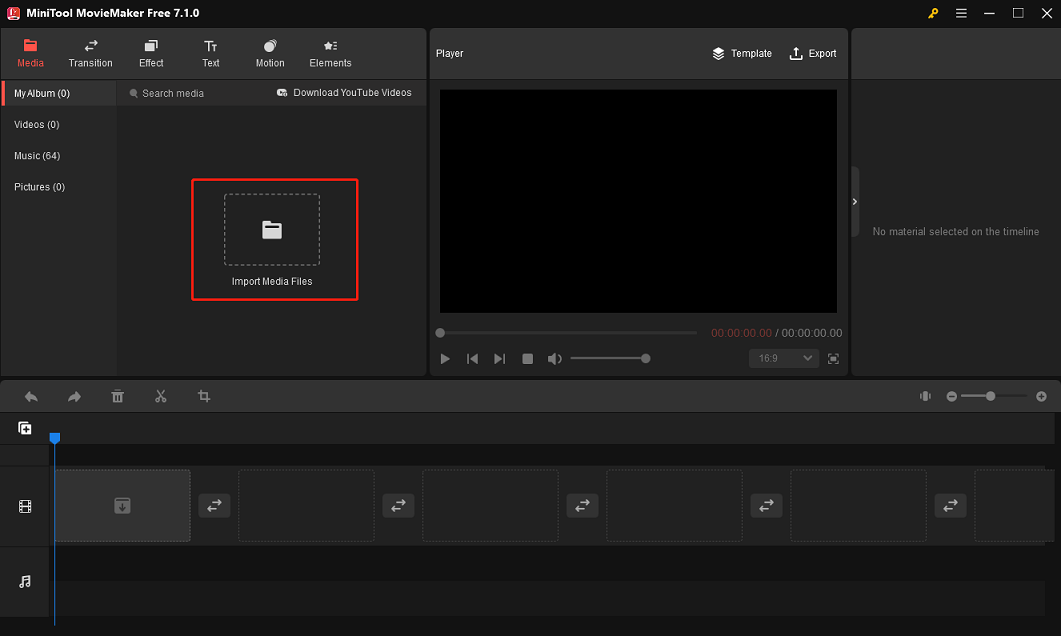
Step 2. Launch MiniTool MovieMaker and close the promotion window to access the main user interface. Click the Import Media Files button to upload your video clips. Drag these clips to the timeline.
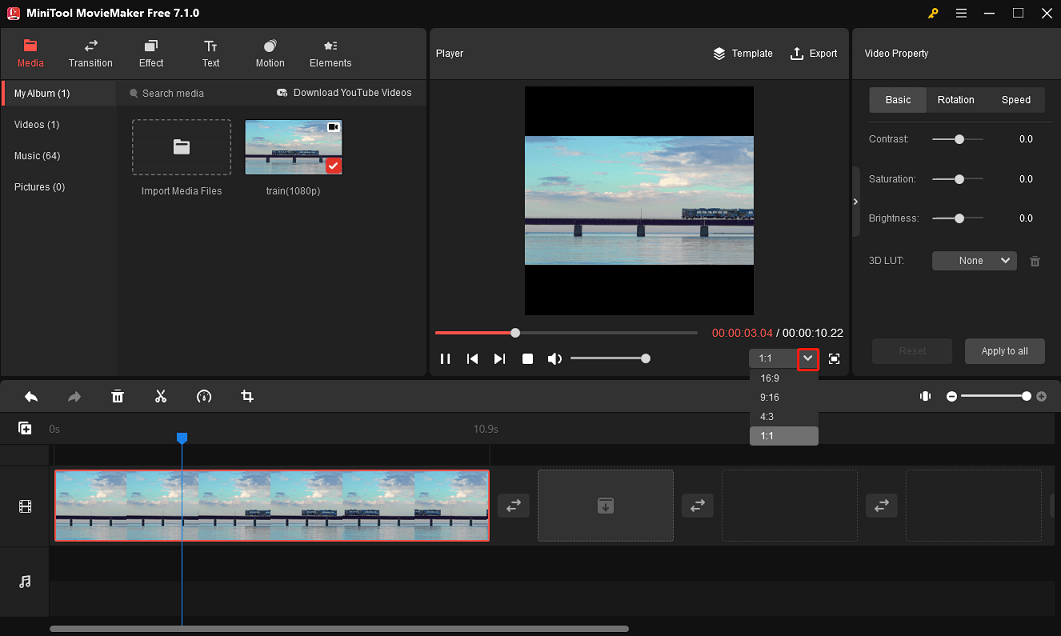
Step 3. Expand the Aspect Ratio dropdown menu and choose from 16:9, 9:16, 1:1, and 4:3. Each gives you different black bars. Select the ratio that you prefer most.
Step 4. Click Export in the upper right corner to open the export settings window, choose the format, resolution, frame rate, and destination folder, and click Export to export the video.
How to Add Black Bars to Video in Final Cut Pro X
Final Cut Pro X is a professional non-linear video editing application for macOS and iPadOS, offering the most advanced organizational tools for creating, editing and producing high-quality videos. Also, it works with a broad range of video formats.
In this section, let’s learn how to add cinematic black bars to video in Final Cut Pro X.
Step 1. Launch Final Cut Pro X on your Mac, import videos, and add them to the timeline.
Step 2. Press Command + 5 to open the Effects Browser, go to the Stylize category, and find and drag the Letterbox effect onto the timeline. Then, you can see a little bit of black bars on the top and the bottom of the frame.
Step 3. Select your video and press Command + 4 to open the Inspector section. Under the video inspector tab, go to the Letterbox section underneath Effects.
Expand the Aspect Ratio menu and you see several options. Try these ratios until the desired black bars appear. Additionally, you can use the Offset slider to move the video down or up, and change the border size and color.
Step 4. If you want to add the same black bars to multiple clips, first select your first video and press Command + C to copy. Then, select other clips, and go to Edit > Paste Attributes. From the Paste Attributes window, select Letterbox, and click Paste.
Step 5. To export the video, click File > Share > Master File, complete the export settings, and save the video.

How to Add Black Bars to Video in Clipchamp
Microsoft Clipchamp is also one of the best video editing apps for Windows 11/10. The application comes with many tools and effects that enable you to create amazing videos, such as transitions, aspect ratio adjustments, and filters.
Additionally, Clipchamp provides various overlays, stock videos, stock images, and other content to decorate your clip. Also, it lets you add black bars to video, rotate video, change video speed, and more.
Step 1. Click the search box, type “clipchamp”, and open Microsoft Clipchamp. If it’s not installed on your PC, go to Microsoft Store to download it on your PC.
Step 2. Sign in with your account and click Create a new video to access the editor page.
Step 3. Click the Import media button on the top to upload your video file and add it to the timeline.
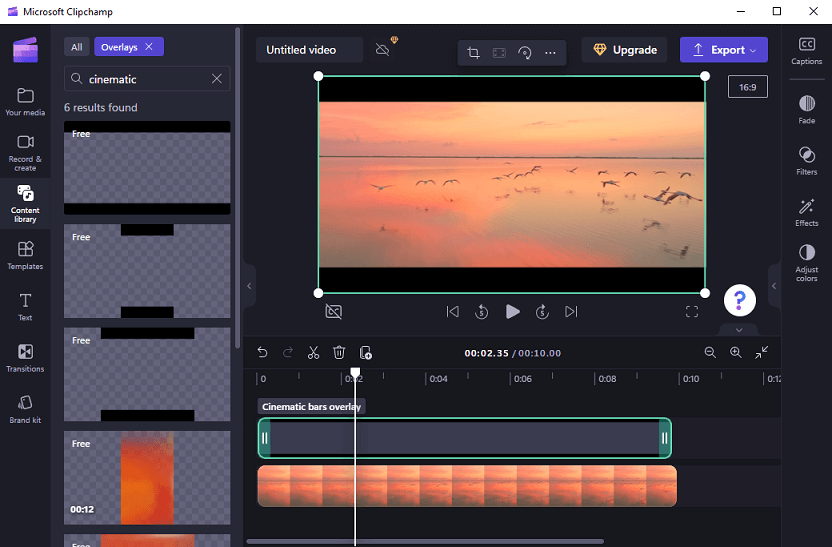
Step 4. Go to Content Library on the left, select the Overlays category, search for “cinematic”, and you can find a free cinematic bars overlay.
Step 5. Drag the Cinematic bars overlay onto the track above the video track to add the cinematic black bars to your video. Expand the black bars overlay to fit the duration of the video.
Step 6. Click the Export button in the upper right corner and choose a video resolution to export your video.

How to Add Black Bars to Video Online
Clideo is a useful online video editing editor, including the most common editing tools, such as compressing video, adding subtitles, looping video, creating a stop-motion animation, changing the DPI of image, etc.
Moreover, Clideo lets you add black bars to video online. Follow the steps below:
Step 1. Go to the Clideo website and sign in with your account.
Step 2. Click the Create project button and select the Resize video tool. Click Choose File to upload your video.
Step 3. Navigate to the Resize for section, and select Custom from the drop-down menu. Choose an aspect ratio from 16:9, 4:3, 1:1, 4:5 and 9:16. Also, you can change the size and color of the black bars.
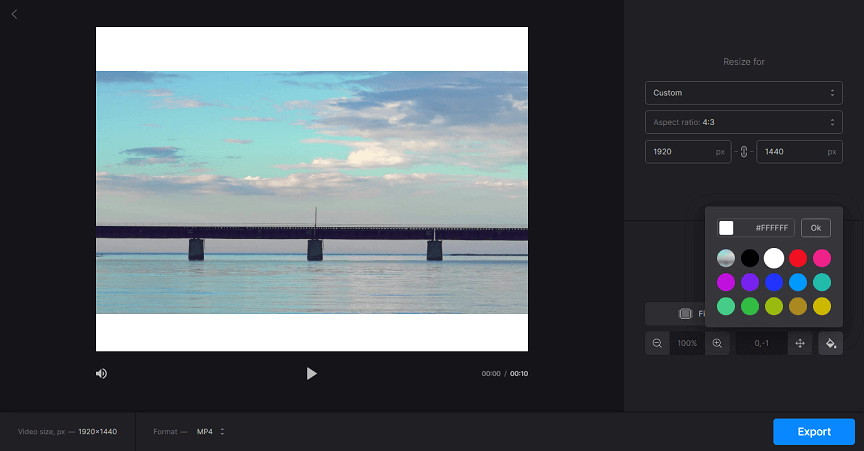
Step 4. Select a video format and click Export to export the video.
![How to Convert Slow Motion Video to Normal Speed [Ultimate Guide]](https://images.minitool.com/moviemaker.minitool.com/images/uploads/2026/04/convert-slow-motion-video-to-normal-speed-thumbnail.jpg)
Conclusion
Adding cinematic black bars is an essential way to create cinematic videos. This post explores 7 methods to add black bars to video using some of the most popular Windows or Mac video editors, and these applications also include many other tools and effects for you to make eye-catching videos.
By the way, if you encounter any problems while using MiniTool MovieMaker, you can contact us via [email protected].
About The Author

Position: Columnist
Cora is a tech writer specializing in digital media workflows, with over six years of hands-on experience in video post-production, media transcoding, and screen capture. Her writing is always clear and practical. Cora also produces in-depth software reviews for users across skill levels to help them find the right tool and enjoy video editing.
User Comments :