To edit photos in Windows 11, consider MiniTool MovieMaker if you need to add filters, text, effects, and export as a GIF; use Paint to draw arrows or highlight key areas; Try Photos to make basic adjustments quickly; use Word to edit and save the picture within a document; use Snipping Tool to annotate right after taking a screenshot.
Photos, pictures, or images are a type of graphic content carrier. They can transfer useful and vivid visual information. Thus, graphic media files are one of the main digital data storage forms in computer usage.
During the management of graphic media files, sometimes, you need to edit photos/pictures/images to make them display content better and more pleasant to view. For example, you may want to crop its size; change its aspect ratio, saturation, brightness, contrast, and resolution; add text to it; alter its metadata; as well as convert its file format, etc.
Then, how to edit photos on Windows 11, 10, 8.1, 8, and 7? Let’s take Windows 11 OS for example to show you some popular methods. Below is a brief comparison.
| Software | Price | Watermark-Free | Core Features | Use Cases | Difficulty |
| MiniTool MovieMaker | Free | Yes | Filters, subtitles, elements, color grading, cropping, export as GIF | Social media images, professional-looking photos | Low |
| Photos | Free | Yes | Cropping, light and color adjustment, filters, markups | Daily quick adjustments | Very Low |
| Paint | Free | Yes | Cropping, resizing, rotating, drawing, and adding text | Simple drawing, arrow annotations | Low |
| Word | Requires Office | Yes | Remove background, artistic effects, borders, and layout | In-document image editing | Low |
| Snipping Tool | Free | Yes | Cropping and annotation | Edit right after taking a screenshot | Very Low |
![[4 Ways] How to View Photos in Windows 11/10/8/7?](https://images.minitool.com/moviemaker.minitool.com/images/uploads/2022/10/view-photos-windows-11-thumbnail.png)
How to Edit Photos by Third-Party Photo Editor?
First of all, let’s see how to edit pictures with a 3rd party photo editing program. Why third-party software first? Because usually they have more powerful features than Windows built-in tools and they can satisfy your various needs.
The following will take one of the professional and easy-to-use image editing applications – MiniTool MovieMaker, for example, to teach you the photo editing process. It is a reliable free app without watermarks and ads.
Fast Track:
- Open MiniTool MovieMaker.
- Import the picture.
- Flip, rotate, scale the picture.
- Edit the image color.
- Apply filters, add text, and crop the image.
- Save the picture as a GIF.
Step 1: Download MiniTool MovieMaker
Click the button below to get the installer for the audio editor, open the file, and complete the installation.
MiniTool MovieMakerClick to Download100%Clean & Safe
Step 2: Upload the Target Photo
Launch the software and click New Project to access the main user interface. Next, click the Import Media Files option in the left panel to add the target picture.
Step 3: Add the Photo to the Timeline
Put your mouse on the photo and click the red + icon that appears to add the photo to the timeline on the video track. Or, you can directly drag and drop the picture to the destination track’s first media file position.
Step 4: Flip, Rotate, or Scale the Picture
Click the photo on the timeline to open Image Property on the right panel. Under the Basic tab, you can flip the picture horizontally or vertically, rotate the photo within 0 – 360 degrees, and scale it.

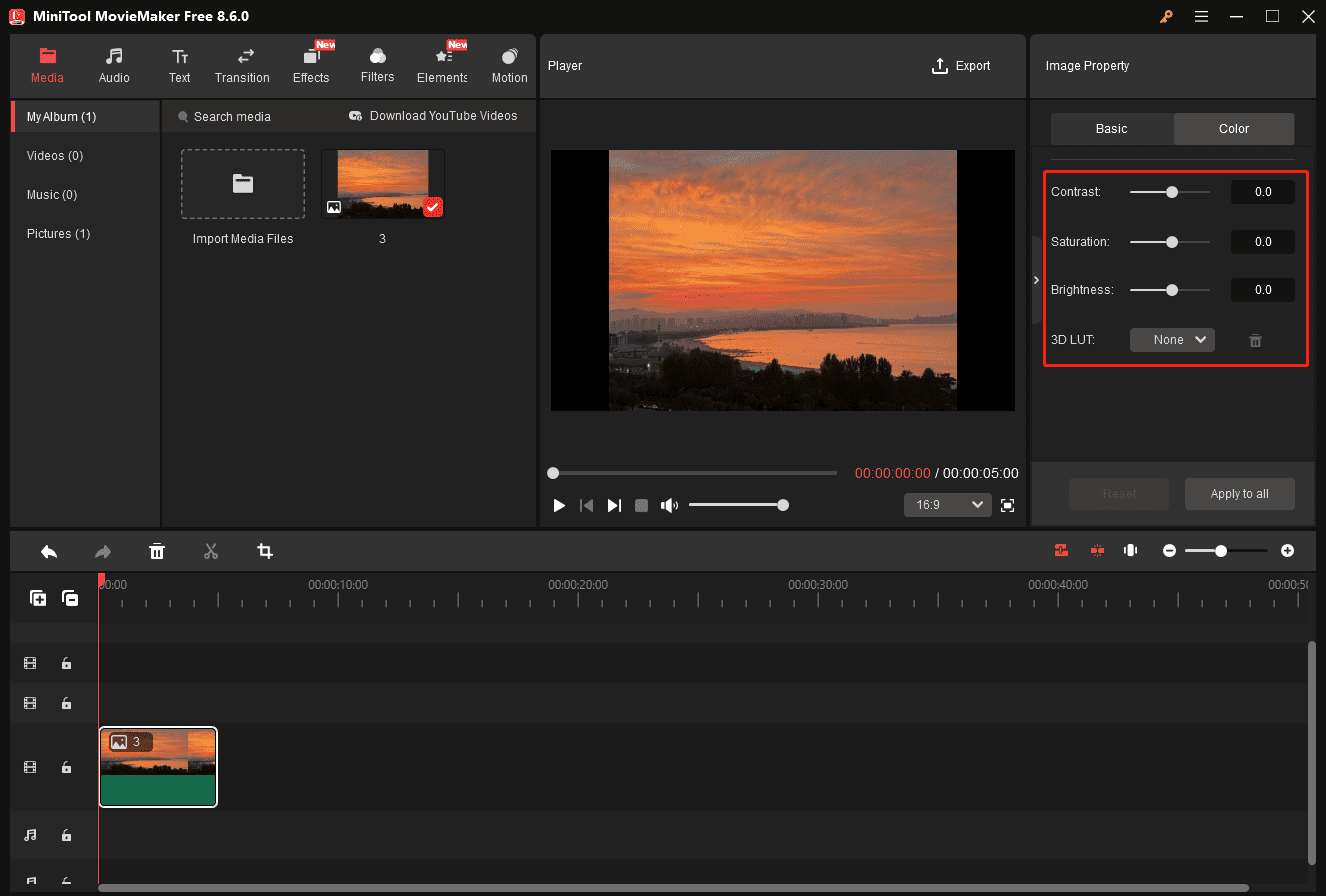
Step 5: Adjust the Color
Then, go to the Color tab in the Image Property. Next, drag the Contrast, Saturation, and Brightness sliders to change the look of the picture. You can also apply a 3D LUT effect to enhance the photo.
Step 6: Apply a Filter
Go to Filters at the top menu, download the desired filter, and click the + icon on the thumbnail to apply the effect.

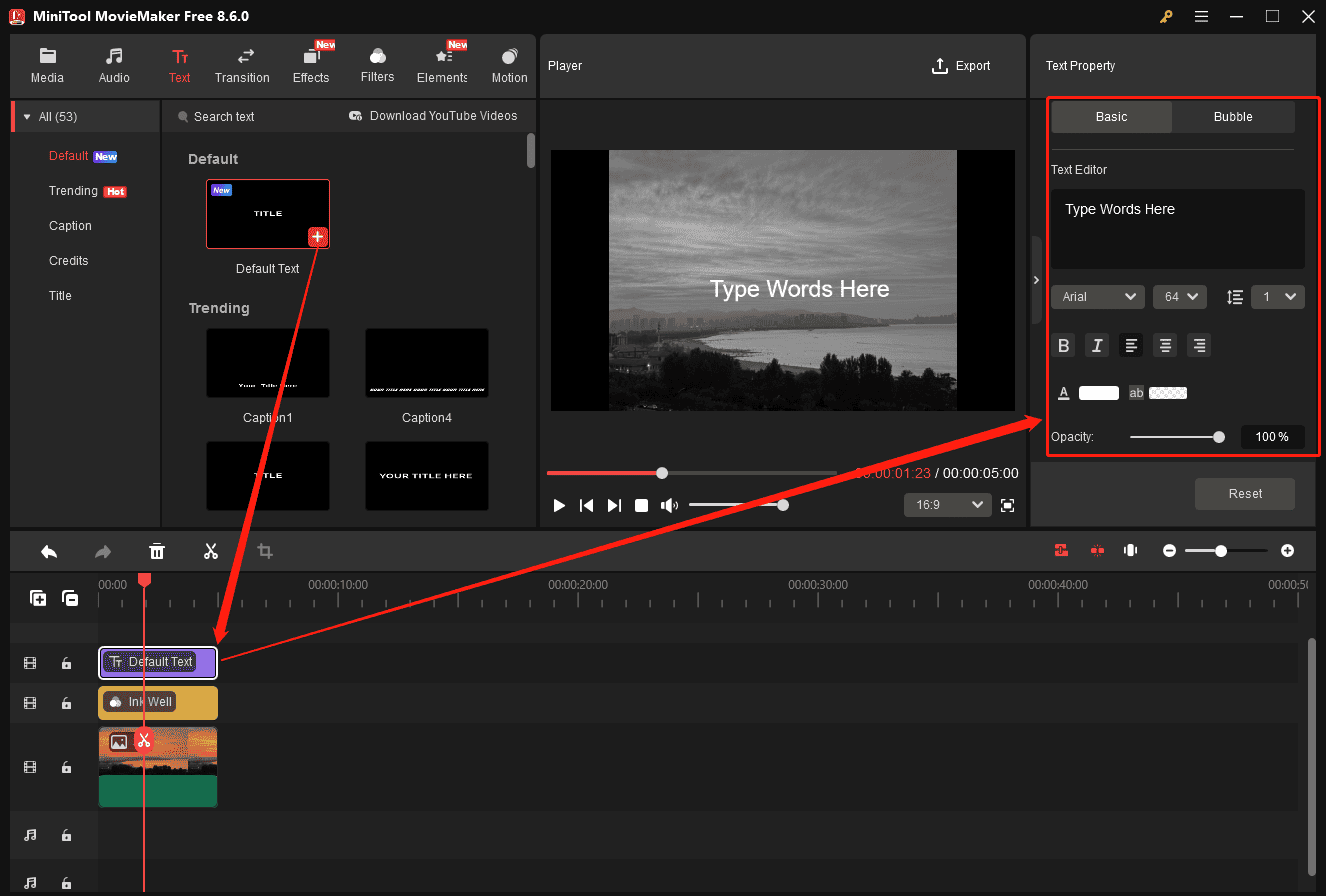
Step 7: Add Captions
Go to Text at the top toolbar, and select a caption template you like to put on your photo. Then, you can write what you want to say and specify your words’ style in the Text Property section: font, size, line space, bold/italics, alignment, text color, text highlight color, and opacity (just like editing words in Word docs). Besides, you can change the location and size of the text on your image by dragging it on the Player screen.
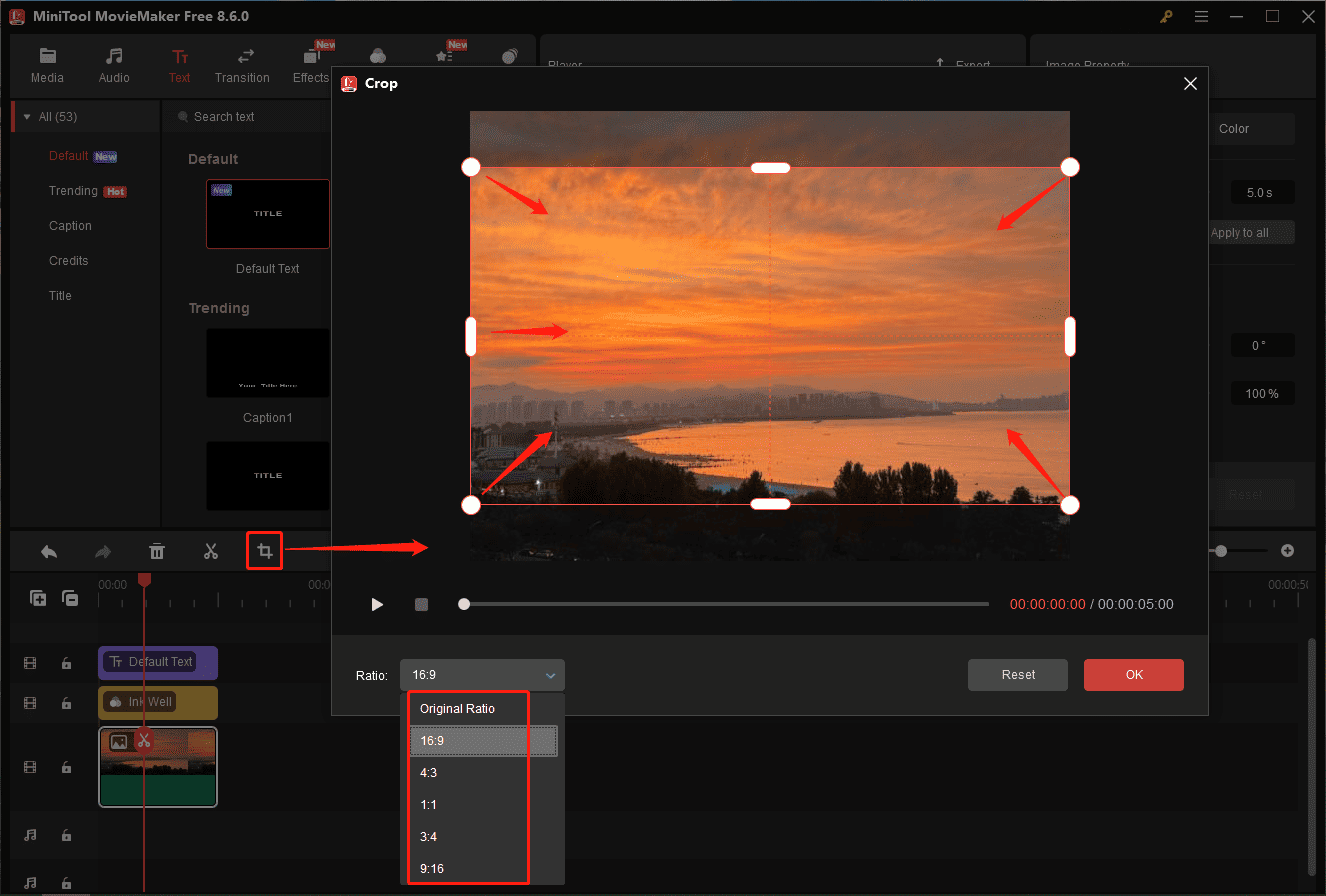
Step 8: Crop the Picture
Select the image on the timeline and click on the Crop icon on the timeline toolbar to trigger the Crop window. There, you can either manually drag the frame box inwards to shrink its size or just choose a preset aspect ratio to cut the photo to a specific width and height.
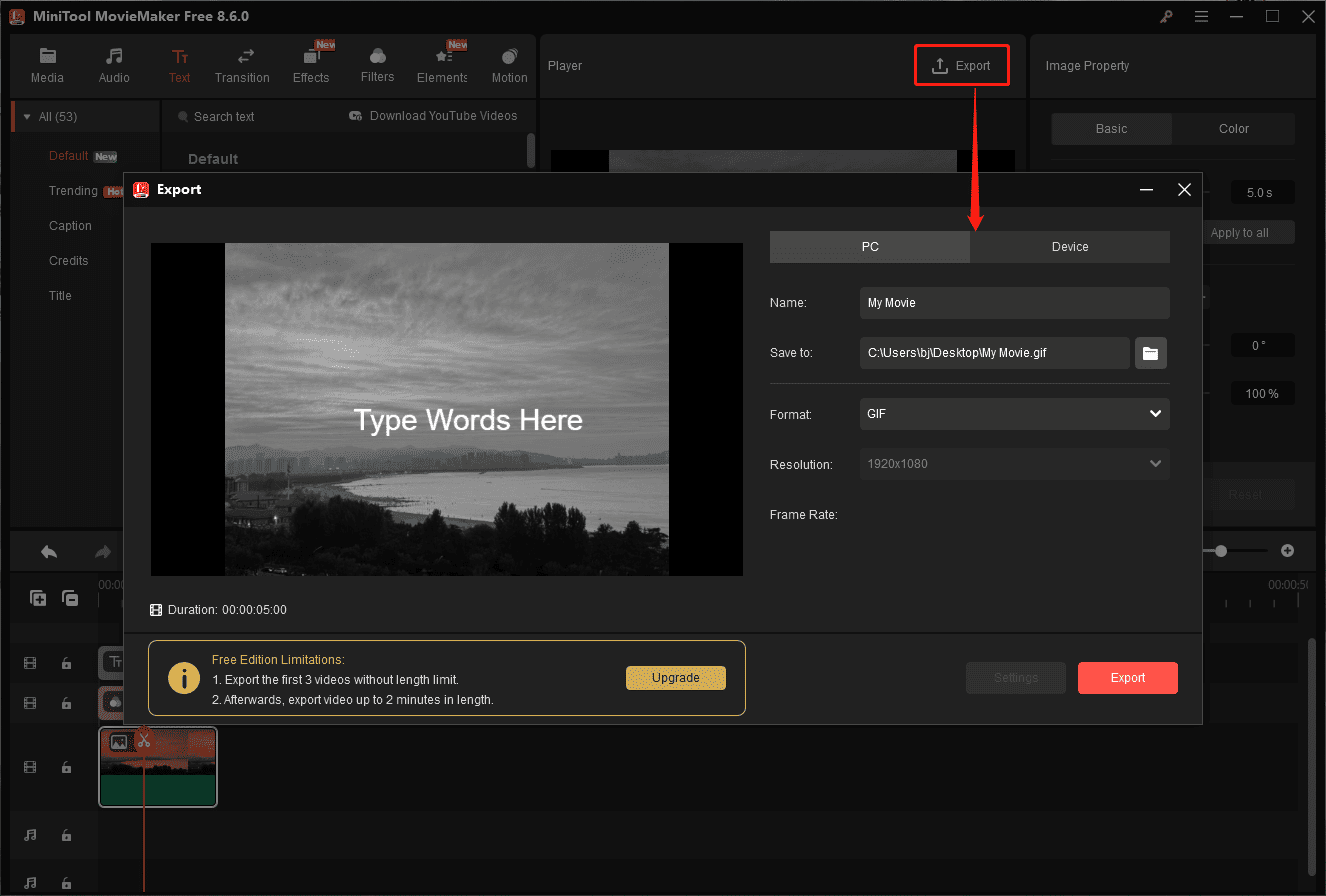
Step 9: Export the Photo
Finally, export the edited photo in GIF format. You can further change its name and save its location on your PC. When all is set, click the Export button and wait until it finishes.
MiniTool MovieMaker does include some effects that are more associated with photo editing apps, such as the face-altering Beauty Skin and Big Eyes. You also get Sparkle, Fire Particles, and distortion options like VCR and water ripple.https://www.pcmag.com/reviews/minitool-moviemaker
How to Edit Pictures in Paint?
Secondly, let’s discuss how to edit a photo in Windows Paint.
Fast Track:
- Open the picture with Paint.
- Crop, resize, rotate, and flip the photo.
- Draw on the picture and add text.
- Save the photo.
1. Open the target image with the Paint app. If the picture is too large that you can’t see its whole content, you can decrease the display percentage in the lower right.
2. Crop the image. Just select a shape (usually a rectangle), mark out the area you want to keep on the photo with the shape, and click the Crop icon on the toolbar.

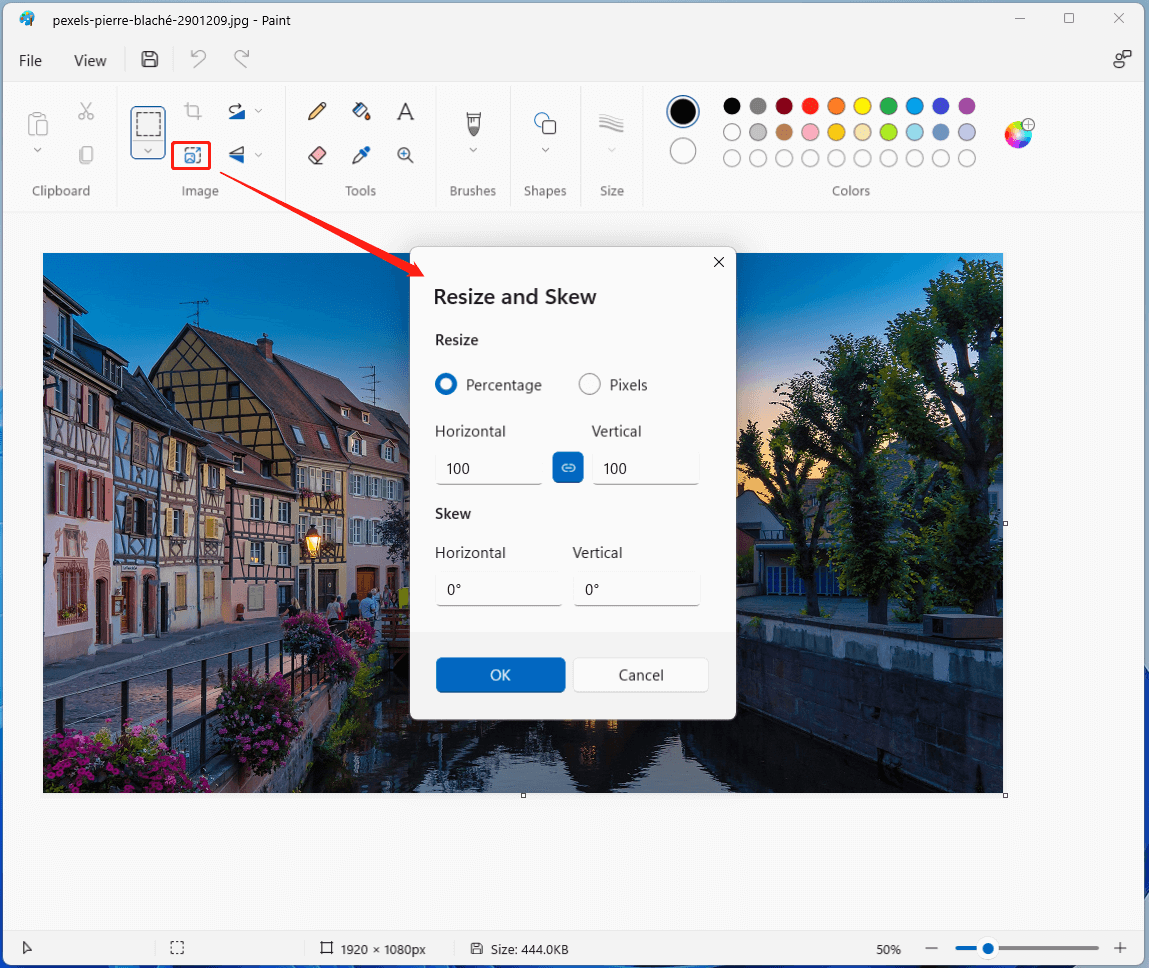
3. Resize or skew a photo. Click the Resize icon to open the Resize and Skew window. Then, you can resize the picture by percentage or pixels; just change the number in both Horizontal and Vertical blanks. To skew the photo, type horizontal and vertical degrees.
4. Click the Rotate icon in the Image section on the toolbar and select an option from the drop-down menu: Rotate right 90°, Rotate left 90°, or Rotate 180°.
5. Click the Flip icon in the Image part and choose to flip the photo vertically or horizontally.
6. Click on the Pencil icon in the Tools area, select a size and color, then you can draw freely on your photo. If you want to use a color that appears on the photo, you can take advantage of the Color picker tool to pick up the specific color from the picture.
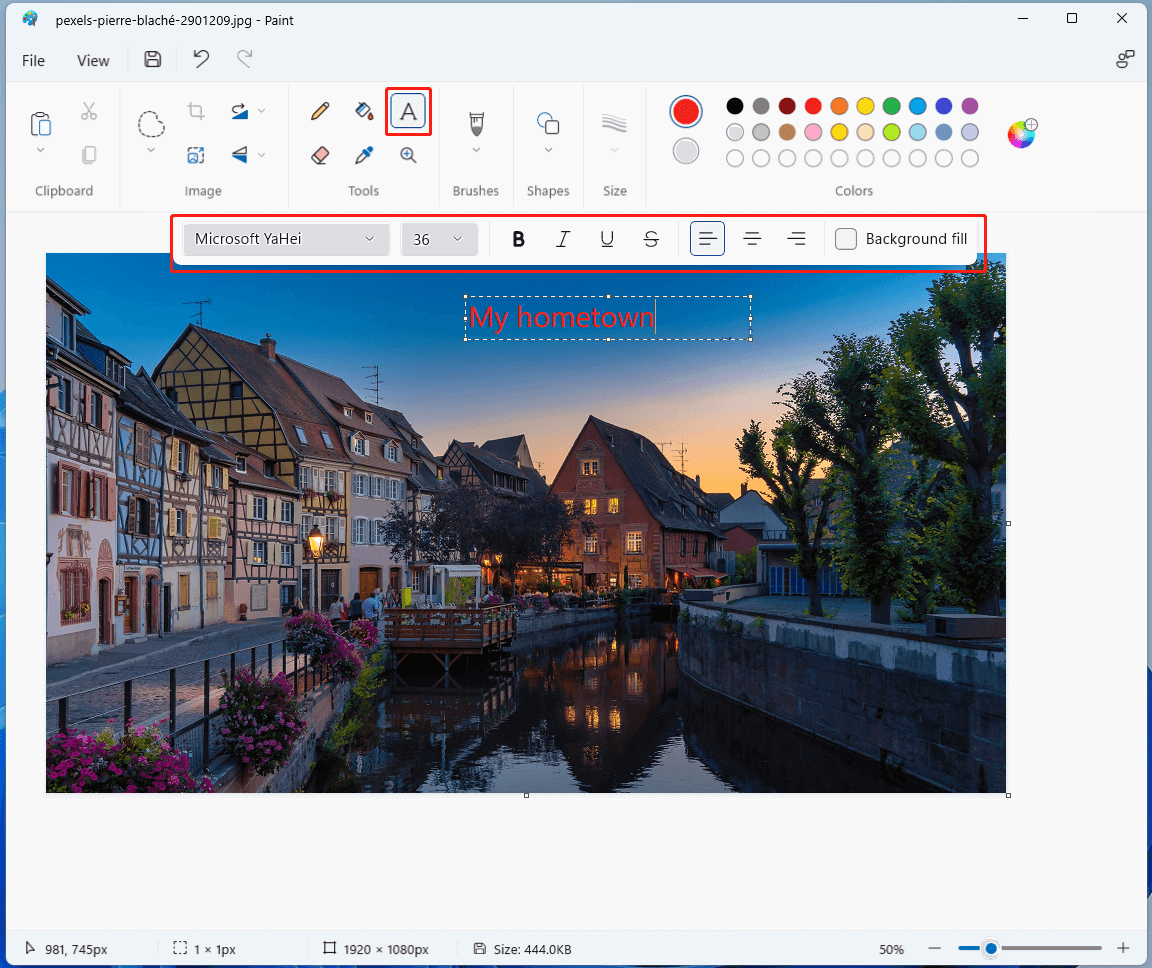
7. Click on the Text icon (“A”), frame out a section on your photo, and you can write some words within the section. You can change the font, size, alignment, background, as well as other styles of the words.
8. Click the Eraser icon to wipe out what you don’t want to display on the picture. You can adjust the size of the eraser.
9. Click the Magnifier icon to enlarge your photo to edit it more precisely.
10. Select your favorite brush, size, and color to draw on your picture.
11. Or, you can choose a shape to draw on the image.
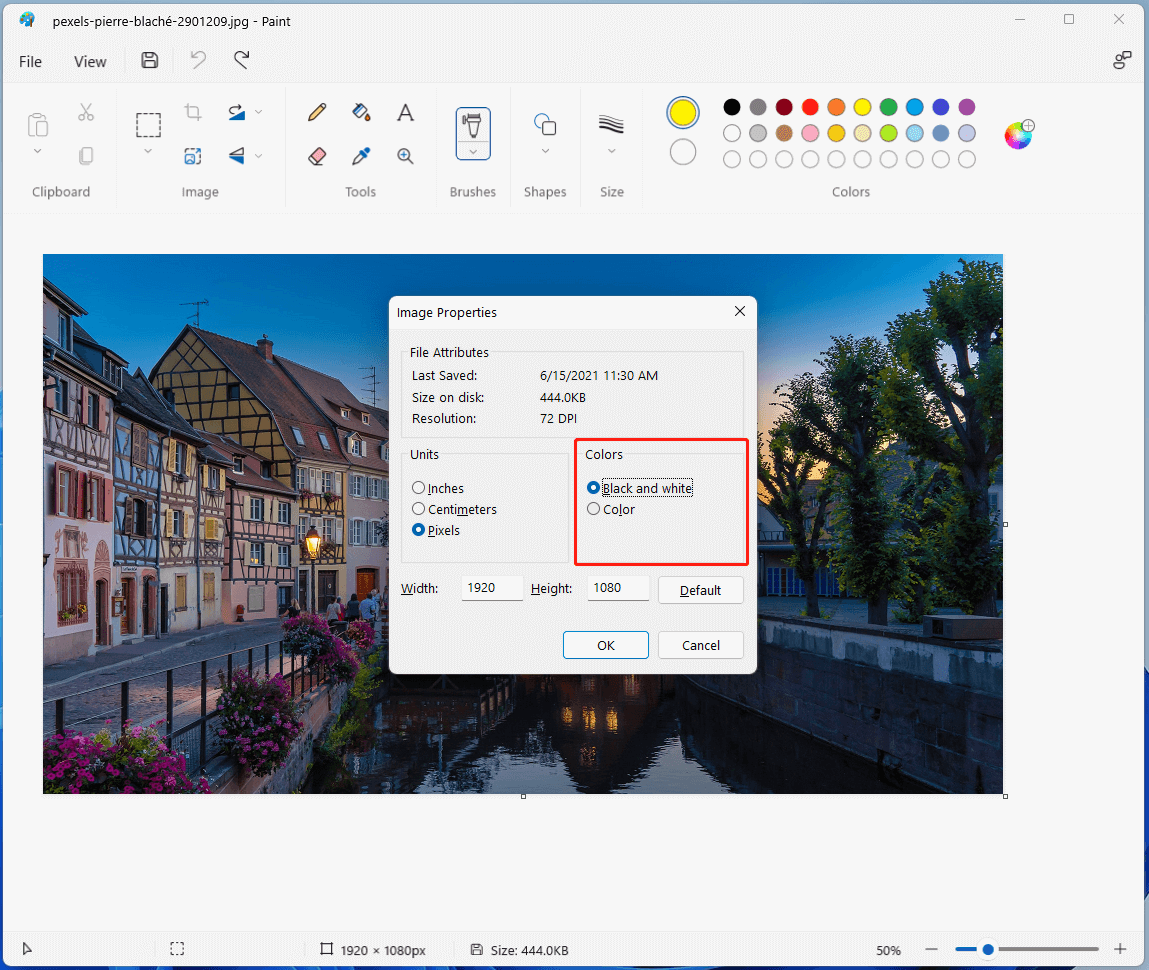
12. You can also turn your color photo into black and white. Just go to File > Image properties. In the new popup, select Black and white in the Colors section. Then, click OK. Please note that this operation can’t be undone and you may lose some color information.
13. Finally, save the edited photo on your computer.
Classic Microsoft Paint should already be on your Windows PC. In the search box next to Start on the taskbar, type paint and then select Paint from the list of results. If you have the latest version of Windows 10 and want to try something new, open Paint 3D featuring new 2D and 3D tools. It's free and ready to go.https://sourceforge.net/software/product/Microsoft-Paint/
How to Edit Photos in Microsoft Photos?
In this part, I’ll show you how to edit a photo using Microsoft Photos.
Fast Track:
- Open the picture with Photos.
- Click the Edit image icon.
- Crop, rotate, add a filter, and mark up.
- Edit metadata.
- Resize the image and save the result.
1. Open your photo with Photos.
2. In the main UI of Photos, click the Edit image icon.
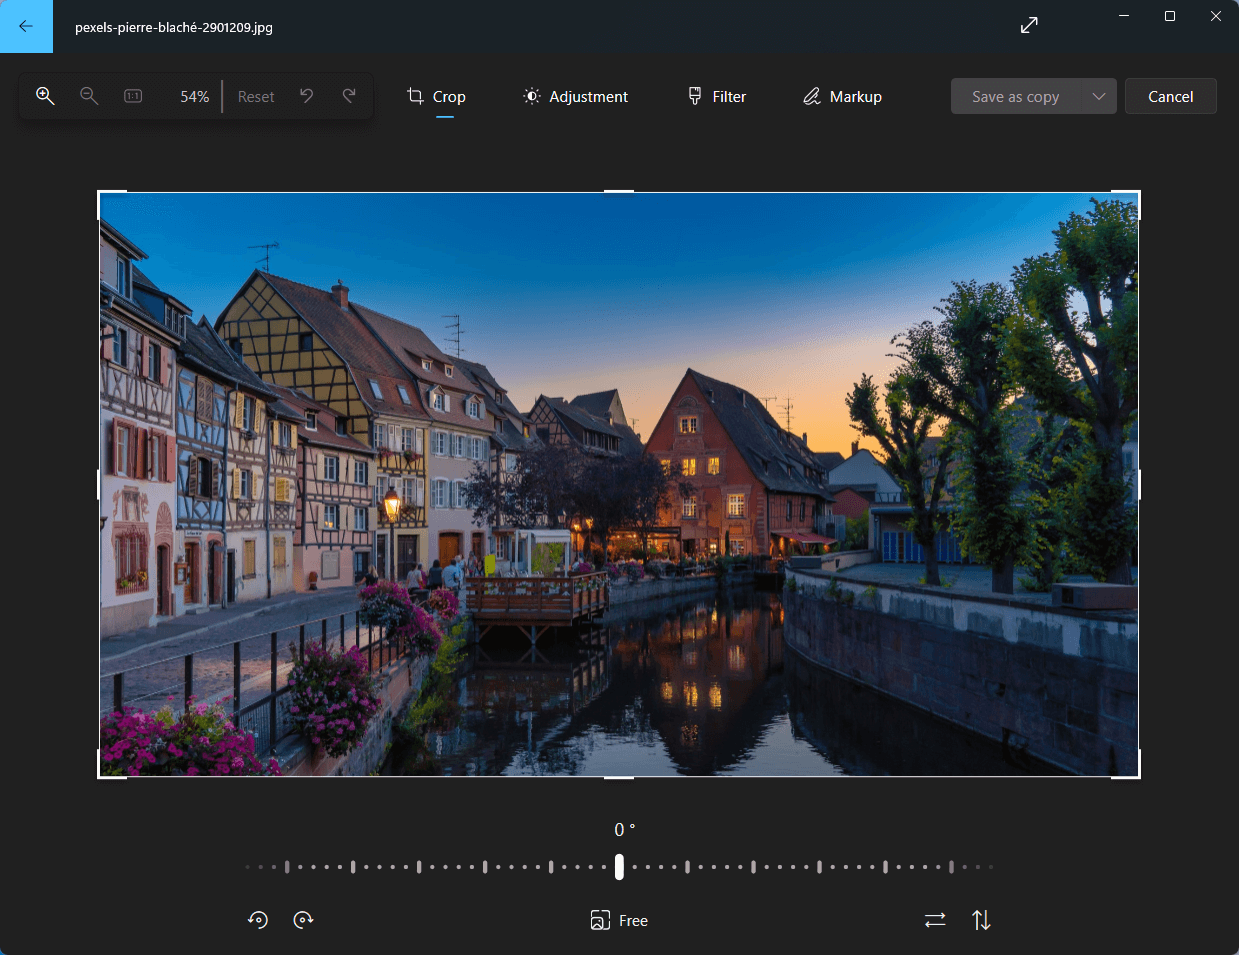
3. On the next screen, you can do the following editing.
- Crop the picture.
- Adjust the light (brightness, exposure, contrast, highlights, shadows, and vignette) and color (saturation, warmth, and tint) of the photo.
- Add a filter to the image.
- Mark up on the picture.
- Rotate/flip the photo.
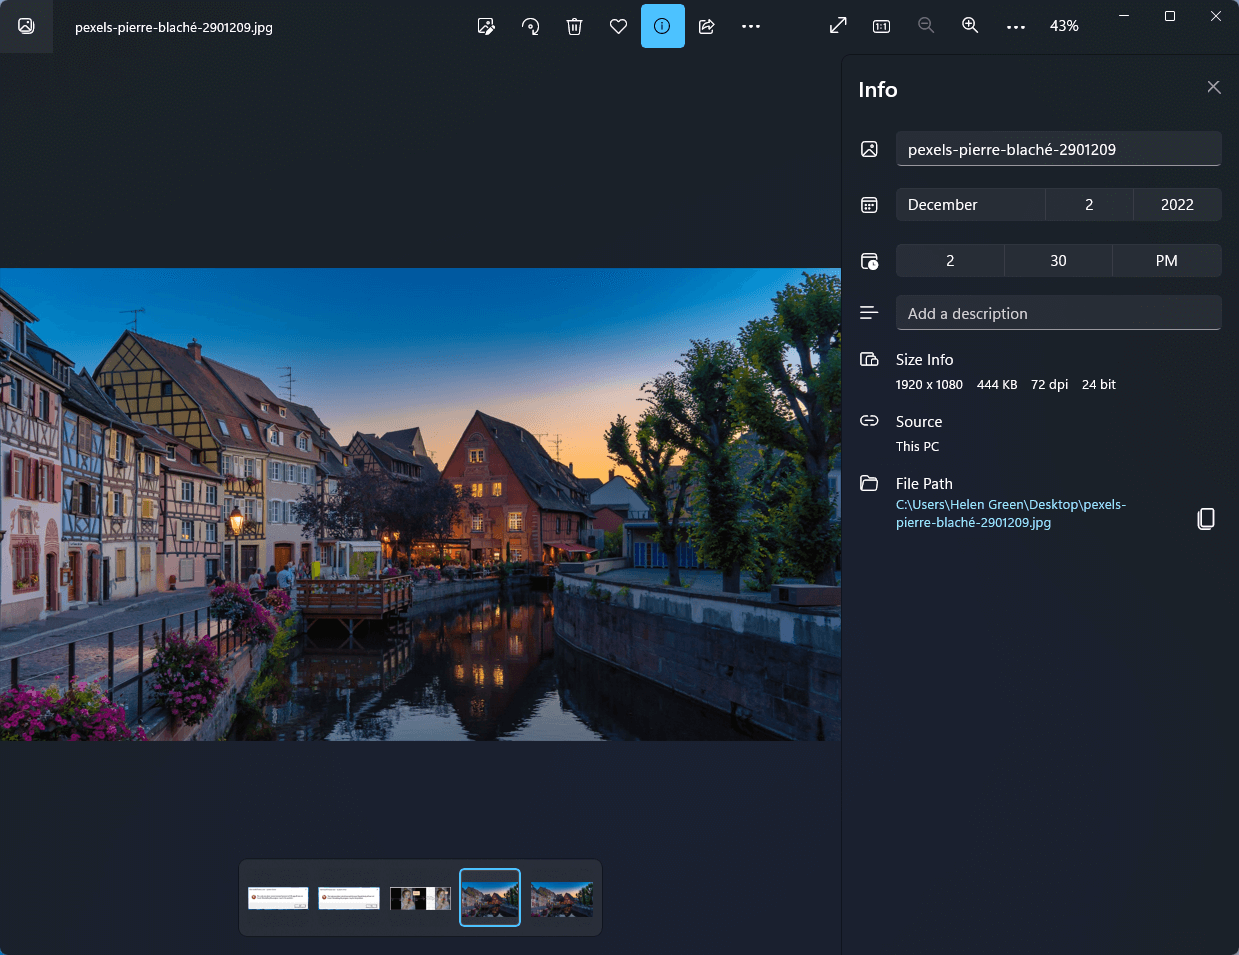
4. Go back to the main interface and click the File info icon to edit photo metadata including name, taken date and time, and description.
5. Click See more (three dots) and choose Resize image. In the new window, pick up a proper size or just customize the dimensions.
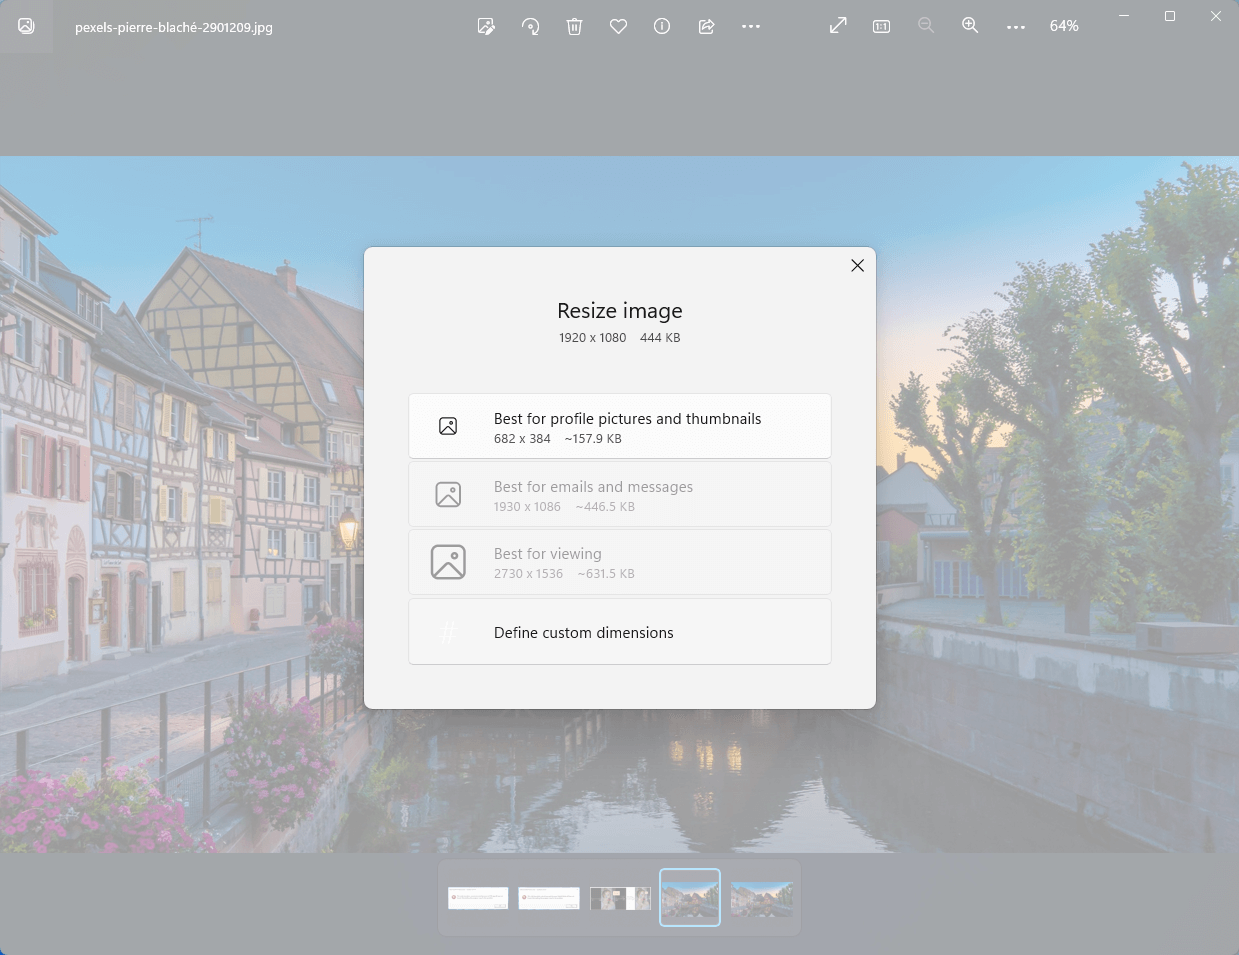
After you have done all the settings. Just save your copy.
Microsoft Photos, the free photo editing app that comes with Windows, offers competent image viewing and editing in an intuitive interface.https://au.pcmag.com/photo-editing/47324/microsoft-photos
You can also edit your picture with the Photos Legacy app, which is an edition that can also create videos just like Windows 10 Photos. Windows 11 Photos can’t create videos. The way to edit photos in Photos Legacy is nearly the same as in the Photos app described above.
How to Edit a Picture in the Microsoft Word App?
Besides, you can make use of Office apps to help you edit your photos in Word, Excel, and PowerPoint. Below, take Microsoft Word for instance to show you the details.
Fast Track:
- Create a Word document.
- Insert a photo and go to Picture Format.
- Remove background, apply effects, and crop the image.
- Once done, save edits.
1. Create a new word document and open it.
2. Insert the target photo into its context area. Or, just directly drag and drop the photo there.
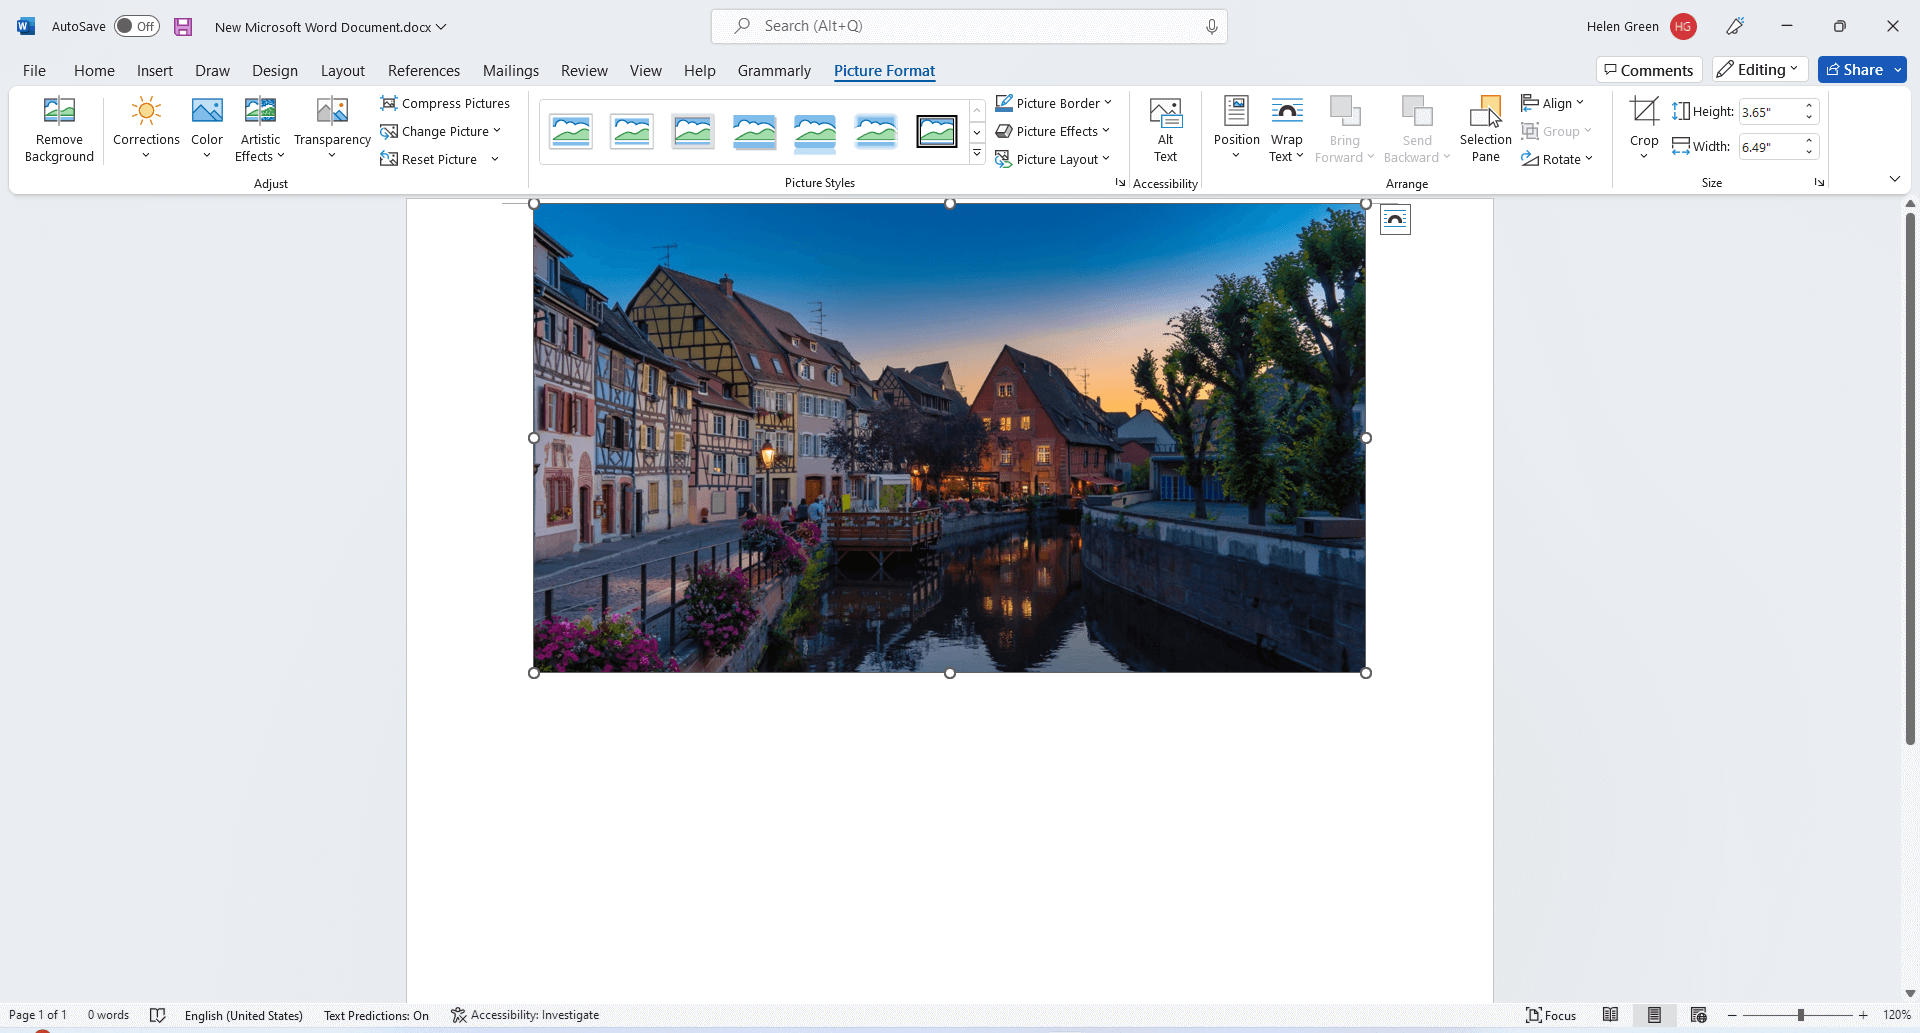
3. Click on the photo to select it and go to the Picture Format tab on the top menu.
4. In the Picture Format tab, you can do many edits to your photo.
- Remove background.
- Change picture correction, color, and transparency.
- Add artistic effect, style, border, picture effect, and picture layout.
- Flip or rotate the picture.
- Crop the picture.
- Change picture height and width.
- …
5. When you finish editing, right-click on the picture and select Save as Picture.
How to Edit a Photo on Snipping Tool?
Moreover, you can also edit your pictures with the Snipping Tool in Win11. With it, you can mark up the image with a ruler, crop the photography, and so on.
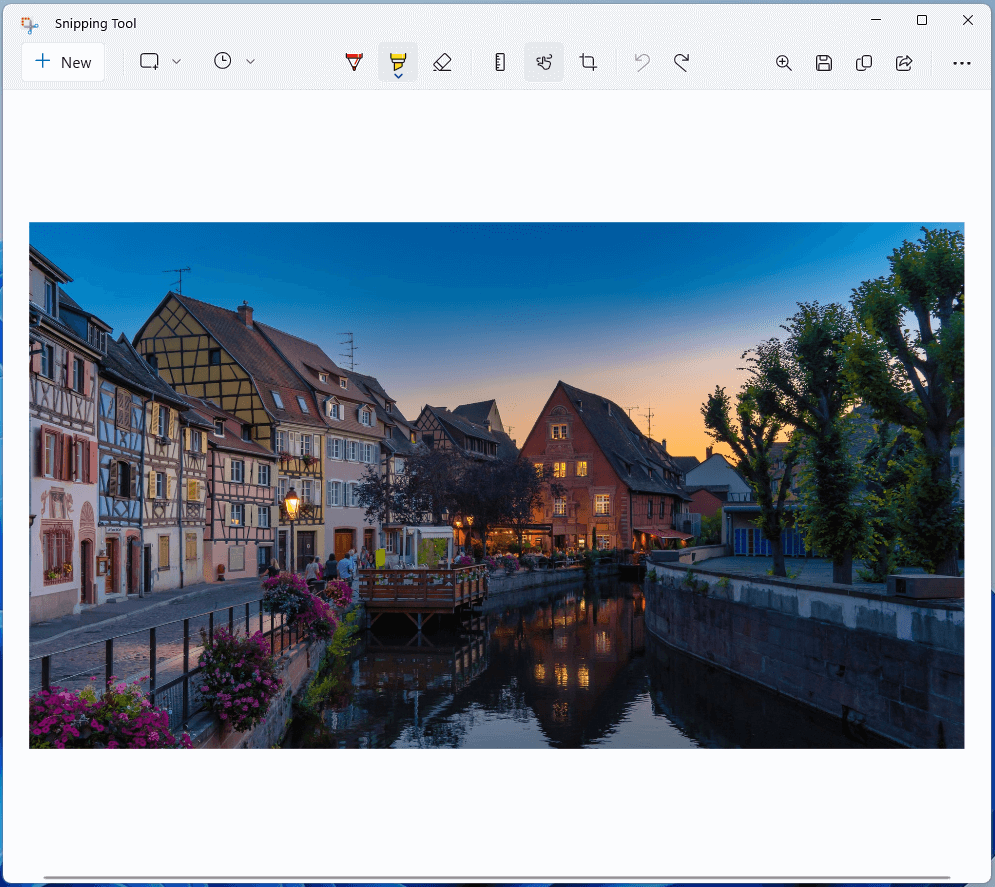
Once you've snipped something, the editor in the Snipping Tool opens, giving you more helpful tools to modify the image. With a mouse or touch screen, you can draw over your capture with one of 25 pen or pencil thicknesses and apply one of 30 colors.https://www.pcmag.com/reviews/microsoft-snip
To Wrap Things Up
Until now, we have introduced altogether 5 Windows 11 programs that can assist you in editing photos, pictures, or images. Which one do you prefer? No matter which one you choose, you can finally get a refined and beautiful masterpiece!
Edit Photos in Windows 11 FAQ
About The Author

Position: Columnist
Cora is a tech writer specializing in digital media workflows, with over six years of hands-on experience in video post-production, media transcoding, and screen capture. Her writing is always clear and practical. Cora also produces in-depth software reviews for users across skill levels to help them find the right tool and enjoy video editing.
User Comments :