GIMP (GNU Image Manipulation Program) is a free and open-source image editing application available on Windows, Mac, Linux. With it, you can change image size, make the image transparent, crop, rotate, and flip images, and more. But how to resize an image in GIMP? Just read the following part and you’ll learn how to let GIMP resize images.
And if you desire to convert your pictures to an amazing video or a photo slideshow, MiniTool MovieMaker is the best tool!
How to Resize an Image in GIMP – Changing the Size of an Image Scale
When it comes to image resizing, the first way is to enlarge or reduce the size of an image. How to let GIMP resize images by adjusting the dimension of an image scale? Here’s the how-to guide.
Step 1. Download, install, and open GIMP.
Step 2. Go to File > Open, choose the target image, and click the Open.
Step 3. Click the Image > Scale Image to open the Scale Image dialog.
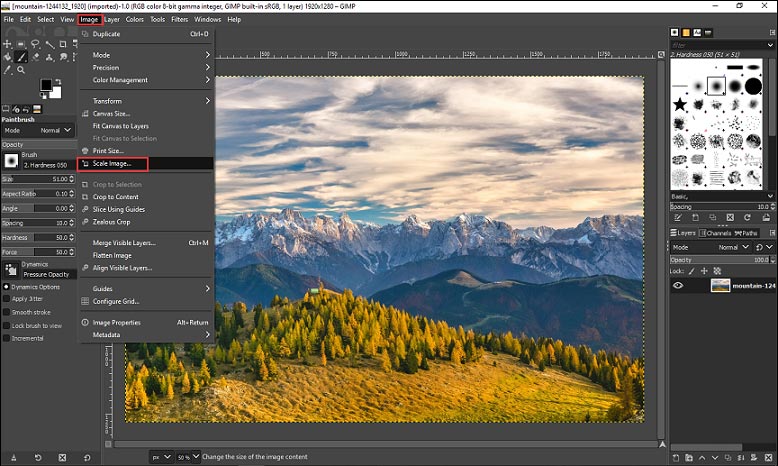 Scale Image”/>
Step 4. In this dialog, first, choose a value type. Pixels, or percent, or others.

Step 5. Type new values for Width and Height.
Step 6. If necessary, enter new values for X resolution and Y resolution.
Step 7. Under the Quality, click the dropdown to select the Interpolation method. The default interpolation value is Cubic.
Step 8. Tap the Scale to apply these changes.
Step 9. Click the File > Save to save this resized image. To export the image back to the import file in the import format, select the File > Overwrite …. To export the image as for another format, click the File > Export as …. To save the image with a new name, tap the File > Save as ….
Related article: Top 9 Best Picture Resizers (100% Free)
How to Resize an Image in GIMP – Changing the File Size of an Image
To resize image in GIMP, you can also control the file size when exporting it as another format like JPEG. Here’s how to change image size in gimp.
Step 1. Launch GIMP, hit the File > Open to upload the image you want to resize.
Step 2. After your editing, click the File > Export as, then rename the file and choose a new location, and click the Export.
Step 3. In the Export Image as JPEG dialog, Move the slider to change the image quality to change the file size.
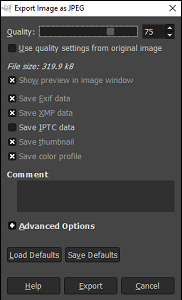
Step 4. When getting the desired file size, tap the Export button.
Conclusion
Now, you must understand how to resize an image in GIMP. It’s time to practice. Try to resize image in GIMP by yourself!
About The Author

Position: Columnist
Cora is a tech writer specializing in digital media workflows, with over six years of hands-on experience in video post-production, media transcoding, and screen capture. Her writing is always clear and practical. Cora also produces in-depth software reviews for users across skill levels to help them find the right tool and enjoy video editing.
User Comments :