Photoshop is a raster graphics editor developed and published by Adobe Inc. It supports both Windows and Mac operating systems. Photoshop can edit and compose raster pictures in multiple layers and supports masks, alpha compositing, as well as several color models like RGB, CMYK, CIELAB, spot color, and duotone relying on its PSD and PSB.
Besides, Photoshop has limited abilities to edit or render vector graphics, text, and 3D graphics/videos. Its feature set can be expanded through plug-ins, tools developed and distributed independently of Photoshop that runs inside it, and provide new (enhanced) utilities.
How to Crop a Photo in Photoshop?
As a powerful photo editing program, you can easily crop photos in Photoshop. Cropping is the process of removing portions of a graphic to create focus or strengthen the composition. Just follow the following steps to crop photo in Photoshop!
Step 1. Download and install Adobe Photoshop on your computer. You can either enjoy its free trial or directly purchase its service.
Step 2. Find your target photo and open it with Photoshop.
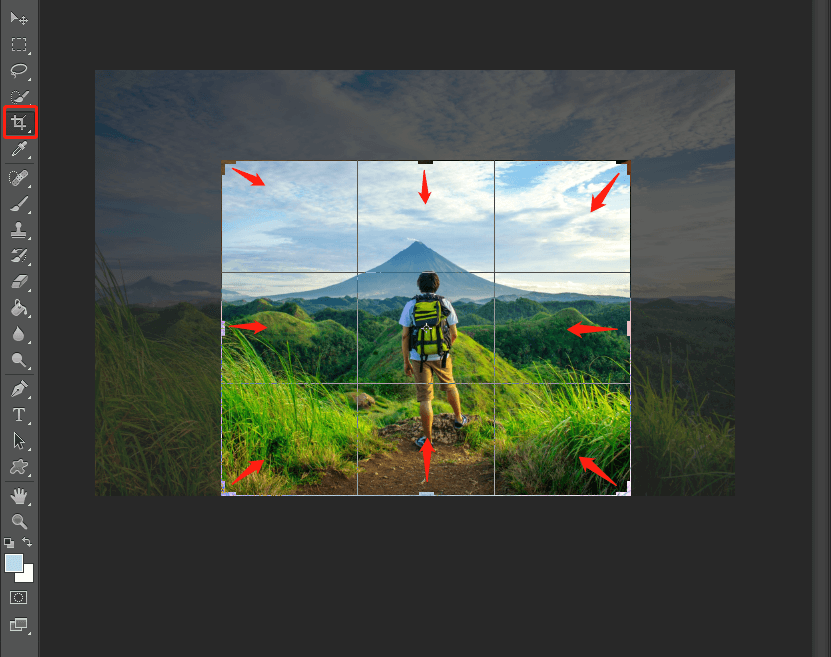
Step 3. Click on the Crop Tool in the left panel and you will see a crop border appears surrounding the image.
Step 4. Put your mouse on any corner or edge of the border and drag inwards to resize or reshape the border.
Step 5. Or, you can take advantage of the preset ratio to automatically crop your picture. Just click on the Ratio drop-down and pick up a proper aspect ratio from the below available ones:
- No Restriction
- Original Ratio
- 1 x 1 (square)
- 4 x 5 (8 x 10)
- 5 x 11
- 4 x 3
- 5 x 7
- 2 x 3 (4 x 6)
- 16 x 9
- …
You are also able to enter your own size or even define your own preset values for later use.
Step 6. Put your mouse inside the border and drag to reposition the border to let it cover the image part that you would like to keep.
Step 7. You are recommended to uncheck the Delete Cropped Pixels option in the top crop menu that appears after you select the crop tool. This option will permanently remove the cropped part (now shaded area) and you can’t retrieve it later. If you untick this option, you can still have the grey area back once you change your mind and want to re-crop the original picture.
Step 8. Click the Commit current crop operation option (the check icon) to confirm your cropping.
Step 9. Save the change.

Other Available Options While Cropping
- Overlay: Select a view to display overlay guides while cropping.
- Settings: Specify additional crop options.
- Use Classic mode: Enable the crop tool like it was in previous versions of Photoshop, CS5 and earlier.
- Auto Center Preview: Place the preview in the center of the canvas.
- Show Cropped Area: Display the cropped area.
- Crop Shield: Overlay the cropped areas with a tint. You can personalize the color and opacity.
- Content-Aware fill: Intelligently fill in the gaps when you crop for straightening or rotating a photo, or expanding your canvas beyond the picture’s original size.
- Straighten photo: Rotate and align a photo while the canvas is automatically resized to accommodate the rotated pixels.
- Perspective Crop: Transform perspective to make distorted photos look like in a straight-on view.
- Resize the canvas: Drag the crop handles outwards to expand the canvas.
- Cancel current cropping.
- Reset: cancel all operations and go back to the original state.
How To Crop Photo In Photoshop Elements?
The Crop tool in Photoshop Elements removes the part of a photo surrounding the selection. It deletes distractive background elements and creates a focus on the important section. When you crop a picture, the resolution remains the same as the original image.
Step 1. Get Photoshop Elements on your device.
Step 2. Open the target photo with Photoshop Elements.
Step 3. Drag over the part of the picture that you plan to retain. Release your mouse and the crop box will display.
Step 4. Adjust the crop handles with one of the following options:
- Select a crop ratio on the left Tool Options.
- Move the crop box to another place by either dragging the mouse inside the box or using the arrow key.
- If you choose No Restriction under the ratio drop-down, you can freely resize the crop box. You can constrain the proportions during scaling by holding down Shift while dragging a corner handle.
- You can customize new values in the Width and Height fields by clicking the Swap icon in the options bar.
- Position the mouse pointer outside the bounding box and drag when the pointer turns into a curved arrow to rotate the crop marquee.
Step 5. Click the Commit button (green check) in the lower-right part of the marquee to confirm the cropping.
To cancel the cropping, just click the Cancel icon (red circle with a slash within) or press Esc.
Other Utilities Related to Crop
- Select boundary crop: Trim the photo to the bounding box that contains the selection. This is useful for irregularly shaped selections.
- Automatic Crop Suggestions: There are 4 ready-to-use cropping modes. You can choose one or none of them.
- Grid Overlay: Creates a grid guide on the photograph to position objects better.
- Perspective Crop tool: Transform the perspective of a picture while cropping to adjust distorted images.
- Cookie Cutter tool: Crop a photo into a shape that you select.
- Change canvas size: Expand or shrink the size of the canvas from any side of the photo.
- Straighten a photo: Realign a photo to make it more horizontally or vertically.
- Divide a scanned photo containing multiple images: Automatically divide and straighten the scanned image into its component pictures only if the pictures have a clear separation between them.
Also read:
- [Look] How to Crop a Picture on TikTok & Photo Crop Challenge
- [Step-by-Step Graphic Guide] How to Crop a Photo on iPhone/iPad?
- [2 Ways] How to Crop a Photo on Mac by Photos & Preview Apps?
- How to Crop Photos for Instagram & Why Does Instagram Crop Photos
- 5 Adobe Video Editors & Their Alternative – MiniTool MovieMaker


![[2 Ways] How to Crop Someone out of a Photo by Photoshop/Fotor?](https://images.minitool.com/moviemaker.minitool.com/images/uploads/2022/11/crop-someone-out-of-a-photo-thumbnail.jpg)
![[Step-by-Step] How to Crop Someone into a Photo by Photoshop?](https://images.minitool.com/moviemaker.minitool.com/images/uploads/2022/11/crop-someone-into-a-photo-thumbnail.png)
![[2 Ways] How to Circle Crop Photo by Office Apps (Word)?](https://images.minitool.com/moviemaker.minitool.com/images/uploads/2022/11/circle-crop-photo-thumbnail.png)

User Comments :