Are you trying to find a congratulations video maker that is easy to operate? How to make a congratulations video with music on your computer? This article describes several essential programs and offers step-by-step instructions for your reference.
How to Make a Congratulations Video Offline?
In this part, I introduce an ideal offline app for producing congratulations videos.
Introduction to MiniTool MovieMaker
MiniTool MovieMaker is a free, robust, and feature-rich congratulations video maker app for Windows devices. It can be used to create personalized congratulations videos in just minutes. Both novices and experts can use the application because of its user-friendly interface.
One of the best aspects of MiniTool MovieMaker is its ability to edit audio and video on several tracks for diverse purposes. For instance, make videos with picture-in-picture (PIP) effects, put more than one video on the same screen, and synchronize voice-overs, music, or sound effects to videos and images.
It remains a fantastic choice if you plan to craft different kinds of projects, such as graduation videos, tribute videos, anniversary videos, birthday videos, Children’s Day videos, Teacher’s Day videos, friendship videos, Thanksgiving videos, and so on.
MiniTool MovieMakerClick to Download100%Clean & Safe
Why Is Creating Congratulations Videos with MiniTool MovieMaker a Smart Idea?
- It gives you the power to import videos, photos, and audio files in many formats, like MP4, MOV, 3GP, MKV, JPG, JPEG, GIF, MP3, WAV, etc.
- It provides multiple popular aspect ratios, including 1:1, 9:16, 16:9, and 4:3.
- It simply requires a few operations to create video from images.
- It allows for drag-and-drop, one-click addition, undo, redo, and delete for a more seamless editing experience.
- It contains a large quantity of free alterable titles, captions, and end credits.
- It enables you to either import your own melodies or obtain royalty-free songs from the audio library.
- It comes packed with tons of trendy transitions, filters, effects, motions, and animated elements.
- It has the ability to quickly do video cropping, video trimming, and video splitting.
- It is capable of scaling, flipping, or rotating video with ease.
- It has the potential to add a fast-motion or slow-motion effect to video material.
- It is able to modify the brightness, contrast, and saturation of video footage.
- It has a variety of exact parameters for exporting media files.
Steps to Make a Congratulations Video with MiniTool MovieMaker
Here is a step-by-step guide on how to make a congratulations video using MiniTool MovieMaker.
MiniTool MovieMakerClick to Download100%Clean & Safe
Step 1: Download and install MiniTool MovieMaker on your Windows PCs. Launch this free congratulations video maker app.
In the project library window, pick the wanted aspect ratio and click on the New Project button to start making your congratulations video.
Step 2: Click anywhere inside the dotted box labeled Import Media Files, locate and choose the congratulations-related media files you have saved on your computer’s hard drive, and then hit the Open button. Drag and drop the videos or photos into the application is another way.

Step 3: The imported video and photo files related to the congratulations will be displayed as thumbnails in the Media tab. Click the plus (+) icon on each thumbnail separately to add the video and photo to the video track in the timeline below. Instead, simply drag and drop them onto the video track(s).
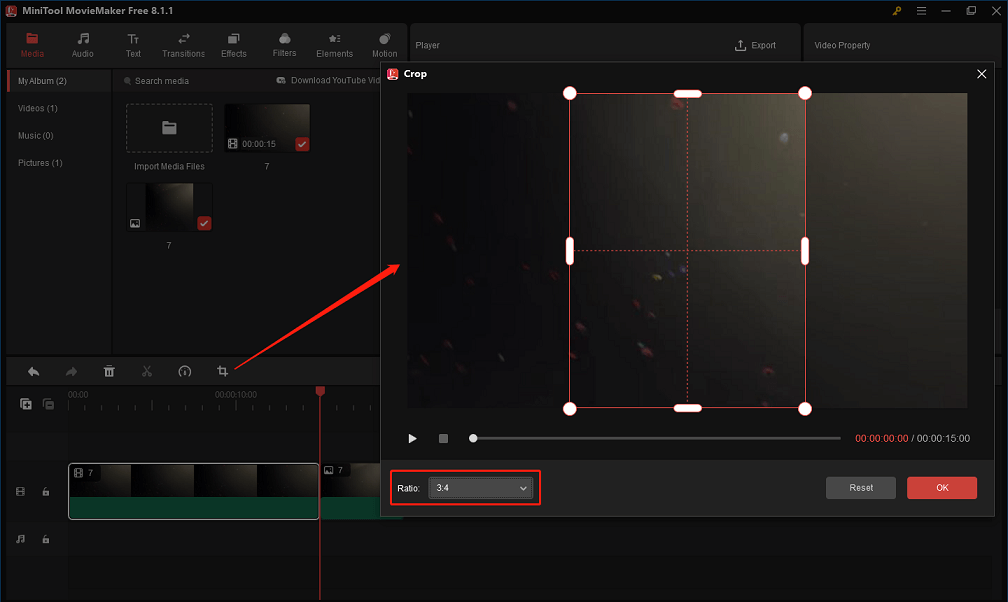
Step 4: If you would like to preserve key portions of a video or image, you can carry out the following actions:
- Highlight the target video or image on the video track and click on the Crop icon on the timeline toolbar.
- In the Crop window that appears, resize the red rectangle by hand or in proportion and move it to the location where you want the content to remain.
- Click on the OK button to save the changes you have made and return to the main user interface.
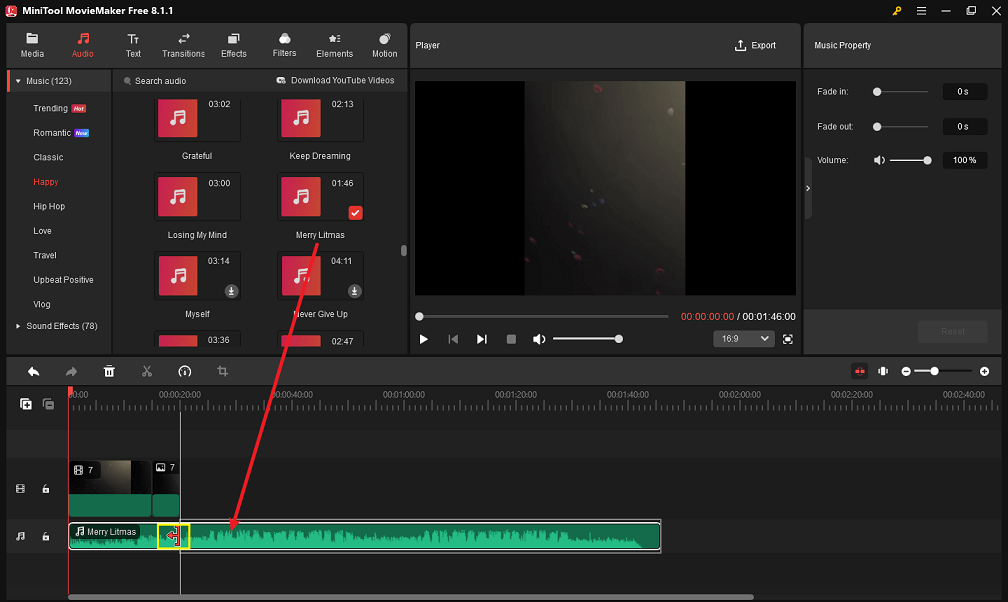
Step 5: To incorporate background music into your project, go to Audio > Music or Sound Effects to find and download the tune you like, put the playhead at the beginning, and then click the + icon to add it to the audio track below the video track.
Further, take advantage of the app’s split or trim functions to remove unwanted parts of the added tune.
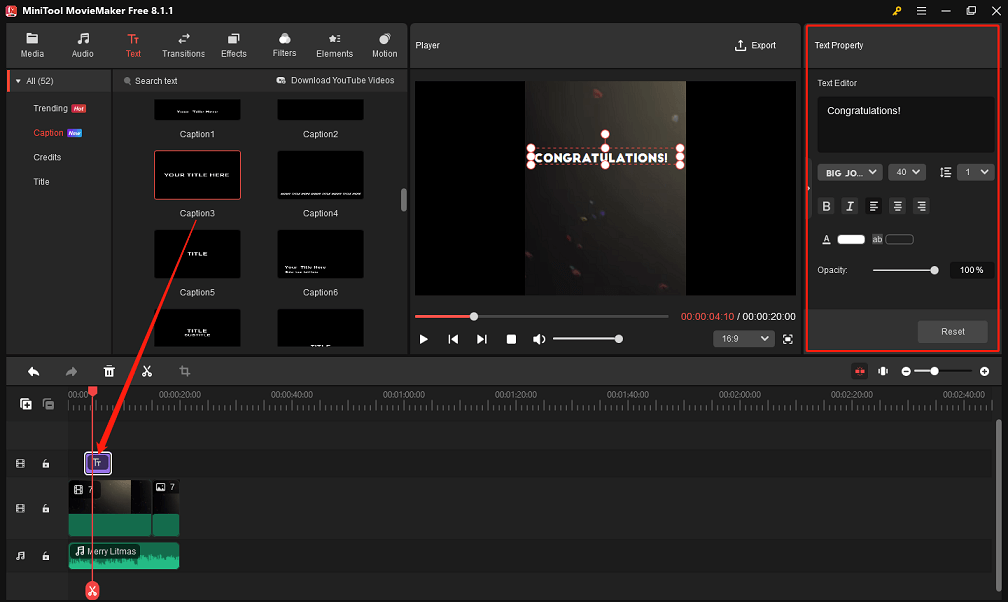
Step 6: To put text overlay on an image or video, move to Text in the top menu, select Caption on the left, look through the text styles in this category until you download one that appeals to you, and drag and drop it above the target clip in the timeline.
Highlight the text in the timeline. The Text Property panel will appear in the interface’s upper right corner. At this point, enter text description related to the congratulations in the box below Text Editor and customize the caption font, size, alignment, line spacing, color, opacity, etc.
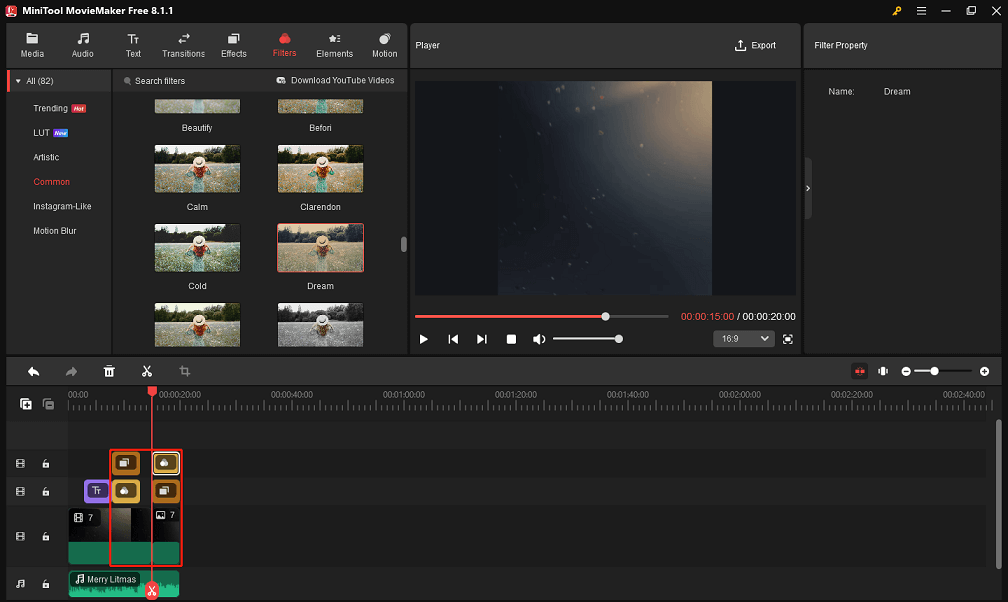
Step 7: You can opt to click the Effects and Filters tab at the top to find and download the visual effects that you want to use. Next, drag and drop the downloaded ones directly on top of the target video or photo in the timeline.
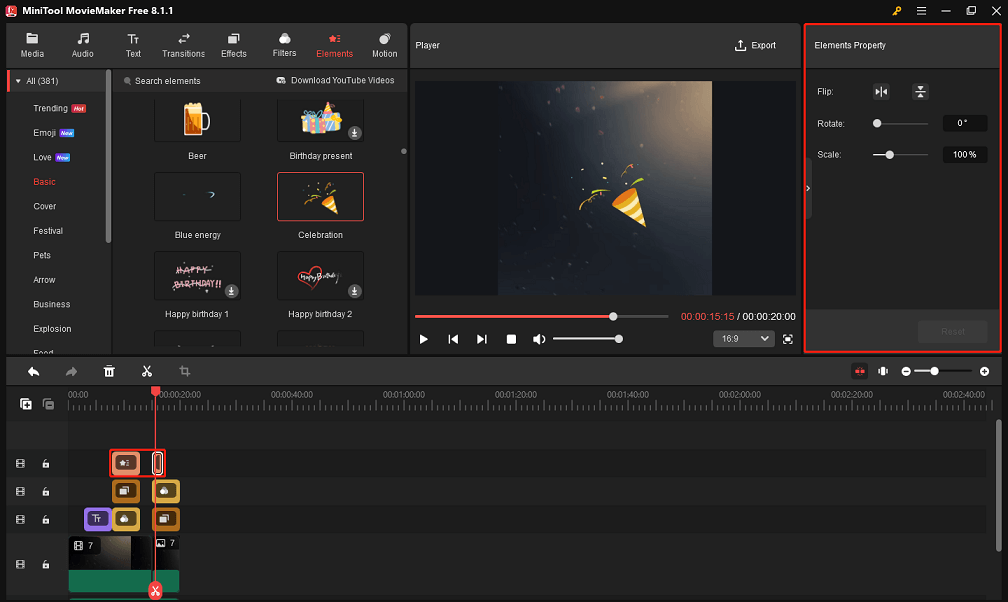
Step 8: To add animated stickers to your project, click the Elements tab at the top, and take the following actions:
- Select the Basic, Festival, etc. sub-tab on the left side.
- Download the animated elements you would like to use.
- Move the playhead to the locations where you want to add the downloaded ones.
- Click the + icon to add them to the target locations in the timeline.
- Flip, rotate, or scale the added elements in the Elements Property panel.
Step 9: Highlight the video or image in the timeline. The Video Property or Image Property will come up. From there, you can make more edits to them to enhance the visual appeal of your project.
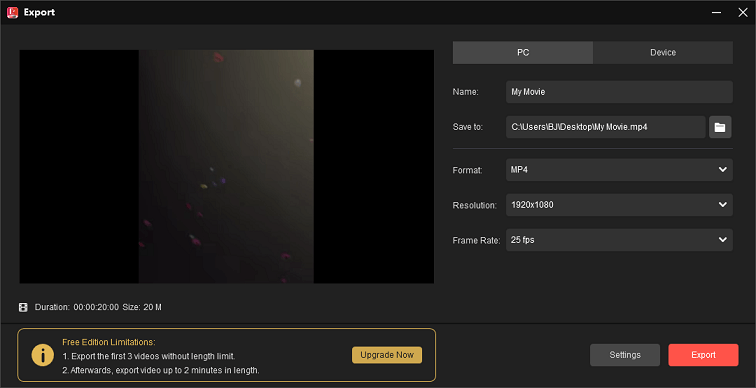
Step 10: When you are satisfied with the edits you have made, click on the Export button in the top right corner to bring up the export settings window.
Here, give your made congratulations video a name, specify the destination folder, and configure the output format, frame rate, resolution, and other parameters.
Finally, click on the Export button at the bottom to save the edited congratulations video to your computer.

How to Make a Congratulations Video Online?
I recommend a few simple yet efficient web tools for generating congratulations videos in this part.
Canva
Canva is an all-in-one online congratulations video maker that enables users to personalize visual content such as videos, banners, and so on. One of the good things about the application is that it lets you make different projects with your coworkers using its collaboration function.
Aside from that, it contains some ready-made congratulatory video templates as well as a variety of video projects. Canva also provides a free media library with backgrounds, photos, and GIFs, among other things. In the meantime, you can unlock all of the tool’s premium features by upgrading to its Pro version.
Refer to the steps outlined below on how to make a congratulations video using Canva.
Step 1: Visit Canva’s homepage through your web browser. Click on the Start designing button and log in to the platform using your Google account or another account.
Step 2: Then, click Video from the options presented, type “congratulations” in the search bar, and choose your favorite design from the search results. You have now entered its editing interface.
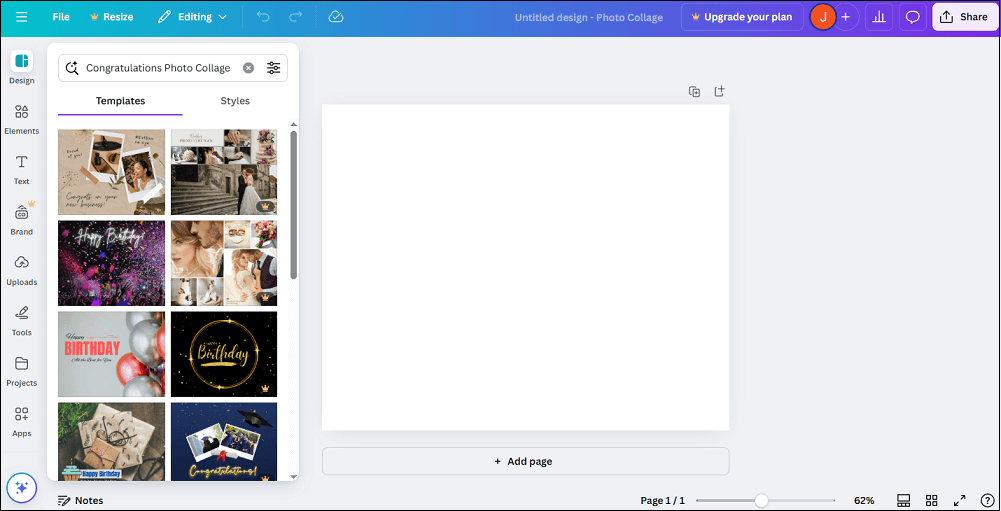
Step 3: From there, pick the template you would like to use. After that, select the Uploads tab on the left side to upload the images, videos, or audio you would like to include. Drag and drop the uploaded media files onto the canvas.
Step 4: Highlight any clip on the canvas and customize it using the editing options at the top of the canvas. For example, trim video, extract audio from video, control video speed, decide on the video or image’s border color and style, crop video or image, flip video or image horizontally or vertically, and a lot more.
Step 5: Further, select one of the editing capabilities in the left sidebar to enhance the design, like adding arrows, shapes, emojis, festive stickers, social media stickers, text, etc.
Step 6: When finished, click on the Share button at the top right and then hit the Download icon. After determining the output format, click on the Download button to complete the download process of the design you created.
LightMV
LightMV is a cross-platform video editor that runs on Windows PCs, Android, and iOS. Not only that, but you can use its web version without downloading any program.
Moreover, it offers amazing templates that are great for creating a congratulations video. In terms of its templates, all you have to do is upload your media files and you can immediately convert them into videos effortlessly. You can personalize the uploaded media files by including background music, and text as well as changing the length of the clip.
Refer to the following steps on how to make a congratulations video using LightMV.
Step 1: Visit LightMV’s homepage via your web browser.
Step 2: Click on the Get Started button, pick the template you would like to use for the congratulations video and log in with Google, Twitter, Facebook, or email address.
Step 3: When you’re in the editing interface, click the + icon to locate, select, and open the video or image files related to congratulations from your computer.
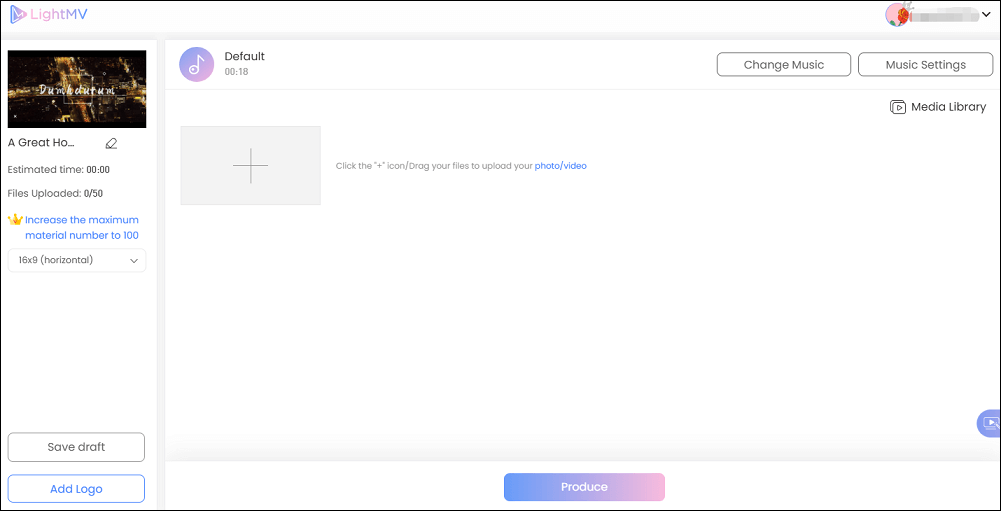
Step 4: After that, click the Edit button on the uploaded video or image files to make adjustments to them. Also, you can click on the Change Music button to choose a piece of music in its music library or hit Add Music to upload your own to replace the default background music.
Step 5: Lastly, click on the Produce button at the bottom to determine the required output resolution and save the personalized congratulations video to your computer.

VEED
VEED is also a congratulations video maker online. You can use its editing tools to make congratulatory greeting card videos. It allows you to choose a template and customize it. Or utilize stock footage in its royalty-free video library.
This video maker is a great option if you plan to use a congratulations video to mark achievements and milestones and add a personal touch to your day. Furthermore, it gives you the ability to add text and transitions to your videos or images.
Follow the steps below on how to make a congratulations video using VEED.
Step 1: Visit VEED’s homepage in your web browser.
Step 2: Click on the Start for free button and sign in to the platform using your Google account, Microsoft account, work email, etc.
Step 3: Then, click Create New Project to access its editing interface. You can upload your videos or photos to the congratulations video maker online by hitting Upload files. The media files you upload will be instantly added to the timeline.
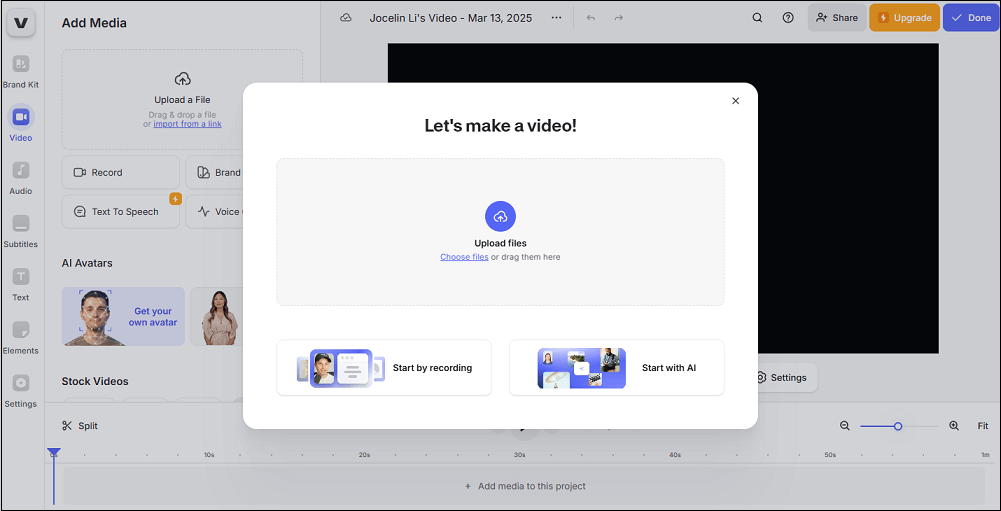
Or, you can use its webcam recorder to record one. Another option is to replace the placeholder video with one of its video templates.
Step 4: Carry out different editing tasks, for example, alter video speed, do color corrections, flip or rotate video, trim or split video, add audio, text, stickers to video or photo, and much more.
Step 5: Once you are satisfied with your edits, click on the Done button in the top right corner and specify the output frame rate, resolution, or quality. Lastly, click on the Export Video button to finish the export process and download the made video to your computer.

Conclusion
How to make a congratulations video with the help of an offline application or online service? This article discusses a couple of handy congratulations video makers and provides step-by-step instructions for your convenience.
If you have any problems while using MiniTool MovieMaker, please contact us via [email protected] for help.
User Comments :