This post provides a comprehensive guide on how to edit a GIF on your Windows computer. It offers essential tips and introduces the best free tool – MiniTool MovieMaker (a free GIF editor and video editor) for customizing your animations.
GIFs are important in the digital world because they provide an efficient way to convey information. Sometimes, you might need to edit or customize a GIF. For instance, you download a GIF from the internet, but find that it is too long or doesn’t include the right text. So, how to edit a GIF?
The process is not complicated. This guide will walk you through everything from quick trimming to text overlay to transform your GIFs into eye-catching animations.
What Is a GIF
Before diving into the step-by-step tutorial, let’s first understand the basics, strengths, and weaknesses of GIFs.
If you’re checking out this post, I believe you won’t be unfamiliar with the term GIF, one of the most significant expression methods on social networks today. However, do you know what GIF stands for? Is GIF an image or a video format? That’s what I’m going to talk about next.
Short for Graphics Interchange Format, GIF is a common image format and can be used for looping animations. This is the biggest difference between GIF and other image types, such as PNG or JPG, which are designed for storing static images. Of course, GIF can also be used to save still images.
Pros
GIFs are still popular, and here are the primary reasons.
1. Supports Animations
The key strength of GIF is that this format supports animations. Simply put, an animated GIF can loop a sequence of images, just like a short video. This feature makes GIF a perfect format for reactions, short clips, or demos.
That’s also why GIFs now function as a crucial communication tool on social media platforms for expressing emotions. In contrast to text and static images, GIFs offer a visual and quick way to convey feelings or reactions, just like a facial expression or body language. Simultaneously, this effective communication method can greatly enhance mutual understanding and increase the connection between both parties.
2. Universal Compatibility
The GIF format is also popular for its excellent compatibility. Almost all web browsers, operating systems, and messaging services can handle and play GIF files without issues. Therefore, you can easily send or share GIFs anywhere.
3. Auto-Playing
Unlike videos, GIFs can play automatically but without sound. In other words, once a GIF appears on the screen, it loops forever. Therefore, a GIF can make the communication more engaging and express ideas, humor, or reactions instantly.
4. Lossless Compression
GIF images are compressed using lossless data compression techniques to reduce file size without reducing visual quality. That’s to say, GIFs can keep the sharp image quality after compression.
5. Supports Transparency
GIFs support transparency. So, you can use the right tool to make a GIF transparent and add a new background to animations.
Cons
Nothing is perfect, and everything has two sides. There is no exception for GIFs.
1. No Audio Support
When audio is not necessary, a silent GIF is a great option. However, this can be a disadvantage if the audio is essential to the context, especially when you want narrations to make the content easy to understand or need background music to evoke emotion.
2. Limited Color Palette
The GIF file format only supports a palette of 256 colors for each frame. Therefore, the images may have lower resolution and can even appear blurry.
Now, we can conclude that the advantages of GIF outweigh the disadvantages. It is now a significant part of communication, serving as a visual expression for emotions, reactions, and ideas on social media and text conversations.
Why Do You Need to Edit GIFs
Although you can easily create a GIF using a simple GIF maker with a few editing features or quickly save GIFs from the internet, sometimes you may still edit them to enhance visual appeal, tailor them for specific platforms, or for other purposes.
1. Improve Visual Quality
A raw GIF may not contain noticeable elements or lack text that fits your context. Necessary edits can turn an ordinary or low-quality GIF into an eye-catching and professional-looking one.
For instance, you can add text to make the GIF easier to understand, adjust brightness, contrast, and saturation to correct the colors, or apply a filter to create a specific mood. You can also resort to modern tools for fixing blurry GIFs.
2. Repurpose Content
Editing a GIF allows you to adapt it for multiple uses and maximize its value. For instance, you can insert your logo, website address, or a branded watermark into a GIF before sharing it on social media.
Sometimes, you may need to repurpose your GIF into a different format. For example, if you want to upload custom GIFs to Instagram Feed or Story, you must convert them to MP4 video files first.
3. Reduce File Size
The GIF format takes a lossless compression method and often creates small files. However, sometimes a single GIF can be large if it has many frames, a long animation, or large dimensions. In this case, it will take some time to send or load the GIF.
Therefore, you need to reduce the GIF file size through multiple editing methods. To make a GIF smaller, you can shorten the clip, decrease the frame rate, reduce the number of colors in the palette, and resize the dimensions.
4. Tailor to Social Platforms
Many social media platforms and messaging services have file size limits or length limits for uploads. When your GIF is larger or longer than the desired platform’s requirements, you will not be allowed to post it.
Therefore, before uploading a GIF, check its file size and length and make any necessary edits to adapt to social media platforms.
What Makes a Good GIF Editor
Since there are many situations where you need to edit GIFs, you should learn this useful skill. First of all, a GIF editor is essential. You can find many GIF editing tools on the market, but how can you find the perfect one?
Based on my testing and editing experience, here are a few factors you should consider when looking for a good GIF editor. So, before learning how to edit a GIF, check out the following content to discover the best GIF editor software that meets your needs.
1. User-Friendly Interface
Personally, editing a GIF is much easier than processing a video clip, and does not require an advanced application. There are so many so-called easy-to-use GIF editing tools, but they will be useless if they don’t have a user-friendly interface.
Whether you’re a casual creator or an advanced user, a GIF editor with an intuitive layout encourages you to explore more and continue editing. Besides, beginners can master such a GIF editor without a steep learning curve.
What’s more, an excellent GIF editor should provide a real-time preview of the GIF as you make changes. If you adjust the speed, add a sticker, or crop the frame, you should see the result instantly without exporting the entire file.
2. Complete and Powerful Features
Some GIF makers or editors are essentially a video to GIF converter with a few editing options. There is no doubt that a great GIF editor must be equipped with all the essential editing functions.
First, a solid GIF editor software program should include the following core editing features:
- Precise trimming and cutting: This can change the exact start and end times of the GIF, or even split a longer clip into multiple segments.
- Speed control: It’s also a fundamental tool of a robust GIF editor. Slow down a GIF to achieve a dramatic effect or speed it up for a comedic effect.
- Cropping and resizing: A capable GIF editor can also focus on a specific area or compose your image by cropping and change the dimensions by resizing.
To further enhance or customize your GIF, your application should also meet these editing needs:
- Text and captions: A great text editor with various text templates and options to change font, size, color, and more for quick customization.
- Filters and effects: A huge library of filters and effects to add a personal touch to your GIF.
- Stickers and overlay: A rich variety of stickers and overlay elements to spice up your GIF.
A powerful GIF editor should offer advanced functions, such as frame-by-frame editing for precise control, the ability to change the loop count, background removal and replacement.
3. High-Quality Output with Controlled File Size
No one wants a blurred GIF. Therefore, a reliable GIF editor should ensure high-quality output. However, a high-resolution GIF makes no sense if the file size is too large to load on social media platforms or send on messaging apps.
Hence, a full-featured GIF editor must provide the necessary options, such as resolution and frame rate control, or other ways to reduce the file size.
4. No Watermarks, No Ads, Better Free
It must be frustrating when you find that your exported GIF has a watermark. Therefore, another important factor to consider when choosing a GIF editor is that it has no watermark. Then, you won’t be bothered by the annoying watermark on your GIF.
During the editing procedure, I believe you definitely don’t want to encounter ads or other pop-ups. While most desktop applications don’t contain ads, some free online services might interrupt your editing session with ads.
So, before starting with a GIF tool, make sure it has no watermarks and ads to ensure a smooth editing experience. Of course, it’s even better if the software is completely free.
5. Direct Share Edited GIF to Social Platforms
Most people create GIFs to share on social media or chat with friends on messaging apps. A good GIF editor can save the GIF to your device and also share it on platforms like WhatsApp, Instagram, Twitter, Messages, etc.
Apart from that, it’s even better if your editing tool enables you to copy the GIF and quickly paste it into chat windows, or it can generate a shareable link to help you send a large GIF file.
How to Edit a GIF (Step-by-Step Tutorial)
With these factors in mind, I tried many GIF editing tools. Actually, it seems impossible to find a tool that could satisfy all of these needs, but it’s possible to discover some applications that meet most of the requirements.
Then, MiniTool MovieMaker comes as the first recommended GIF editor software due to its user-friendly interface and comprehensive editing capabilities. Best of all, it’s free to use, has no ads, and won’t leave a watermark on the exported GIF.
As the name suggests, MiniTool MovieMaker is primarily a video maker and editor. It’s designed for everyone to create video from image, video clips, and background music in minutes.
As one of the best free video editing software programs, MiniTool MovieMaker provides rich editing tools. It allows you to crop, split, rotate, flip, trim video clips, add text, create picture-in-picture effects, apply filters, and more. Most of its video editing features can be applied to GIFs. Therefore, if you’re looking for a GIF editor, don’t miss MiniTool MovieMaker.
Additionally, MiniTool MovieMaker also functions as a GIF maker to create GIFs from your video clip or images and a GIF editor to enhance your clip effortlessly.
Here’s how to edit a GIF with MiniTool MovieMaker.
Step 1: Install the GIF Editor
Start by clicking the button below to download the GIF editor software on your computer. Then, open it and follow the on-screen instructions to complete the installation.
MiniTool MovieMakerClick to Download100%Clean & Safe
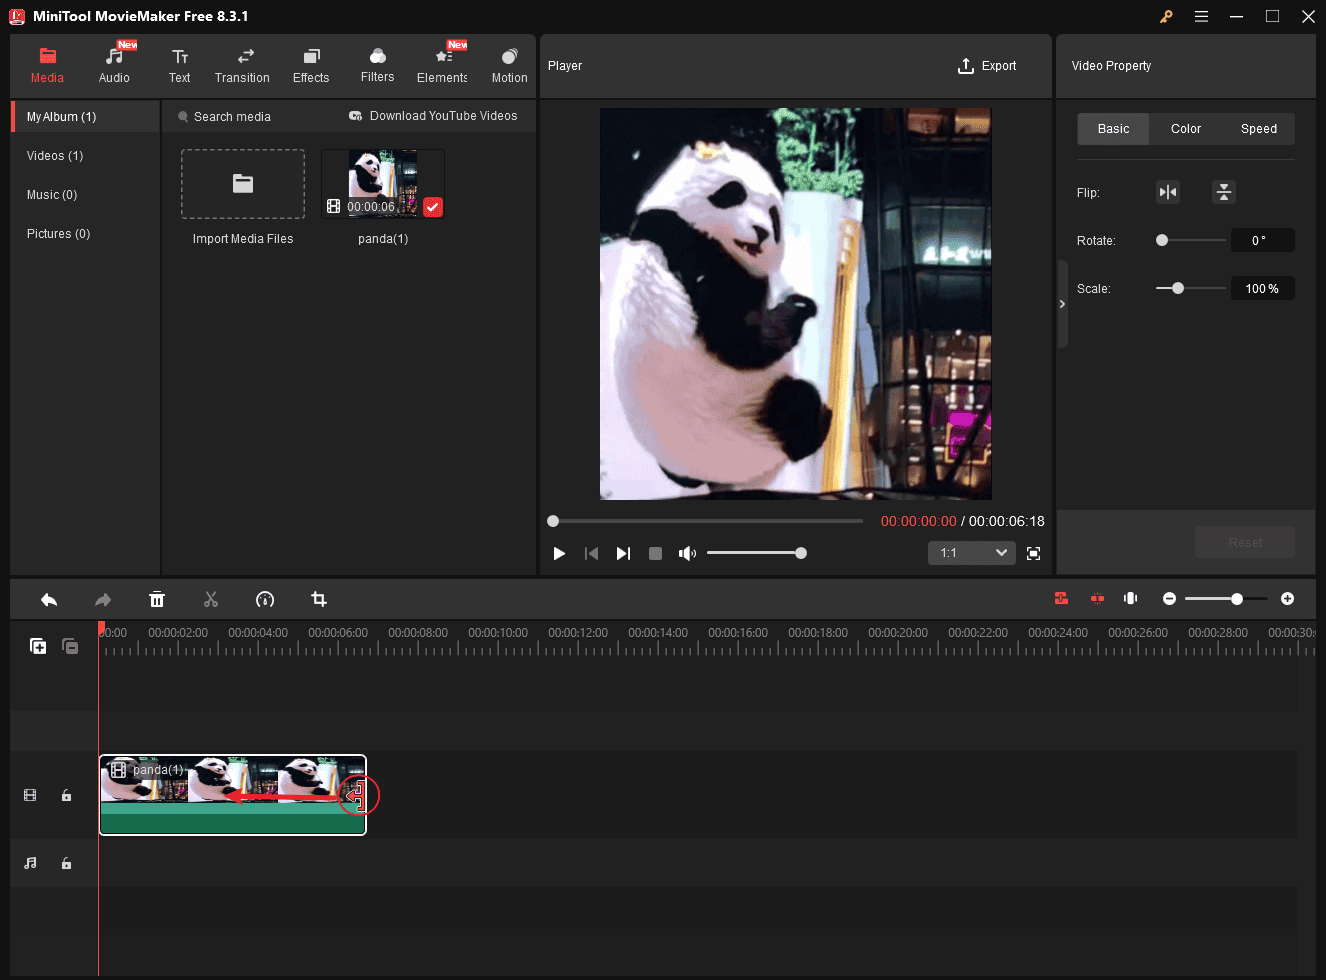
Step 2: Import Your GIF
When you launch the application, click the New Project button or close the promotion window to access the main interface. Then, click the Import Media Files button to select the target GIF from your computer and add it to the software. Next, drag and drop the GIF to the timeline to begin editing.
Step 3: Edit Your GIF
This section covers all the GIF editing features of MiniTool MovieMaker, gives you a step-by-step tutorial, and tells you why or when to edit the GIF.
#1 Compress GIF
As I mentioned previously, a large GIF file will result in a longer uploading or loading time. To ensure fast GIF delivery, you need to compress it to a smaller file size. Try one of the following methods to reduce the file size.
Shorten GIF Length
There is no doubt that you can shorten a long GIF by trimming the edges or removing the middle part to decrease the file size.
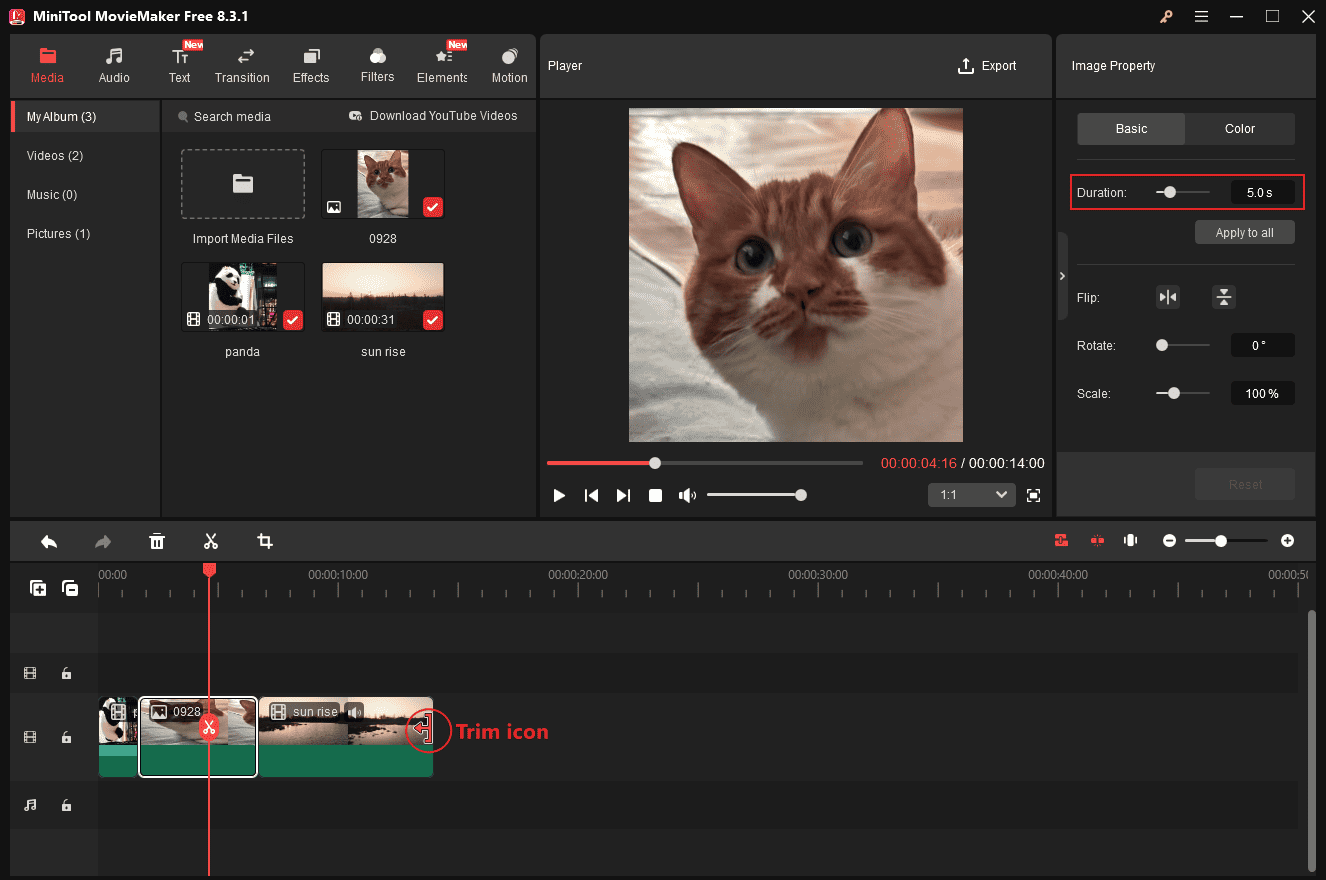
Trim GIF
Put the mouse cursor over the start or end of the clip, then the Trim icon appears immediately, and drag the icon inwards. When you release the mouse, the section behind the Trim icon will be removed.
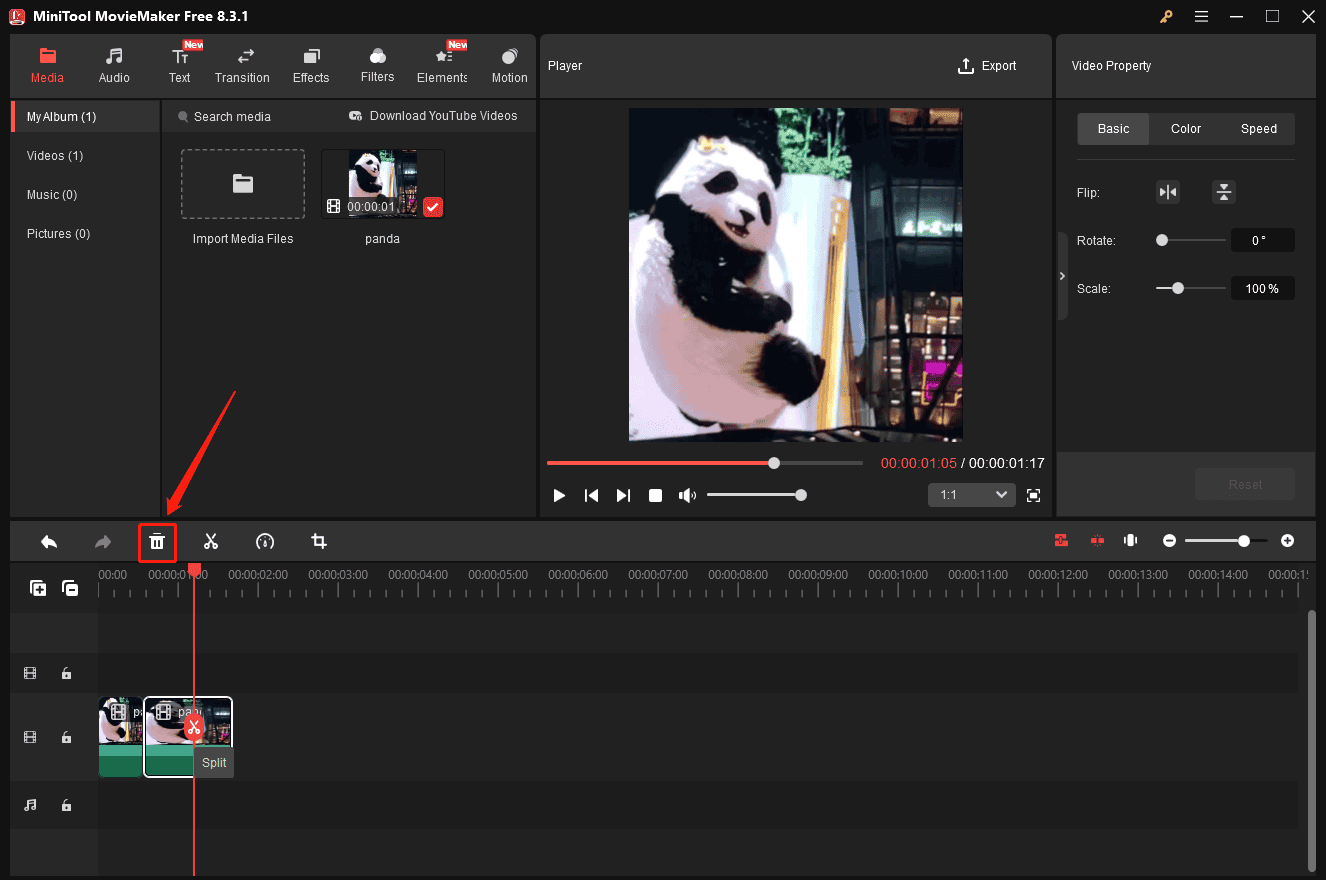
Cut GIF and Remove a Part
Drag the playhead to the beginning of the unwanted section, click the Split icon, continue moving the playhead to the end of the unwanted section, and click the Split icon again to separate the middle part. Select the middle part and click the Delete icon.
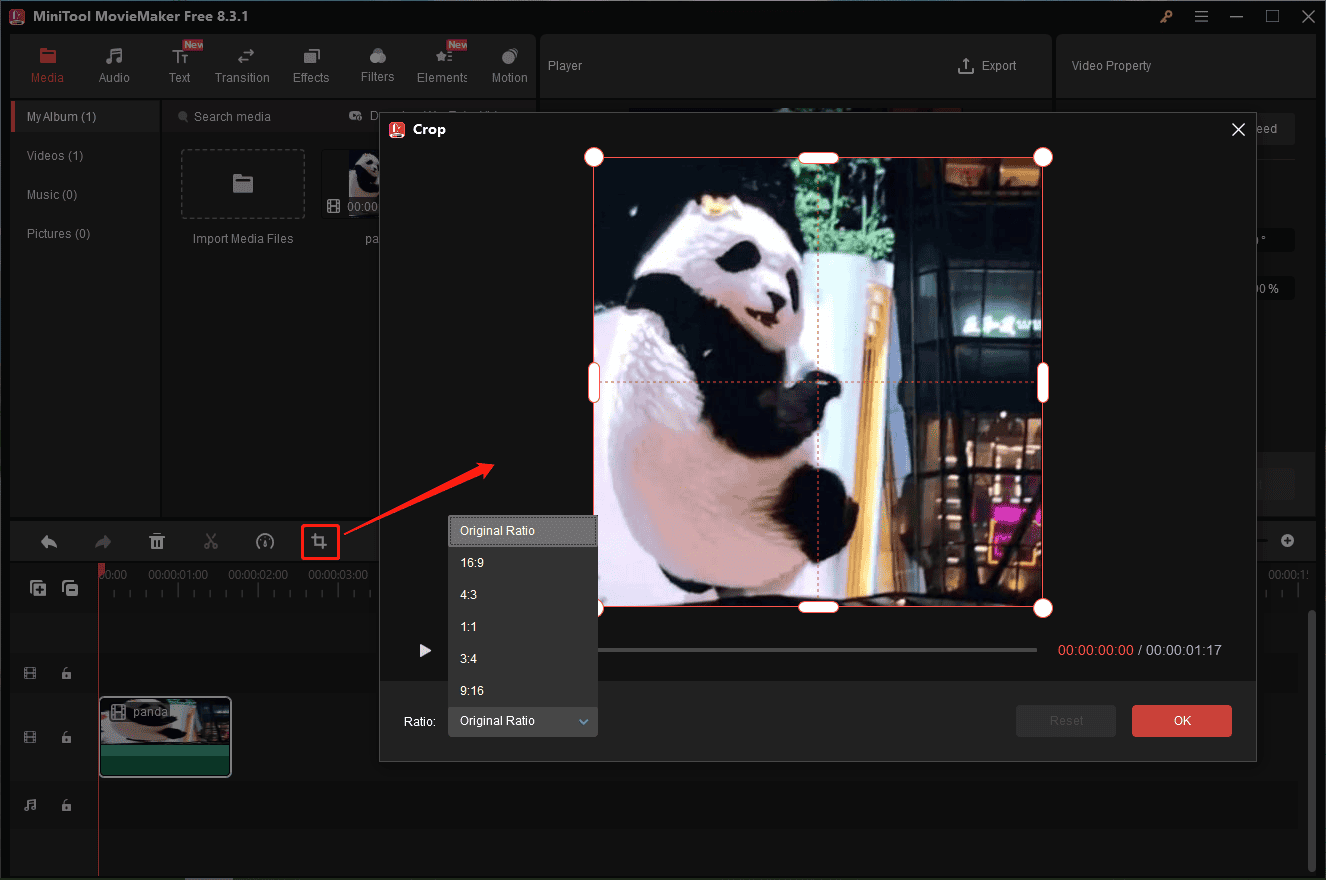
Crop GIF
Cropping means removing unwanted outer areas (a watermark or unnecessary text) from a GIF, which also reduces the file size by deleting some details.
To crop a GIF, select the clip on the timeline and click the Crop icon on the timeline toolbar. On the Crop window, use the original ratio or choose another one, and adjust the cropping handles to select the area you want to save. Click OK to apply the changes.
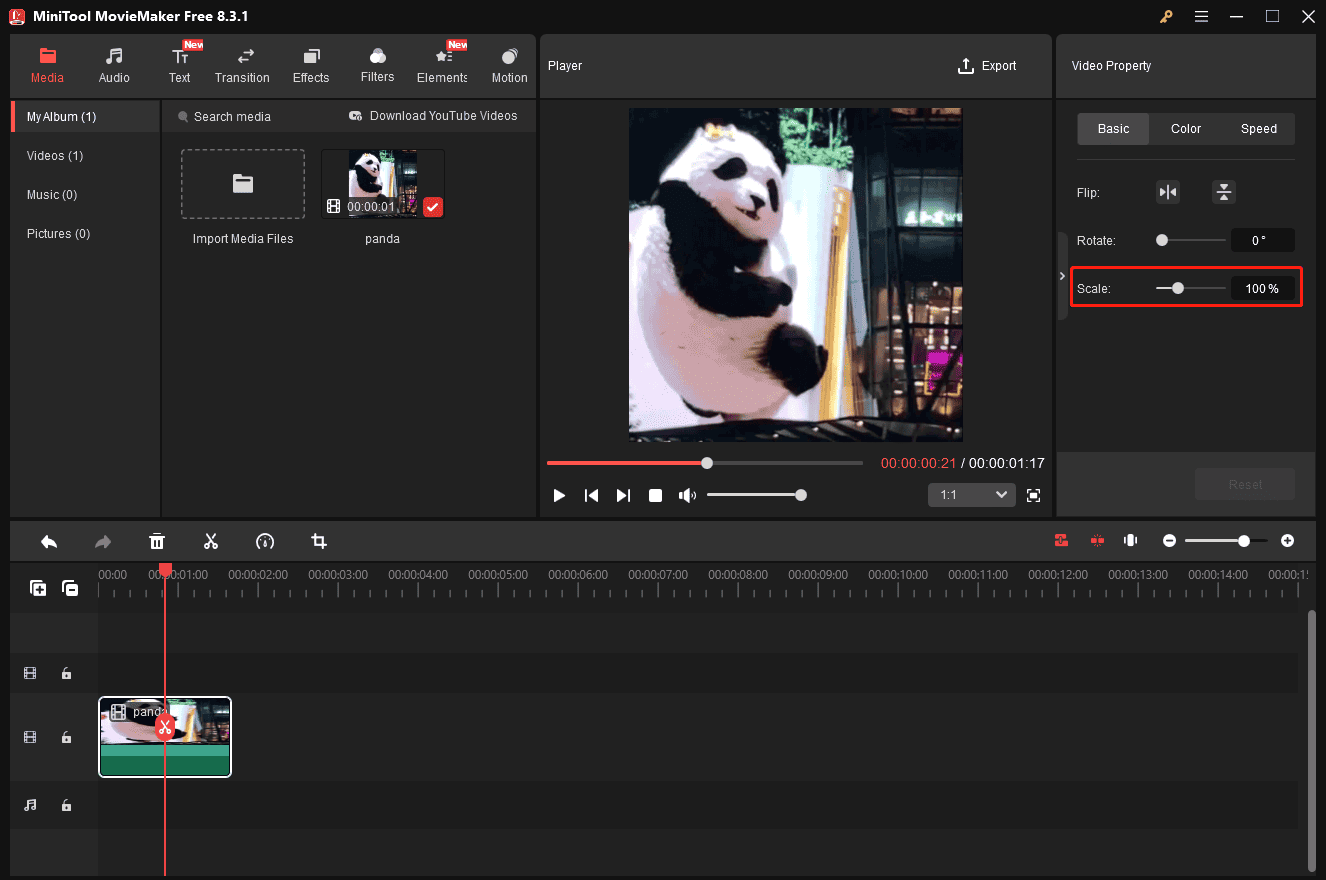
Resize GIF
If you resize GIF files, you’ll change their width and height. To resize a GIF to reduce the file size for faster sharing, you can scale it to a smaller percentage.
In MiniTool MovieMaker, click the GIF on the timeline to enable the property section, then drag the Scale slider to the left or enter a number in the corresponding box.
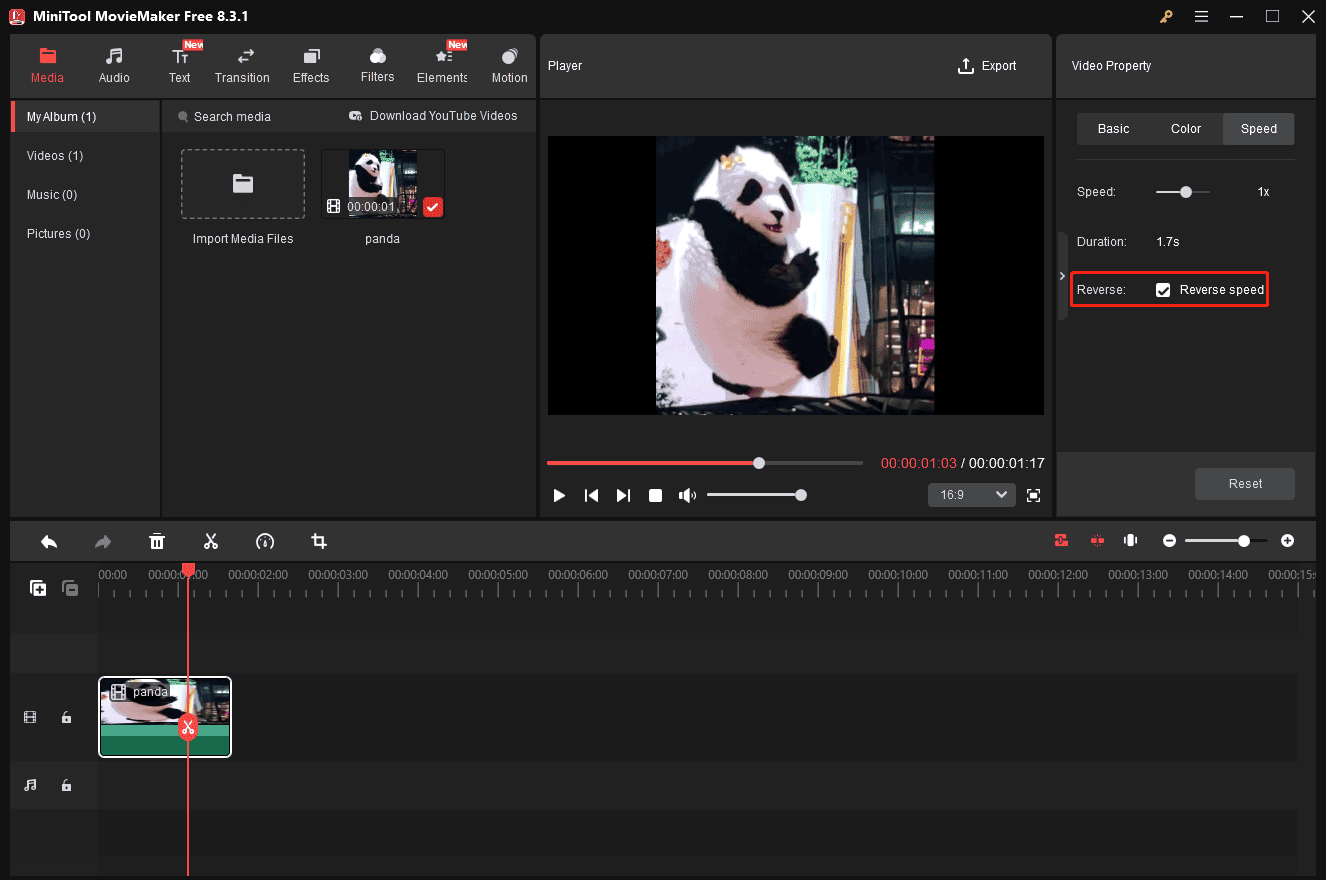
#2 Reverse GIF
When you desire to play a GIF from the end to the beginning, just reverse it. Reversing a GIF can add a sense of comedy and humor and create an unexpected result.
For example, if you reverse a GIF of someone jumping into a pool, then the resulting GIF will show the person flying backwards out of the pool and onto the diving board. That’s much funnier.
To reverse a GIF, highlight it on the timeline, click the Speed icon on the timeline toolbar, and select Reverse from the dropdown menu.

Alternatively, you can go to the Speed tab in the Video Property and check the Reverse speed option to reverse the GIF.
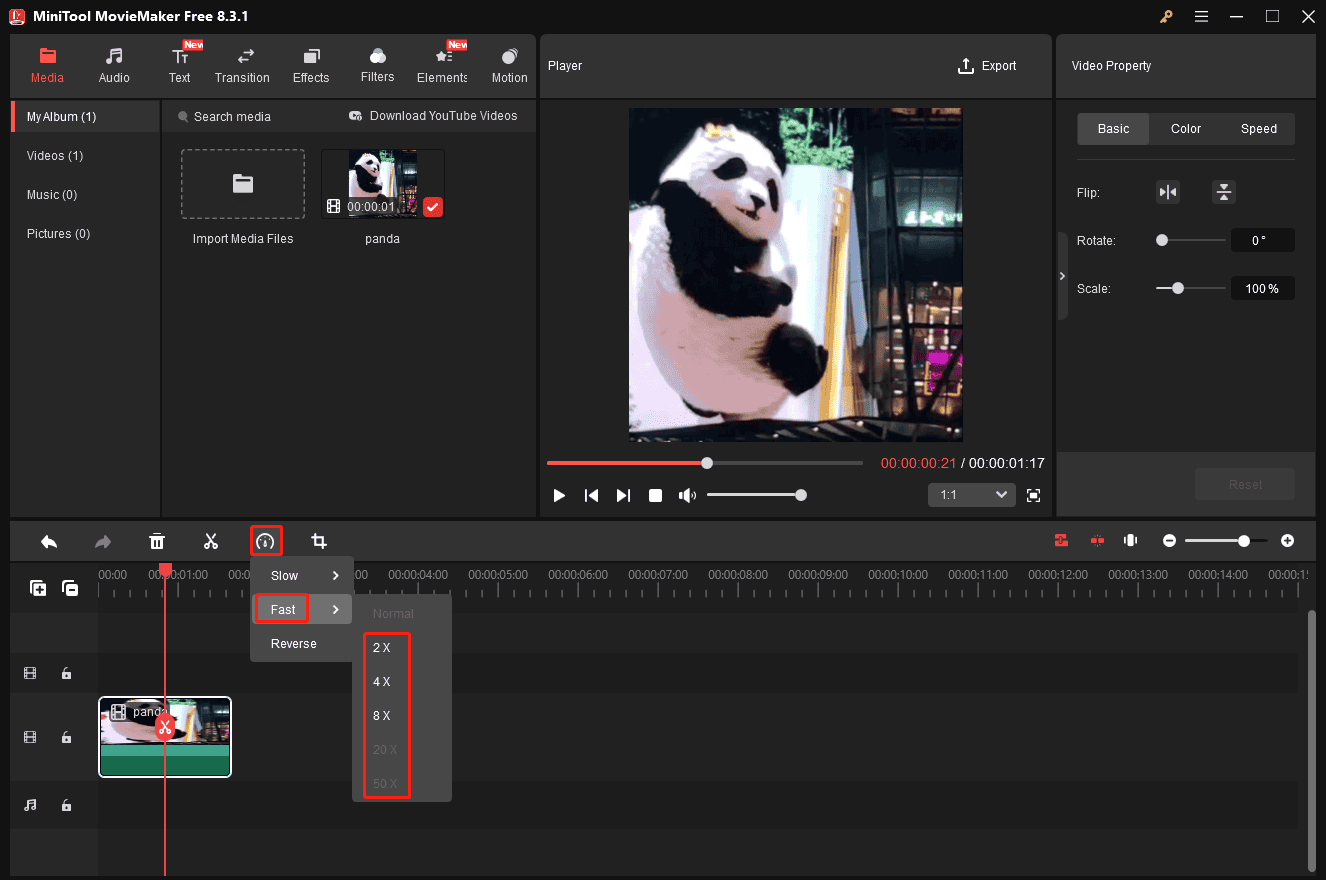
#3 Change GIF Speed
Speed adjustment is also a common GIF editing technique. When you play a GIF with fast animations, you may not be able to see what’s happening, resulting in blurred effects or seriously affecting the viewing experience. In this case, slow down the GIF to make it viewable and enjoyable. Of course, this will make the GIF longer in length.
Likewise, a slow GIF can also be annoying. It delivers a large file size, making it not easy to share. It also takes some time to load a slow GIF, and this stretches the viewers’ patience. Speeding it up can make the GIF shorter with a smaller file size and make the GIF more engaging.
If you’re looking for a free GIF speed changer, don’t miss MiniTool MovieMaker.
MiniTool MovieMakerClick to Download100%Clean & Safe
Speed Up GIF
To speed up the GIF, highlight it, click the Speed icon on the timeline toolbar, select the Fast option, and choose from 2X, 4X, 8X, 20X, and 50X.
Slow Down GIF
To slow down a GIF, click the Speed, choose Slow, and click a speed of 0.5X, 0.25X, 0.1X, 0.05X, and 0.01X. Experiment with these options until you’re satisfied with the result.
Alternatively, you can switch to the Speed tab in the Video Property and drag the Speed slider to the left or right to decrease or increase the playback speed. Meanwhile, you can see the duration of the GIF instantly. If you want to return the GIF to its original speed, just click the Reset button.
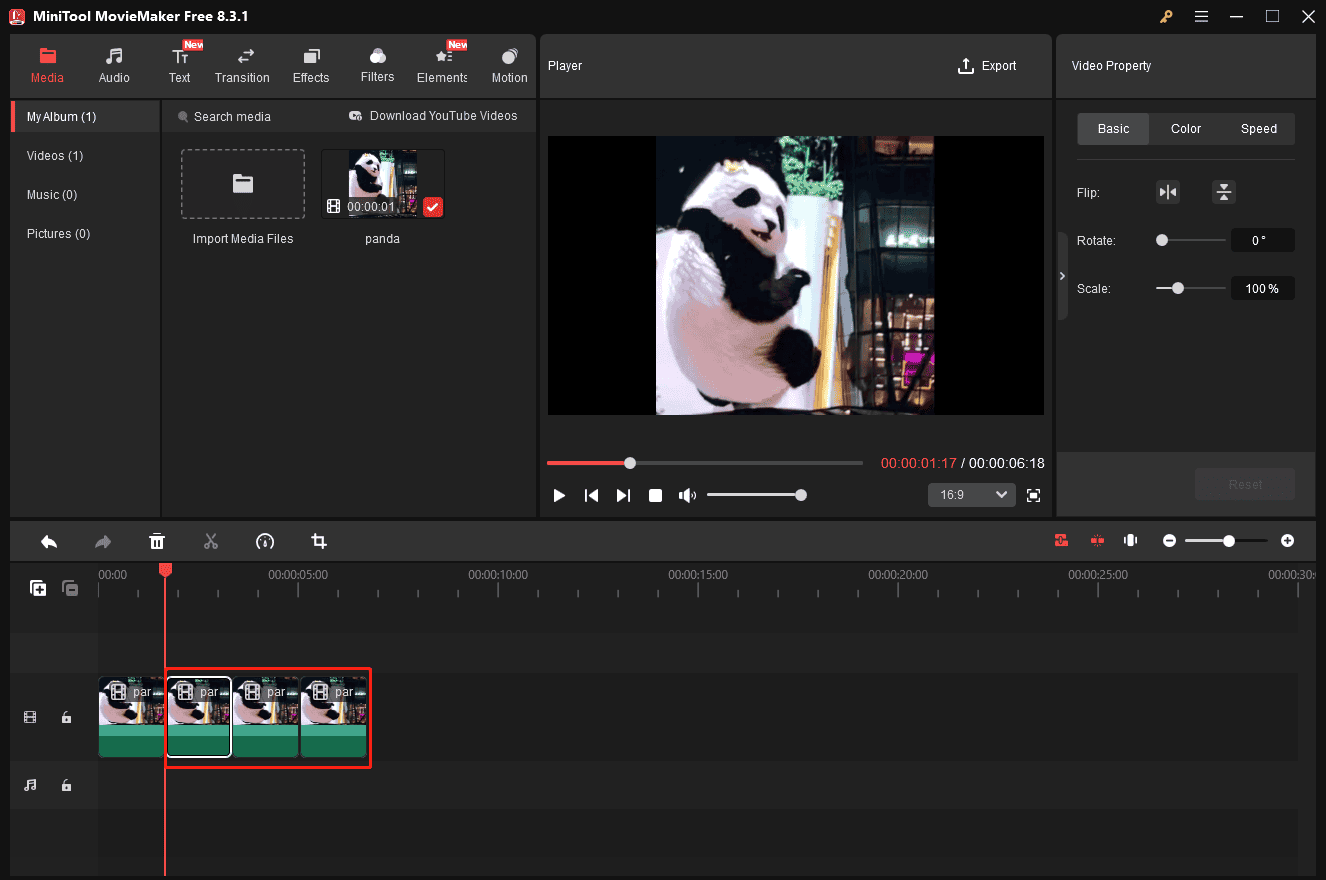
#4 Loop GIF
A GIF is essentially a sequence of images played in a loop to create a sense of motion. You can still loop a GIF to extend its duration. Just right-click on the GIF on the timeline, select the Copy option, right-click on the timeline, and select Paste (or press the Ctrl + V keys on the keyboard)as many times as needed.
#5 Add Text/Caption to GIF
Text on GIFs plays a vital role in strengthening communication. First, adding appropriate text can make the GIF be understood correctly and avoid other ambiguities. After all, a GIF can convey varying messages to different people.
Then, if you want to express exactly how you feel, text can also help. Simply type in the words that best describe your emotion.
To add text to GIF, MiniTool MovieMaker provides various text templates to help you customize your text and make the animation more expressive.
Go to the Text tab at the top menu bar, select Caption on the left sidebar, scroll through the available styles, and hover your mouse over any one for a quick preview. Download the target caption preset and drag it onto the GIF on the timeline.
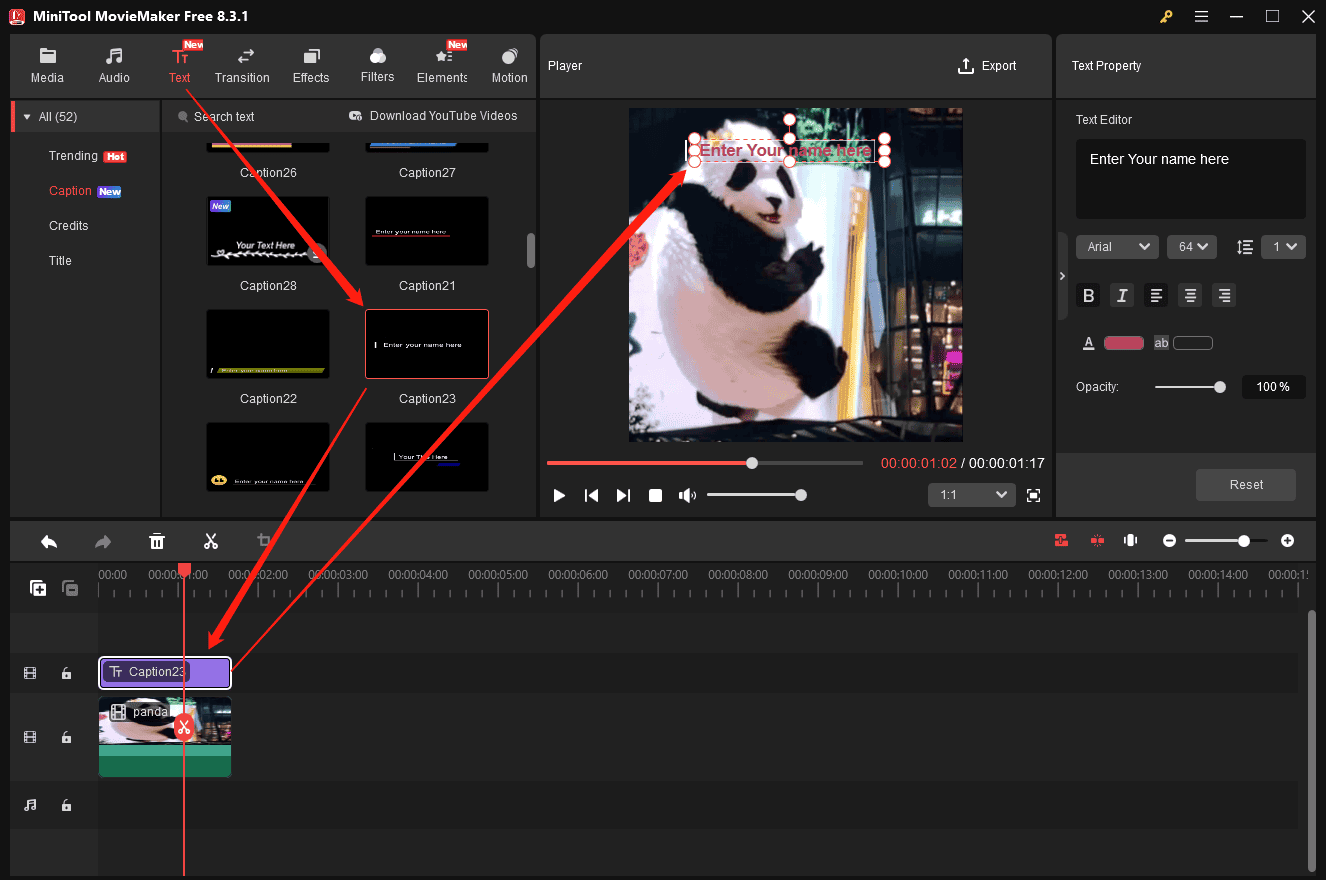
Next, you can drag the edges of the text on the timeline to adjust its duration or go to the player window to change its position on the frame. Go to the Text Editor to enter your text and change the font, color, size, and other settings.
#6 Add Image/Video to GIF
Sometimes, you may need to add an image or a video clip to your GIF and combine them into a new GIF to encourage communication or create custom content. MiniTool MovieMaker also helps you with that.
Go to Media and click Import Media Files to upload your media files, then add them to the timeline. To modify the image’s duration, select it on the timeline and drag the Duration slider in the Image property. To trim the video, put your mouse cursor over the start or end of the clip until the Trim icon appears, and drag the icon inwards.
Finally, you can jump to step 4 and follow the instructions to save your GIF. Please note that you might get a large GIF file. If you want a small file size, set MP4 to the output format because it uses advanced compression to reduce file size.
#7 Animate a GIF
It’s easy to make an animated GIF from a video. Just extract your favorite part and convert it to animations. How about creating an animated GIF from images? At this time, you might think of Adobe Photoshop. This application indeed helps you create an animated GIF from a sequence of images.
However, if you just have one or two images, there are still workarounds to help you get an animated GIF.
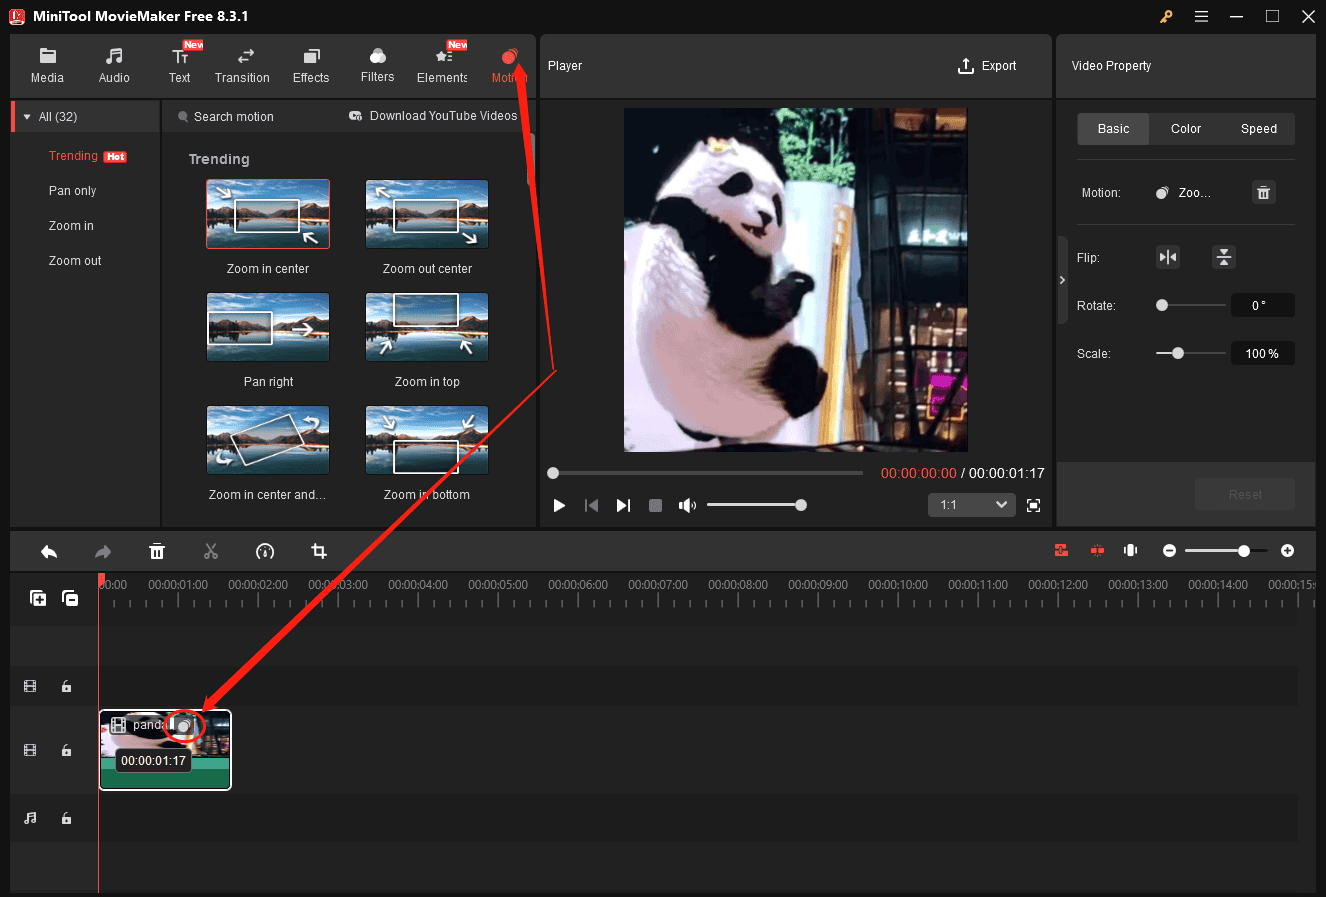
Add Motion
First, you can add a motion effect to create dynamic movement for the image, thereby changing the clip’s position, scale, and rotation.
MiniTool MovieMaker, an excellent GIF editor software, offers various motion effects, including panning and zooming. Go to the Motion tab at the top of the software, and then you can scroll through these effects. Place your mouse cursor over any effect to preview it.
To add motion to an entire image, simply drag the effect over the clip until the motion icon appears. However, if you want to add motion to just a portion of a clip, add the effect above the clip and then drag the edge of the motion track to control its duration.
Add Elements
In addition to motion effects, you can also add animated elements to give your GIFs a sense of movement. MiniTool MovieMaker comes with a huge library of elements, such as arrows, festival stickers, emojis, shapes, web icons, sports elements, and more.
Go to the Elements option to open the gallery, choose a category to discover your desired sticker, or enter a keyword in the top box to search for elements. Next, download the target element and click the + icon in the corner to add it to the timeline.

You can then customize the element. Move the edges of the element on the timeline to set its duration, change its position on the frame in the player window, and rotate, flip, or scale the element in the Elements Property.
#8 Add Overlay to GIF
An overlay is also an important part when editing or enhancing a GIF. For instance, you can add an image overlay like a company logo or watermark to make it more recognizable, combine other visuals for a more impactful effect, or make a face swap for fun.
Go to Media > Import Media Files again to upload your image and drag it over the GIF on the timeline. Then, scale the image and move it to the correct position in the player window. Also, you can crop the image to highlight the subject or remove unwanted details.
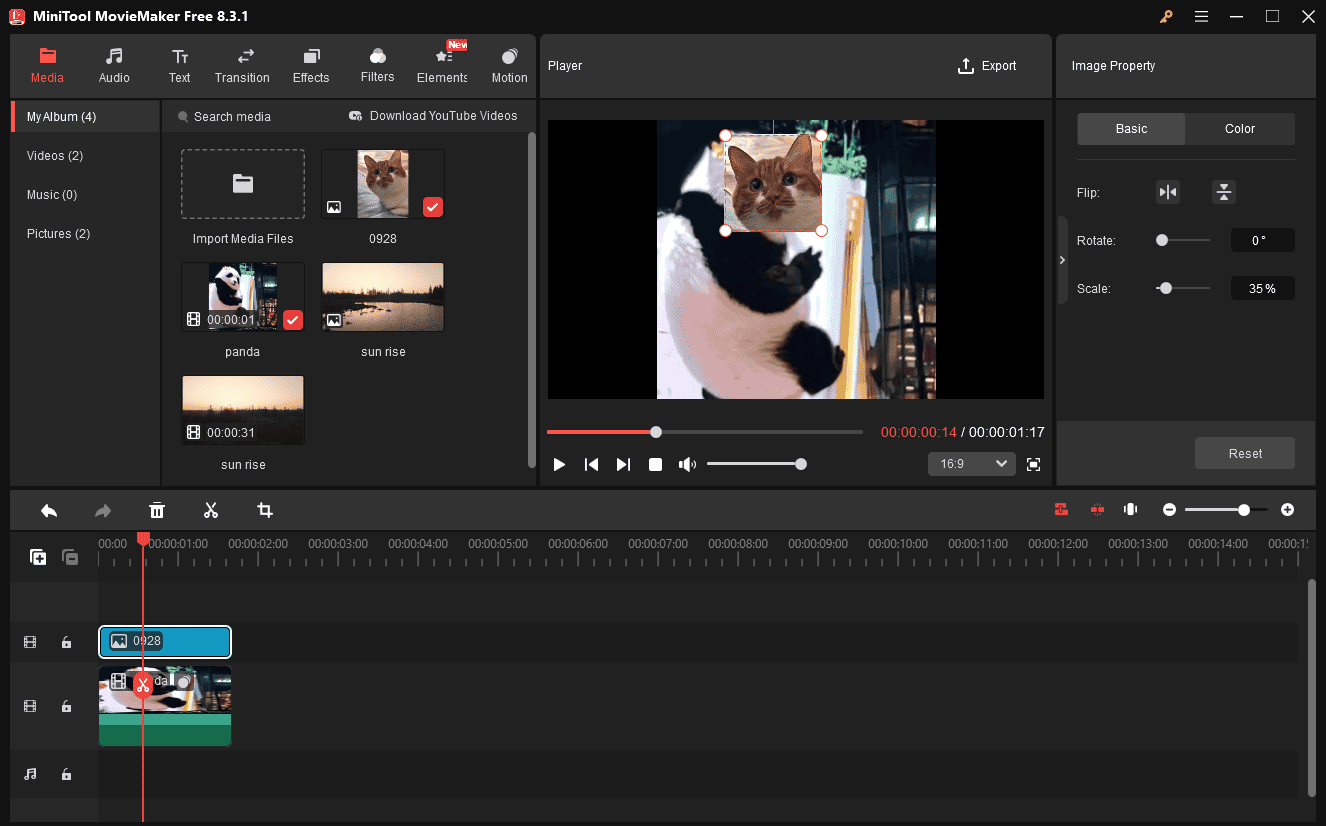
Thanks to the multi-track editing, you can also add a background to the GIF. Just add the background onto the timeline and drag the GIF to the top of the image.
#9 Recolor GIF
When your GIF’s color does not match your website, social media usage, or other purposes, then you need to recolor it for your creative expression. You might also need a GIF recolor tool for fixing its color issues or creating a specific mood to enhance storytelling.
How to recolor a GIF with MiniTool MovieMaker? Here are two options.
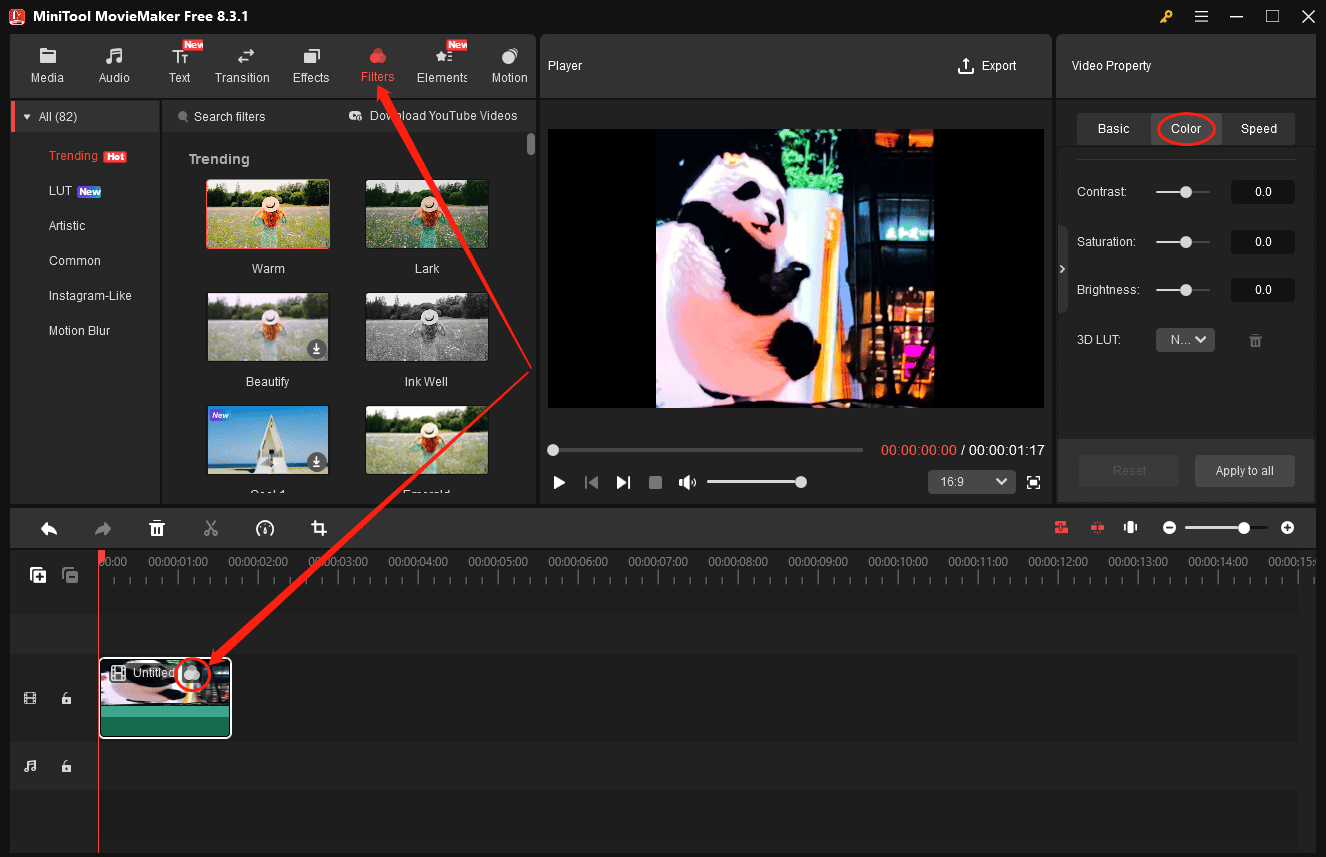
Basic Color Adjustment
Click the GIF on the timeline to enable the property panel on the right side, and go to the Color tab. Then, you’ll see four options: Contrast, Saturation, Brightness, and 3D LUT.
- Contrast refers to the difference between the brightest and darkest areas in the image. Increasing contrast will make highlights brighter and shadows darker.
- Saturation is the purity of color. Colors with higher saturation will be more vibrant and eye-catching. On the contrary, colors with lower saturation gradually appear to be gray.
- Brightness reflects the overall lightness or darkness of an image.
- 3D LUTs are essentially preset effects for color grading to change colors in an image or video.
You can move the sliders to adjust contrast, saturation, and brightness to give your GIF a new look. Experiment with different settings until you’re happy with the result. Additionally, you can open the 3D LUT dropdown list and choose an effect to recolor the GIF quickly.
Apply a Filter
MiniTool MovieMaker also features various filters to modify the tone of your footage. Likewise, you can add a filter to your GIF to give it a new look.
Go to Filters at the top toolbar, preview, and download the filter you like. Then, drag it to the GIF on the timeline, and a filter icon will appear on the GIF.
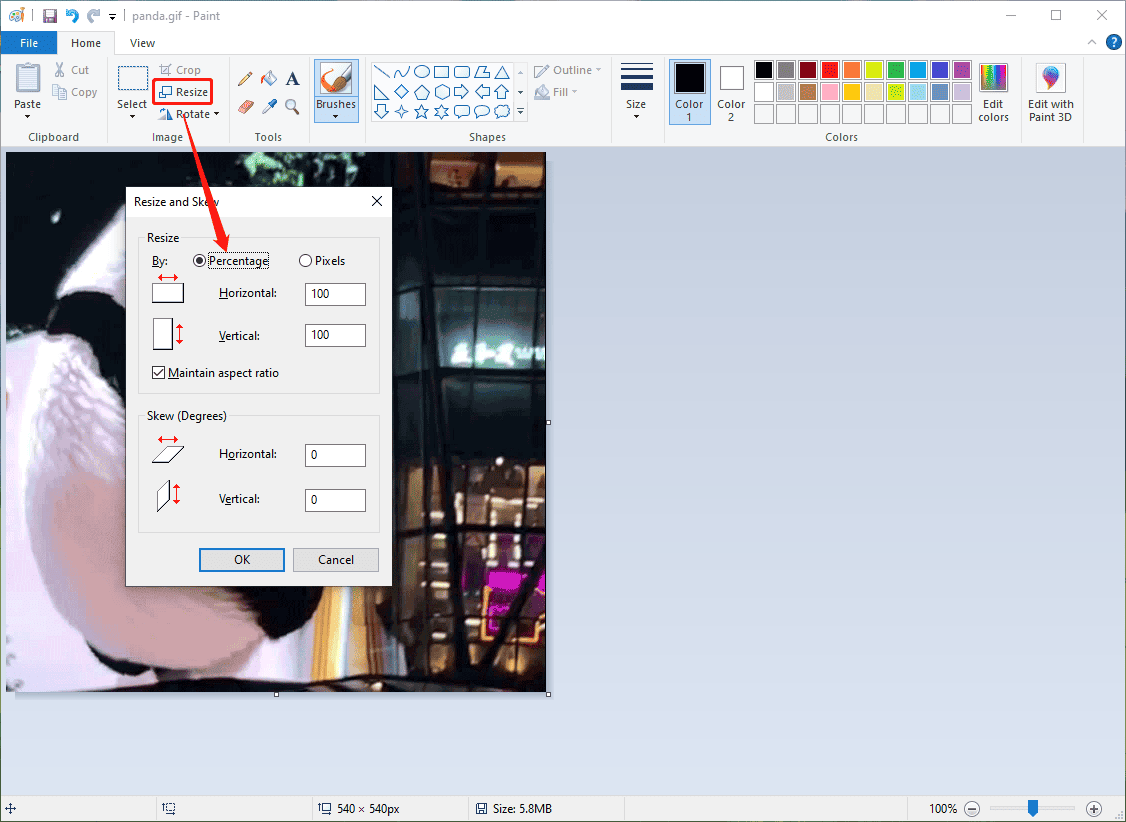
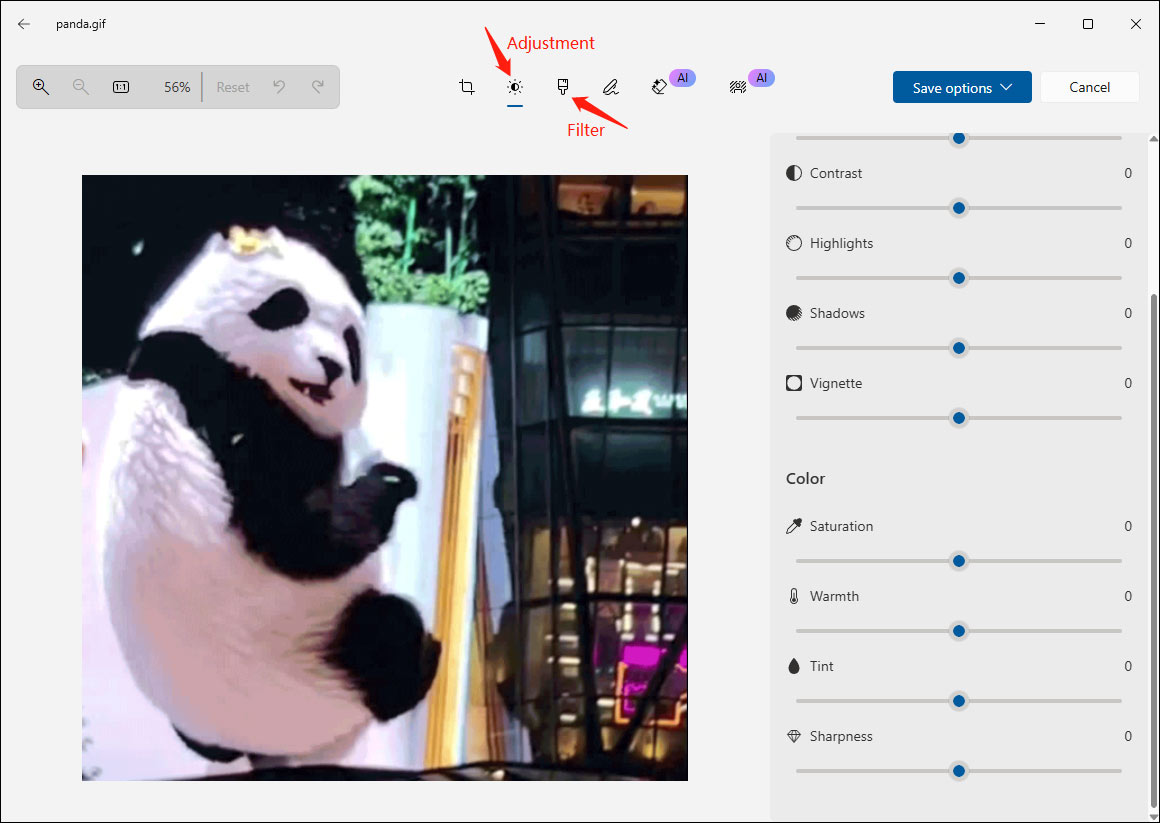
Open your GIF with the Photos app, click the Edit option in the top left corner of the screen, and click the Adjustment icon. Then, change the saturation, warmth, tint, sharpness, brightness, exposure, contrast, and other settings to recolor your GIF. Alternatively, click the Filter option from the top menu and choose your favorite filter based on the instant preview.
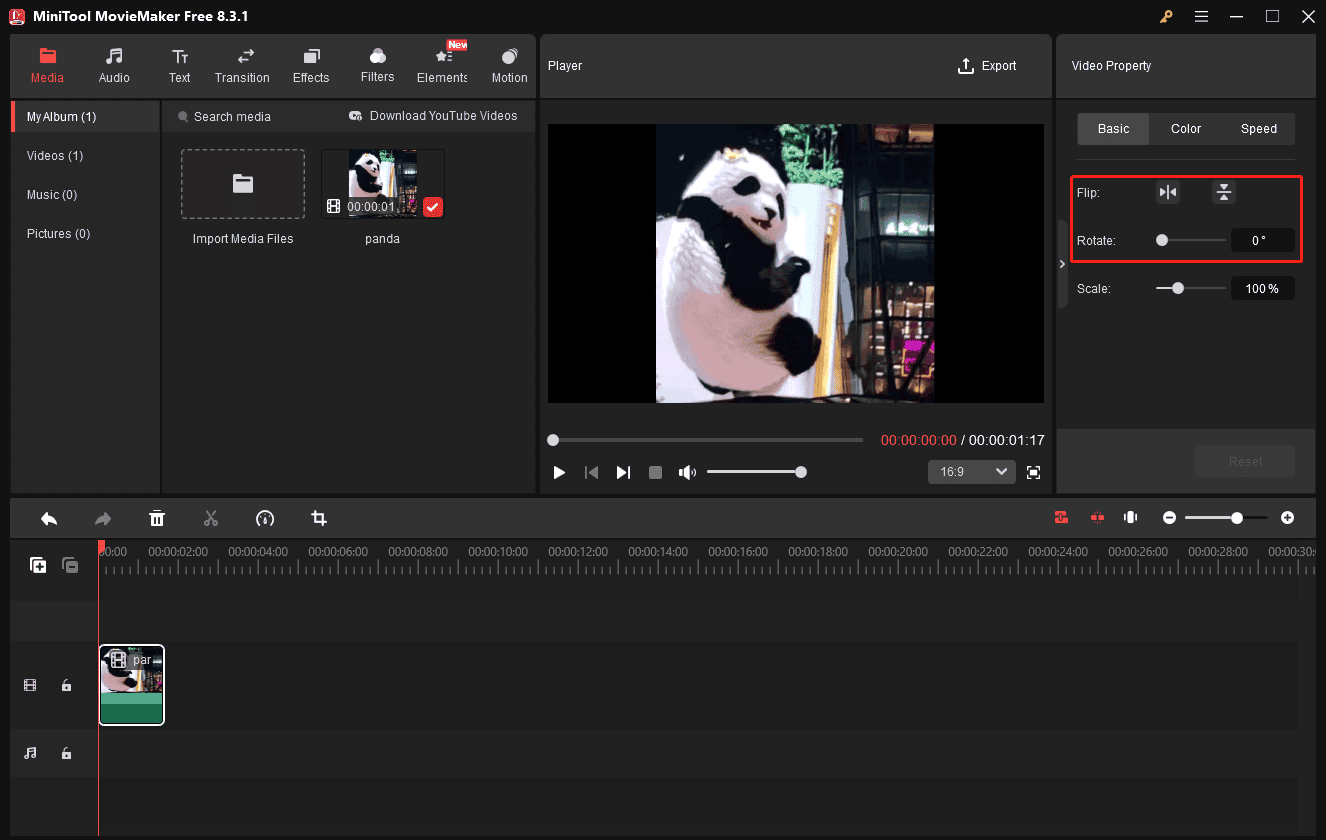
#10 Flip/Rotate GIF
Sometimes you may desire to create a sideways or upside-down GIF to stand out in social media feeds or achieve a certain stylistic effect. Then, it’s time to flip or rotate your GIF.
Select the GIF on the timeline to activate the property panel on the right. To flip the GIF, click the Flip Horizontal icon or the Flip Vertical icon. To rotate the GIF, move the slider or enter the desired degree (0 – 360) in the box.
#11 Split GIF
To insert a frame into your GIF or delete an unwanted frame, simply divide it into two or more segments to find the right location.
First, click the Zoom in button to magnify the timeline, so you can precisely split the GIF. Move the playhead to the target place, and click the Split icon on the playhead or on the timeline toolbar. Repeat this step to split the GIF into multiple short clips.
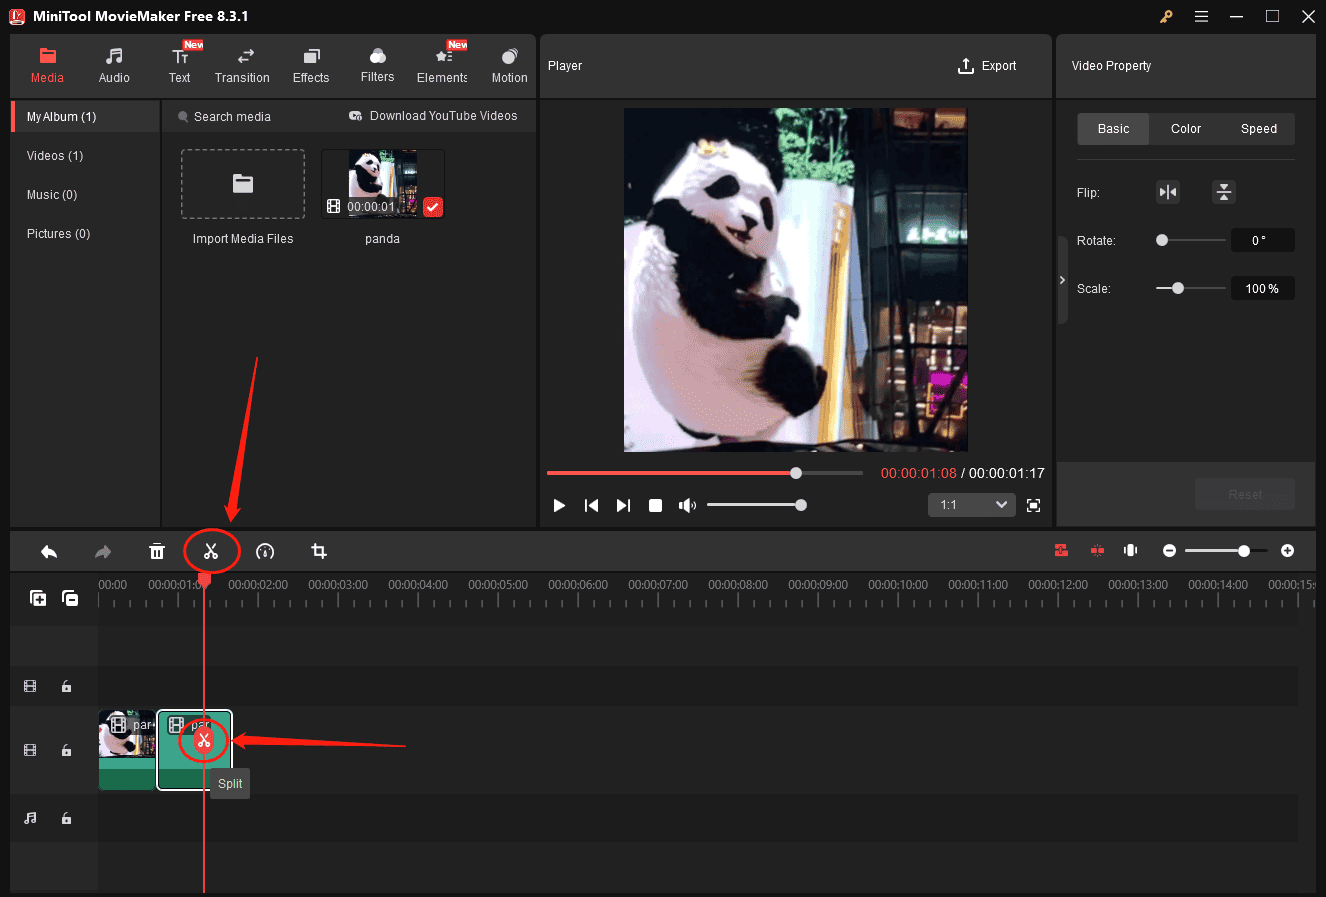
To add an image, click Media > Import Media Files, then drag it to the desired gap on the timeline from your computer. To delete a frame, just right-click it and select Delete from the menu.
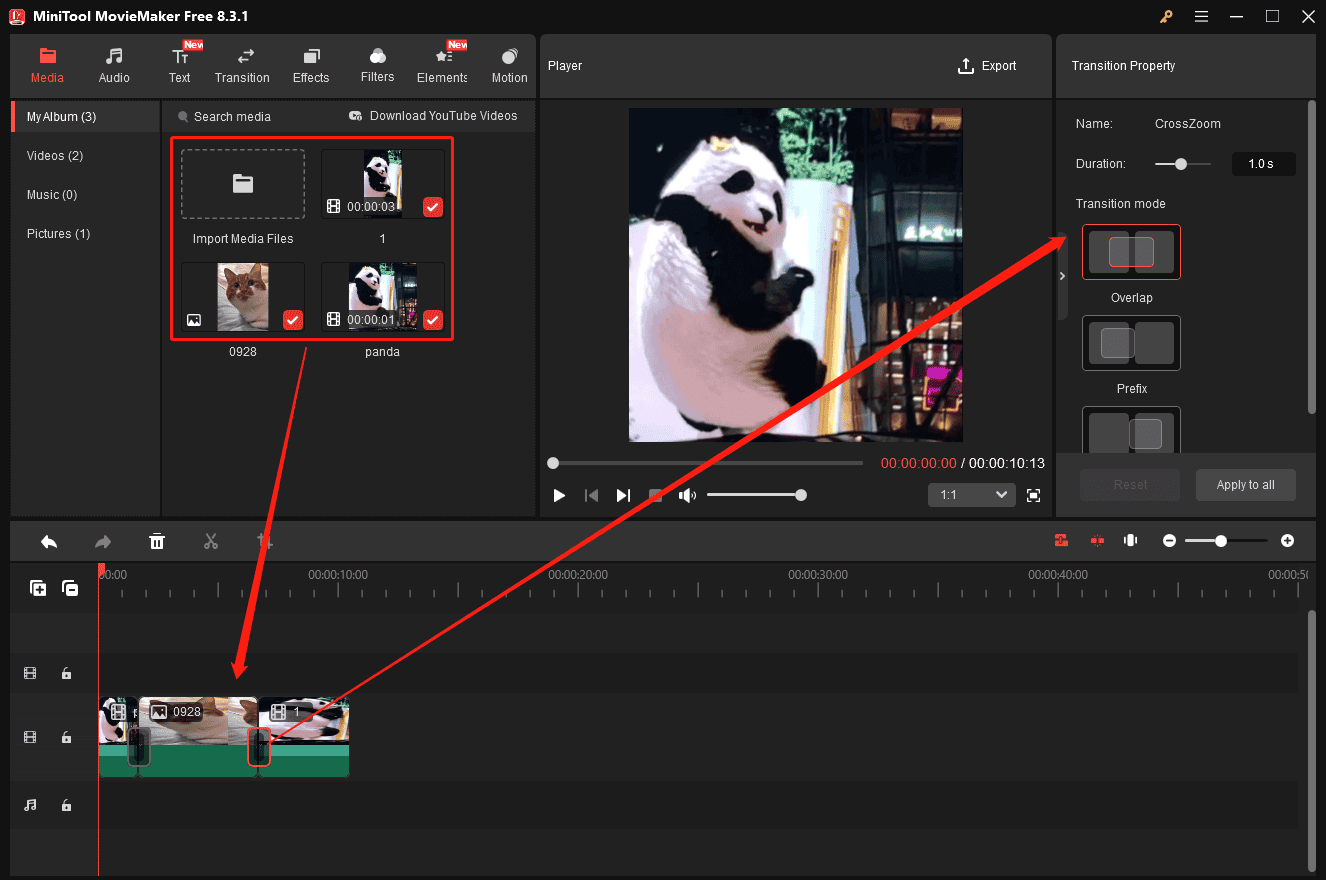
#12 Combine/Merge GIF
You can also combine multiple GIF files into one. Drag them to the timeline and adjust the order as you like. To make the final GIF more appealing, you can add a transition between any two clips. Then, customize the duration and mode of the transition effect.
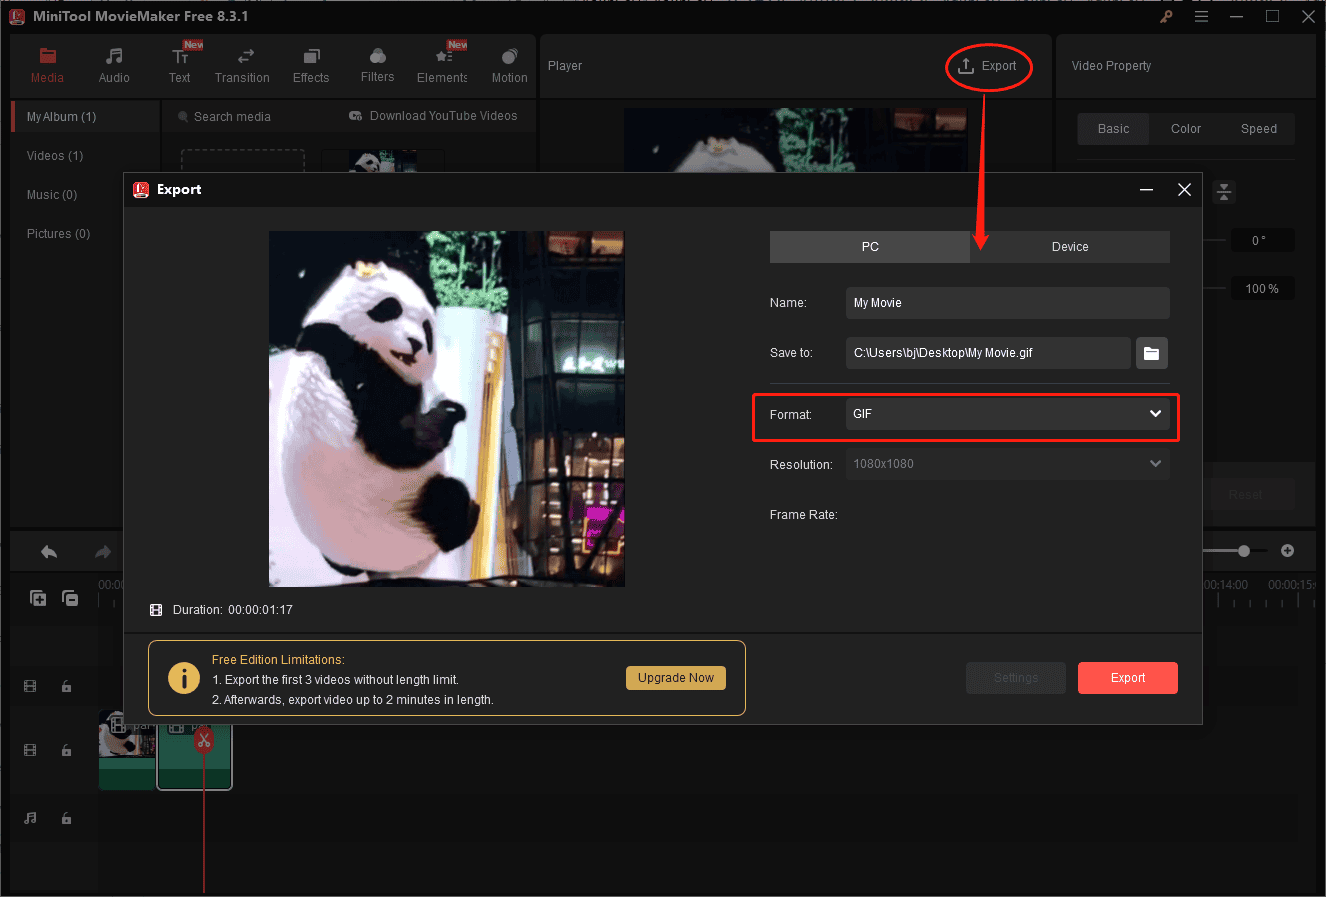
Step 4: Export Your GIF
To export your GIF, click the Export option in the upper-right corner. On the Export window, you can give the GIF a name, select the output folder, expand the Format menu, and choose GIF from the list. Finally, click the Export button to start the rendering process. Once done, click the Find Target button to locate the GIF directly.
Online GIF Editors
In addition to MiniTool MovieMaker, there are many tools you can try to edit your GIF.
Ezgif
When it comes to the online GIF editor, Ezgif immediately comes to mind. You can resize, rotate, crop GIFs, extract frames from a GIF, optimize GIFs by removing frames or color reduction, change animation speed, adjust the loop count, remove background, apply color filters, and more.
Pros:
- A suite of editing features.
- Easily accessed through your web browser.
- No registration required.
- Completely free to use and no watermarks.
- Easy to use and no editing experience required.
Cons:
- The website contains ads.
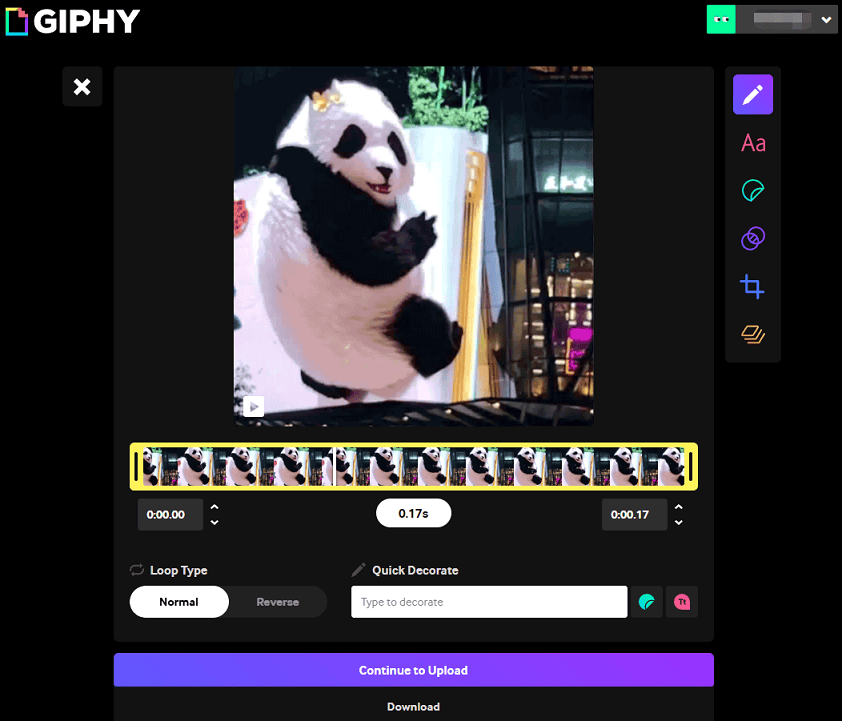
GIPHY
GIPHY is a popular platform where people can search for and share animated GIFs. It provides a vast library of GIFs and stickers for you to explore. It also serves as an online GIF creator and editor that enables you to change the loop type, add captions, decorate a GIF with stickers, apply filters like B&W and VHS, crop the dimensions, change the aspect ratio, etc.
Pros:
- Free of charge and no branding watermarks.
- Generate shareable links and embed code.
Cons:
- The editing features are somewhat limited.
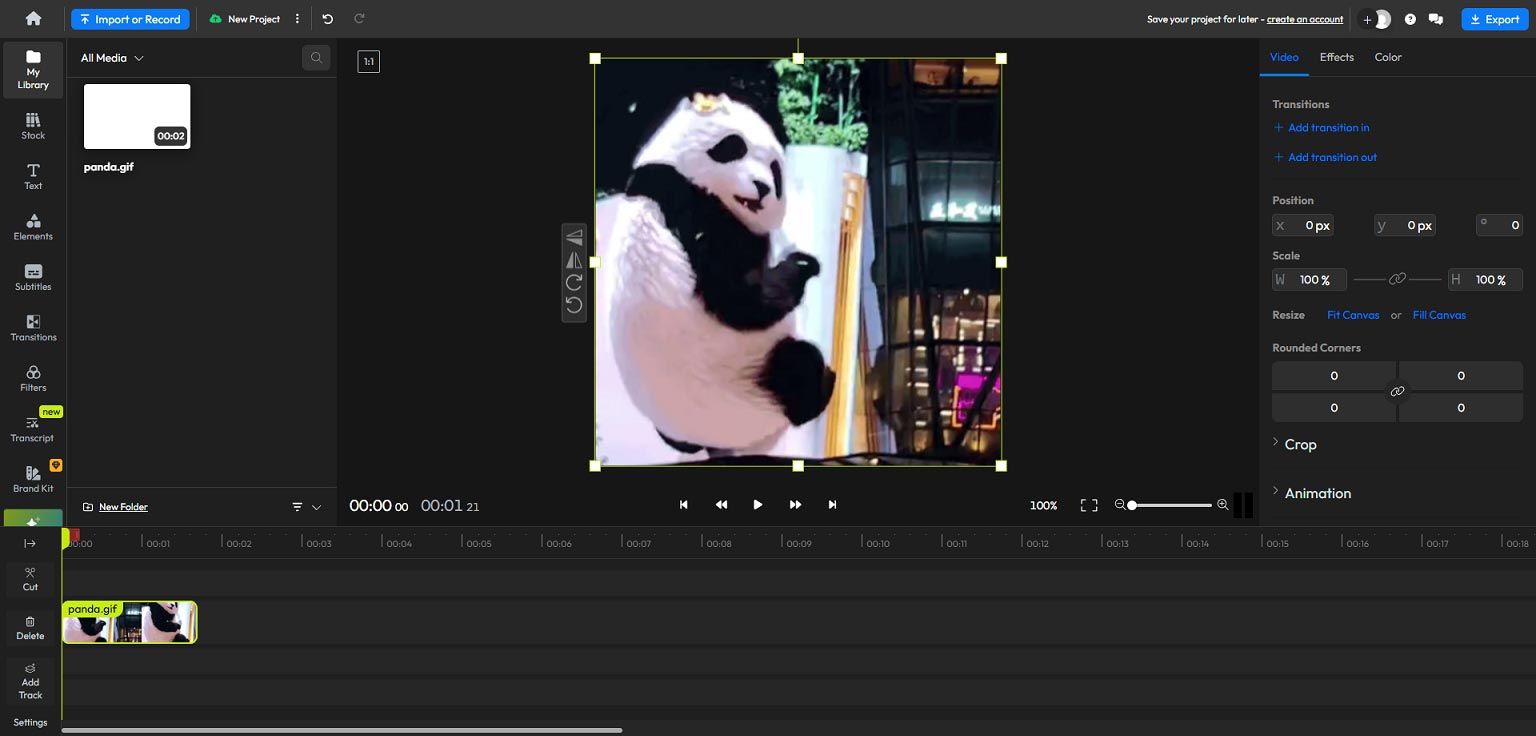
Flixier
If you want to edit GIFs in your web browser, Flixier is also a great choice. It provides a collection of stickers, shapes, icons, and more elements to spice up your GIF and lets you add filters, adjust colors, crop GIFs, resize GIFs, modify the playback speed, and put text on the GIF. Before you export a GIF, this service allows you to set the frame rate, 25, 20, or 10 FPS.
Pros:
- A user-friendly interface makes it easy to navigate.
- Rich editing tools and trendy effects.
Cons:
- The free version will add a watermark to the exported GIF.
Tip: Can You Add Music/Audio to GIF
First, it’s important to note that the GIF format doesn’t support audio. You might come across so-called music GIFs with sound, but these aren’t true GIF files. In most cases, they’re short MP4 videos that look like looping GIFs.
You can still add music or audio to a GIF. However, the output can only be saved in a video format, such as MP4, not as a GIF. This process is just like converting a GIF to a video file and adding music.
How to add music to a GIF and save it as a video file? MiniTool MovieMaker can also help you.
MiniTool MovieMakerClick to Download100%Clean & Safe
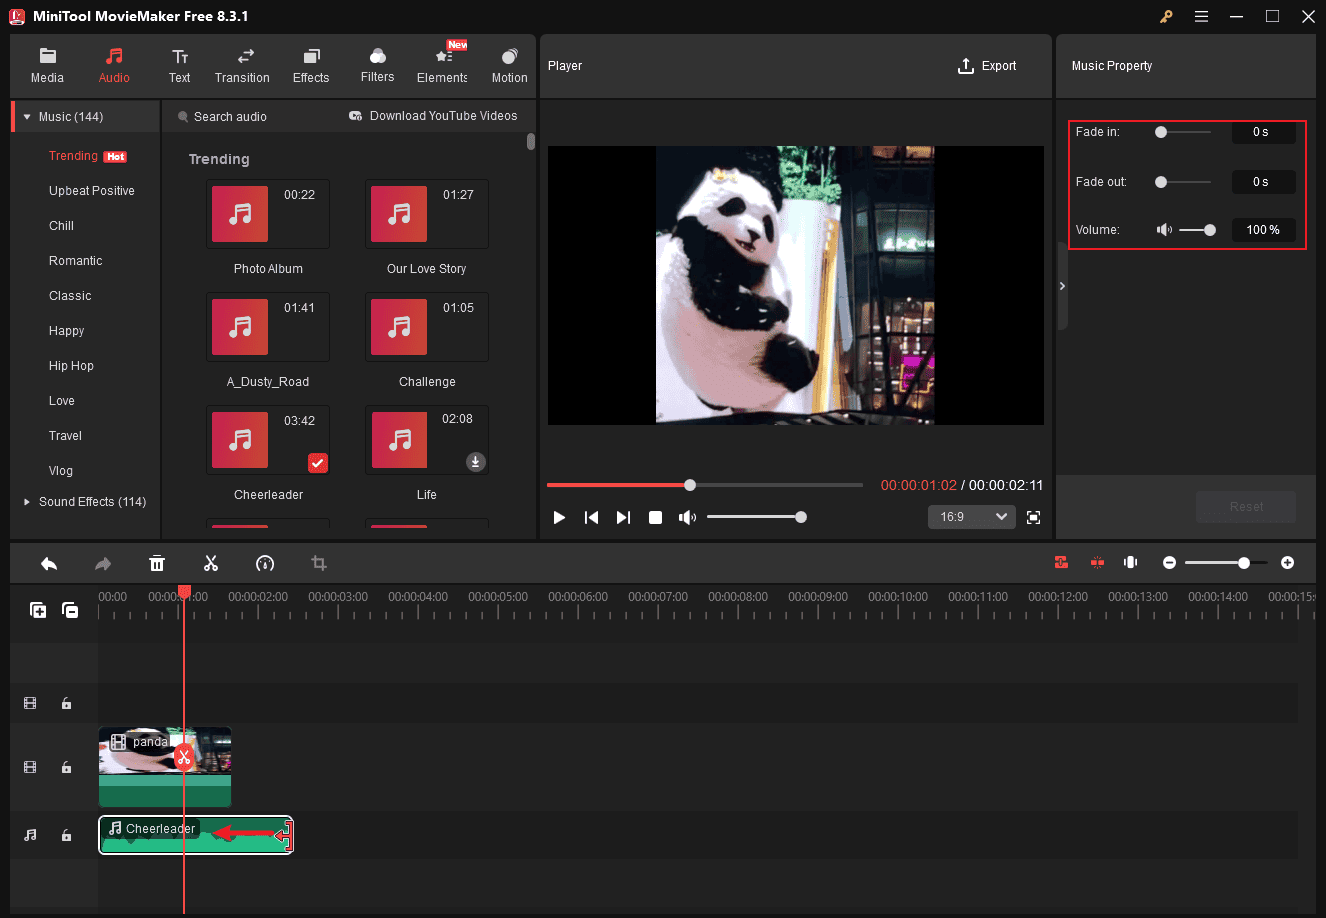
Step 1: Add your GIF and music/audio
Click the Import Media Files button to add your GIF and audio files, and drag them to the timeline. You can also go to the Audio tab to add a built-in soundtrack.
Step 2: Edit your music/audio
Trim the audio clip on the timeline to remove unwanted parts. Then, adjust the clip to sync it with the GIF. You can also apply fade-in/out effects or change the volume in the Music Property.
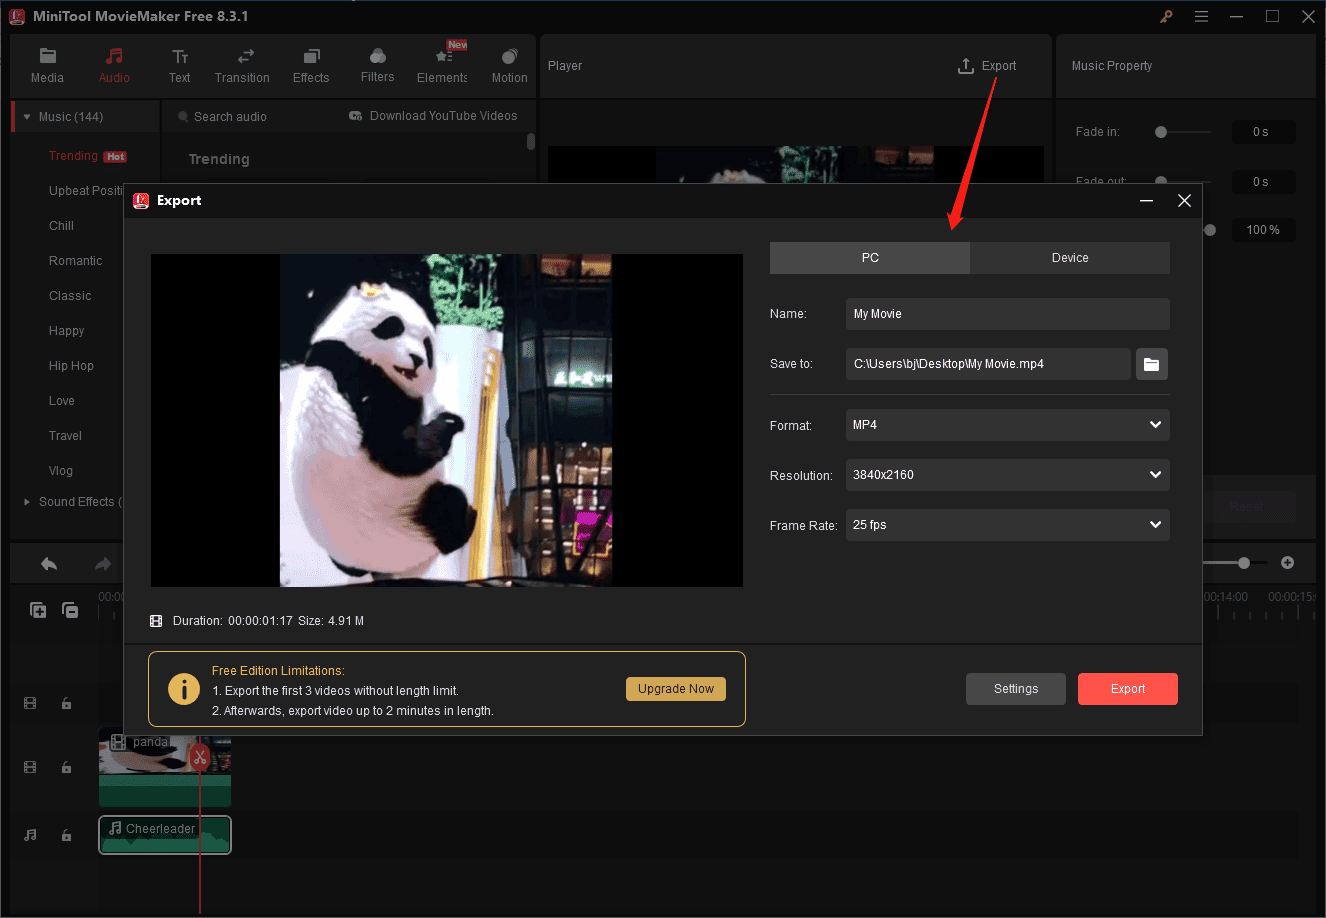
Step 3: Save the file
Open the export window by clicking the Export button, then change the output settings like format, resolution, or frame rate, and click Export again to start rendering your video.
Conclusion
GIF offers a unique method for communication because this format supports simple looping animations, making them distinct from static images and ideal for expressing emotions.
There are always times when you need to edit or enhance a GIF. Thus, this post offers the ultimate guide on how to edit a GIF with MiniTool MovieMaker, covering common editing needs. Whether you need to compress GIFs, change GIF speed, or add text to GIFs, you can find the right steps here.
Finally, if you encounter problems while editing GIFs with MiniTool MovieMaker, don’t hesitate to contact us at [email protected] for help.
About The Author

Position: Columnist
Cora is a tech writer specializing in digital media workflows, with over six years of hands-on experience in video post-production, media transcoding, and screen capture. Her writing is always clear and practical. Cora also produces in-depth software reviews for users across skill levels to help them find the right tool and enjoy video editing.
User Comments :