If you need the best funeral slideshow maker software, then you’ve come to the right place. In this article, I’ve put together some excellent options for you to use when creating this type of project. You will also learn how to make a slideshow for a funeral step by step using MiniTool MovieMaker (generally used as a movie maker).
Like a yellowing photo album, a touching funeral slideshow video is a wonderful way to remember your loved one. What are the top funeral slideshow maker apps? How to make a funeral slideshow with music, text, etc. step by step? Keep reading for the details.
6 Best Funeral Slideshow Makers
Here are a couple of great funeral slideshow makers that I’ve compiled for you to select from.
1. MiniTool MovieMaker
MiniTool MovieMaker is a free funeral slideshow maker software that runs on Windows devices. Its simple interface and comprehensive editing options make creating different types of slideshows a breeze. It is aimed at beginners and professionals alike.
You can use the software to add various text, audio, transitions, effects, filters, motions, and elements to embellish your projects. In addition, the file formats, resolutions, frame rates, and others it supports make it possible to export high-quality videos.
MiniTool MovieMakerClick to Download100%Clean & Safe
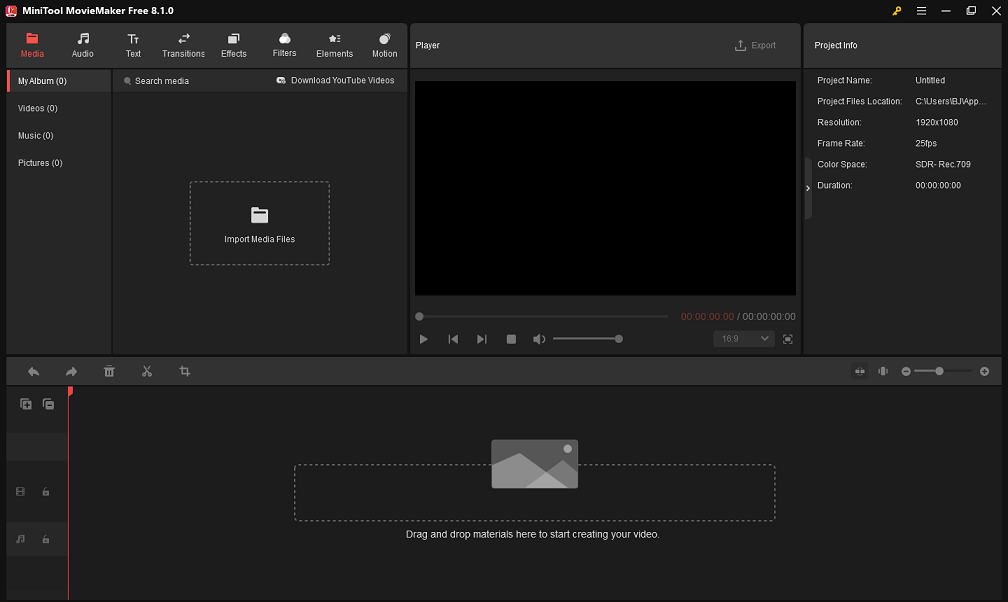
Important features:
- The audio library covers a large number of built-in music and sound effects.
- Incorporate animated text into your video to tell the story of the person to whom you’re paying tribute.
- Make your footage look even better by overlaying effects and filters.
- Split media files, trim video/image/audio clips, and crop videos/photos.
- …
2. VidDay
VidDay is a multi-purpose slideshow maker for funerals, graduations, or weddings. Because of its easy-to-use interface, people, regardless of technical proficiency, may use it on any device.
It contains a vast array of customization options, enabling you to add captions, custom messages, and music to make the tribute truly yours. VidDay guarantees excellent video results, which is critical in preserving your loved one’s memories.
Important features:
- Pick from the platform’s huge music library or upload your own songs.
- Include captions, messages, and quotes that highlight the unique times you spent with your loved one to give it a more personal touch.
- Arrange the videos and pictures chronologically to form a story.
- Edit and trim footage to make a smooth and compelling tribute.
- …
3. Movavi Video Editor
Movavi Video Editor is one of the best funeral slideshow makers that I recommend. The application streamlines the workflow with its intuitive user interface and extensive functions for adding videos, images, music, and text.
You can make a professional-looking slideshow to honor the life of your loved one with ease. It is appropriate for both individuals and families who would like to generate a thoughtful and lasting tribute.
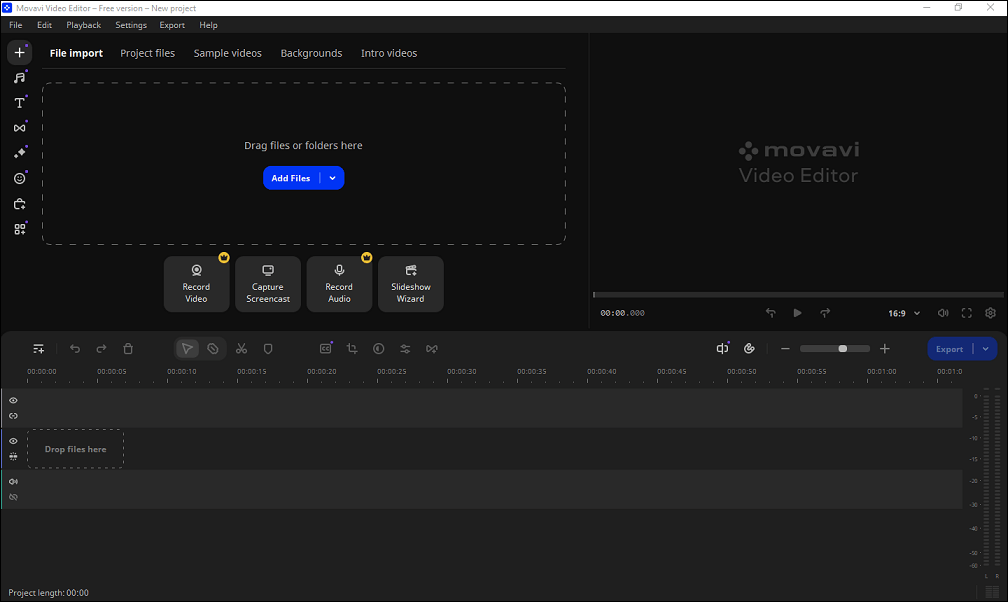
Important features:
- Insert music or songs that fit the mood of a slideshow.
- Use title styles to add dates to images, show names, and emphasize special occasions.
- Apply transitions to make a slideshow flow more naturally.
- Use amazing filters to make a slideshow more impactful.
- …
4. VideoProc Vlogger
VideoProc Vlogger is a simple-to-use yet robust funeral slideshow maker software, ideal for generating moving funeral slideshows.
The software provides a user-friendly interface that streamlines the video production process without sacrificing quality or control, making it suitable for both inexperienced and seasoned editors.
Important features:
- Come with voiceovers, music, captions, and transitions.
- No conversion support for broad video, photo, and audio formats.
- Support for 4K HD video without any watermark or limit.
- Work with both Windows and macOS.
- …
5. SmartSHOW 3D
SmartSHOW 3D is also one of the top funeral slideshow maker apps for Windows devices. Its templates for memorial presentations and ease of use make it a fantastic option for making tribute videos.
The app is equipped with an extensive built-in music and effects collection, allowing you to define the tone and mood of your project.
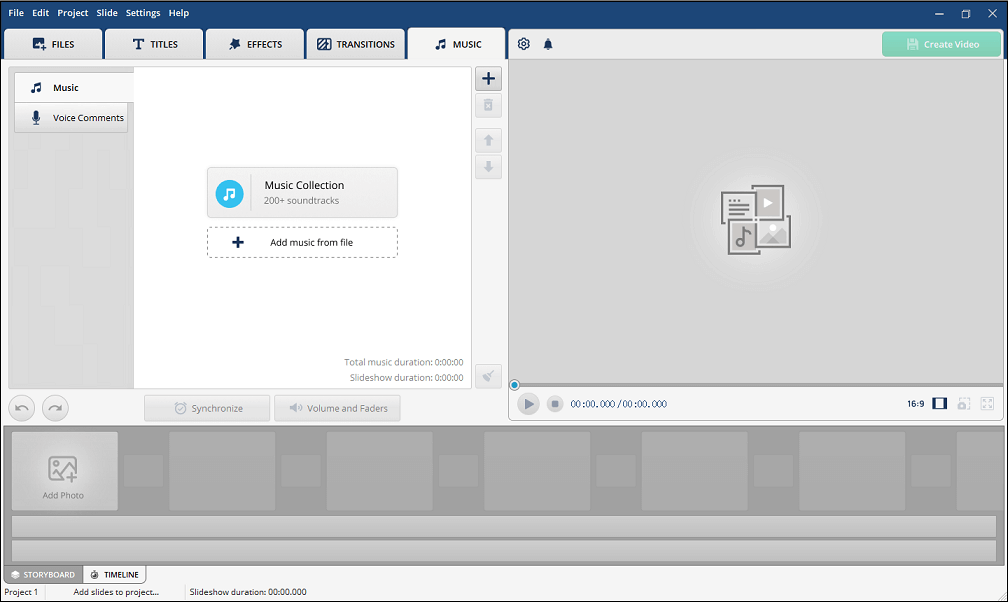
Important features:
- Hundreds of royalty-free music are categorized by tempo and mood.
- A wide range of collages, themes, and titles to produce a moving tribute video.
- Tons of transitions and effects to harmonize the story.
- Plenty of sharing options, including ongoing HD videos, DVDs, and more.
- …
6. Animoto
Animoto is also a free funeral slideshow maker on this list. It provides a great starting point with video templates. Each is adjustable and designed especially for making a polished slideshow video for a funeral.
Important features:
- Choose a track to use in your slideshow from its vast collection of licensed music.
- Attract the target group with striking text animations and a variety of 40+ professional fonts.
- Crop images, trim material, and change the media’s timing.
- Share your project wherever you like after downloading it to your PC or burning a DVD.
- …
How to Make a Slideshow for a Funeral? Step-by-Step Guide
In this part, I use MiniTool MovieMaker as an example to show you step-by-step how to make a funeral slideshow with music, text styles, and more.
Step 1. Download and Install MiniTool MovieMaker
MiniTool MovieMakerClick to Download100%Clean & Safe
First of all, you need to click on the button above to download MiniTool MovieMaker and install it on your computer. Start the best free funeral slideshow maker.
Then, select the required aspect ratio and click the New Project button to create a blank project from scratch.
Step 2. Drag and Drop Media Files to the Timeline
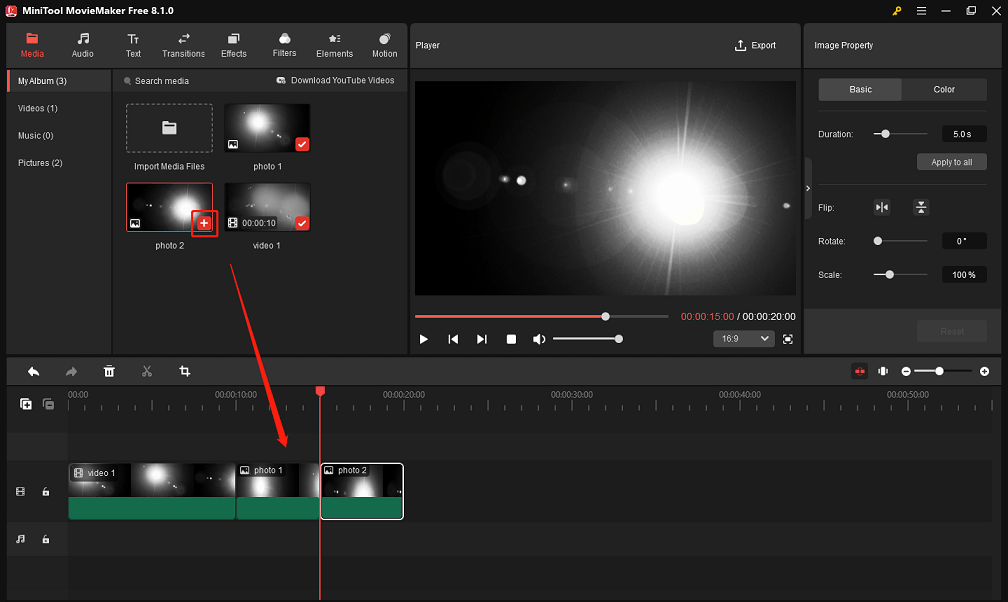
Click anywhere inside the dotted box marked Import Media Files to open File Explorer, choose the original material you prepared, and hit the Open button. Your imported media files will appear in the Media tab.
Drag and drop them in order onto the video track in the timeline. Or, click the + icon in the lower right corner of the media file thumbnail to add it to the timeline.
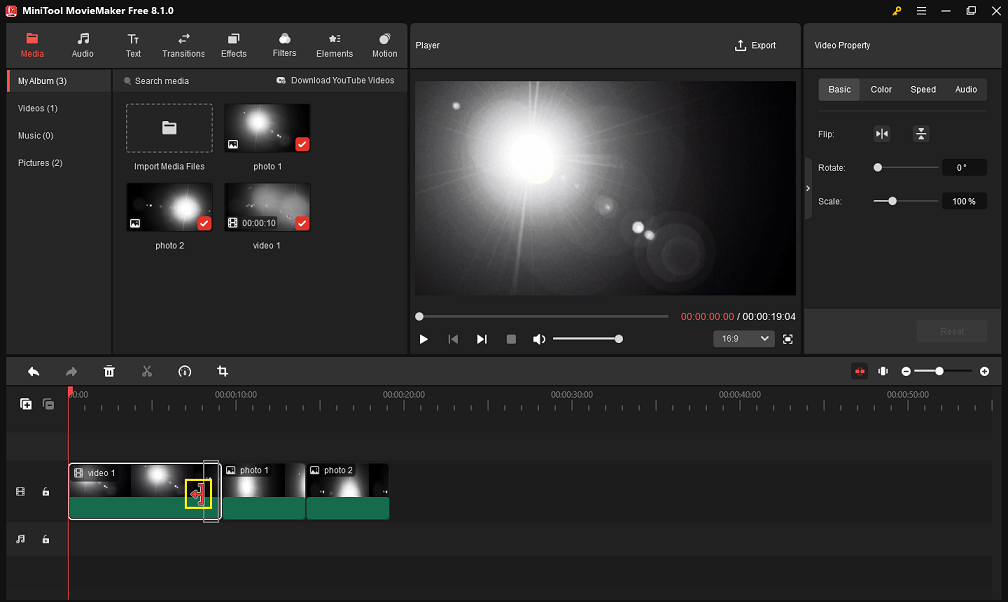
Step 3. Trim the Original Footage
Proceed as follows if you would like to trim unwanted beginning or ending parts of the original footage:
- Highlight the target clip on the timeline.
- Put the mouse pointer on the start or end of the clip until you see the Trim icon.
- Drag either edge towards the center to remove unneeded beginning or ending portions of the clip.
Step 4. Add the Appropriate Soundtrack
You have access to MiniTool MovieMaker’s audio library to add music or sound effects that suit the ambiance of your funeral slideshow.
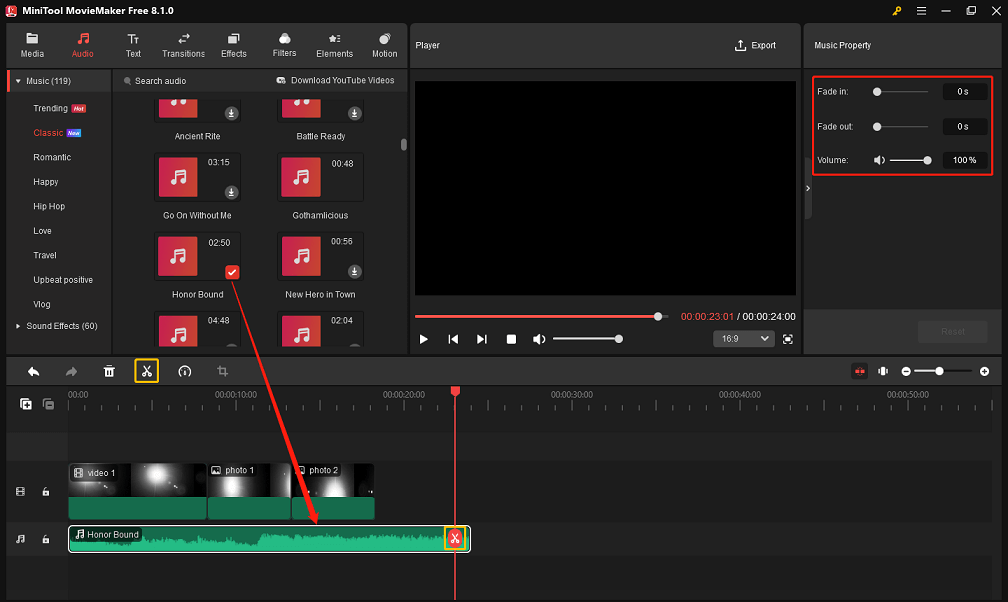
In order to add the appropriate soundtrack, go to Audio > Music or Sound Effects to find one, click on the Download icon to get it, and then drag and drop it to the audio track in the timeline.
Its Split tool can be useful when you need to remove excess parts from the added audio. Do the following:
- Highlight the added soundtrack on the timeline.
- Place the playhead at the split point.
- Click the Split icon on the playhead or timeline toolbar.
- Right-click the redundant part and select Delete to remove it.
Further, the Music Property area will show up as you highlight the audio on the timeline. Here, you can opt to fade the soundtrack in or out, lower or raise the volume, or mute/unmute it.
Step 5. Customize Text for Funeral Slideshow
When you make a slideshow for a funeral, you may want to consider including opening and closing credits.
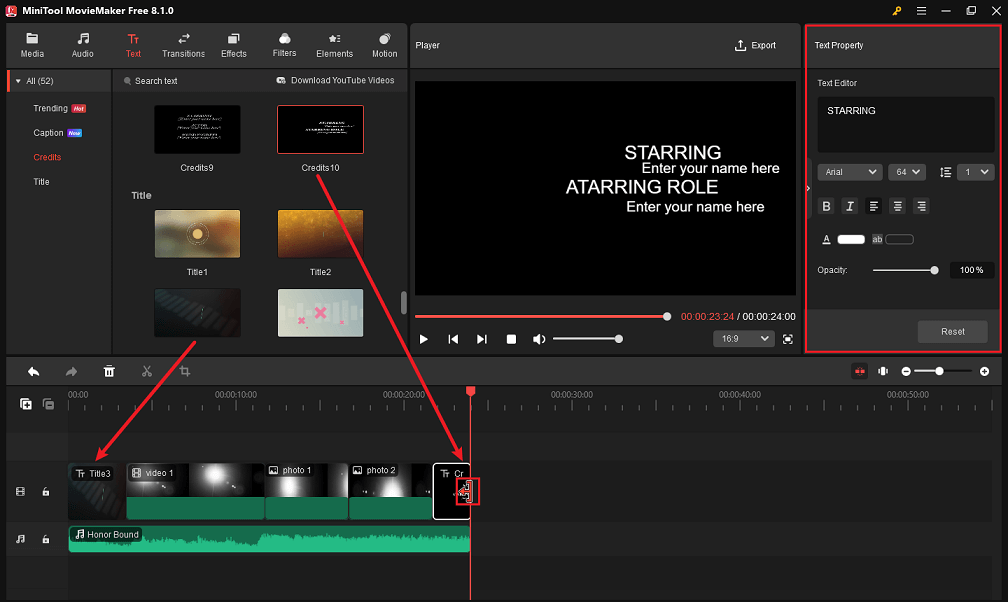
Now, switch to the Text tab at the top. Find and download the desired text templates in the Title and Credits sub-tab on the left side. Drag and drop the title and end credits styles to the start and end of the entire project, respectively.
Optionally, you can use the Split or Trim tool to remove unwanted portions of the included title and credits styles.
The Text Property area will come up as you click on the title or credits on the timeline. From there, enter your comforting words under Text Editor and customize the text font, size, line spacing, color, highlight color, opacity, etc.
Step 6. Create Transitions Between Clips
Apply transitions between clips for a smoother funeral slideshow.
Select the Transitions tab at the top. Find and download the transitions you want. Drag the downloaded transitions to the clips on the timeline. You can also click the + icon to apply them.
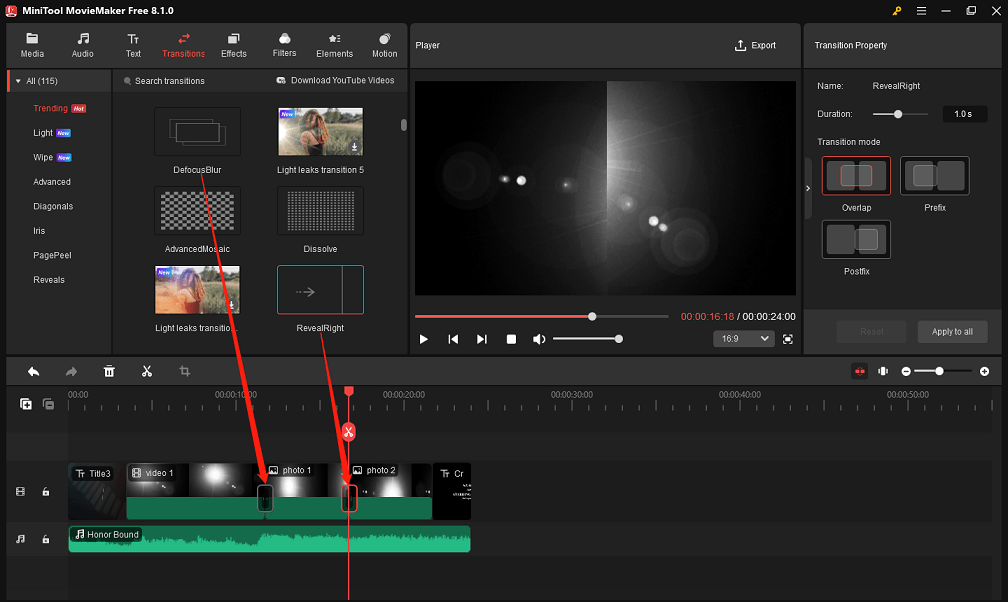
In the Transition Property area, you will be able to change the duration or the mode of the transitions you have just added.
Step 7. Overlay Effects and Filters on Clips
Improve the look and feel of your project using different effects and filters in this funeral slideshow maker.
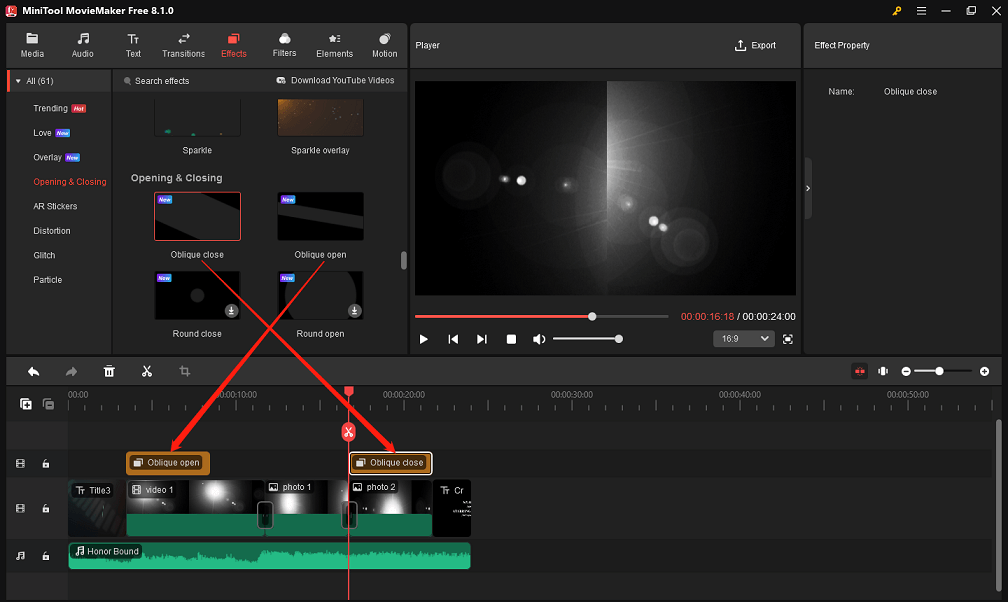
To overlay effects on clips, select the top Effects tab, find and download your favorite effects, and then put the downloaded ones above the clips in the timeline.
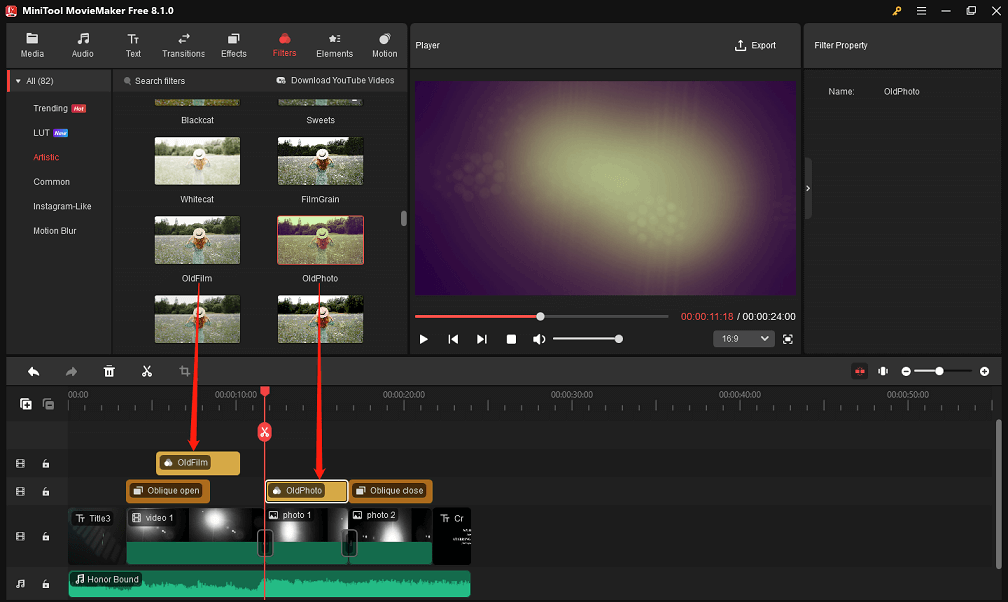
To overlay filters on clips, select the top Filters tab, find and download the filters you like, and then put the downloaded ones above the clips in the timeline.
Step 8. Preview and Save the Created Funeral Slideshow
In the lower-left corner of the Player area, click the Play (Space) icon to preview the funeral slideshow you created to make sure everything looks the way you intended.
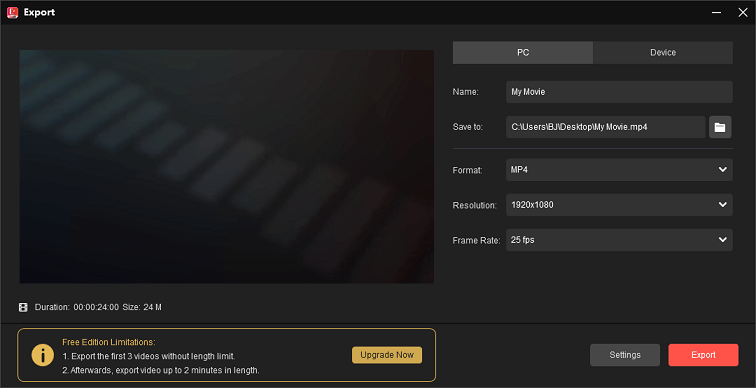
After that, click the Export option in the top right corner to bring up the output settings window. In the PC tab, give the project a name, select the destination folder, and set the output format, resolution, and frame rate.
Besides, click the Settings button to set other export options, such as quality and bit rate.
Finally, click the Export button at the bottom to save the created funeral slideshow to your computer.
Other features worth trying in MiniTool MovieMaker to optimize personal projects:
- Create video from images, audio, and videos.
- Scale and flip or rotate videos.
- Speed up or slow down videos.
- Reverse video files.
- Short videos within minutes.
- Make color adjustments to videos.
- Generate picture-in-picture and split-screen effects.
- Undo or redo the last action you performed.
- Export watermark-free videos in 1080p or 4K.
Conclusion
I’ve gathered the best funeral slideshow makers above for you to use. Plus, you learned how to use MiniTool MovieMaker to create a personalized funeral slideshow video from the ground up.
Please email us at [email protected] if you have any questions about MiniTool MovieMaker.
You may also enjoy:


User Comments :