What is the most common transition in films? Do you know how to make a video with the most popular transitions? This post lists the top 5 commonly used transitions in films. If you want to enjoy these video transitions and try more excellent transitions for free, you can try MiniTool MovieMaker, a free video editor developed by MiniTool.
When watching films, you will find there are many video transitions. In general, almost every film or video is composed of many individual shots edited together. Filmmakers or video creators always use a post-production technique to combine two shots. This technique is the video transition effect.

What Is Video Transition Effect?
Video transition is used to join two separate shots or clips. Filmmakers always use transitions to tell viewers the scene has changed, e.g. a pan from one person to another. Video transitions can seamlessly integrate different footage, therefore the core narrative moves forward believably.
Video editing software offers different kinds of video transitions. Video transitions let you connect one shot to the next to jump between storylines, move backward or forward in time, spice up the narrative, convey a particular mood, switch to another point of view, etc.
Top 5 Most Common Video Transitions in Films
There are many different video transitions. Here, we list the frequently used transitions in films or videos.
#Fade Video Transition
Fades are the building blocks of many other transitions, making the scene gradually turn to a single color, usually black or white. Using fades is an effective way of conveying the passage of time.
The Fade-in transition gradually makes the shot visible, giving the viewer time to take in an image. Filmmakers always put the fade-in transition at the beginning of a film or scene.
The fade-out transition is often used to end a film or scene. By using this transition, you will find the shot starts at full brightness and gradually becomes invisible.
Sometimes, fade-out is also called fade-to-black. It is a dramatic transition and symbolizes the passage of time or signifies completion. Filmmakers always use the fade-to-black transition to move from a dramatic or emotional scene into another scene, or to the credits at the end of a film.
To know the fade transition effect, you can watch the following video.
#Wipe Video Transition
If fades symbolize completion, you can try the wipe transition to show that the action is unresolved.
Wipe transitions replace one shot with another through animation, making the shot travel from one side of the frame to the other. Filmmakers always use wipe transitions to establish tension or conflict. For instance, the original Star Wars trilogy has some great examples of wipe transitions.
A clock wipe uses a circular motion like the hands of a clock to show the second shot.
The iris-out transition will animate a contracting circle inward from the edge of the frame. This transition indicates the end of a story.
The iris-in transition is widely used at the beginning of a scene since this video transition effect shows a small, circular area of the shot before expanding out to reveal the entire frame. You can easily find this video transition in Tom & Jerry or The Departed.
#Zoom Video Transition
Zoom transitions are widely used to convey a frenetic pace, switching quickly from one scene to the next. Edgar Wright uses zoom transitions to make the Shaun of the Dead film has a comedic effect.
#Whip Pan Video Transition
A whip pan is a bit similar to a wipe, but it tends to be much faster. A camera quickly pans to create a blur effect between scenes. This is a whip pan.
Whip pan can move from one shot to another and can change to a different angle in one shot. If you want to create a comedic effect or to convey fast-paced action, whip pan is a great choice for you. Director Paul Thomas Anderson frequently uses whip-pan video transitions in his films.
#Dissolve Video Transition
Building on fades, dissolves overlap two shots or scenes and gradually move from one to another. To show two narratives or scenes are linked or time passing, or to move from one location to another, filmmakers always use dissolve effects at the end of one scene and the beginning of the next.
Match dissolve effects is a slightly more advanced form of dissolve. During this video transition, you can see that an object will dissolve into another similarly-shaped object. For instance, slowly dissolve from a soccer ball to the moon, and match their size and position on the screen.
Cross dissolve gradually replaces one shot with another, implying a passage of time or a change of location.
Ripple dissolve is similar to a cross dissolve. However, it can give a dream-like effect to the transition since it makes use of a “Ripple” filter.
No, enjoy the dissolve effects in the film.
See! If you want to convey a particular mood, switch to another point of view, or move backward or forward in time, you need to use video transitions.
Share the most common video transitions in films with all of you.Click to Tweet
Reading here, we know the most commonly used transitions in films. What should you do if you want to try more excellent video transitions? Besides, how to add transitions to video?
4 Useful Tips about Video Transitions
Tip 1. Free Enjoy Popular Video Transitions
Now, we can see fade, dissolve, wipe, whip pan and zoom are the most commonly used transitions in film. If you want to use more video transitions for free, you can try MiniTool MovieMaker because it offers many different video transitions. You can safely use these transitions to make a cool video or film as it is a free and simple video editor without watermark.
Tip 2. How to Add Transitions to Video
MiniTool MovieMaker, free, no ads, no bundle video editing software, lets you add transitions like dissolves, fades, wipes and other transitions between videos and images. For detailed instructions and screenshots, see below:
Step 1: Download MiniTool MovieMaker
Click the Download button below to download free video editor and install it on your Windows PC.
MiniTool MovieMakerClick to Download100%Clean & Safe
Step 2: Import your video files
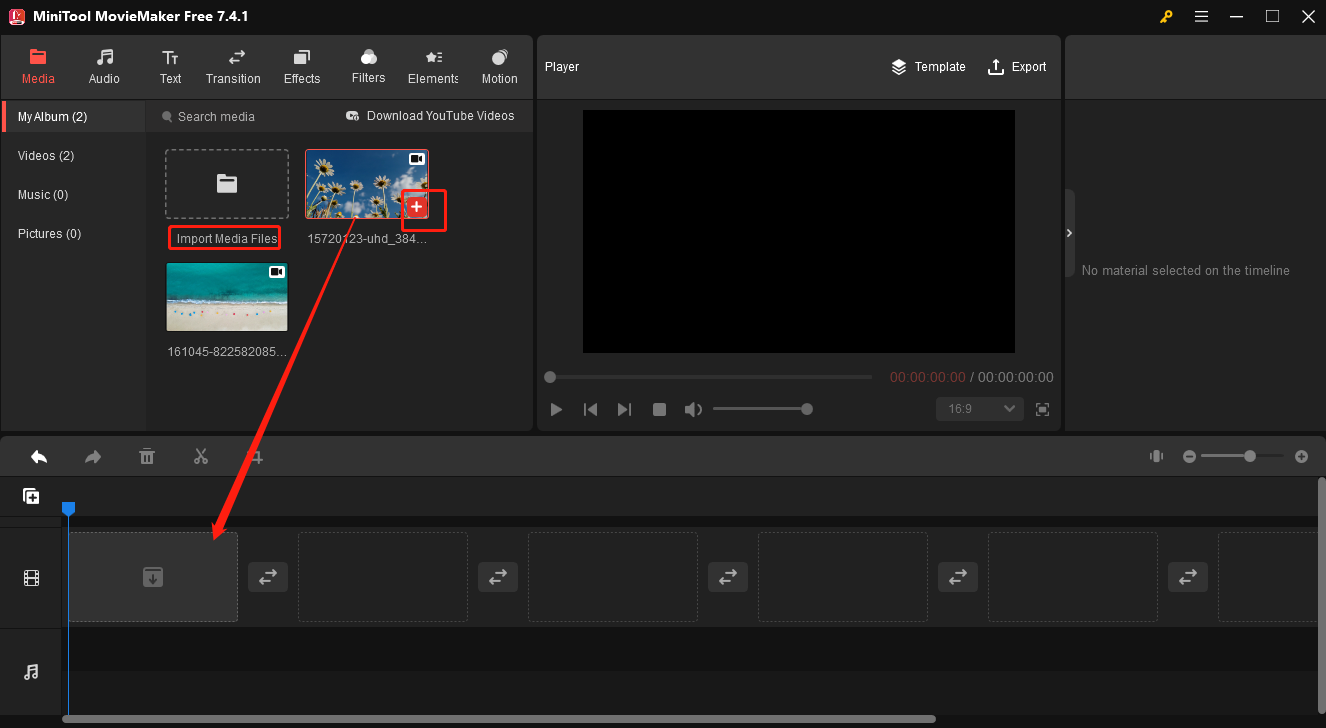
Launch this software and close the promotion interface, then click the Import Media Files button to select your needed files, you can import multiple files at once by pressing Shift or Ctrl on your keyboard to select multiple files. After importing the files, you can click “+” or directly drag and drop it to the timeline.
Step 3: Add transition to your video files
Here are three ways to add transitions:
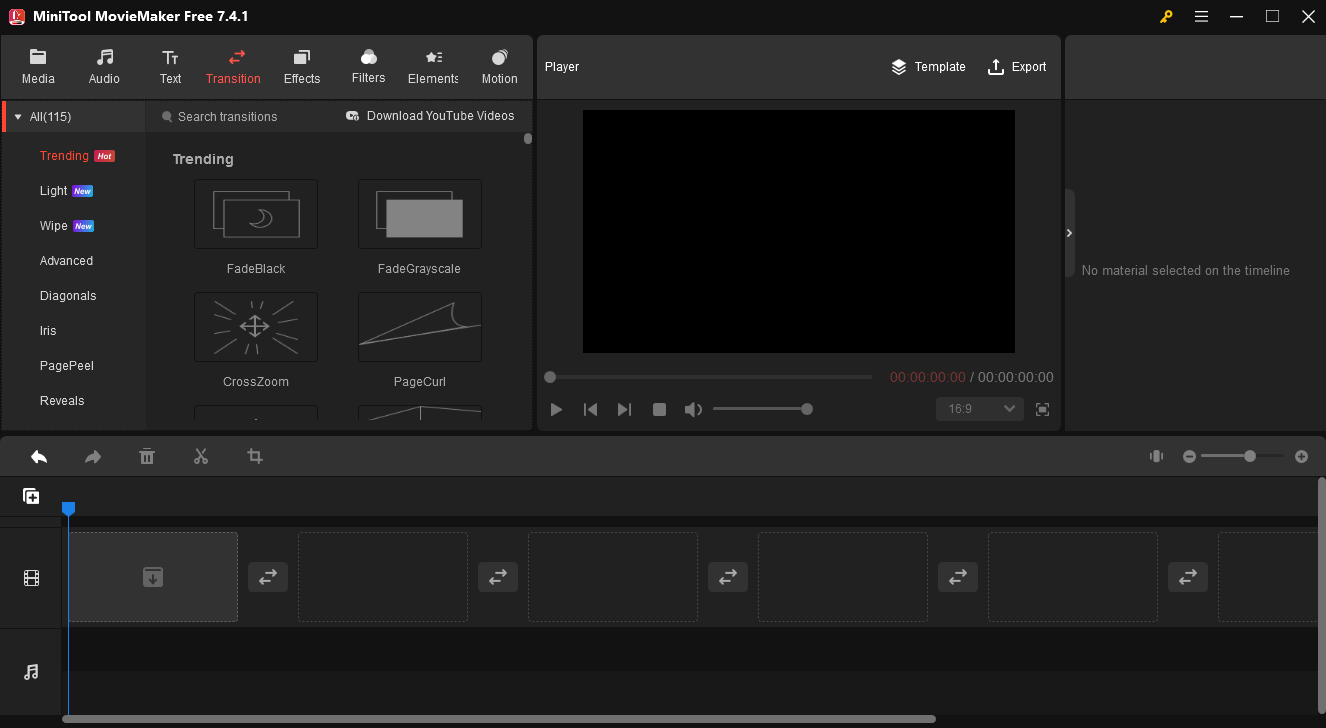
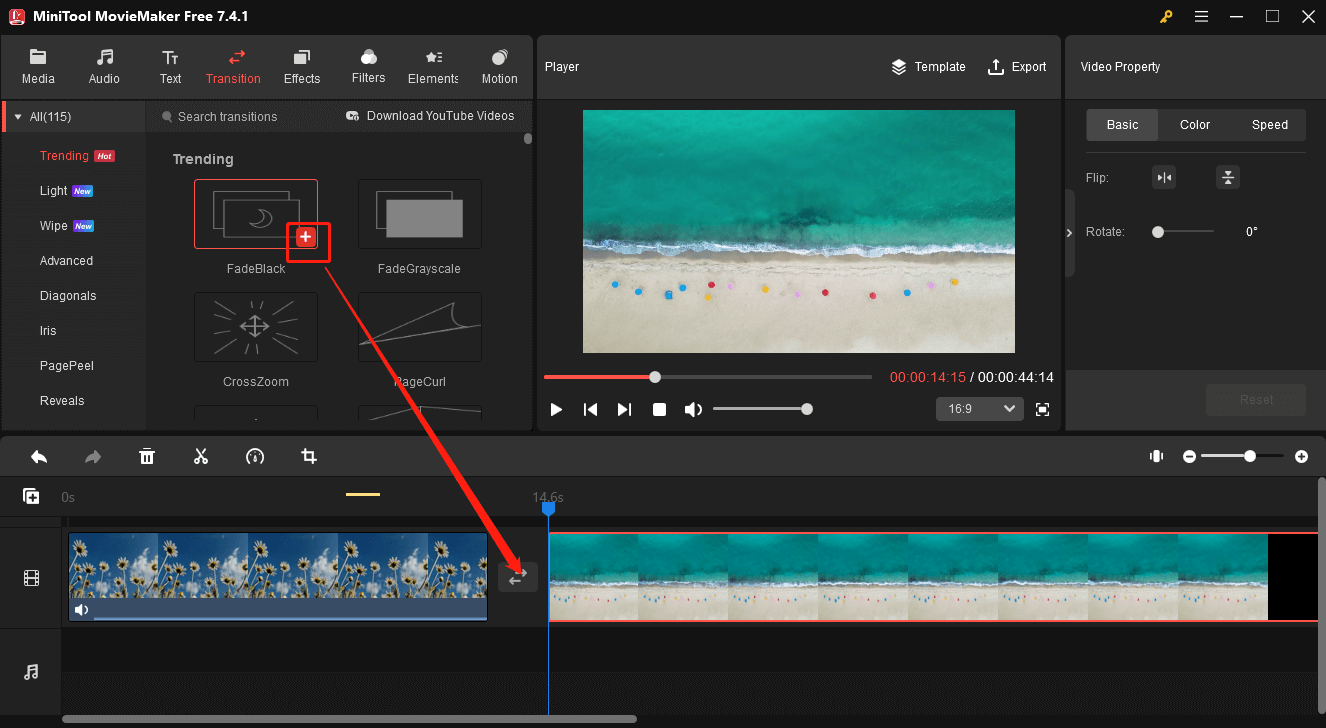
1. If you want to add a transition between two clips, click Transitions first to select the transition you want, and click the plus icon (+) on it or you can also drag and drop the desired transition to the location between the target 2 clips.
2. If you want to add a transition between multiple clips, select the clips where you want to add the same transition first. Then choose the appropriate transition, right-click on the needed transition, and select Apply to Selected Clips and the transition will be added to the back of the selected clip.
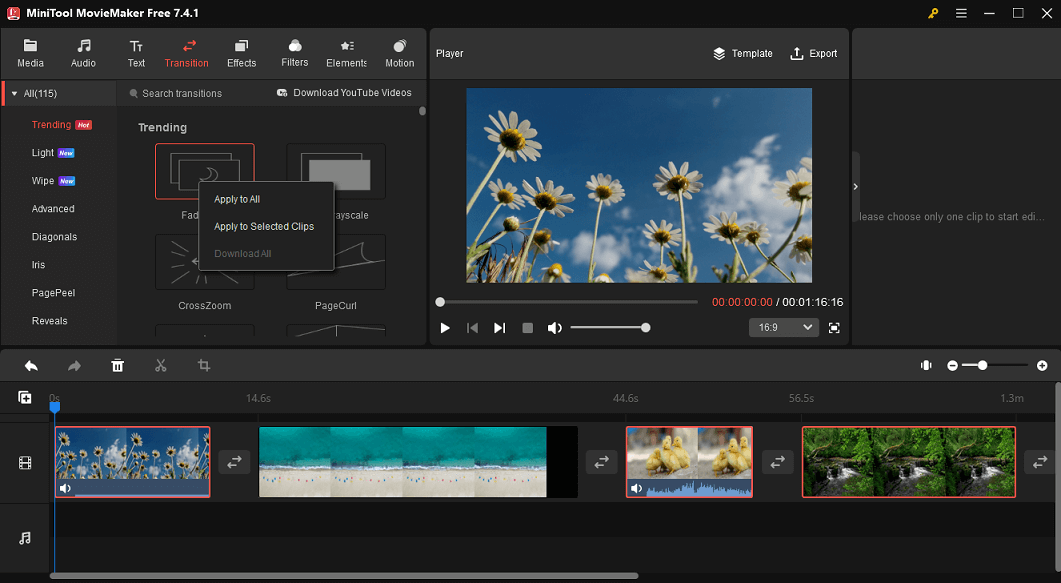
3. If you want to add a transition to all clips, you should click Transitions first to select the desired transition, then right-click on the transition, and select Apply to All.

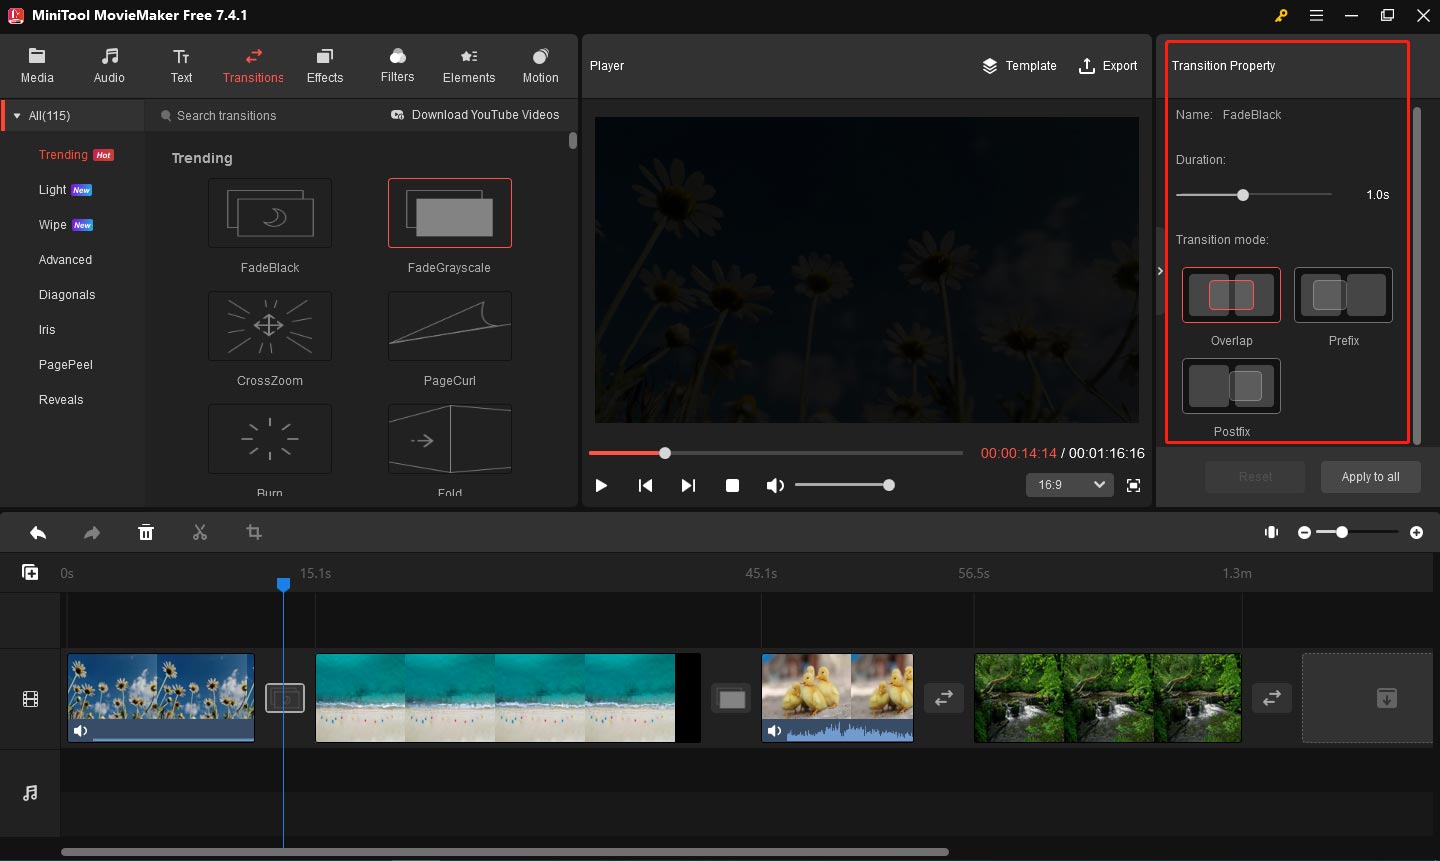
Step 4: Edit the added transition
After you add a transition, you can first click the transition icon in the timeline, then you can edit the transition in the Transition Property, where there are two columns, Duration and Transition mode, you can set the duration of the transition from 0.3s to 2s, and you can set the transition mode to Overlap, Prefix and Postfix. Once you’ve edited your transitions, you can also apply them to all transitions by clicking Apply to all.
If you are not satisfied with the current transitions, you can re-add a new one and the original ones will be directly replaced. Or you can just right-click the transition and select Delete.
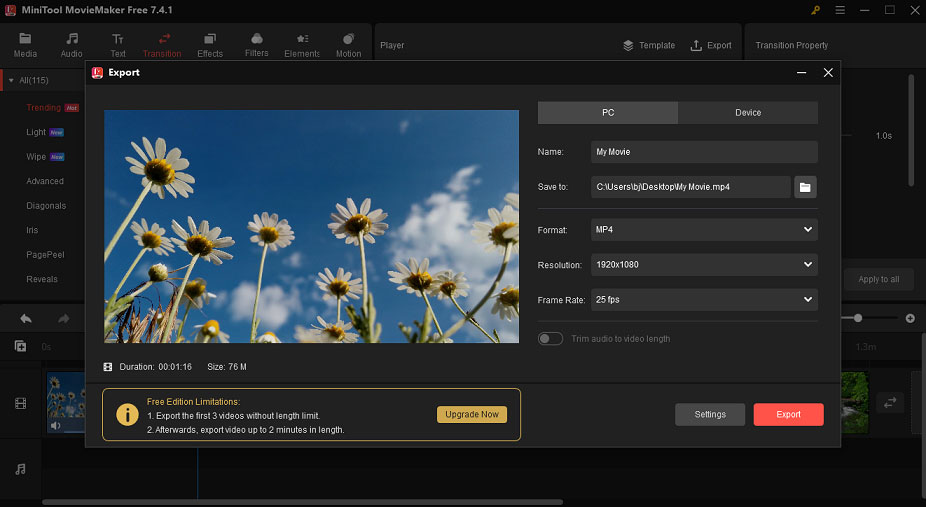
Step 5: Save your videos
After you have successfully edited the satisfied transition, you can click Export and select the file format you want to export.
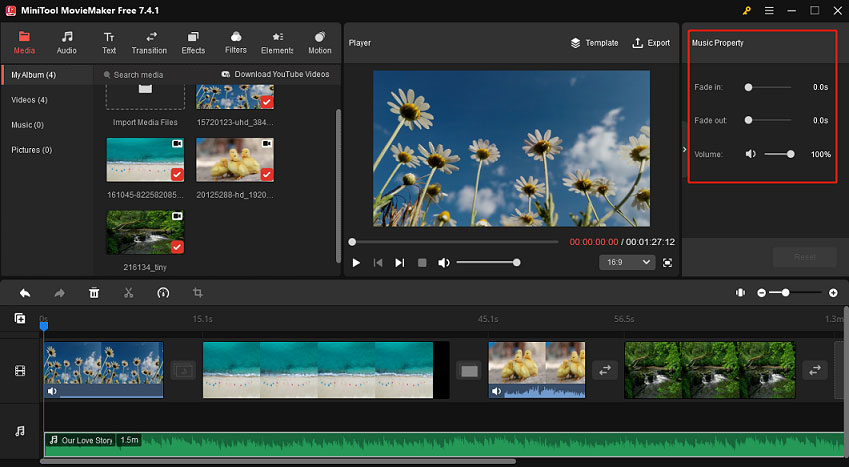
Tip 3. How to Fade in or Fade out Music
MiniTool MovieMaker not only offers fades to help you create video or film but also lets you fade in or fade out music files. Now, let’s see how to fade in/out music:
- Launch MiniTool MovieMaker, and import your files.
- Drag and drop files to the timeline.
- Right-click the music file in the timeline and choose Edit button.
- Fade in or fade out music according to actual needs.
- Save your video.
Tip 4. Some Other Excellent Features of MiniTool MovieMaker
MiniTool MovieMaker offers various popular video transitions. You can choose the most commonly used transitions in films like fades, dissolves, etc. to create your movies. Also, you can choose other popular video transitions to grab the viewer’s attention as you jump from scene to scene.
On the other hand, this free video editor offers some other excellent features to help you create cool films or videos.
- It is free, as well as simple video editing software. You can easily use it to create videos without watermark.
- It offers different video templates to help you create Hollywood-style videos easily. You only need to select a template, import your files, and share this video with your friends.
- It lets you split video, trim video and merge video without any difficulty. (Related article: Top 7 Free Video Splitters – How to Split Video.)
- It allows you to add animated texts, subtitles, and end credits to your video to complete your story.
- It offers a color correction tool. Thus, you can change the contrast, saturation, and brightness of video, and you even can apply 3D LUTs to video.
- It is a simple video editor as well as a video player like MKV player, it also is a video converter. It can change video format, change video resolution, and change video bitrate.
Bottom Line
This post lists the most common video transitions in films and other popular video transitions you may like. Now, it’s your time to apply video transitions to your project. If you don’t know how to add transitions to videos, you can try the free video editing software, MiniTool MovieMaker.
Should you like any other transitions that we don’t have, please share them with us. Thanks in advance. If you have any questions, please feel free to contact us via [email protected].
Video Transitions FAQ
2. Add media files to the timeline.
3. Click the Transition menu to view 115 popular video transitions.
4. Drag and drop a suitable transition to the timeline.
5. Play your video, and save this video.
2. Dissolve is a gradual transition from one image to another. It is widely used at the end of one scene and the beginning of the next, and it shows time passing.
3. Wipe is a type of film transition when a shot travels from one side of the frame to another or with a special shape, replacing the previous scene. You can see this transition in the original Star Wars.
About The Author

Position: Columnist
Yulia has a great passion for life. She enjoys photography and travel, and is always eager to record cherished moment through her lens. This also led to her strong interest in video editing, and she kept learning multimedia-related knowledge, hoping to bring readers better advice on images, audio, video, and related topics.
User Comments :