A school project video is an excellent approach to getting a taste of what it's like to work as a professional video editor or filmmaker. This article from MiniTool MovieMaker will show how to make a video for school projects using helpful tips and powerful video editing software.
Are you concerned about your school project? Now, you have nothing to worry about. Creating videos is a must! Videos are useful in a variety of situations: delivering a sales pitch, submitting a proposal, project presentation, social media posts, and so on.
Although your scripts might have been well-drafted, the video creation process is even more important. That’s where video editing applications come in. Using these, you can produce amazing videos with personalized backgrounds, add animations and captions, stylize your text, etc. This means that with the right tools, your video project presentations will go much more smoothly.
Part 1: Tips on How to Make a Video for a School Project
Video ideas come to life while also being entertaining, informative, and simple to understand. The same is true of educational videos. You can use videos to describe school projects for teachers to guide and students to follow more easily. Videos, as with most visual tools, are often easier to master and retain. The following are some useful tips to adopt if you want to learn how to make an engaging video for a school project:
- Apply recognizable fonts.
- Videos should be neither too fast nor too slow.
- Use high-resolution images to avoid blurriness.
- Choose images that convey your message most effectively.
- Add audio tracks that convey the video’s general feelings and emotions.
- Add text elements, such as subtitles and captions, as needed.
- Avoid distracting effects and only use those that are necessary for comprehending the video.
Part 2: What Video Editors Can You Use for a School Project Video?
With the substantial increase in videos for various purposes, it is no surprise that many video editing applications and programs have been developed. Hobbyists and professionals alike can use these video editors to create stunning videos.
If you’re looking for the right tools to help learn how to make a video longer for school projects or how to make a music video for school projects, then take a look at any of the following video editing programs:
#1. MiniTool MovieMaker
MiniTool MovieMaker is a free video editing application for newcomers and professionals to make a school project video. It covers a wealth of cool movie templates including Love, Travel, Festival, Family&Friends, and more.
The application supports the most popular video, audio, and image formats, like MP4, AVI, MOV, WMV, JPG, PNG, GIF, MP3, etc. Also, it provides users with built-in music, transitions, filters, captions, titles, credits, motions, animated elements, and so on.
With the help of MiniTool MovieMaker, you can make video projects engaging by splitting, trimming, cropping, rotating, flipping, speeding up, slowing down, and reversing. In addition, the software allows you to brighten dark videos by changing the contrast, brightness, and saturation.
On top of that, MiniTool MovieMaker comes with easy-to-use features and advanced tools for Windows users to produce different types of videos for almost any occasion, like product videos, gaming intro videos, typography videos, hype videos, and others.
Further Advanced Features:
- Popular aspect ratios.
- Artistic, Instagram-Like, and MotionBlur effects.
- Pan and zoom motions.
- Apply 3D LUT effects.
- Create slideshows with photos and music.
- Batch processing of video and images.
- Adjust the video’s quality, bitrate, frame rate, and resolution.
- Export standard or HD videos without watermarks.
#2. iMovie
iMovie is a video-making and editing tool that supports iOS and macOS, enabling you to create 4K resolution videos from your original clips. If you want to learn how to make a video for school projects or how to make an HD trailer, iMovie will let you choose your media clips, add titles, effects, music, graphic elements, motion compensation, and more.
You can use this video creation tool to make cinema-quality videos with ease. Additionally, users can create a really inspiring video with simple-to-use and built-in video filters, an audio library, a green screen, picture-in-picture effects, and many more.
Further Advanced Features:
- Intuitive interface.
- Simple-to-use transitions.
- Free of charge for Mac users.
- Reduce the speed of some shots.
- Supports importing clips from your local media library.
#3. Wonderhshare Filmora
Wonderhshare Filmora is a great video editing program that works with Windows and macOS. Ranging from easy to advanced video editing and making features, this program comes in handy when creating videos for different purposes, including sales pitches, proposals, memes, movies, projects, social media posts, and more.
Using Filmora, users can make a video for a school project in a few easy steps. With keyframing and motion-tracking features that enable you to design custom animations, you’re sure to turn your imagination into reality. Moreover, the program’s features contain titles, captions, filters, split screen, speed control, green screen, audio ducking, color match, color grading, keyboard shortcut, etc.
Further Advanced Features:
- Intuitive and user-friendly interface.
- Supports most common video formats.
- Integrated stock library.
- Extensive built-in video effects.
- AI-powered features such as AI Portrait, AR stickers, and Auto Reframe.
- Special offer for teachers and students.
- Works on both Windows and macOS.
#4. Final Cut Pro
Final Cut Pro is an all-in-one video editing software that supports proxy workflows, enabling you to share your library of work with other programs worldwide. It works efficiently on MacOS.
The software’s modern machine learning algorithm changes your video projects from widescreen to custom sizes for social media. Users can guide graphics and text elements with the custom overlay feature.
Final Cut Pro assists you in working with complex projects at larger frame sizes and higher frame rates. If you want to make a video for a school project, you can do graphic tasks such as real-time effects, rendering, and exporting at blazing speed on this one-stop tool.
Further Advanced Features:
- Provides a rich toolset for video making and editing.
- Integrates well with other studio applications such as Compressor and Motion.
- Automatically saves while you are working.
Also read: Top 6 Alternatives to Final Cut Pro for Windows in 2023
#5. Adobe Premiere Pro
Adobe Premiere Pro serves as a robust tool with its plans that let users access a vast array of creative features and applications for teachers and students who want to know how to make a video for school projects. This video editing program will allow you to create innovative video clips in seconds.
When importing clips, merging clips, and adding transitions, you can make your video projects outstanding. You can also use the built-in preset to play audio and music tracks as well as add elements such as titles, transitions, motion stickers, and more. Besides, you can explore the world of Premiere Pro, including stylized fonts, stock media library, and motion graphics templates.
Further Advanced Features:
- Straightforward and flexible user interface.
- Fast ProRes HDR rendering.
- Support for local files.
- Compatible with others such as After Effects, Illustrator, and Photoshop.
You may also like:
- Final Cut Pro VS Premiere – Which One is Better?
- Filmora vs Premiere: The Ultimate Comparison in 2023
- Camtasia vs Adobe Premiere – Which One Is Right for You?
Part 3: How to Make a Video for School Projects Step by Step?
As mentioned above, MiniTool MovieMaker is a distinctive and user-friendly video editing software, which provides good deals for teachers and students. It’s a good option for you to learn how to make a video for your school project.
Below is a step-by-step guide on how to make an engaging video for a school project with MiniTool MovieMaker:
Step 1: Create a new project
MiniTool MovieMakerClick to Download100%Clean & Safe
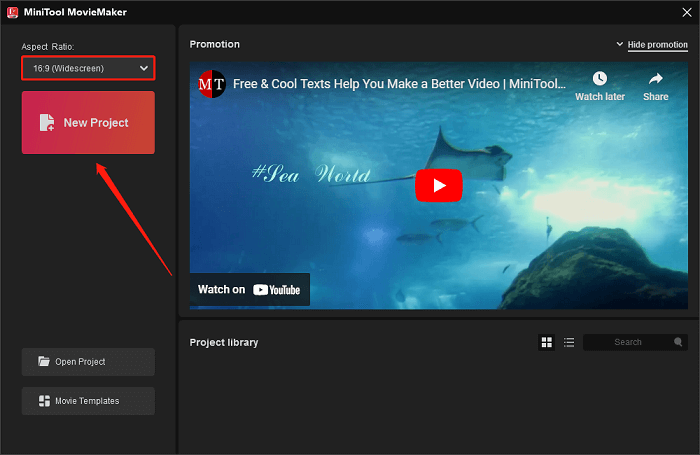
Click the green Free Download button to download and install MiniTool MovieMaker on your computer. Launch this video editor and close the pop-up window to go to the Project library window.
Here, click on the Aspect Ratio drop-down list from the top left corner of the interface and choose the appropriate aspect ratio, such as 16:9 (widescreen), 9:16 (portrait), 4:3 (standard), and 1:1 (Instagram). Click on the New Project button to enter the main interface where you can start making a video for your school project.

Step 2: Import local media files
Click on the Import Media Files option, locate the folder where your media files are stored, choose the media files you would like to import, and then click on Open.
Step 3: Drag and drop media files onto the timeline
Directly drag and drop the imported media files onto the timeline in sequence. Or, click on the + sign on the imported media files to add them to the timeline.
Step 4: Add a transition between video or image clips
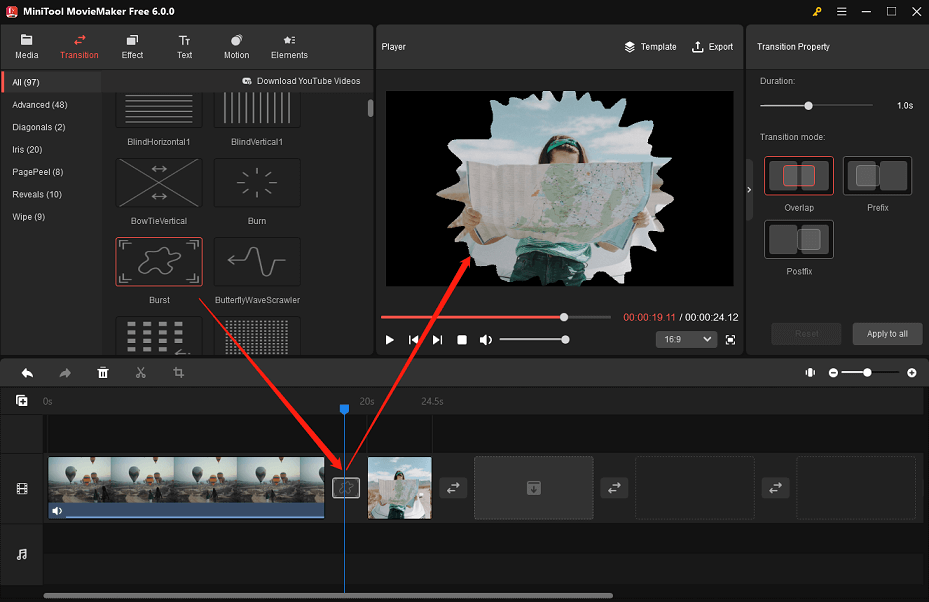
Click on the Transition tab at the top of the main interface, select the video or image clip you want to add a transition next to, and click on the + sign on the desired transition to add it between the target two clips.

Step 5: Edit any video clip on the timeline
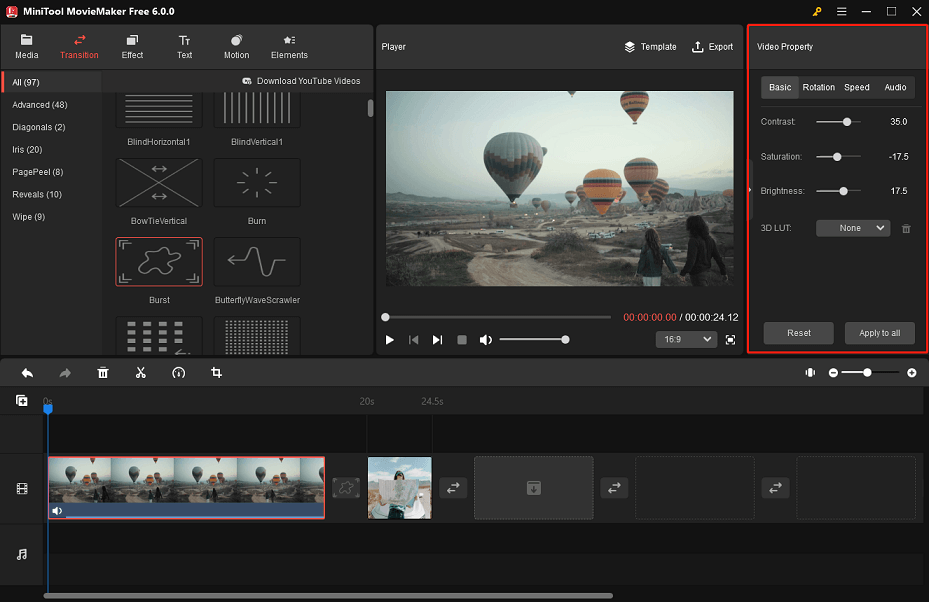
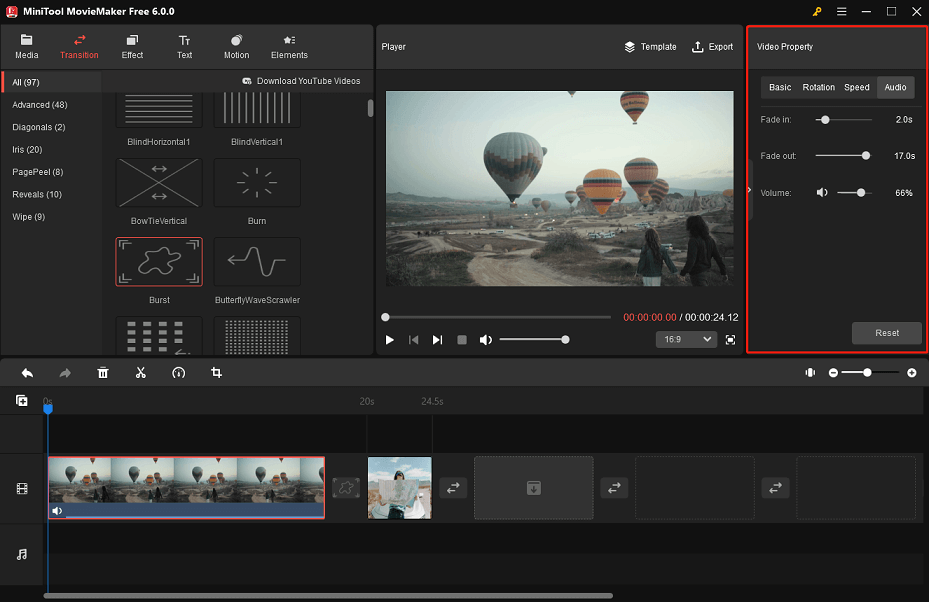
Click on the video clip you want to edit on the timeline and the Video Property section will appear, where you can make color corrections, apply a 3D LUT effect, flip or rotate the video clip, adjust the playback speed of the video clip, and edit the built-in audio of the video clip.
In the Basic tab, drag the sliders to change the contrast, saturation, and brightness of the video clip. Click on the None drop-down list next to 3D LUT and choose a 3D LUT effect you like.

In the Rotation tab, click on the Flip Horizontal or Flip Vertical icon to flip the video clip horizontally or vertically as desired. Optionally, drag the Rotate slider to rotate the video clip by a certain angle.
In the Speed tab, drag the Speed slider to the left or right to slow down or speed up the video clip. Additionally, check the Reverse speed option to reverse the video clip.
In the Audio tab, drag the sliders to adjust the duration of the Fade in / Fade out effects. Or, drag the Volume slider to the left or right to make the video clip’s built-in audio quieter or louder.

Step 6: Export your video project
After editing, click on Export at the top of the interface to rename your video, select the video format, and specify the destination folder. Further, click on Settings to make adjustments to the video’s quality, resolution, bitrate, and frame rate. Finally, click the Export button to save your video project.
Conclusion
All in all, if you are wondering how to make a video for school projects, you can choose the right video editor (MiniTool MovieMaker is highly recommended) to help your school project video stand out.
If you have any questions or comments about MiniTool MovieMaker, please feel free to email us at [email protected].


User Comments :