This guide gives quick navigation to the main interfaces of MiniTool MovieMaker.
This help document provides a concise introduction to the primary interface components of MiniTool MovieMaker.
MiniTool MovieMakerClick to Download100%Clean & Safe
Project Library Window
Once MiniTool MovieMaker launches, you will see the pop-up window below, which displays a roster of your recent projects, along with the options to initiate video creation.
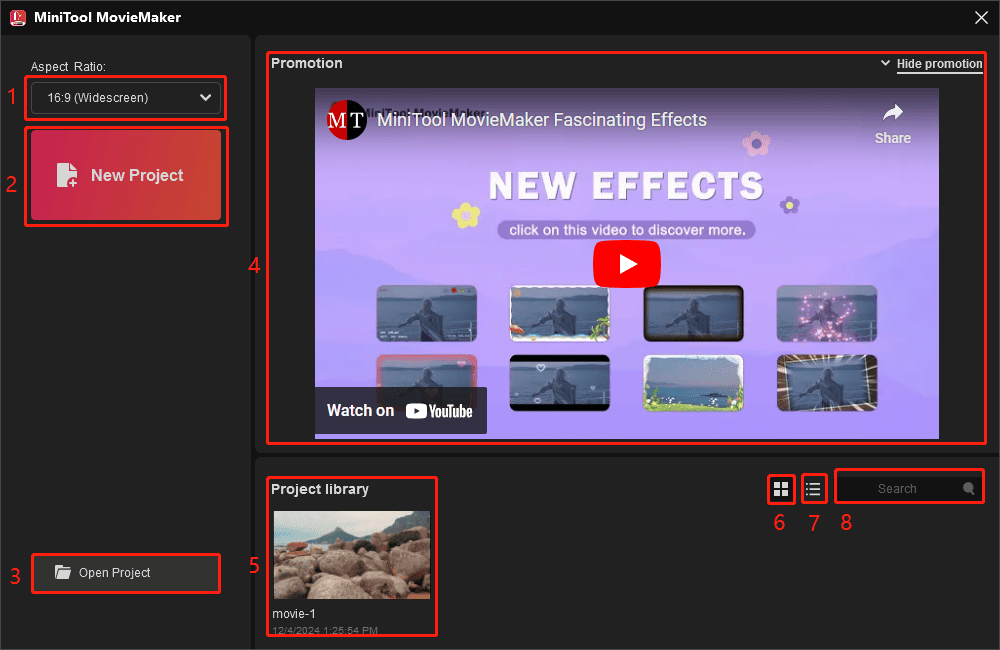
- Aspect Ratio: Set up the ratio of the width and height of the new video.
- New Project: Create a new video project.
- Open Project: Locate the previously saved project file and open it.
- Promotion: A marketing video shows how to make your videos better with MiniTool MovieMaker.
- Project library: Lists all the recent projects.
- Large Icons: Show the thumbnails of the project files.
- Details: Show the project file’s name, date modified, size, and type.
- Search bar: Search for projects with their file names.
Main Interface Introduction
After closing the project library window, you will see the main user interface of MiniTool MovieMaker. This intuitive and user-friendly window contains 5 parts:
1. Menu Bar
The top menu bar includes these basic options in MiniTool MovieMaker.
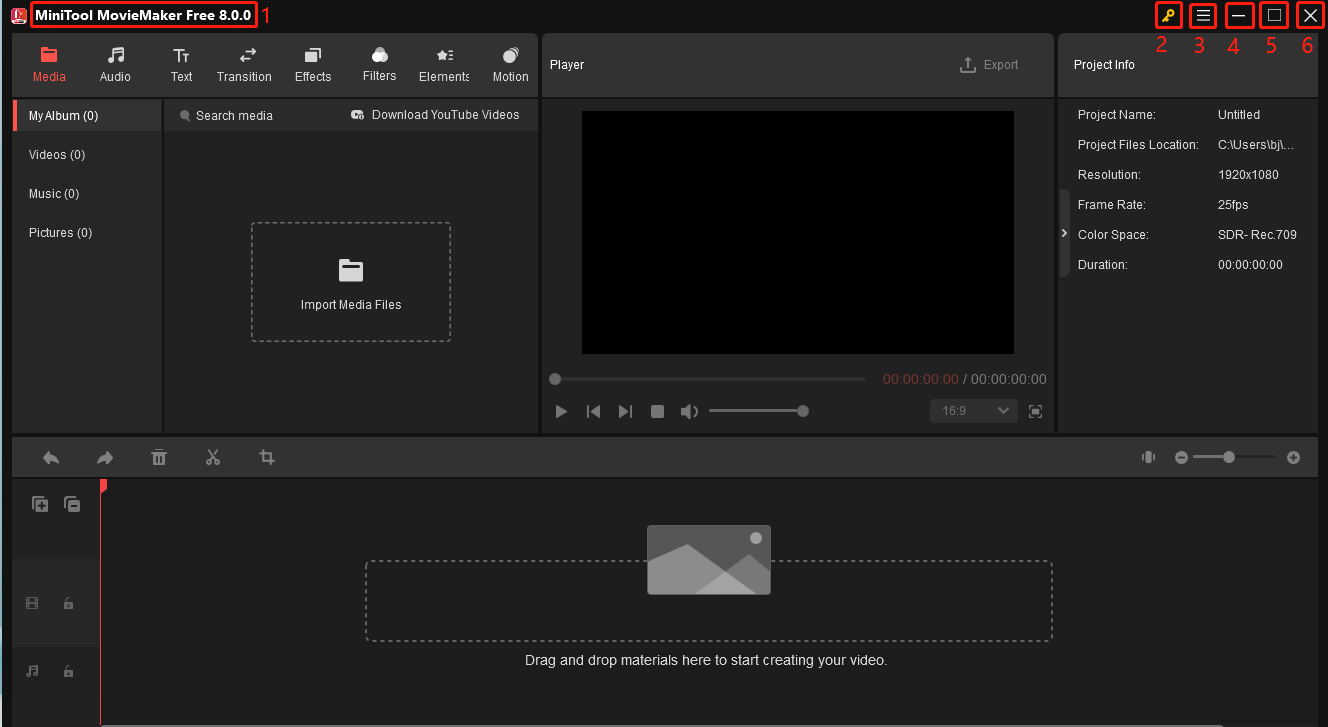
- Product name: MiniTool MovieMaker <edition> <version>
- Register: Register/activate MiniTool MovieMaker with a license code.
- More: Contain File, Help, and Language. The File menu consists of New Project, Open Project, Save Project, Save Project as, Import Media – Import from PC, and Exit options; the Help menu includes Walkthrough, Video Tutorials, Manual, Check for Update, Enter License Key, Log file location, About, and Feedback options; the Language menu includes English, Japanese, and German.
- Minimize: Minimize the main window.
- Maximize: Maximize the main window.
- Close: Close the main window.
2. Resource & Effects Section
This part is located on the upper left of the main user interface (UI) of MiniTool MovieMaker. It displays all the source files and effects, whether they are pre-installed or user-uploaded, that can be applied to enhance your videos.
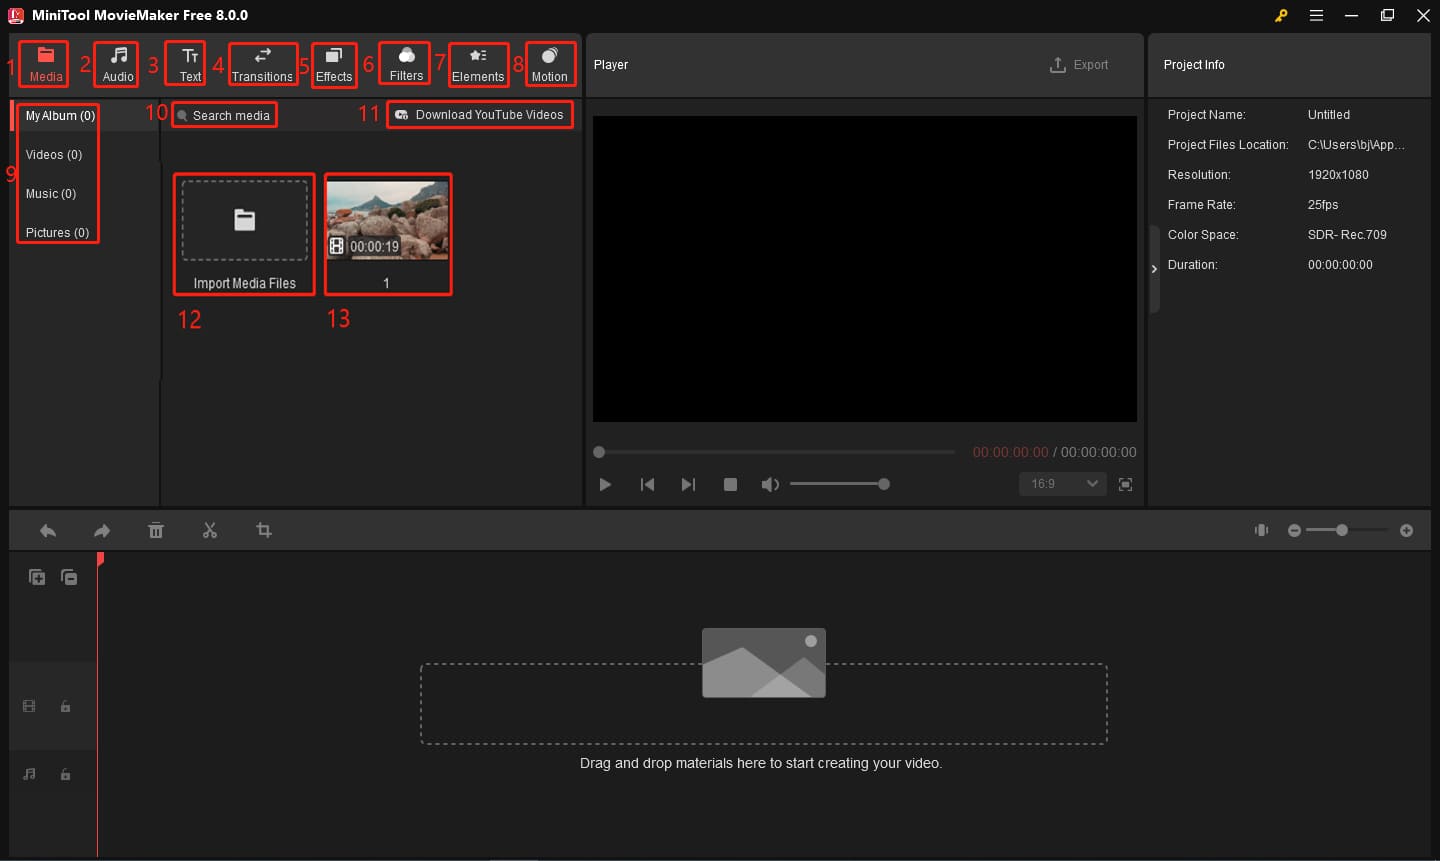
- Media: Collects all media files including videos, music, and pictures.
- Audio: Software built-in audio including music and sound effects.
- Text: Contains rich text templates for opening titles, middle captions, and ending credits.
- Transitions: Offers many transitions like wipe, dissolve, fade, fill, and reveal.
- Effects: Includes various effects containing overlay, love, distortion, particle, glitch, etc.
- Filters: Provides various filters including LUT, artistic, Instagram-like, motion blur, etc.
- Elements: Lists cartoon animated stickers including types of emoji, festivals, pets, pops, arrows…
- Motion: Stores plenty of motion effects including pan, zoom in, and zoom out.
- Left menu: The submenu of each top menu.
- Search feature: Search for specific media files or effects by their names.
- Download YouTube Videos: Guide to downloading MiniTool Video Converter, a free video downloader and converter.
- Import Media Files: Add videos, songs, or photos from your local computer to MiniTool MovieMaker.
- Added media files: The uploaded media files in the Media library.
3. Player Section
The Player window shows the video that is currently being edited on the timeline or storyboard.
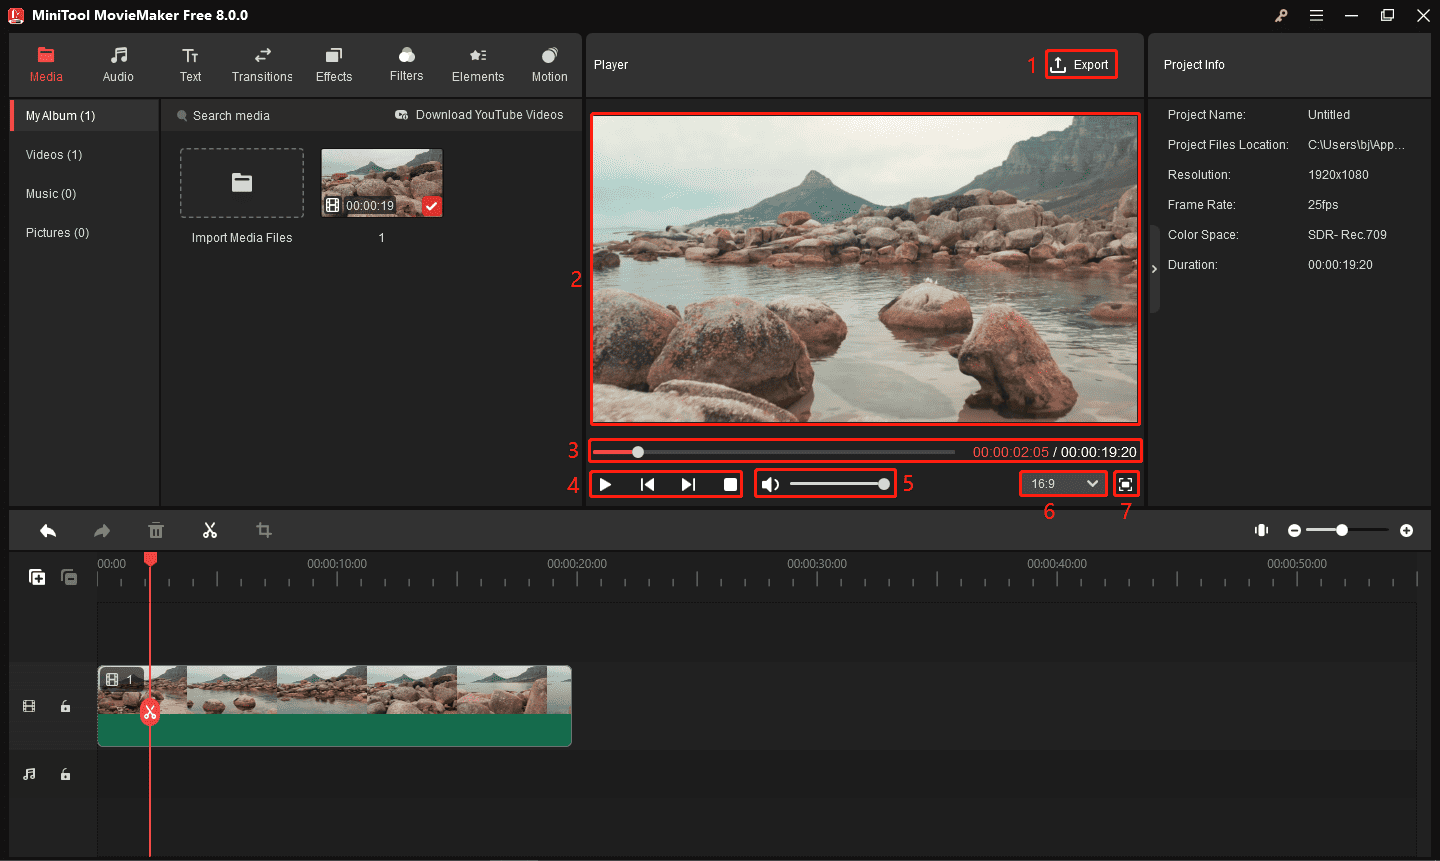
- Export: Save and export the created video.
- Player screen: Display the scene of the video.
- Timecode: Display the exact time of the playhead position and the duration of the complete sequence.
- Play buttons: Play/pause the video, step forward/backward by one frame, or skip to the start point of the video.
- Volume: Change the volume of the video playback.
- Aspect ratio: Change the aspect ratio of the whole video.
- Full screen: Enter or exit full screen.
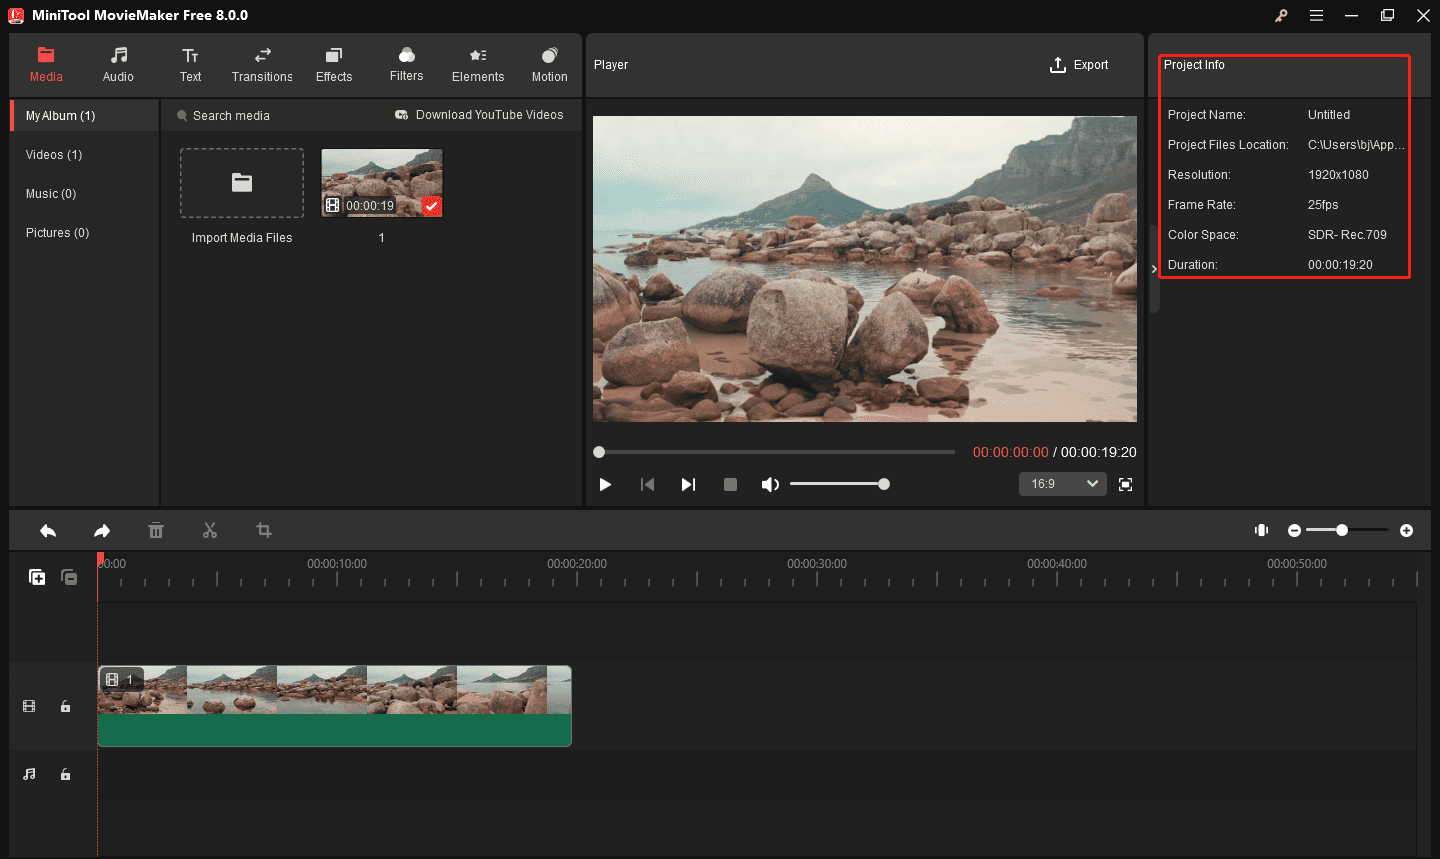
4. Project Information Section
The Project Info section will appear when you do not choose any footage or element on the timeline. You will also see this window every time you enter the main UI of MiniTool MovieMaker. From this section, you can know the project name, location, resolution, frame rate, color space, and duration.
5. Property Section
This section displays the editable properties of the currently selected item on the timeline.
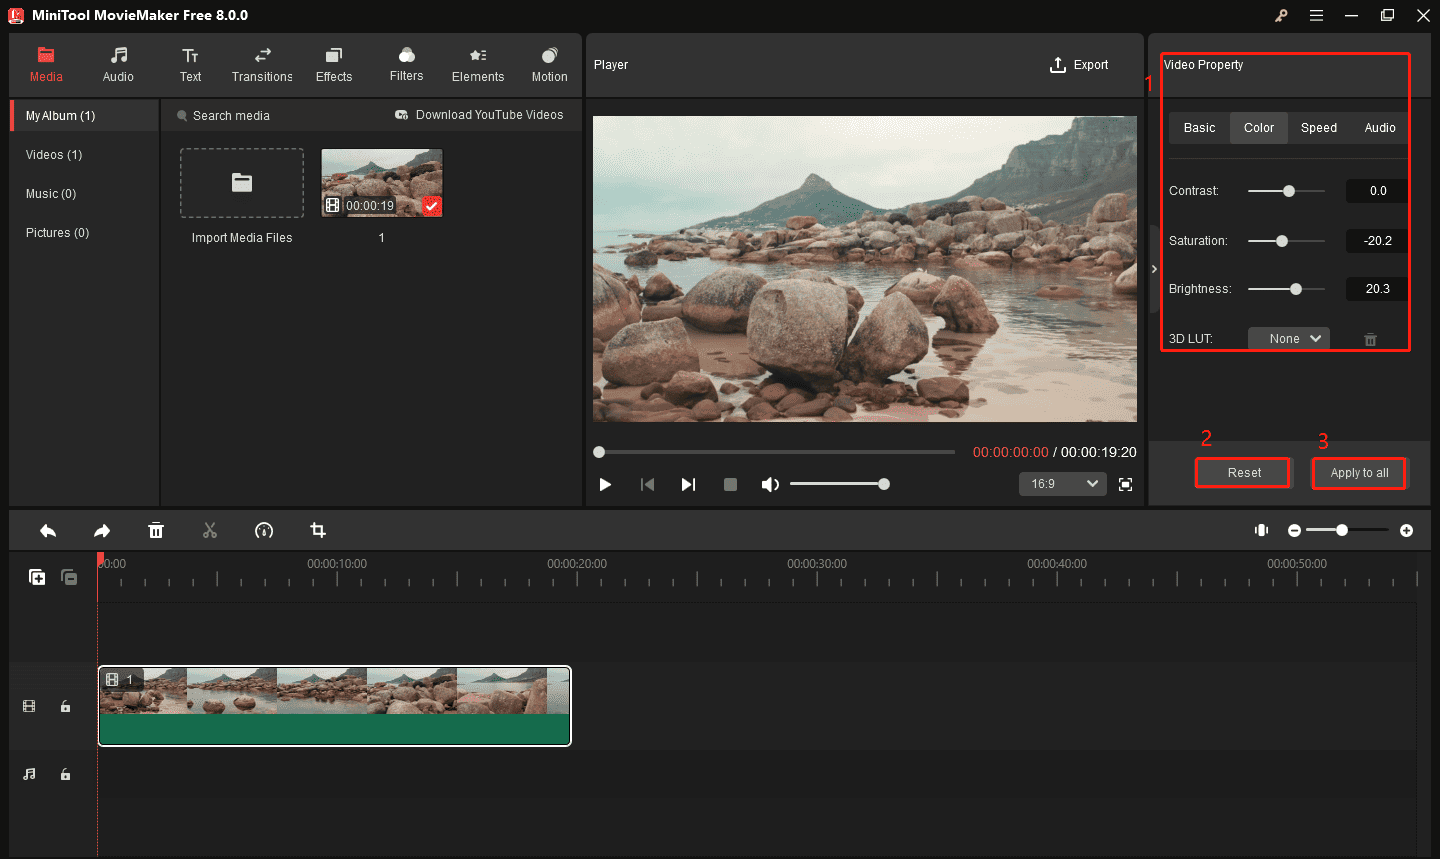
- Editable properties: Display the editable parameters of the current item on the timeline.
- Reset: Discard all changes and go back to the original settings.
- Apply to All: Apply the above settings to all media files of the same type on the timeline.
6. Timeline Section
The timeline is where you assemble the media files into a complete video.
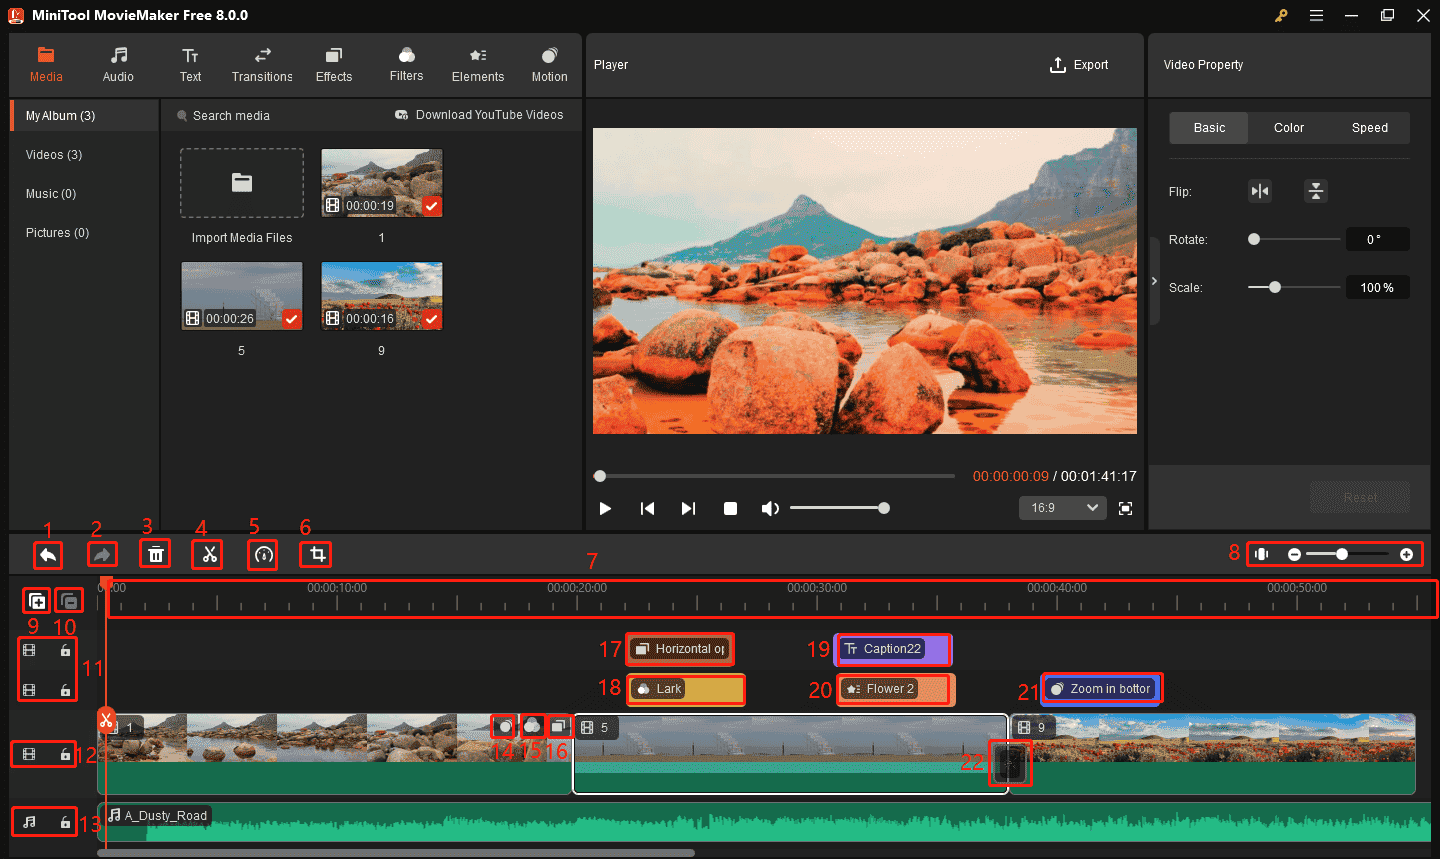
1. Undo: Undo the last change.
2. Redo: Restore the change that was undone.
3. Delete: Delete the selected unwanted media files or effects on the timeline.
4. Split: Split media at playhead location.
5. Speed: Change the video clip speed or just reverse your video.
6. Crop: Crop a video clip or photo to shape it to a proper aspect ratio.
7. Time scale: Help you locate a time point precisely.
8. Zoom slider: Zoom in or zoom out the whole video to fit the timeline.
9. Add tracks: Add a video or audio track.
10. Delete tracks: Delete empty tracks or selected tracks.
11. Additional video tracks: They are used to hold text, elements, filters, effects, motion effects, video clips, images, etc. Each track includes a video icon and a track lock icon.
12. The main video track: Arrange video clips and photo clips with flexibility and also hold transitions.
13. The main audio track: Display sounds, music, or songs within the video.
14. Motion on the video clip that only applies to this video clip.
15. Filter on the video clip that only applies to this video clip.
16. Effect on the video clip that only applies to this video clip.
17. Effect on another video track that applies to videos or photos on its below tracks.
18. Filter on another video track that applies to videos or photos on its below tracks.
19. Text on another video track.
20. Element on another video track.
21. Motion on another video track that applies to videos or photos on its below tracks.
22. Transition on the timeline.
About The Author

Position: Columnist
Cora is a tech writer specializing in digital media workflows, with over six years of hands-on experience in video post-production, media transcoding, and screen capture. Her writing is always clear and practical. Cora also produces in-depth software reviews for users across skill levels to help them find the right tool and enjoy video editing.
User Comments :