A loading screen, commonly seen in video games and web pages, originally meant a short buffer while a computer program is loading or initializing.
These days, the loading screen animation featuring a looping loading circle or loading bar has proven popular among video creators for creating intros of YouTube vlogs or trailers, podcasts, and more.
Therefore, within this guide, we’ll introduce you to several simple methods to make a creative and bespoke loading screen for your video intros. You can then add personal touches and interests to your video projects and gain more likes, comments, and followers.
How to Create a Killer Loading Animation Video with MiniTool MovieMaker?
To make a distinctive and custom loading screen animation, the most effective tool would be utilizing After Effects. However, the challenging learning curve and the laborious process make it an unrealistic option for the majority of inexperienced content creators.
So, a fantastic substitute is to make use of MiniTool MovieMaker. With its changeable animated loading video effects, you can effortlessly make stunning loading effect videos on your computer that will leave you satisfied.
In addition to the modifiable dynamic loading video overlays, MiniTool MovieMaker also lets you add customizable text animations to design a creative loading screen for YouTube intros, gameplays, etc. within minutes.
Furthermore, lots of royalty-free music or sound effects are accessible for you to add feelings and moods to your video projects.
Make a Great Loading Animation Video Tutorial
Here’s a step-by-step tutorial on how to make a stunning loading effect video using MiniTool MovieMaker. Have a look:
Step 1. Import the Video You Wish to Edit
To acquire the MiniTool MovieMaker installation package, click the download button below. After acquiring, open the installation package and follow the on-screen prompts to install MiniTool MovieMaker.
MiniTool MovieMakerClick to Download100%Clean & Safe
Then, launch this video editing tool. Click New Project from the Promotion window to start creating a fresh video project.
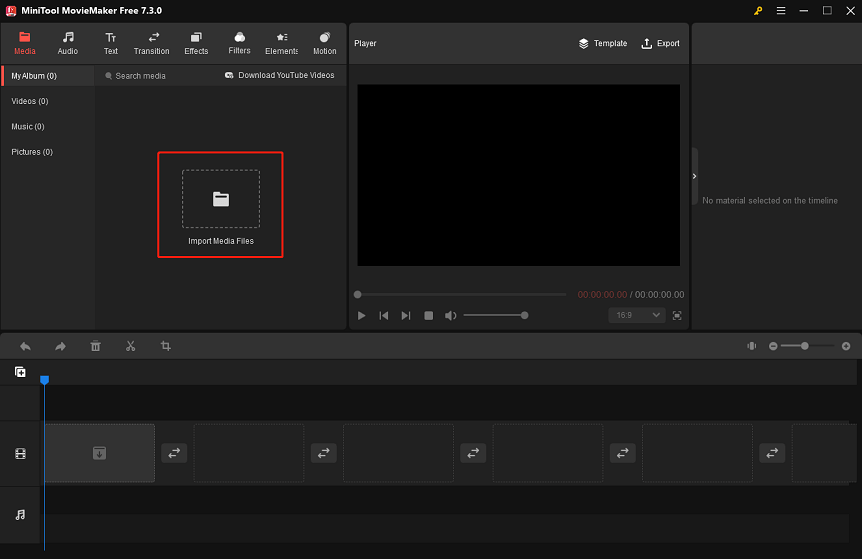
Click the Import Media Files area under Media to import the video that you intend to edit.
Step 2. Apply the Required Loading Element(s)
Place your mouse cursor over the imported video. When you see the + icon, click on it to add the video to the video track on the timeline below. Or, simply drag and drop the video onto the video track.
Now, go to the top Elements tab. To quickly find loading overlays, you can type “loading” into the search bar and press Enter. Alternatively, select the Props sub-tab on the left and scroll down to locate them.
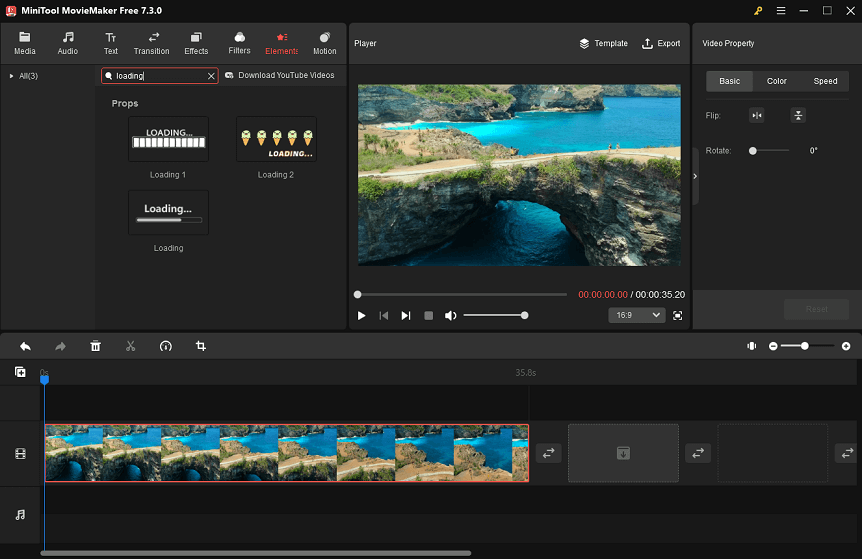
Through a simple operation, you can achieve the desired loading video effect download. Click the Download icon on the loading sticker you want to get it.
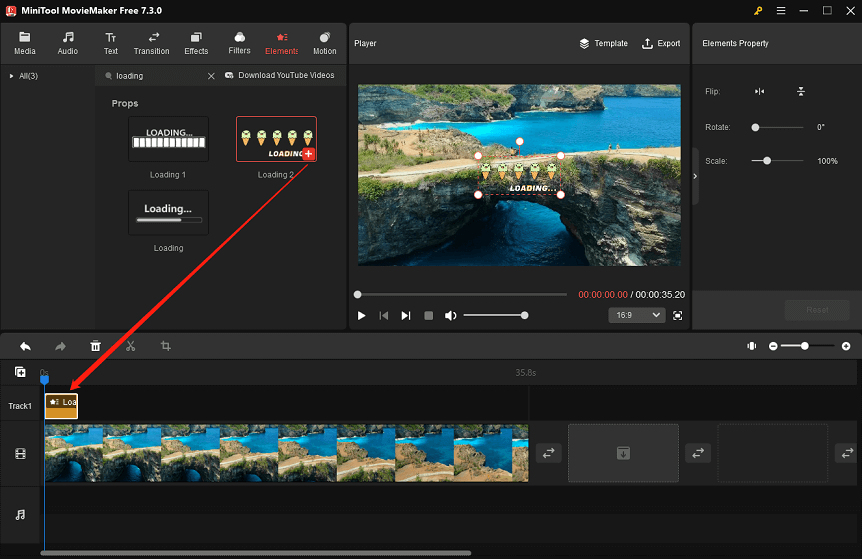
After that, click the + icon to apply the downloaded loading element to the timeline. You can also apply it to the empty track above the video track by dragging and dropping. Optionally, insert multiple ones by following the same procedure.
Step 3. Edit the Loading Element(s) You Added
This step is critical to creating a unique loading screen for video intros. Perform these editing actions:
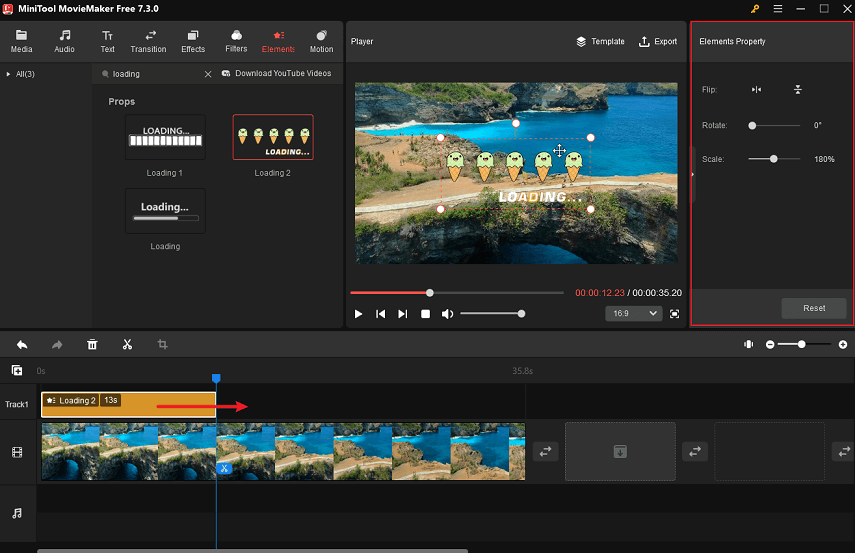
- Customize loading sticker duration. On the timeline, position the cursor on the right edge of the loading sticker. When a double-headed arrow appears on the screen, drag the edge to the right to increase the duration. Otherwise, drag to the left to decrease the duration.
- Flip or rotate the loading overlay. Highlight the loading overlay on the timeline. In the Elements Property panel, hit the Flip Horizontal or Flip Vertical icon to flip the loading overlay. Use the Rotate slider to rotate it from 0 to 360 degrees.
- Change loading sticker size. Still, in the Elements Property panel, drag the Scale slider to the right or left to make the loading sticker larger or smaller. Or, move the cursor over any of the small white circles at the four corners of the loading sticker’s dotted box in the Player window. When a two-headed arrow appears, drag outward or inward to change the size to your preference.
- Adjust the loading element position. Put the cursor anywhere within the dotted box of the loading element. If the cursor changes to a four-headed arrow, hold down the left mouse button to place the loading element in the appropriate location.
Step 4. Add a Caption or Sound Effect You like
MiniTool MovieMaker lets you flexibly add captions and sound effects to bring your video intro to life. Do the following for further editing:
Leave the video highlighted on the timeline. Switch to the top Text tab. From the left side, select the Caption sub-tab. Obtain the desired caption template by clicking the Download icon on it. Wait a few seconds. Hit + to add the obtained caption to the timeline.
Click on the caption overlay on the timeline. This will open the Text Property panel. Here, you can opt to enter your caption content, make it bold or italic, modify its font, size, line spacing, color, highlight color, opacity, etc.
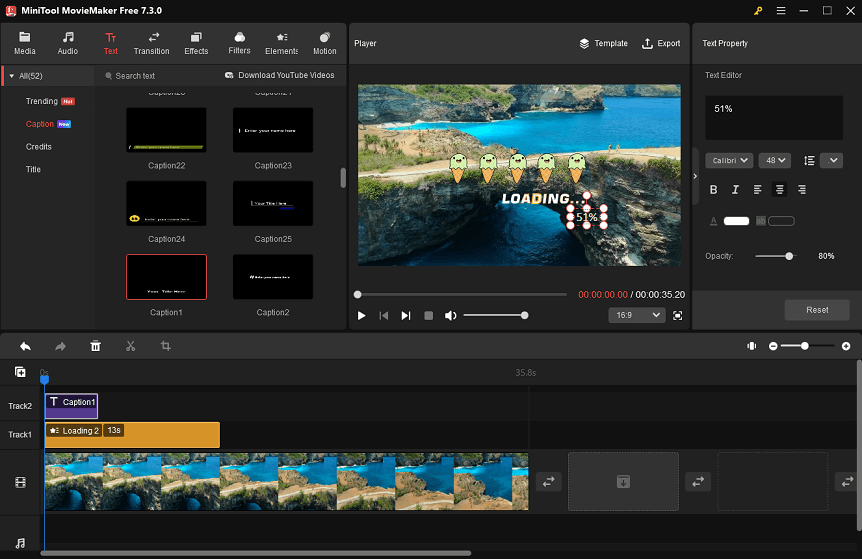
To add a sound effect, just navigate to Audio > Sound Effect, download the one you like, and then hit +.
In the Music Property panel, you have the option to fade the sound effect in or out and control its volume by moving the corresponding sliders.
Step 5. Export Your Customized Video
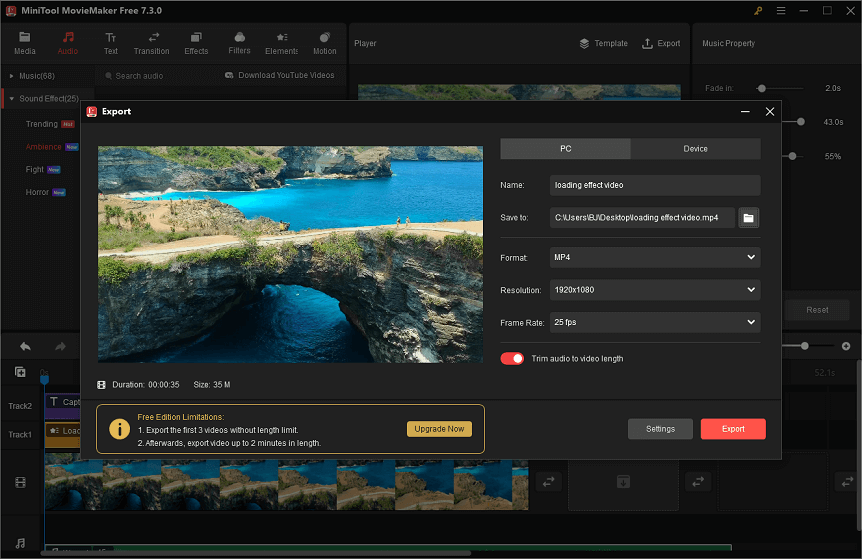
Once you’ve previewed the final video and are satisfied with it, click the top Export option to bring up the Export window. From there, give your loading effect video a name and set its save path. Additionally, determine the ideal video output format, resolution, and frame rate.
Remember to enable the Trim audio to video length button if the previously inserted sound effect exceeds the length of the video. Finally, click the red Export button to save the edited loading animation video to your hard drive.
Outstanding Features of MiniTool MovieMaker
- It is a good video editor without watermark.
- It provides you with embedded movie templates.
- It allows you to add a transition between two video segments.
- It enables you to put filters on videos with ease.
- It gives you the ability to insert motion effects into your videos.
- It supports 16:9, 9:16, 1:1, and 4:3 aspect ratios.
- It can create video from images in just a few minutes.
- It acts as a video splitter, trimmer, or cropper.
- It is capable of flipping the video in a horizontal or vertical direction.
- It is able to rotate the video at any angle.
- It helps you resize videos for TikTok, Instagram, and YouTube.
- …
How to Create a Beautiful Loading Animation Video with FlexClip?
If you need to make a loading screen animation for your videos with no prior knowledge or experience, FlexClip, an online loading effect video maker, is for you.
Start your journey immediately with its templates. Plus, seamlessly swap out its text, pictures, or design elements to add a personal flair.
Instead, begin with a blank canvas, where you can pick from a spinning loading bar, a loading circle, or any animated icon to indicate an ongoing process.
These versatile options can be used for a variety of videos, like video openings, video games, etc. Everything here is under your control, including personalizing the size, color, position, and so on.
Get Motion Array’s Royalty-free Loading Screen Packs
If you want high-quality and professionally-created loading screen templates for personal and commercial purposes, an excellent choice is downloading Motion Array’s royalty-free loading screen packs.
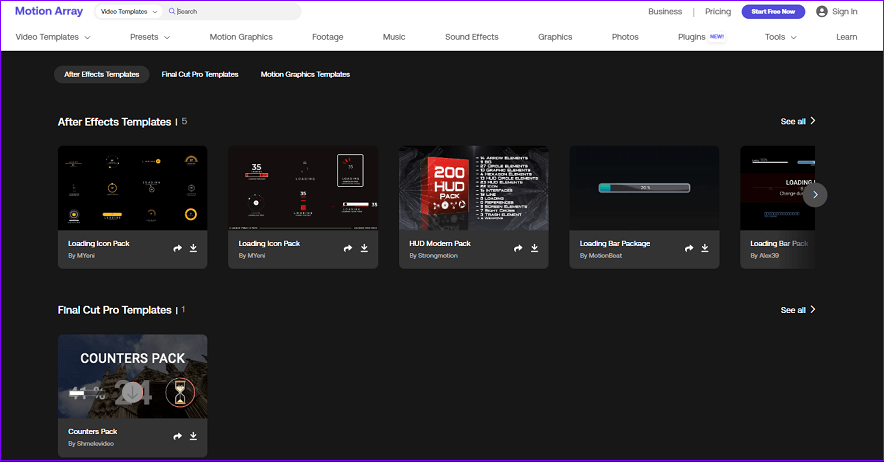
As an increasingly popular website providing stock footage, templates, audio, images, presets, plugins, and more to filmmakers and videographers, Motion Array gives you a large selection of loading screen packs for downloads. Most of the loading bar and loading circle animations are placed on a transparent alpha channel. This makes it simpler for you to incorporate them into your material. Meanwhile, you can customize the shadows, color, and other effects in After Effects or Final Cut Pro easily.
At a reasonable monthly subscription fee of $29.99, you can get unlimited creative resources, exclusive plugins, and 250G storage space.
The absence of music in the download packs is one drawback of the Motion Array loading screen packs. And, if your subscription expires, the previously downloaded assets cannot be used for new video projects.
Get Free Loading Screen Videos from YouTube for Editing
On top of that, there is a solution to make a loading screen for YouTube intros or trailers. Download a copyright-free loading screen video from YouTube and import it into Adobe Premiere Pro or any other video editing tool for editing.
As one of the most widely used video hosting or sharing platforms worldwide, YouTube is equipped with precious video resources published by creative YouTube video creators. You can look for the free loading screen in YouTube’s search bar and get tons of copyright-free loading screen animations and videos.
The loading screen animation with a black background is a preferable option. Thus, you can later add it to Premiere Pro and alter its blending mode to Screen to get rid of the background.
The drawback of getting free loading screen videos and animations is that occasionally the download links can be clickbait and you cannot completely customize them. Also, the download packs for the loading screen don’t include any music. But considering the free downloads without attribution, it can be a feasible and cost-free choice.
Last Words
Whether you wish to make a loading screen for video intros or a loading animation video, we definitely recommend using MiniTool MovieMaker given that it includes pre-made loading video effects. Please share this guide on Twitter or Facebook if you find it useful. Many thanks!
Please feel free to contact us at [email protected] if you have any questions regarding the use of MiniTool MovieMaker.
You May Also Like


User Comments :