This post mainly explains how to edit YouTube videos using MiniTool MovieMaker (a Windows movie maker) to enhance your footage before posting. After uploading, use the built-in editor to modify clips. Explore the complete beginner’s guide to the two-stage editing workflow to create professional-looking videos for YouTube.
YouTube is the world’s largest online video-sharing platform and the second-most visited website. Every day, millions of people upload and watch videos on the platform. If you’re going to publish new videos for your channel, knowing how to edit YouTube videos is an essential skill.
After filming your footage, you need to edit and enhance your content to transform simple recordings into captivating stories. That’s why I crafted this post to tell you, especially beginners, how to edit videos for YouTube. How to choose the right tool? MiniTool MovieMaker, YouTube Studio, Microsoft Cliphamp, or CapCut? Here is the quick guide.
| Best Recommendation | If you need to: | Reasons |
| MiniTool MovieMaker | Edit and retouch videos on Windows for free | Completely free, no watermark, supports 4K, and feature-rich |
| YouTube Studio Built-in Editor | Quickly fix a video after uploading (trim/blur/add music) | No need to re-upload, can blur faces, and add free music |
| Microsoft Clipchamp | Get started as a beginner on Windows 11 (built-in) | System-integrated, clean interface, and supports free 1080P export |
| CapCut | Use AI-assisted features (auto reframe, many effects) | Powerful free version, no watermark, and rich template library |
Best Video Editing Software for YouTube
A good video editor is essential for editing and optimizing footage for YouTube. What is the best video editing software for YouTube? Here is a brief comparison of four excellent YouTube video editors.
| Software | MiniTool MovieMaker | YouTube Studio | Microsoft Clipchamp | CapCut |
| Platform | Windows | Web | Windows + Web | Windows + Web |
| Price | Free | Free | Free + Pro | Free + Pro |
| Watermark-Free | Yes | Yes | Yes | Yes |
| Maximum Export Resolution | 4K | Same as original | 4K (requires subscription) | 4K |
| Core Strengths | Rich features, easy to use, no watermark | No need to re-upload, face blur, free music library | System-integrated, no learning curve | Powerful AI features, rich templates, cross-platform |
| Main Limitations | Windows only | Limited features | 4K export requires paid version | The free version has limited features. |
MiniTool MovieMaker
MiniTool MovieMaker is an easy-to-use and feature-rich video editor for Windows. It has a clean, simple, and intuitive interface, and with the drag-and-drop functionality, it can be an excellent choice for beginners who want to showcase their creativity on YouTube without a steep learning curve.
In addition to the ease of use, MiniTool MovieMaker also boasts various tools and effects to produce high-quality videos for YouTube and other platforms. Whether you want to trim, split, rotate, merge, adjust video speed, apply filters, add transitions, or add motion effects, the software has you covered.
Additionally, MiniTool MovieMaker’s multitrack timeline allows you to create picture-in-picture effects and make video collages. It also supports grouping footage on the main track with other elements on the sub-tracks. As a stable video editor, MiniTool MovieMaker can process 4K videos without lagging.
Best of all, MiniTool MovieMaker supports all the aspect ratios you need to create YouTube videos, including 16:9 (horizontal), 9:16 (vertical), and 1:1 (square). Regardless of the original footage size, you can choose the appropriate ratio for cropping and set the same project ratio, thus easily removing black borders.
When exporting videos, MiniTool MovieMaker gives you essential settings to control the final video. You can choose from MP4, AVI, MOV, WMV, WebM, and MKV, change the frame rate (24, 25, 30, and 60FPS), and adjust the bitrate to save the videos. More importantly, it supports exporting MP4 videos up to 4K resolution without watermarks.
All in all, MiniTool MovieMaker is a reliable YouTube video editor, allowing you to create high-quality videos effortlessly. Try the application now and start your creation!
MiniTool MovieMakerClick to Download100%Clean & Safe
MovieMaker by MiniTool is an inexpensive, easy-to-use video editing program. It includes a fair number of effects and gives you easy ways to join your clips, add transitions, and overlay objects and text.https://www.pcmag.com/reviews/minitool-moviemaker
YouTube Built-in Video Editor
YouTube Studio includes a built-in video editor that allows users to edit videos after uploading. If you want to make some simple edits, like trimming and cutting, after publishing a YouTube video, you don’t need to download it to your computer and edit it with a third-party editor.
Besides, the YouTube Studio video editor has a powerful blur tool for blurring faces and other elements in the video. Best of all, the platform can automatically detect all the faces, and you just need to select the faces you’d like to blur.
What’s more, the YouTube Studio video editor enables you to add audio, subtitles, and end screens to videos.
Microsoft Clipchamp
When you’re looking for the best video editing software for YouTube, don’t miss Microsoft Clipchamp, especially if you’re a beginner or a casual creator. The beginner-friendly interface is intuitive and clean, making it easy to learn.
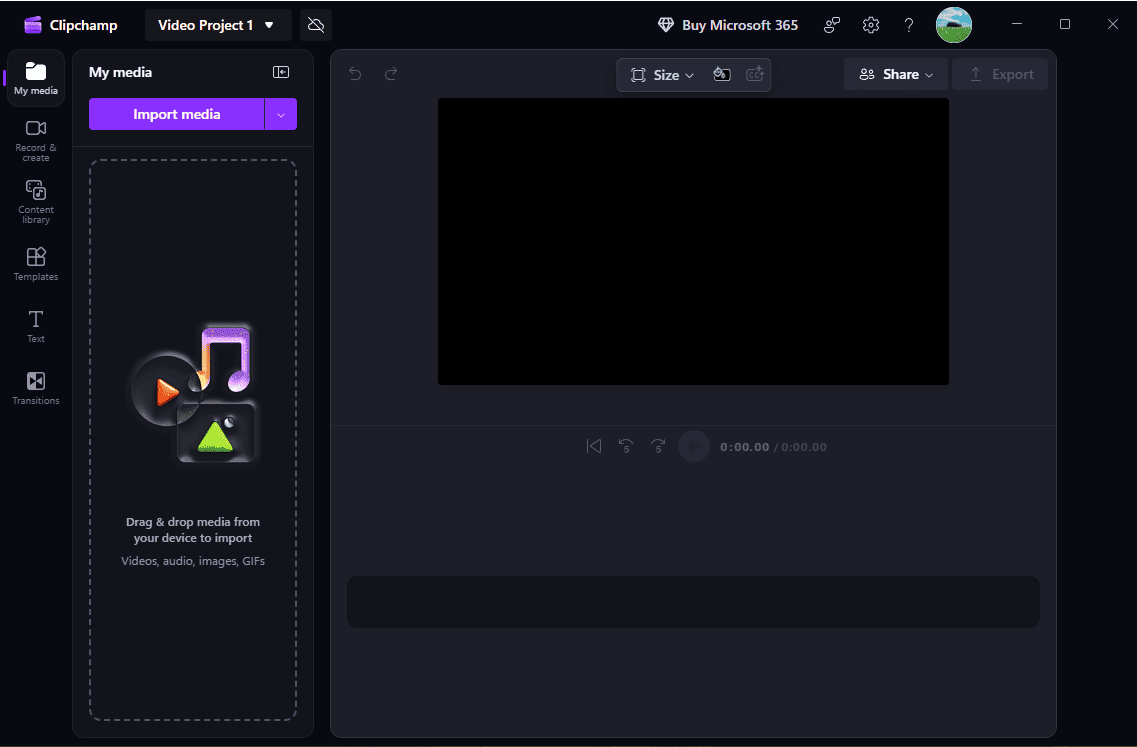
Microsoft Clipchamp comes pre-installed on Windows 11, and its web version is also accessible through your browser. Therefore, you don’t have to download and install it on your computer. If you’re running Windows 10, you can get the software from the Microsoft Store.
This YouTube video editor offers a variety of tools and effects to edit and retouch your footage. You can effortlessly trim, split, crop, rotate, or flip videos, adjust the aspect ratio, apply filters, correct the clip’s color, add text, add captions using the text-to-speech feature, etc.
Microsoft Clipchamp only supports MP4 format output and does not offer any other export settings except for resolution. However, the software can export videos up to 1080P for free, and the 4K export requires an upgrade.
Clipchamp, the default video editing software for Windows 10 and Windows 11, is surprisingly capable for both personal and professional use. It includes all the basic tools you need to produce video projects, some fun effects, and helpful templates for social media posts.https://www.pcmag.com/reviews/clipchamp
CapCut
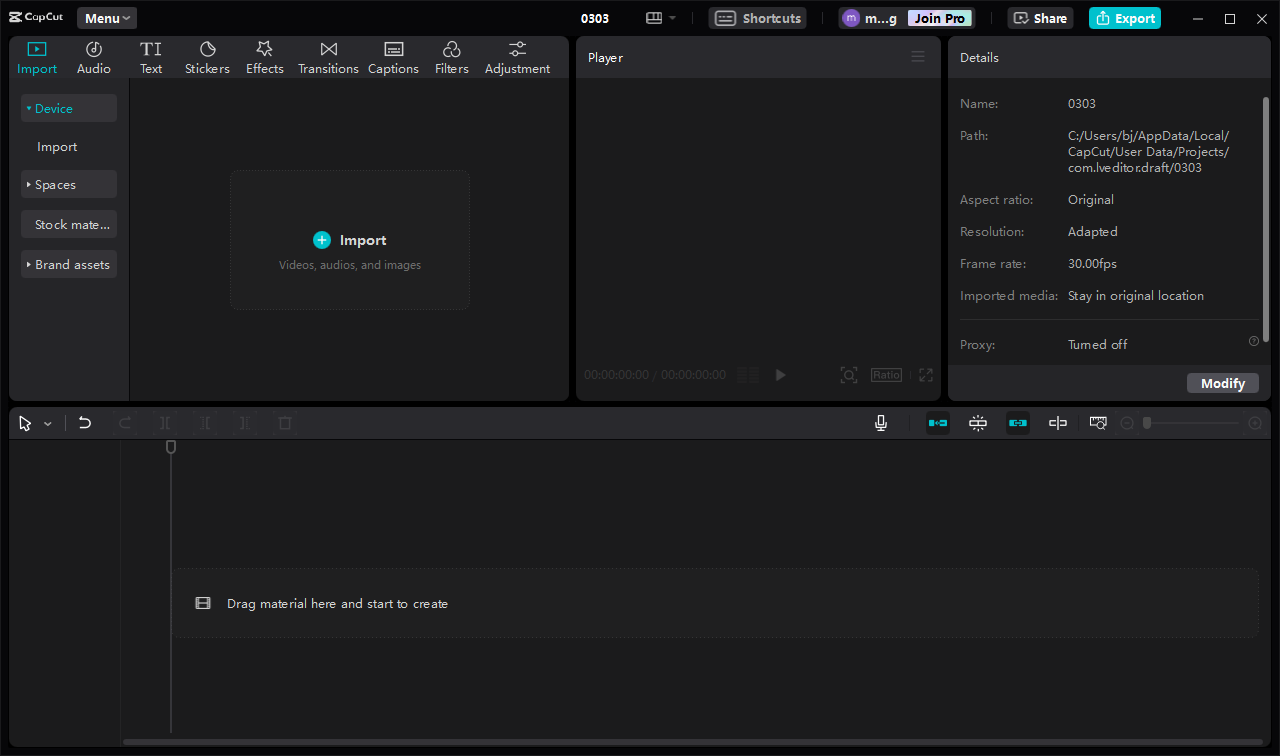
As one of the most popular social media video editors, CapCut is undoubtedly an excellent tool for editing YouTube videos because it combines a beginner-friendly interface and powerful features. Its major advantage lies in the robust free version, and it won’t leave a watermark on the exported videos.
Whether you want to create the standard 16:9 landscape YouTube videos or the vertical 9:16 Shorts, CapCut offers the right aspect ratio. With the AI-powered auto reframe feature, the application can effortlessly keep the main subject centered while adjusting videos for different platforms. What’s more, the software supports 4:3, 1:1, 2:1, 3:4, and other ratios.
CapCut’s other key features include keyframe animation, advanced color correction, a multi-layer timeline, video masks, various blending modes, speed curve, noise reduction, voice enhancement, etc. The software exports your final video in the MP4 or MOV formats, with resolutions up to 4K.
CapCut even boasts that its desktop collaboration tools, where multiple team members can work on the same project online, make it useful for businesses.https://www.pcmag.com/reviews/capcut
How to Edit YouTube Videos Before Uploading
Fast Track:
- Launch MiniTool MovieMaker.
- Import the target video.
- Trim, cut, and crop the video.
- Add background music.
- Adjust the aspect ratio.
- Overlay text and do color correction.
- Flip, rotate, and reverse the video.
- Enhance the video with title cards and elements.
- Save and export the video.
In this section, I’ll take MiniTool MovieMaker as an example to show you how to edit a YouTube video.
Step 1: Import the Video into MiniTool MovieMaker
First, click the button below to download the excellent YouTube video editor and install it on your computer.
MiniTool MovieMakerClick to Download100%Clean & Safe
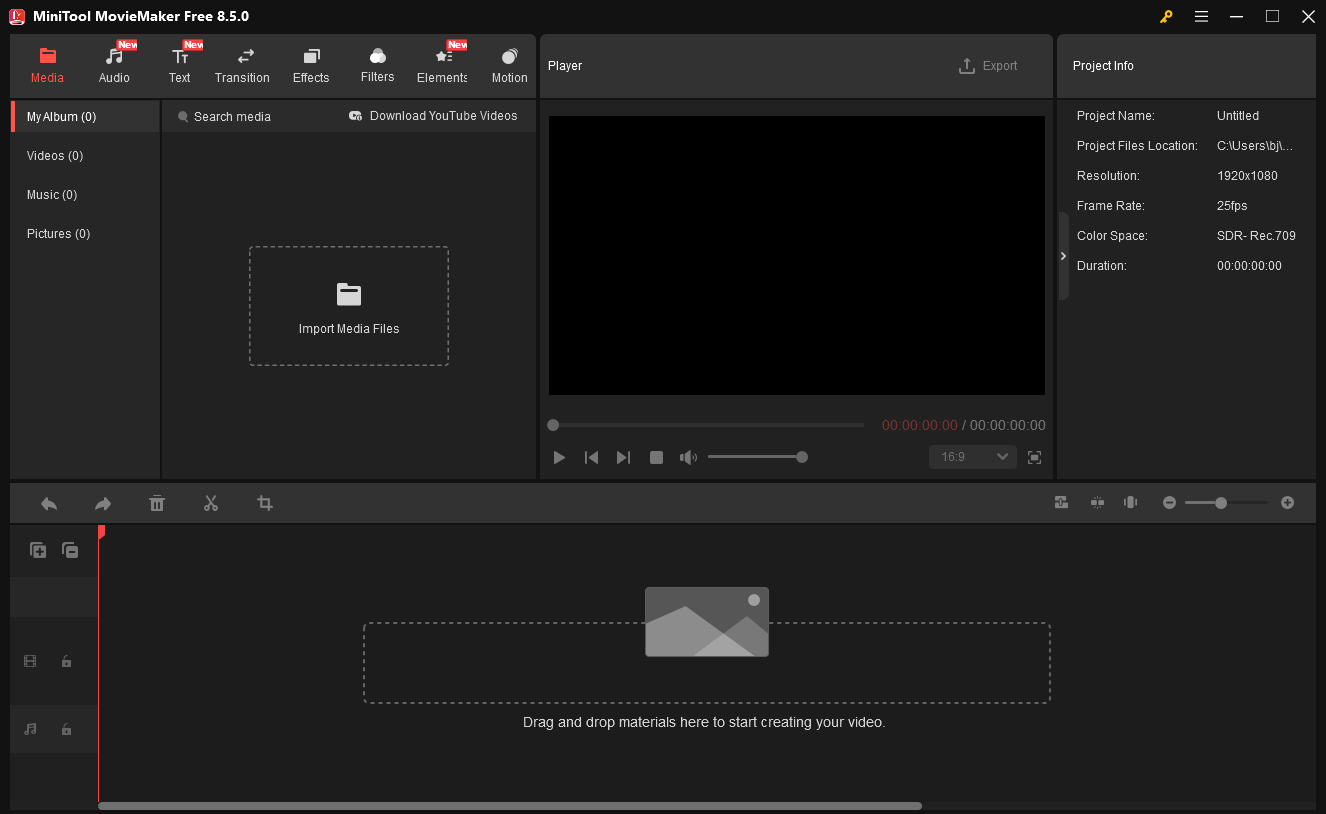
Second, launch the software after installation. Close the pop-up window to enter the main user interface of MiniTool MovieMaker.
Next, click the Import Media Files area to open the File Explorer. Navigate to the target video(s) and add them to the timeline to start editing.
Step 2: Trim YouTube Video
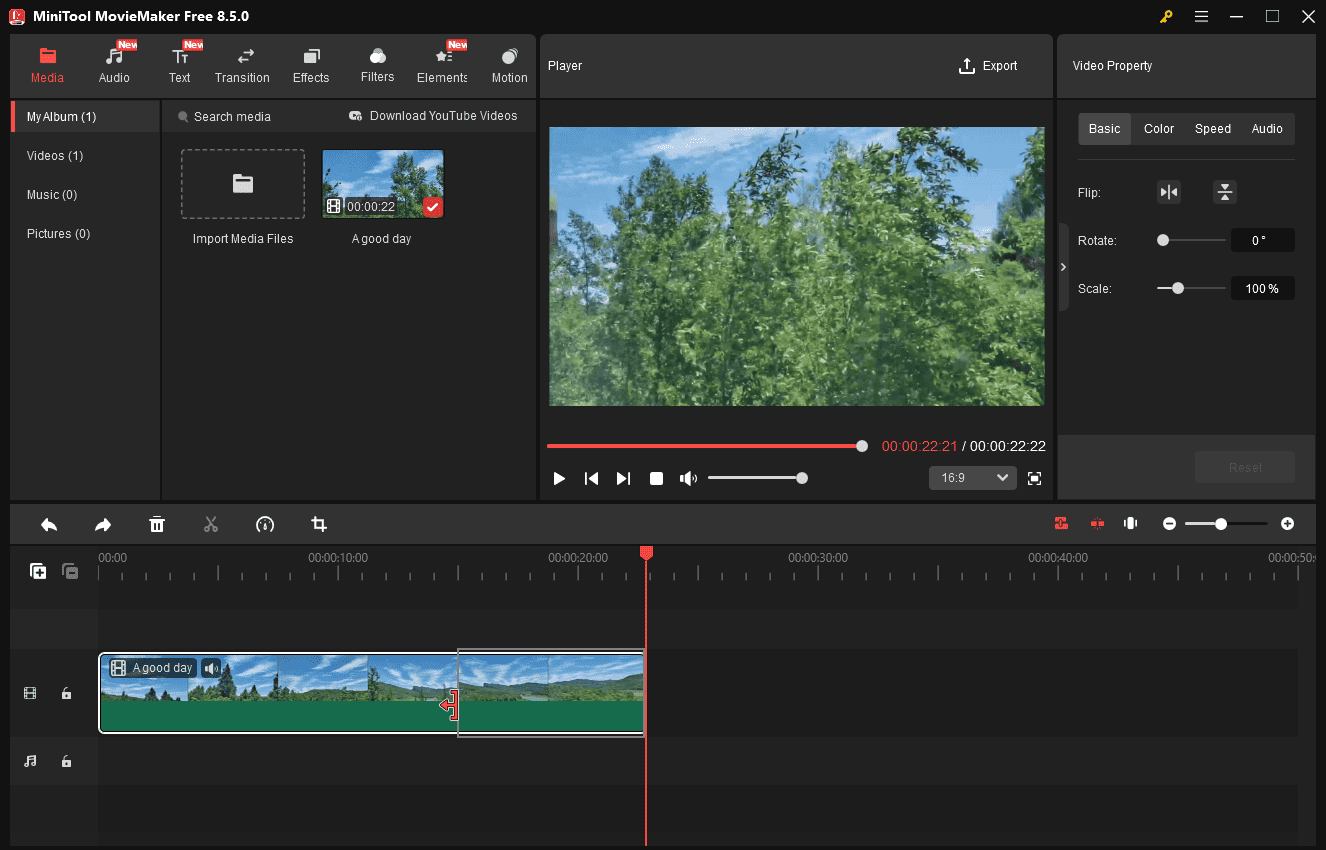
Unnecessary parts may inevitably be included in the recording. You can trim the video to remove irrelevant parts from the beginning or end, effectively keeping the clip concise and engaging.
To trim a video for YouTube, hover the mouse cursor over the start or end point of the clip on the timeline, and the Trim icon appears. Drag the Trim icon inward to the desired position, and then release the mouse to delete the beginning or end of the video. You can zoom in on the timeline to precisely locate the exact location where you want to delete.
Trimming a video is essentially shortening its length. Therefore, the process can reduce the video file size or fit time limits on social media platforms.
Step 3: Cut YouTube Video
Trimming and cutting are two different editing techniques. The former works on the start and end points, and the latter often refers to splitting a clip in the middle to remove a section or insert media.
You need to cut a YouTube video into segments, whether you want to delete a middle part, add a new clip, or apply effects.
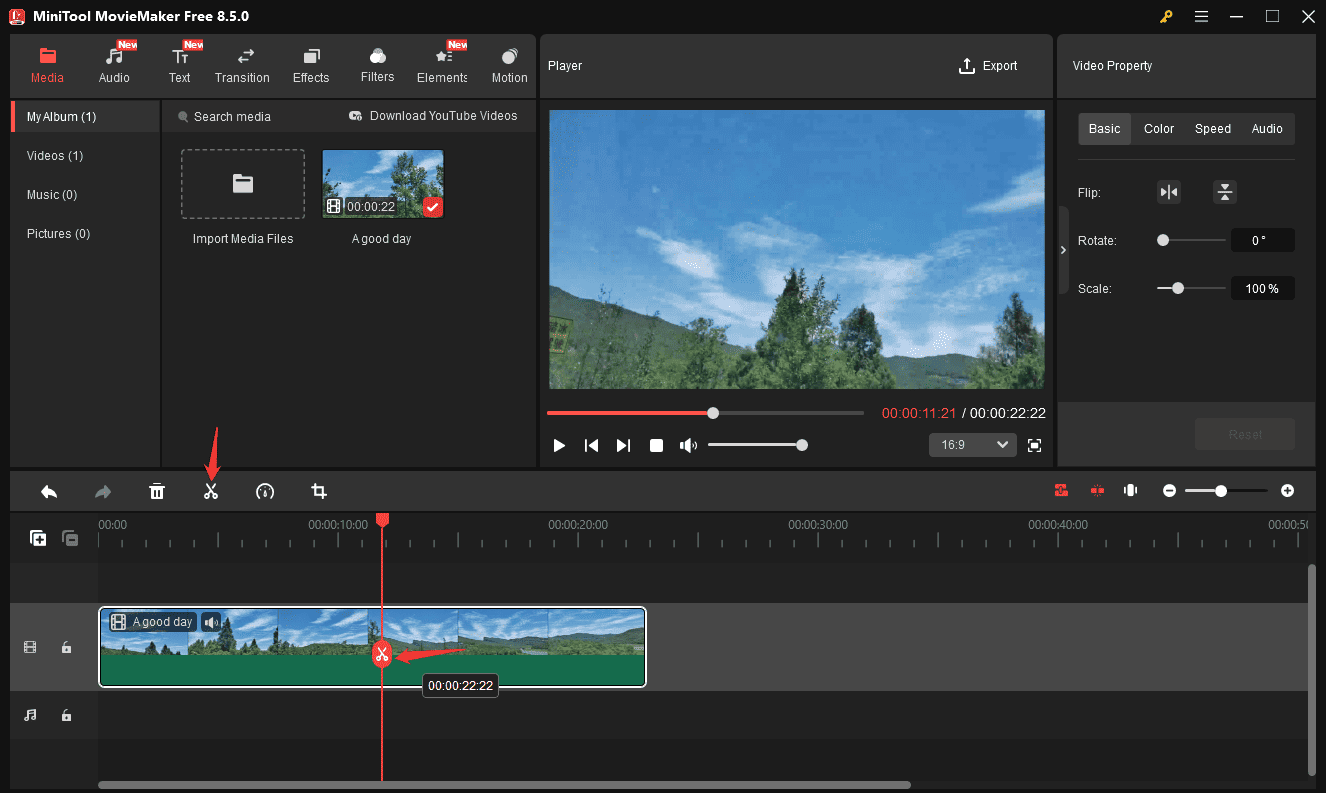
Select the target video on the timeline, drag the playhead to the desired place, and click the Split icon on the playhead or the timeline toolbar to divide the clip into two parts. You can repeat this step to split the video into multiple pieces.
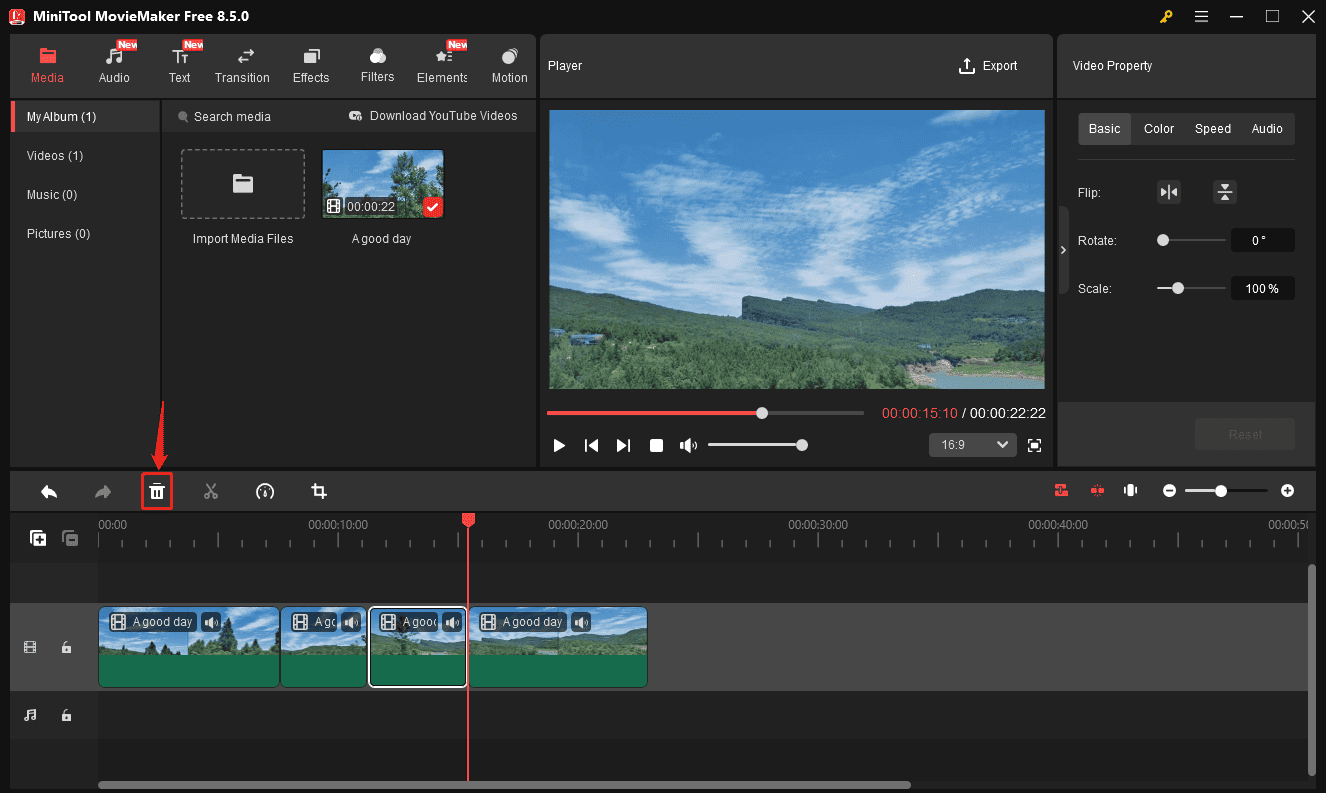
If you need to delete a middle section, select the clip and click the Delete icon on the timeline toolbar.
You can also drag new video or image clips, or add transition effects into the gap between the segments.
Step 3: Crop YouTube Video
Cropping a video means removing the outer edges of a frame to highlight the subject, remove distractions, or change the aspect ratio. This is different from trimming, which shortens the duration, while cropping changes the dimensions and composition of the video without affecting the length.
When you edit a video for YouTube, you might need to crop it to remove unwanted elements for better visual focus or adjust a landscape video into the 9:16 portrait format.
How to edit YouTube videos through cropping? MiniTool MovieMaker also helps.
Highlight the video you want to crop on the timeline and click the Crop icon in the toolbar above. By default, the video will be cropped to its original ratio. You can also choose a preset ratio from the Ratio dropdown, including 16:9, 4:3, 1:1, 3:4, and 9:16 to crop the video.
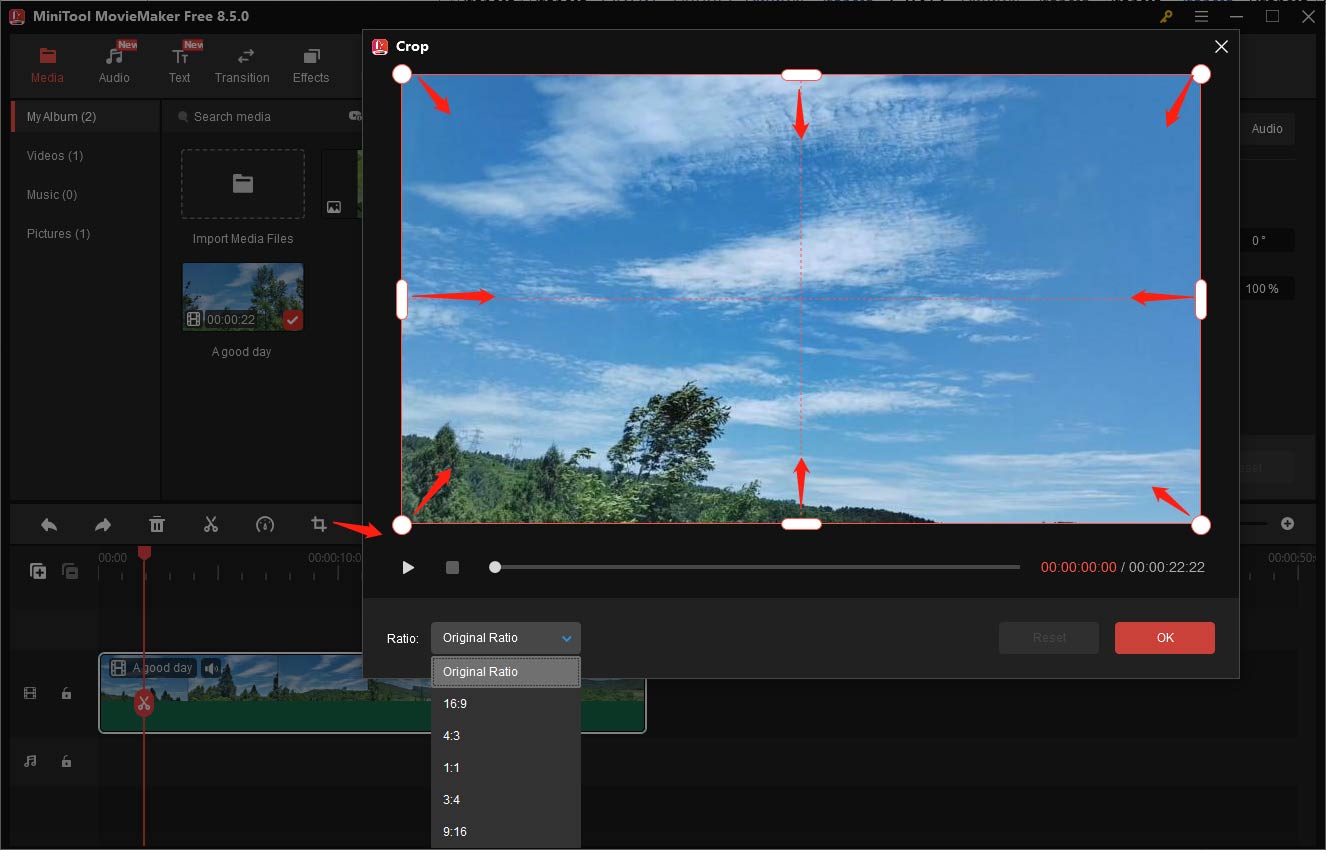
Next, adjust the rectangle’s size and position on the preview window to select the area to be saved. Click OK to save changes.
Step 4: Add Music to YouTube Video
Music plays a vital role in videos. It can set the tone, enhance narrative, and improve audience engagement. Likewise, music is also an indispensable part of a good YouTube video.
To add music to your YouTube video before uploading, you can also try MiniTool MovieMaker. This application provides an audio library with songs and sound effects.
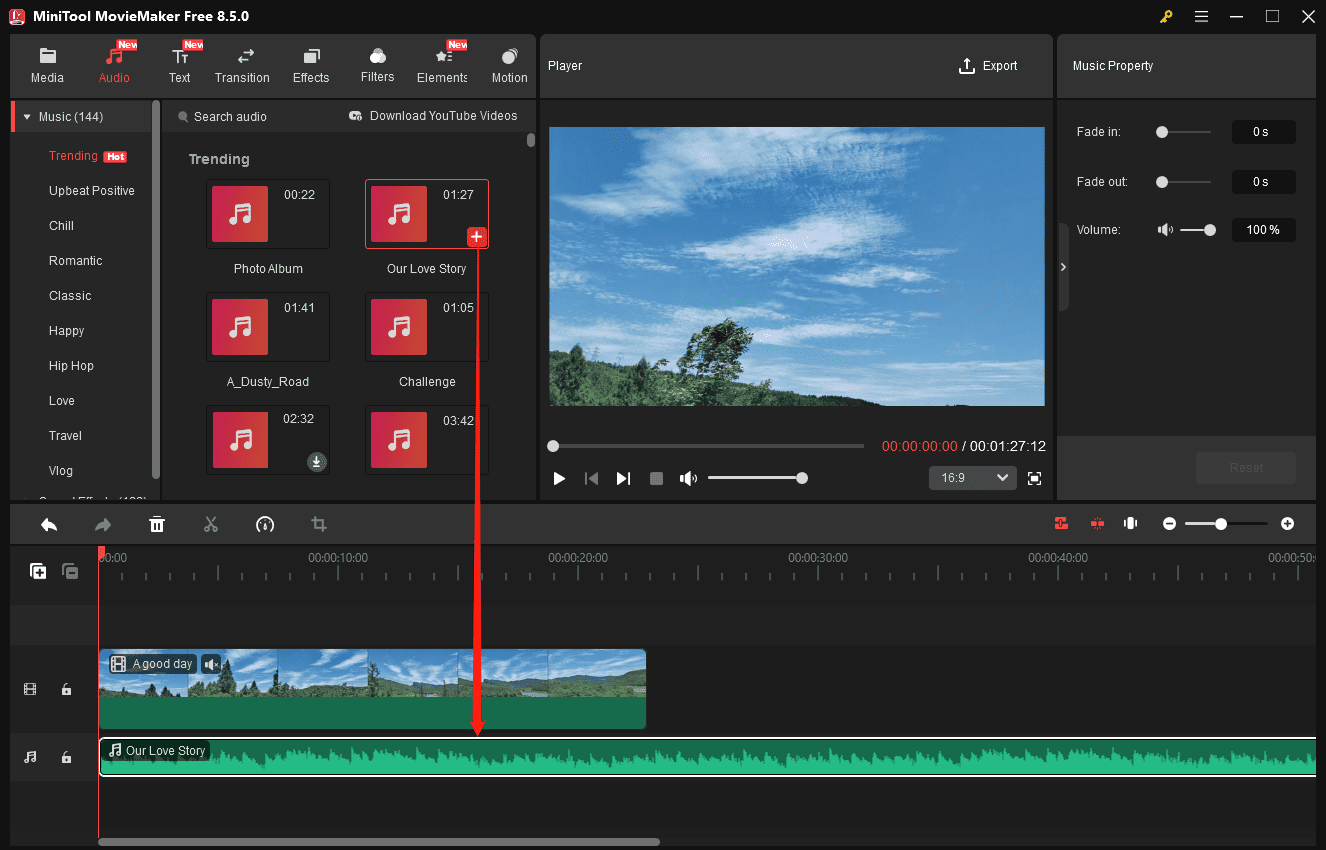
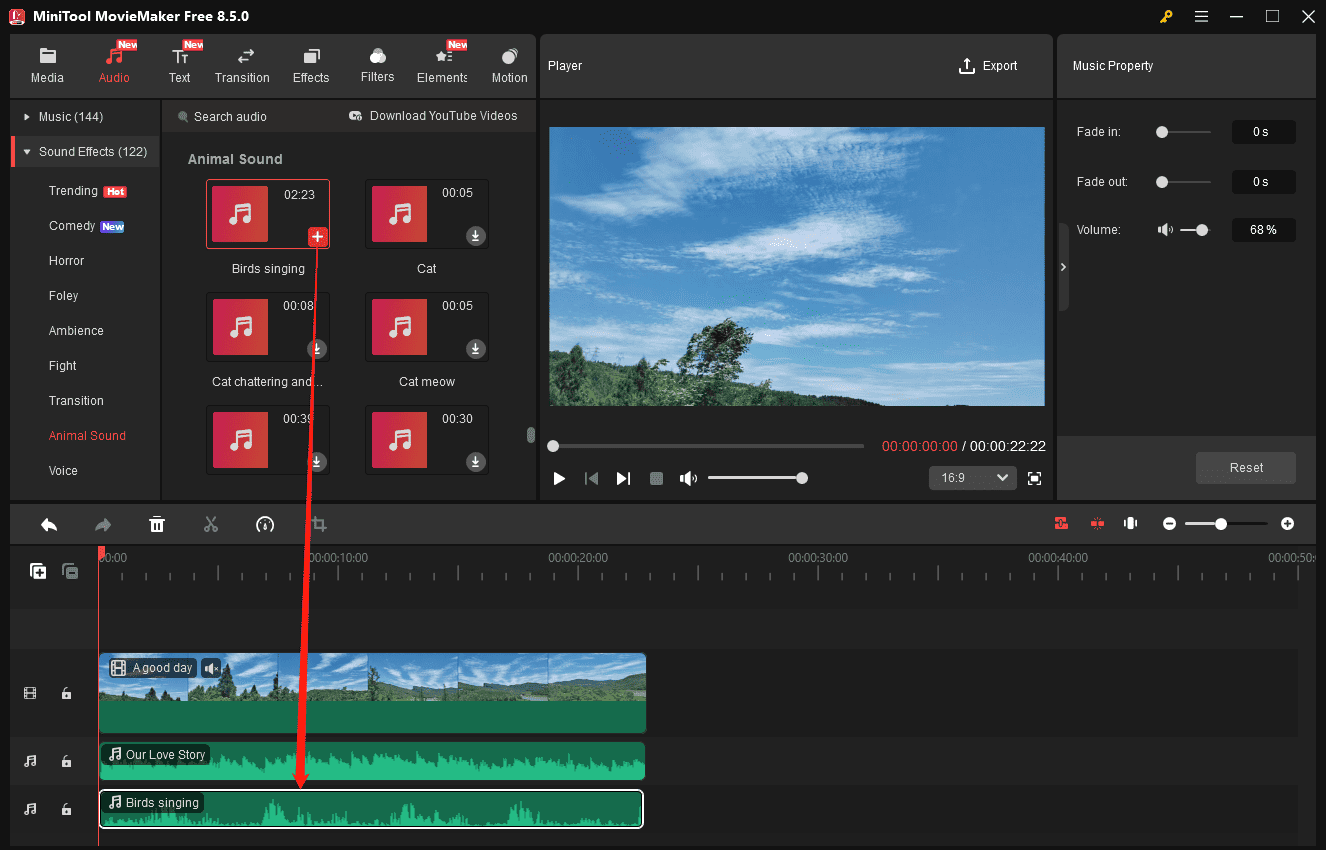
Go to the Audio tab at the top, expand the Music dropdown on the left side, browse through the categories, and download a song. Then, click the + icon on the music to add it to the timeline. Next, you can trim the music to jump directly to your favorite part or match the video duration.
To remove background noise from the video, you can click the Speaker icon on the clip to mute it. Next, select the audio track on the timeline, apply fade-in/out effects, and adjust the volume in the upper-right Music Property section.
To enrich your content, you can add a sound effect to the video. Go to Sound Effects on the left sidebar, download a sound, and drag it to the timeline.
Step 5: Adjust YouTube Video Aspect Ratio
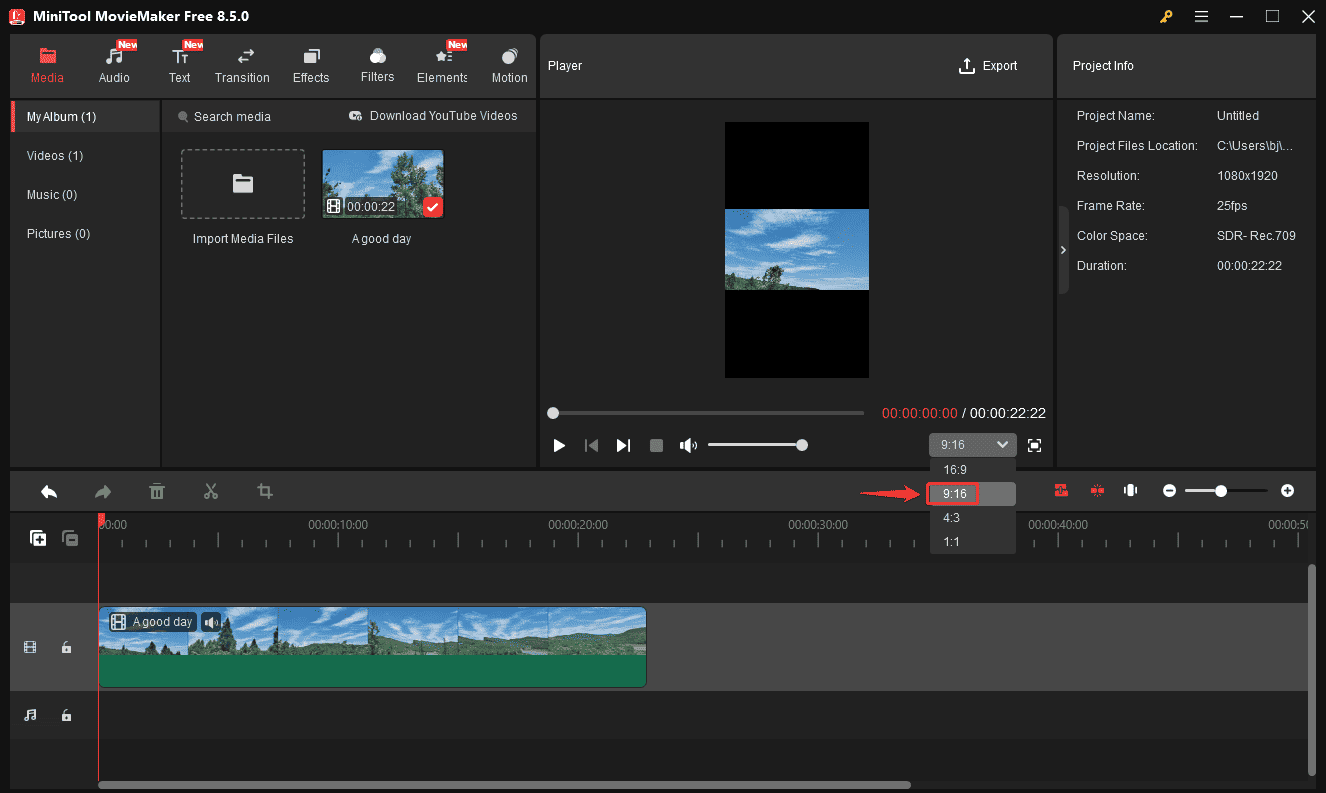
When it comes to YouTube video aspect ratios, there are two standards: 16:9 for long videos and 9:16 for Shorts. By default, the project’s ratio is set to 16:9 in MiniTool MovieMaker. Therefore, you don’t have to change it if you’re editing a traditional video for YouTube.
However, if black bars appear at the top, bottom, right, or left of the video (due to a mismatched aspect ratio of your original video, you can crop the video to 16:9 to eliminate black areas.
If you need to convert a video for YouTube Shorts, set the aspect ratio to 9:16. Click the arrow next to 16:9 under the player window, and click 9:16 from the dropdown.
Similarly, if the video has black bars, crop it to 9:16 or add a background to fix the issue.
Step 6: Add Text Overlay and Subtitles
You can add a text overlay to videos to highlight key points and increase viewer engagement. MiniTool MovieMaker offers multiple caption templates for you to choose from. Whether you want static or animated caption styles, the software can meet your needs.
To add text overlays to your YouTube video, click Text at the top and select Caption on the left. Hover the mouse cursor over any caption for a quick preview. Download a template and add it to the timeline.
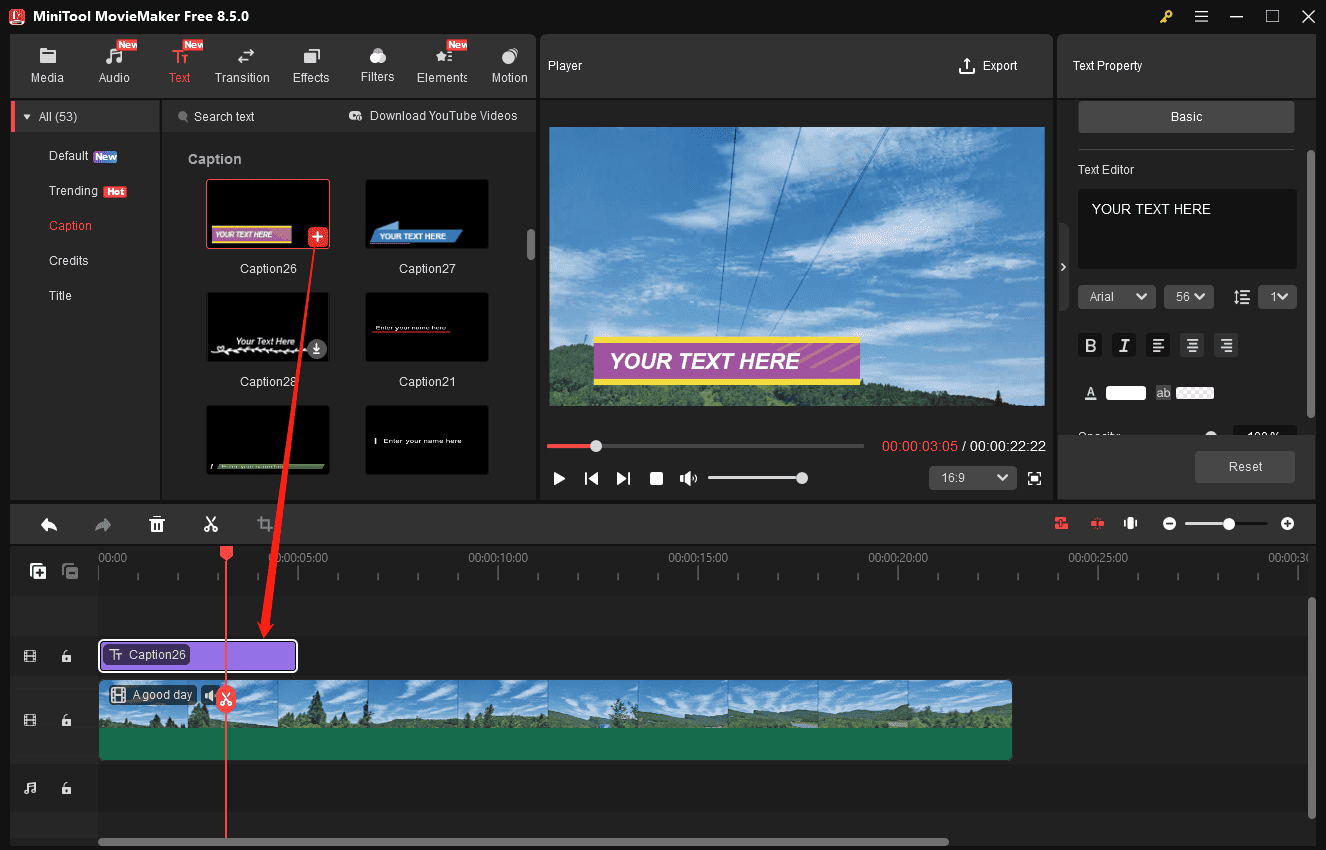
You can then adjust the caption’s duration by dragging either its track edge on the timeline. Next, go to the Text Editor on the upper-right to type and edit your text.
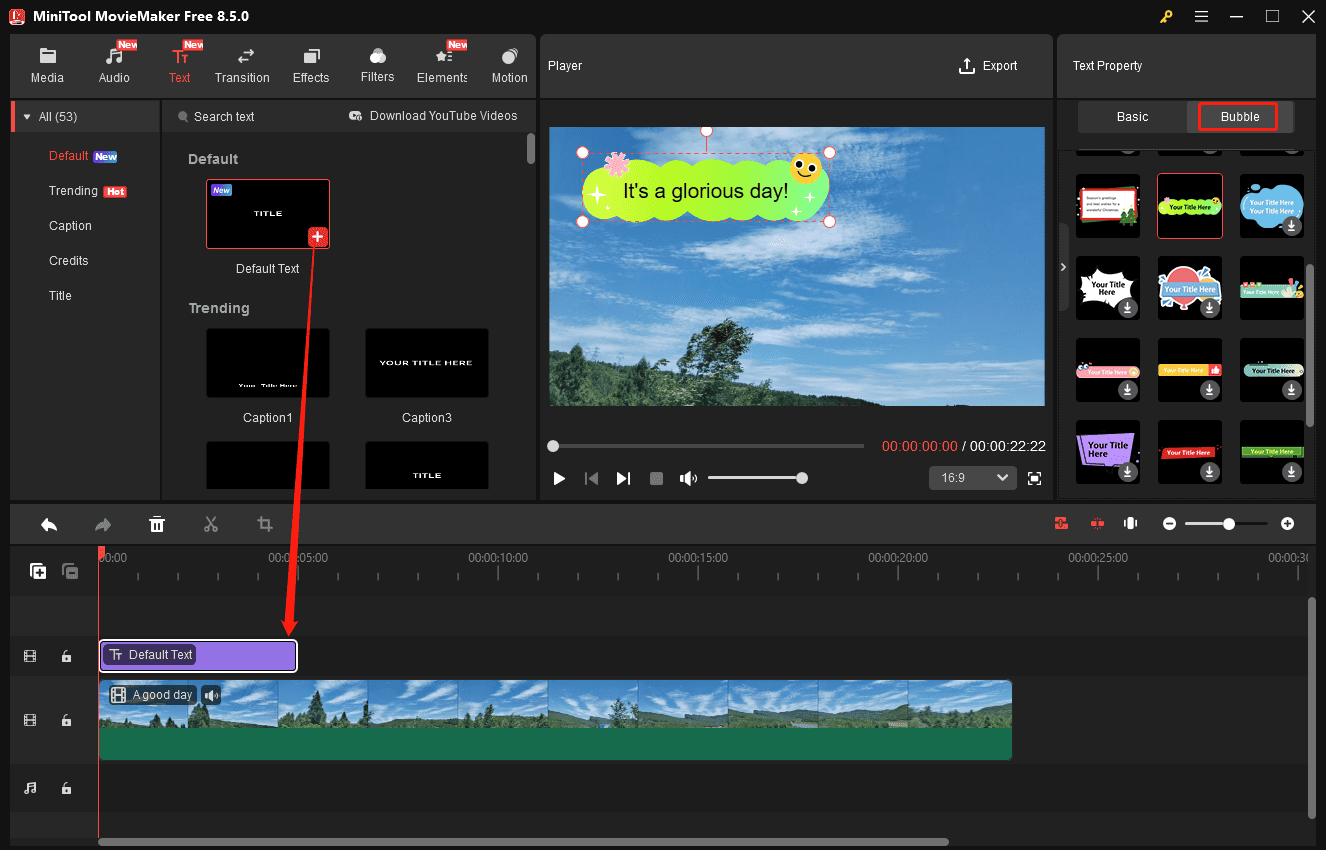
If you desire to add plain text to the video, select Default on the left, and add Default Text to the timeline. Enter and edit your text in the Text Editor. Then, switch to the Bubble tab and download a bubble to spice up your text.
When you create tutorials or lectures for YouTube or want to ensure accessibility for all, subtitles are necessary. How to add subtitles to YouTube videos? MiniTool Video Converter is a great option. It has an AI-powered Intelligent Subtitle feature to convert speech to text instantly.
1: Install the software
Click the button below to download the intelligent subtitles generator and install it on your computer.
MiniTool Video ConverterClick to Download100%Clean & Safe
2: Upload your target video
Launch MiniTool Video Converter and go to the Intelligent Subtitle AI option on the left. Click Choose Video at the top to add your video. If it’s the first time you use this feature, you will need to download a necessary speech-to-text model.

3: Start the transcription
Once your file is uploaded, the software will automatically analyze the audio in the video and turn it into text. The transcript will be burned into the video as permanent subtitles. You can then check the sentences in the Text section and click the Edit icon to make corrections. You can also go to the Style tab to edit the font, size, color, position, and more of the subtitles.
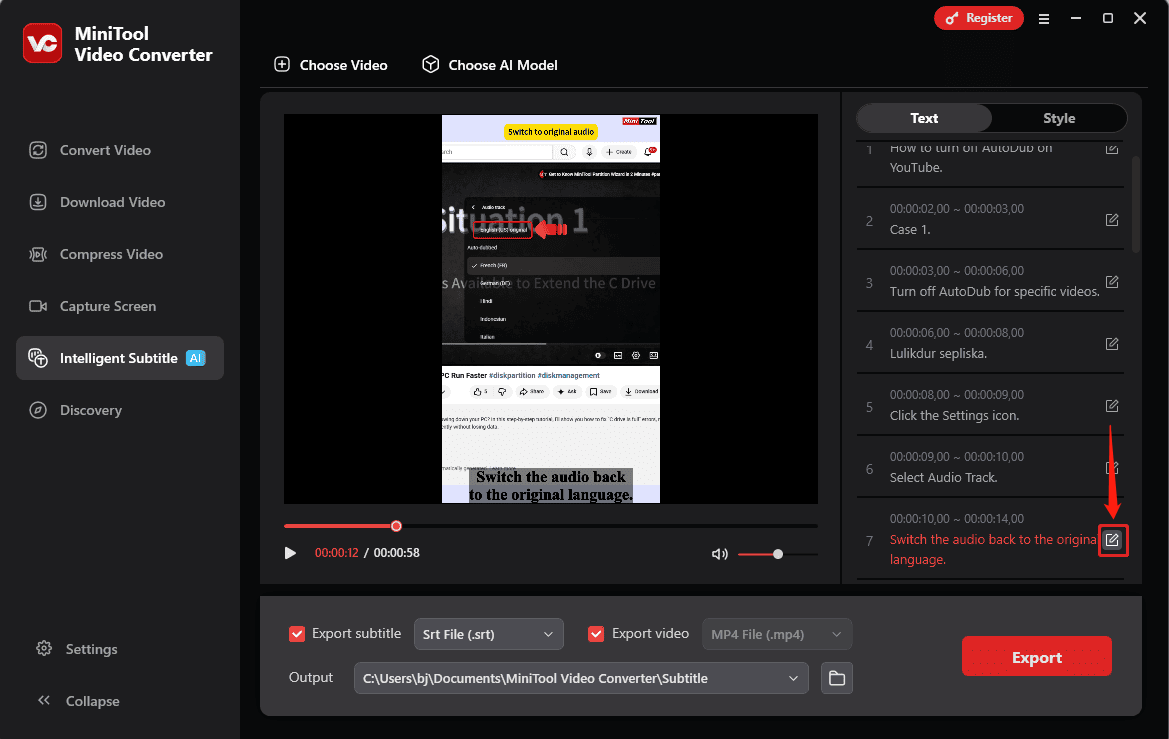
4: Export the video and text
By default, the software generates two output files: a new video with burned-in subtitles and a standalone subtitle file. The transcript can be saved as an SRT subtitle file or as a plain TXT document. To ensure broad compatibility, the final video is rendered as an MP4 file.
Click the Export button to begin processing. When finished, the output folder will open automatically.
Step 7: Color Correction and Grading
Color correction is the process of fixing color, exposure, and white balance issues to ensure footage appears natural. After all, color and light conditions vary and are hard to control.
To create professional-looking videos for YouTube, color correction is an essential step, especially if your footage looks too dark, too bright, or the colors appear unnatural.
To make simple color adjustments in MiniTool MovieMaker, select your clip on the timeline, then go to the Color tab in the Video Properties, and you’ll see three settings: Contrast, Saturation, and Brightness.

Contrast describes the differences in color between the brightest and darkest parts of an image. Drag the slider to the right to increase contrast. The video will be more vivid and sharp. Decreasing contrast makes the video appear softer.
Saturation refers to the purity or intensity of colors, deciding how vibrant or dull they appear. Increasing saturation makes colors brighter, while lowering it makes colors greyish, even black and white.
Brightness controls the overall lightness or darkness of the video. Increasing brightness makes dark areas lighter and bright areas whiter. This effectively helps correct underexposed or overexposed videos/images.
Step 8: Mirror a YouTube video
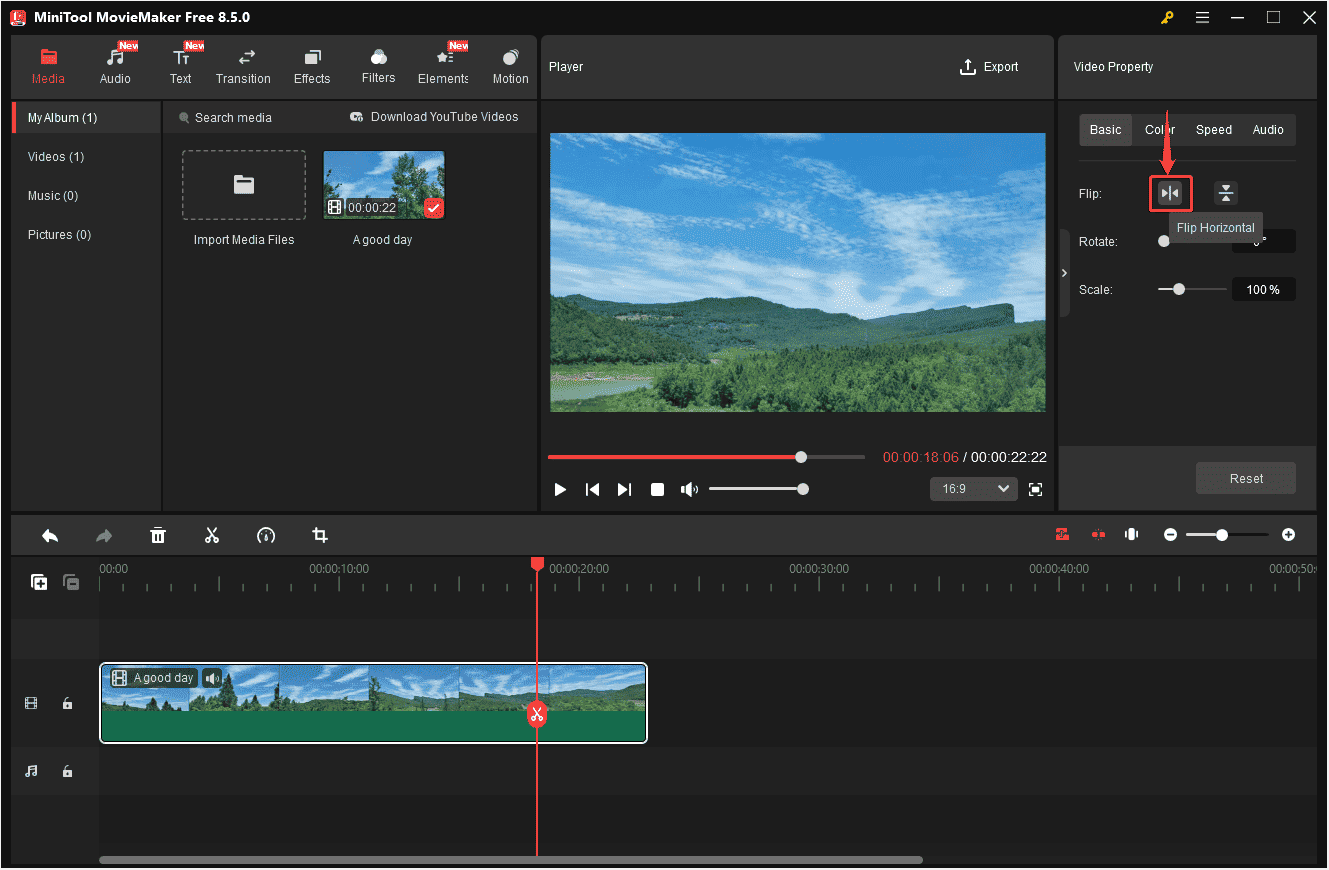
Mirroring a video means horizontally flipping the footage to create a mirror-image effect. It reverses the left and right sides of the frame and changes the side of the screen on which an object is displayed.
If you want to mirror your YouTube video to create an artistic effect, MiniTool MovieMaker also helps. Click the clip on the timeline to open Video Property. Under the Basic tab, click the Flip Horizontal icon to mirror the video. The software also enables you to flip a video vertically.
Step 9: Reverse a YouTube Video
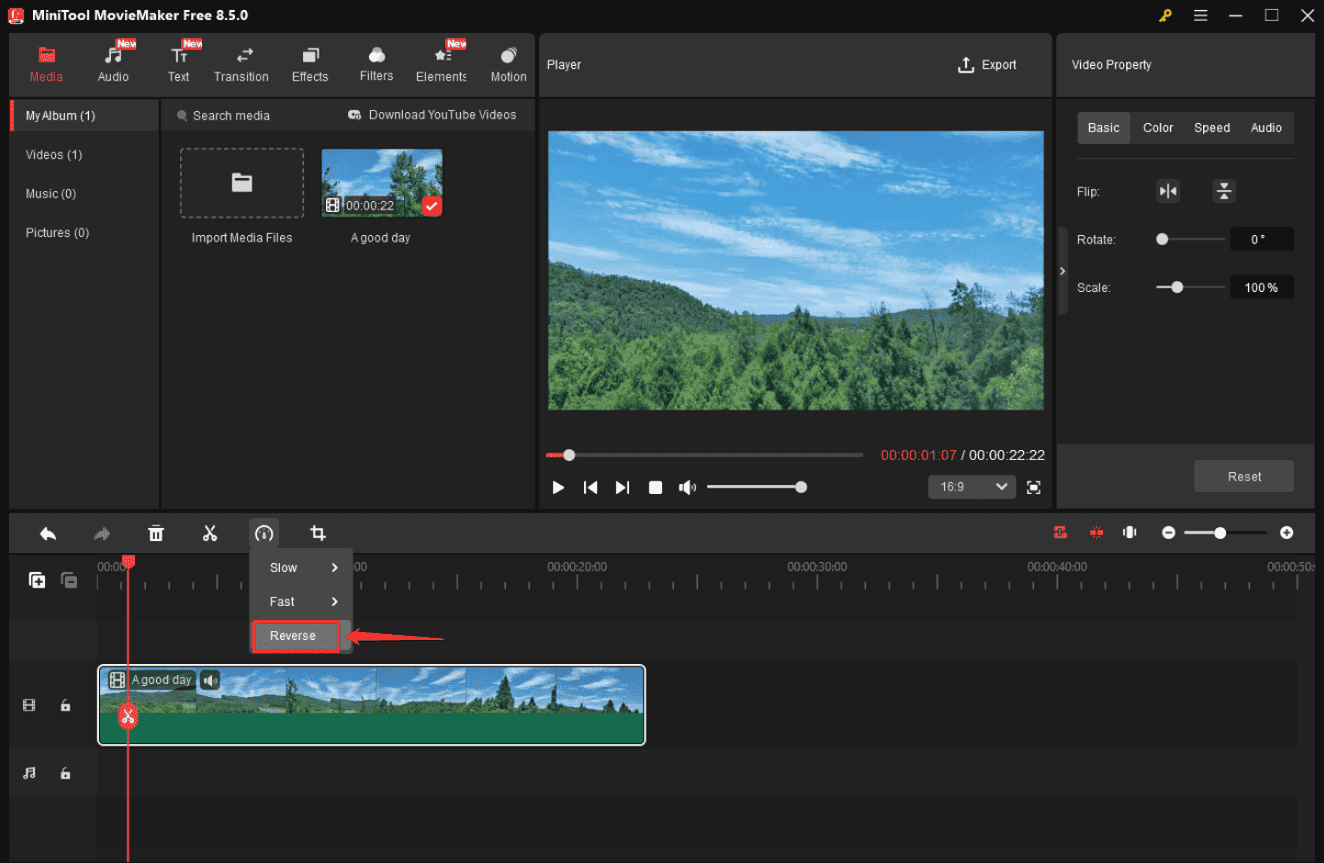
Want to play your YouTube video backward? With MiniTool MovieMaker, you can reverse your footage with one click.
Select your desired clip on the timeline, click the Speed icon in the toolbar above, and choose Reverse from the dropdown.
Step 10: Add Title Cards
Adding a title card directly provides viewers with the theme or key messages of the video, which also helps keep viewers engaged. MiniTool MovieMaker offers multiple preset title templates to help you create eye-catching title cards with ease.
Go to Text in the top menu bar, select Title at the bottom of the sidebar, choose a template, and add it to the beginning of your video on the timeline. You can then drag either edge of the title track on the timeline to adjust its duration. Generally speaking, 3 seconds is enough for a title card.
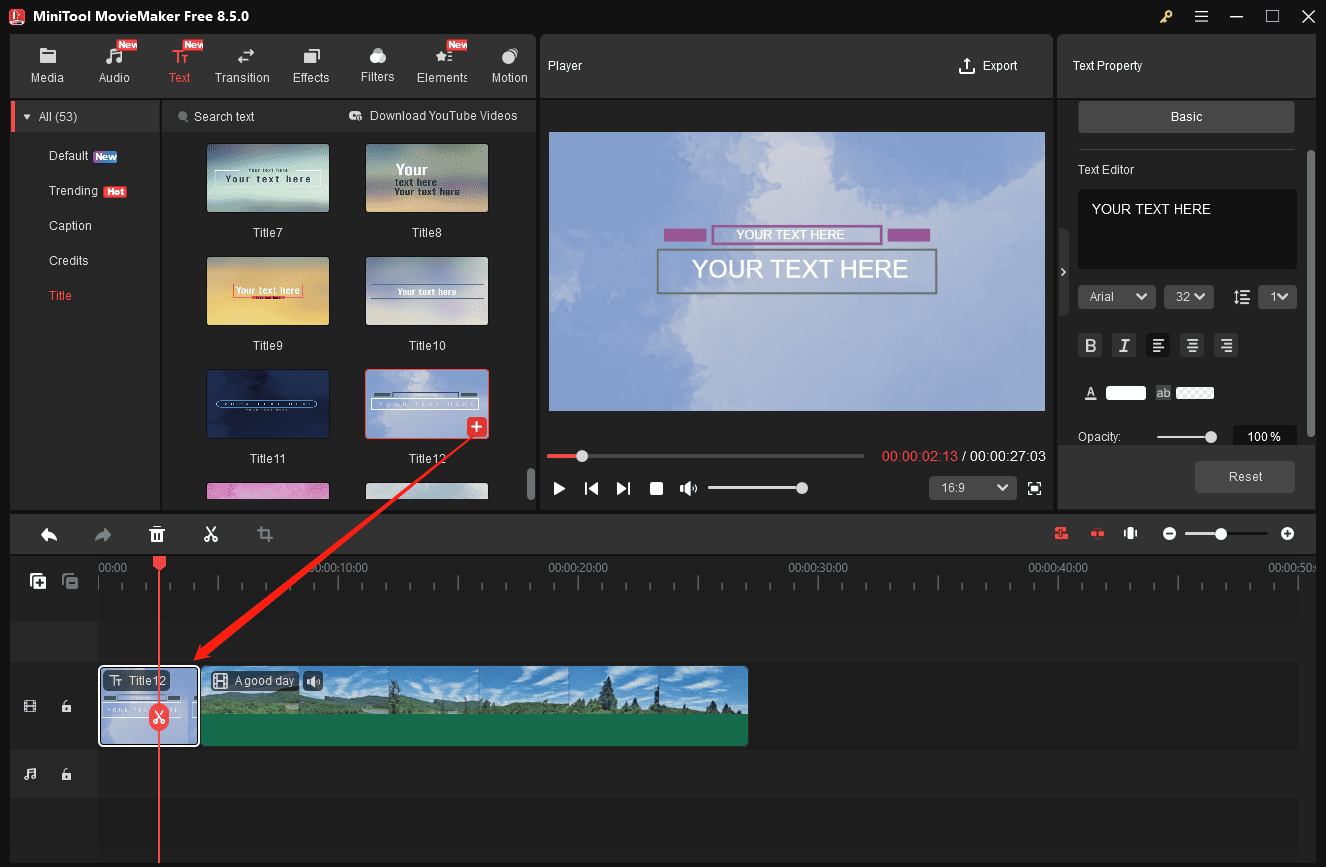
Next, enter your text in the Text Editor, and adjust the font, size, color, alignment, opacity, etc.
Step 11: Enhance Content with Dynamic Elements
Furthermore, you can enhance your YouTube video using various animated elements. MiniTool MovieMaker provides a huge collection of stickers, such as emojis, shapes, arrows, festival elements, mood stickers, social media icons, and more.
Navigate to the Elements tab at the top to open MiniTool MovieMaker’s element library. Browse the collection or enter a keyword to find a desired sticker. Hover the mouse cursor over a sticker to preview it quickly. If you like it, click the Download icon. Next, drag it to the top of your video on the timeline.
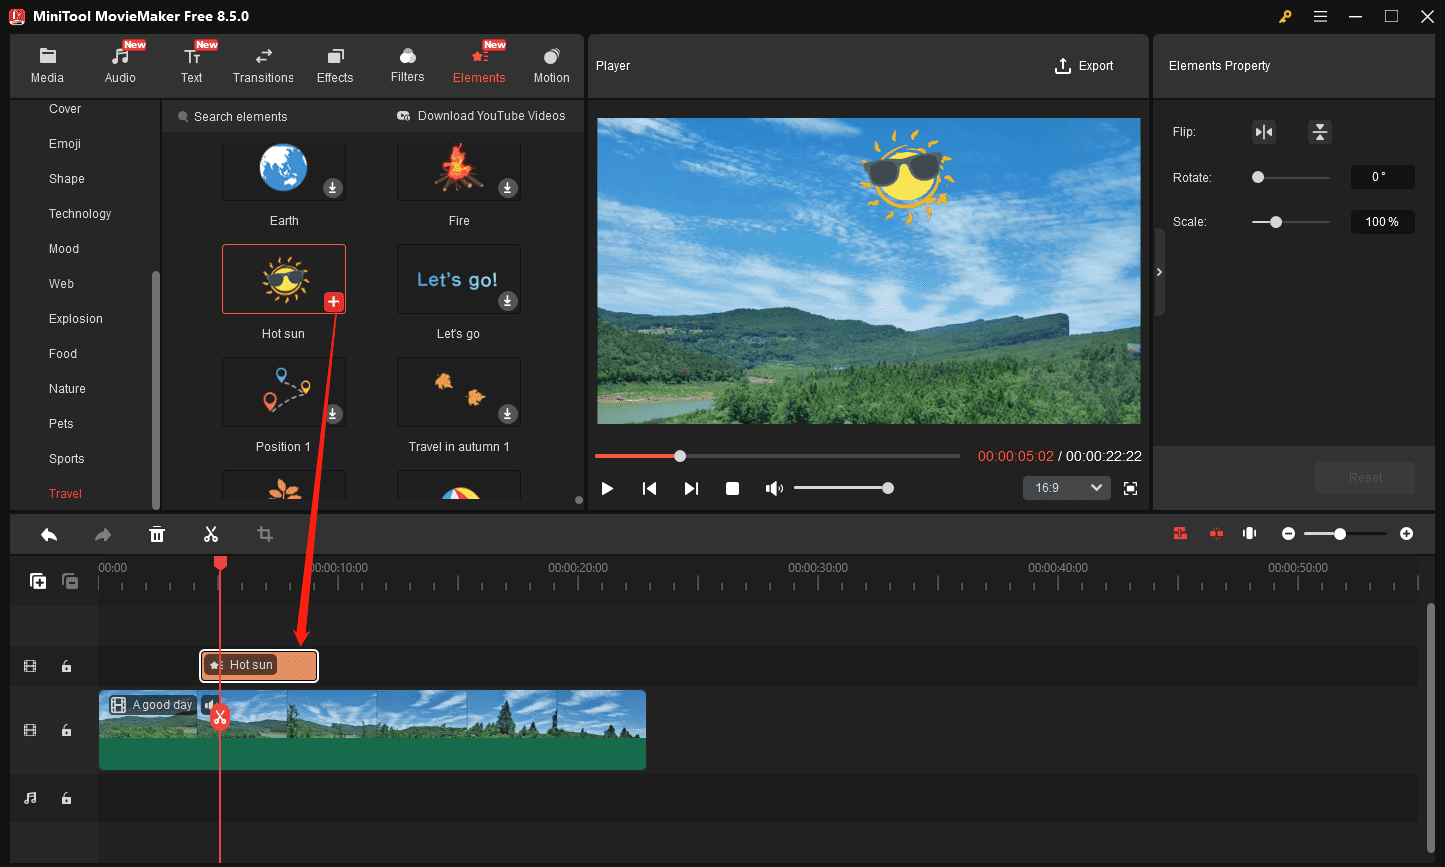
To adjust the length of the added sticker, drag either edge of the sticker on the timeline. In the Elements Property on the upper-right section, you can flip, rotate, and scale the sticker. In the player window, you can also change its position on the frame.
Step 12: Export the Video
Editing videos for YouTube is not a difficult thing. With MiniTool MovieMaker, the reliable and stable YouTube video editor, you can edit and enhance your footage effortlessly. After your edits, it’s time to export the video.
Click the Export option in the upper-right corner of the interface, and you can then rename the file and choose a save location. By default, the video will be saved in the MP4 format and 1080p resolution, which are YouTube’s recommended upload settings.
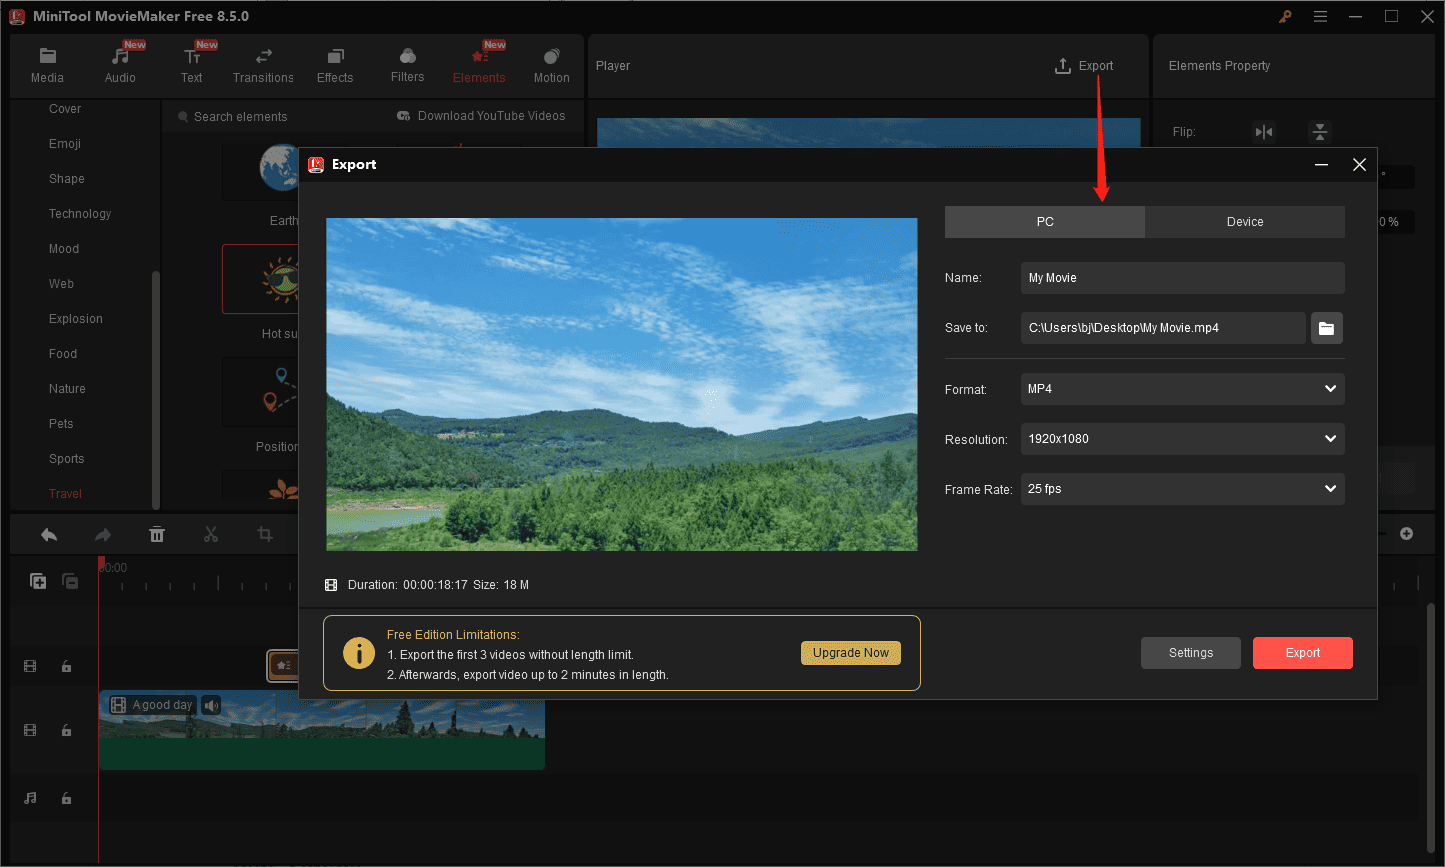
As for the frame rate, 24, 25, 30, and 60FPS are acceptable. You can expand the Frame Rate menu to change the PFS of your YouTube video.
Finally, click Export to start rendering the video. Once done, click the Find Target option to locate the video on your computer.
How to Edit YouTube Videos After Uploading
Fast Track:
- Visit YouTube Studio and find the video you want to edit.
- Click Editor to enable YouTube’s built-in video editor.
- Trim and cut the video.
- Blur the face or other parts of the video.
- Add music and subtitles.
- Save the edits
While editing is necessary before publishing a video to YouTube, you may still need to modify the content you upload sometimes. Therefore, YouTube Studio offers a built-in editor for quick edits.
How to edit YouTube videos after uploading? Here is the quick guide.
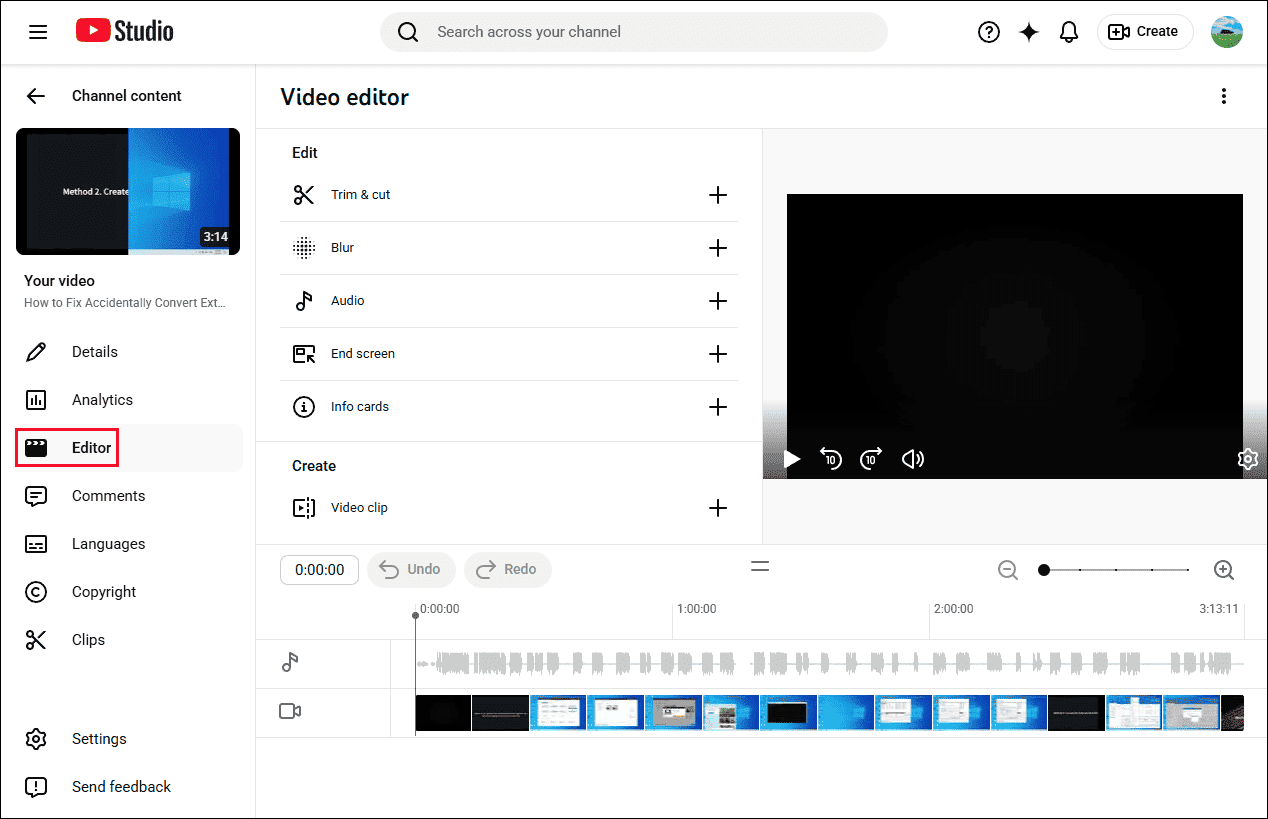
Step 1: Enable YouTube’s Built-in Video Editor
Go to your YouTube Studio, click Content on the left sidebar, and click the title or thumbnail of the video you’d like to edit. Next, click Editor on the left menu bar to open YouTube’s built-in video editor.
Step 2: Trim and Cut a Video
Click the Trim & cut option at the top, and then you’ll see a blue framework in the timeline of the editor. Drag the sides of the blue framework to choose the portion of the video you want to keep. Anything not in the framework will be removed from the video. Click Save to trim the video.
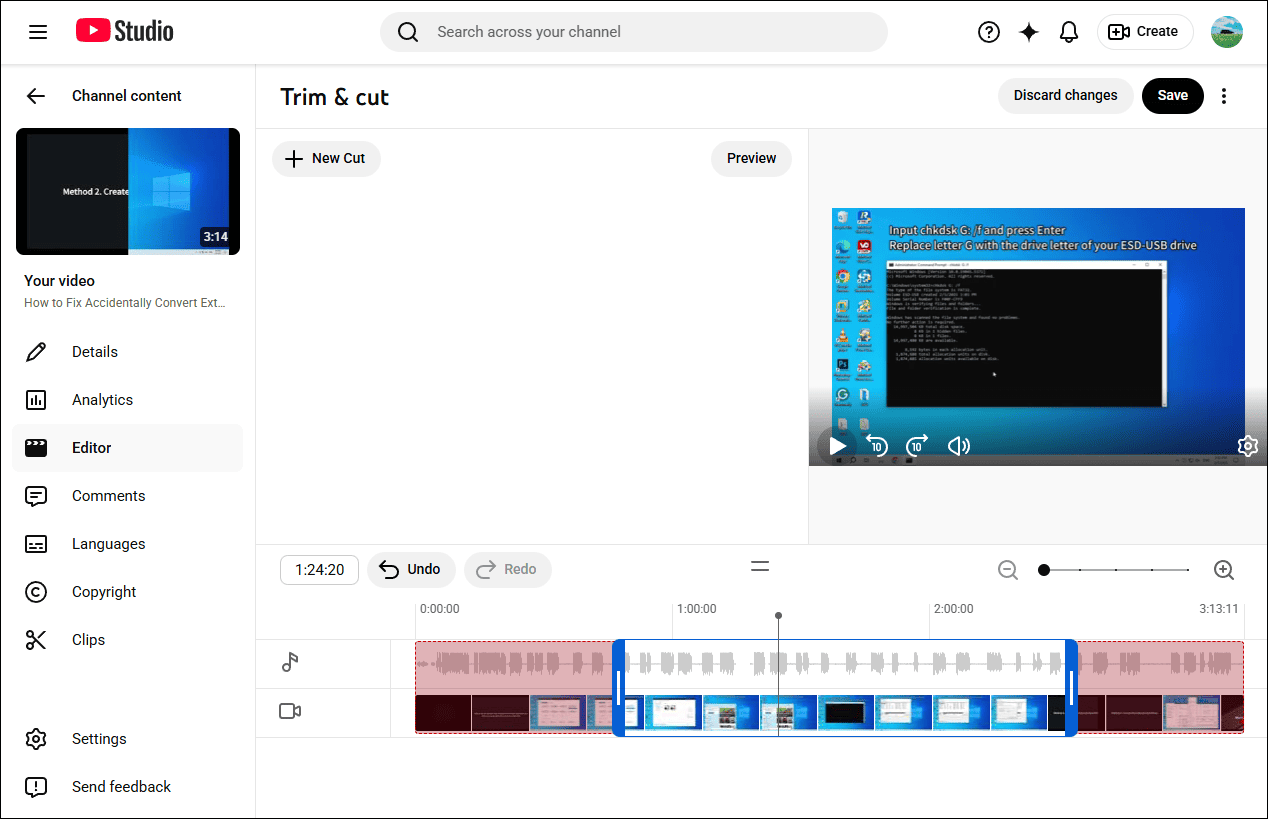
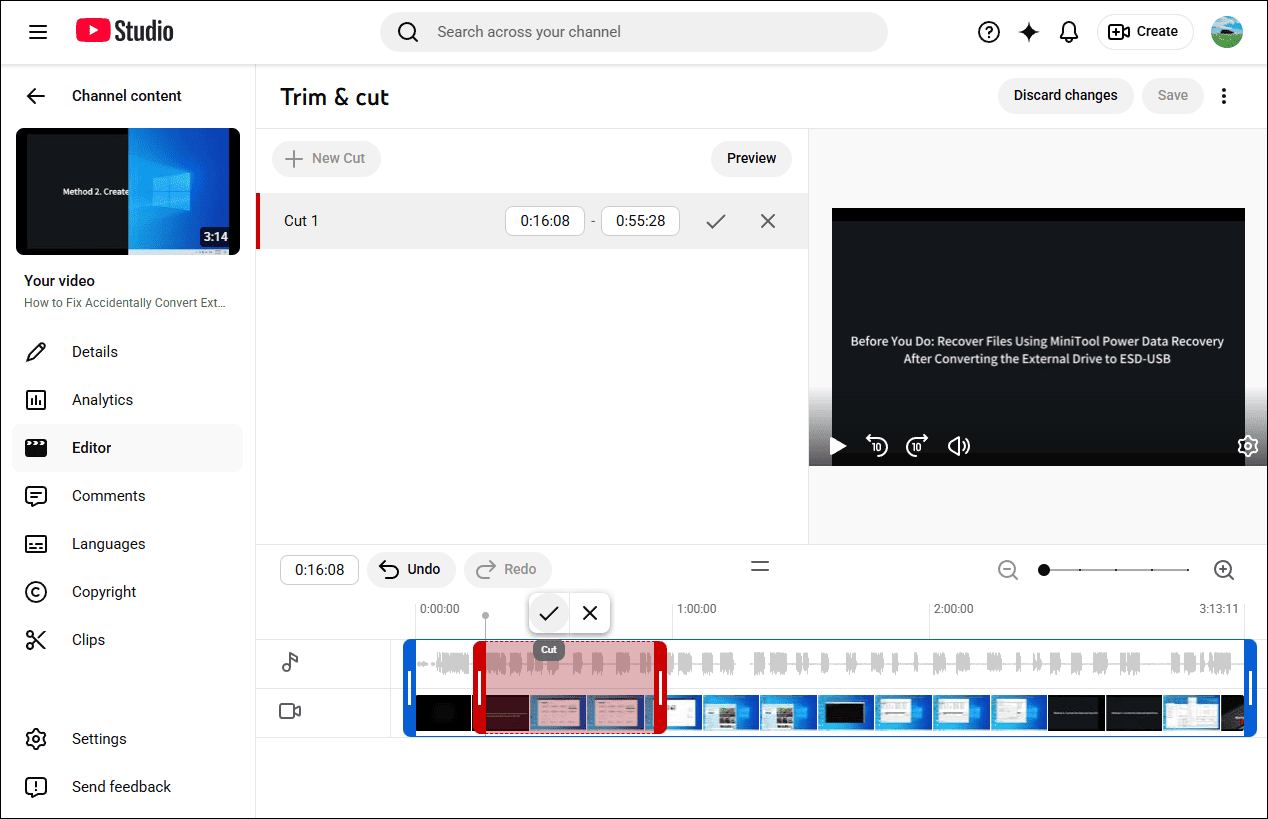
To delete the middle section of the video, click the Trim & cut option, select the + New cut option, and then a red framework appears in the editor.
Drag the sides of the red framework to choose the part of the video you want to remove. Other parts not in the red framework will remain in the video. Click the Cut icon (a checkmark) to confirm your edits, and click Save > Confirm changes.
Step 3: Blur Videos
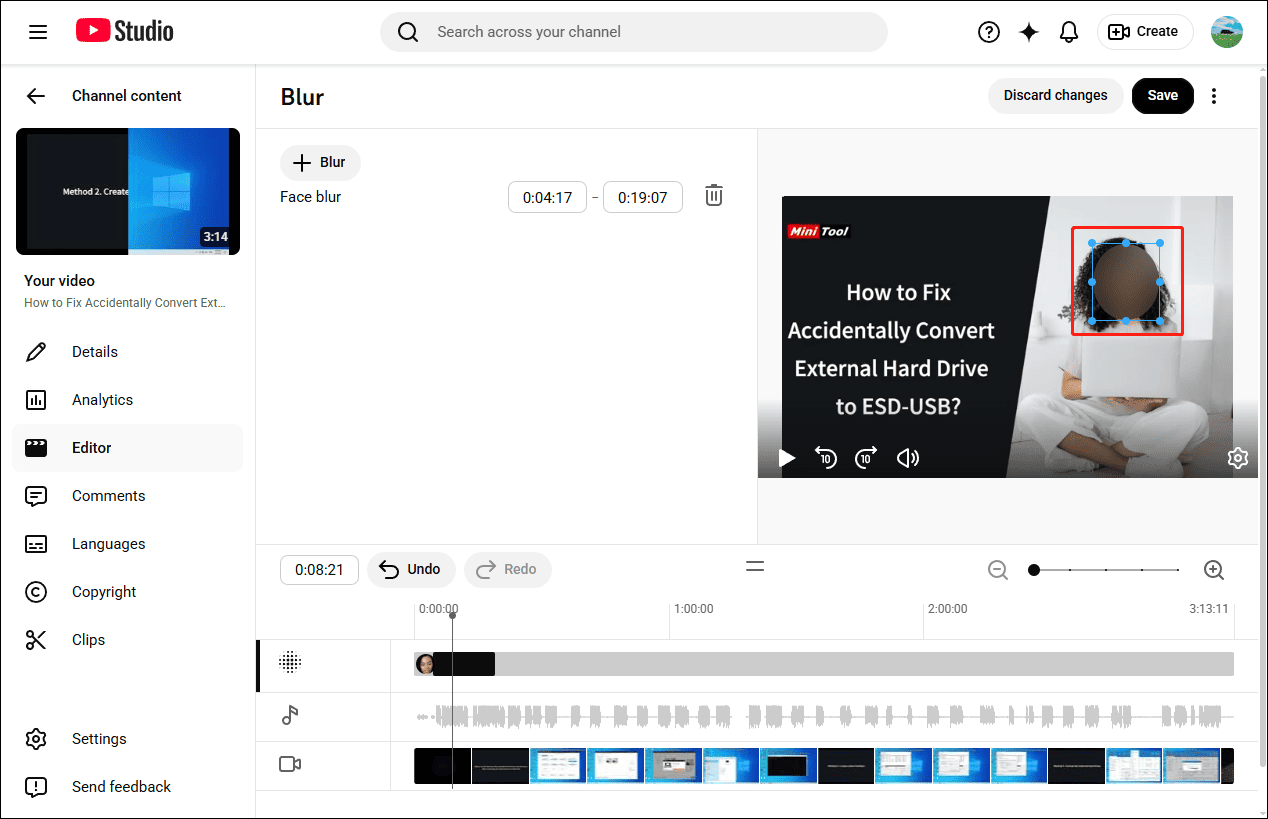
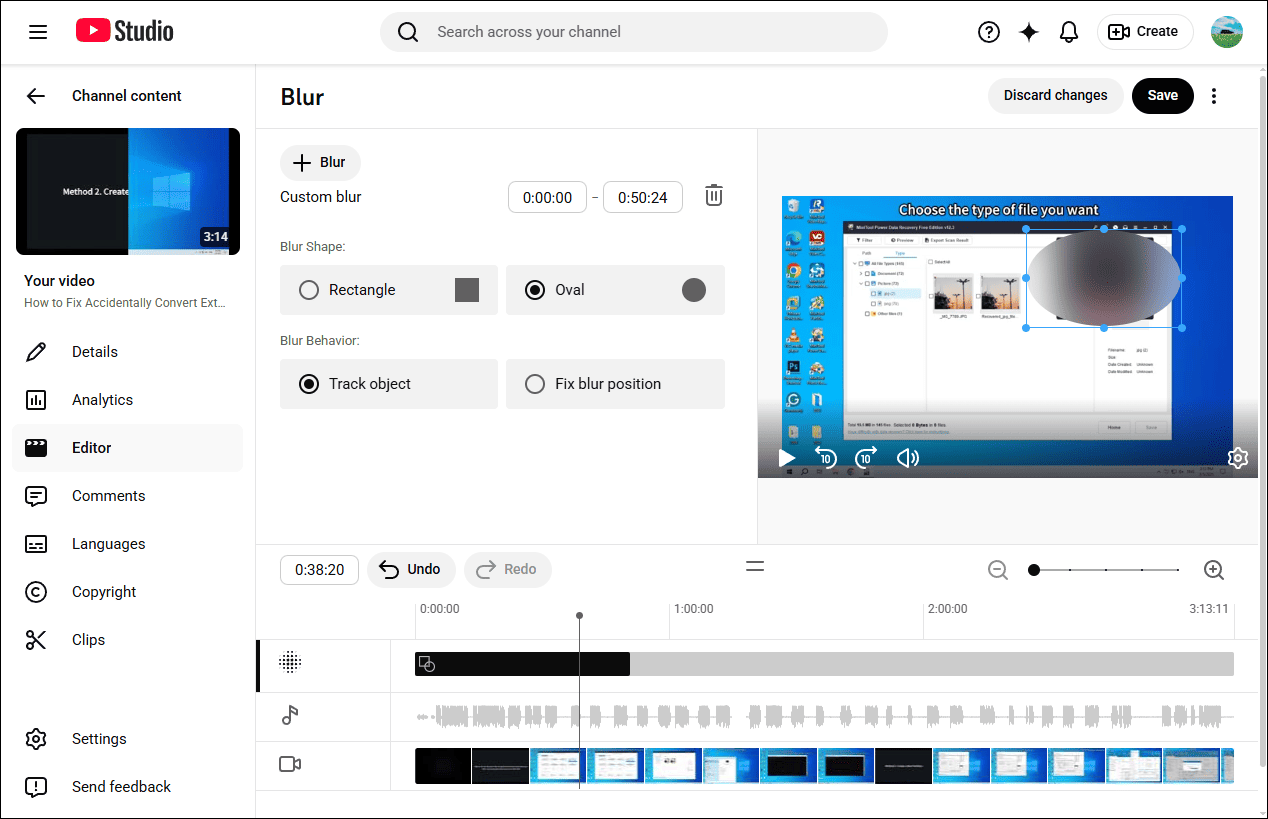
Click Blur and choose Face blur or Custom blur.
If you want to hide faces in the YouTube video, Face Blur is the perfect choice. After clicking the option, YouTube Studio will immediately analyze the video and detect faces. Once finished, select the faces you want to blur and click Apply. Next, you can adjust the size and position of the blur cover in the preview window.
If you need to blur other parts of your video, select Custom blur. You can decide when the blur starts and ends, and choose the blur shape – either a rectangle or an oval. To track and blur a moving object, select Track object. Additionally, you can adjust the blur’s position and size. Finally, click Save > Confirm changes.
Step 4: Add Royalty-Free Audio
Moreover, the YouTube Studio video editor allows you to add licensed songs to videos. Click Audio, use the search filters to find the song you need. Click the Play icon to listen to the track. Hover over a song, click the Add icon to add it to your video.
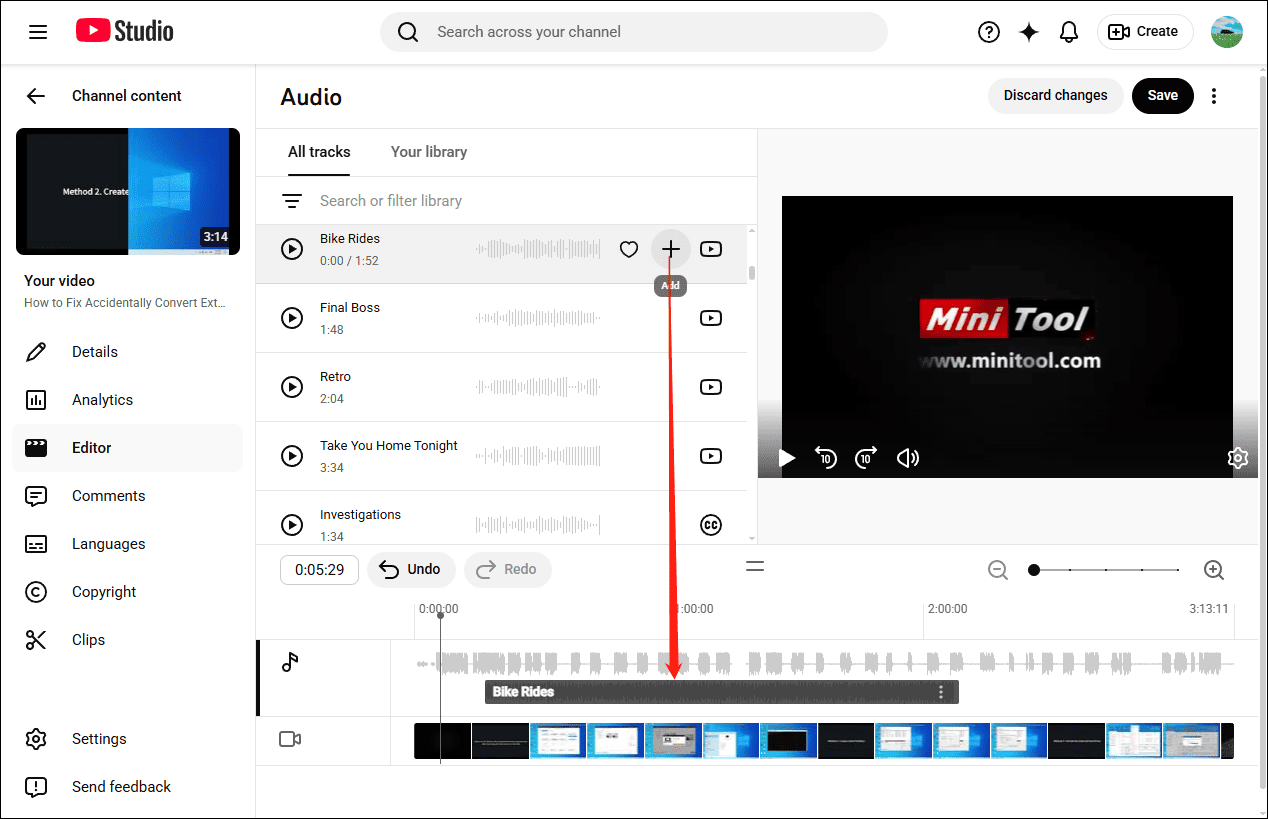
Next, you can drag the added track to change when the song should begin. When you’re finished, click Save.
However, the YouTube Studio video editor doesn’t let you edit the audio in the original video. You can use the platform’s audio library if your video doesn’t have background music. Personally, you’d better add music or other audio to your video before uploading it to YouTube, which gives you more control over the audio.
Step 5: Add Subtitles
The YouTube Studio video editor lets you add subtitles and captions to make your video accessible to a wider audience, including deaf or hard-of-hearing viewers, as well as those who speak other languages.
From the left menu, select Languages, click Add language on the right side, and select your language.
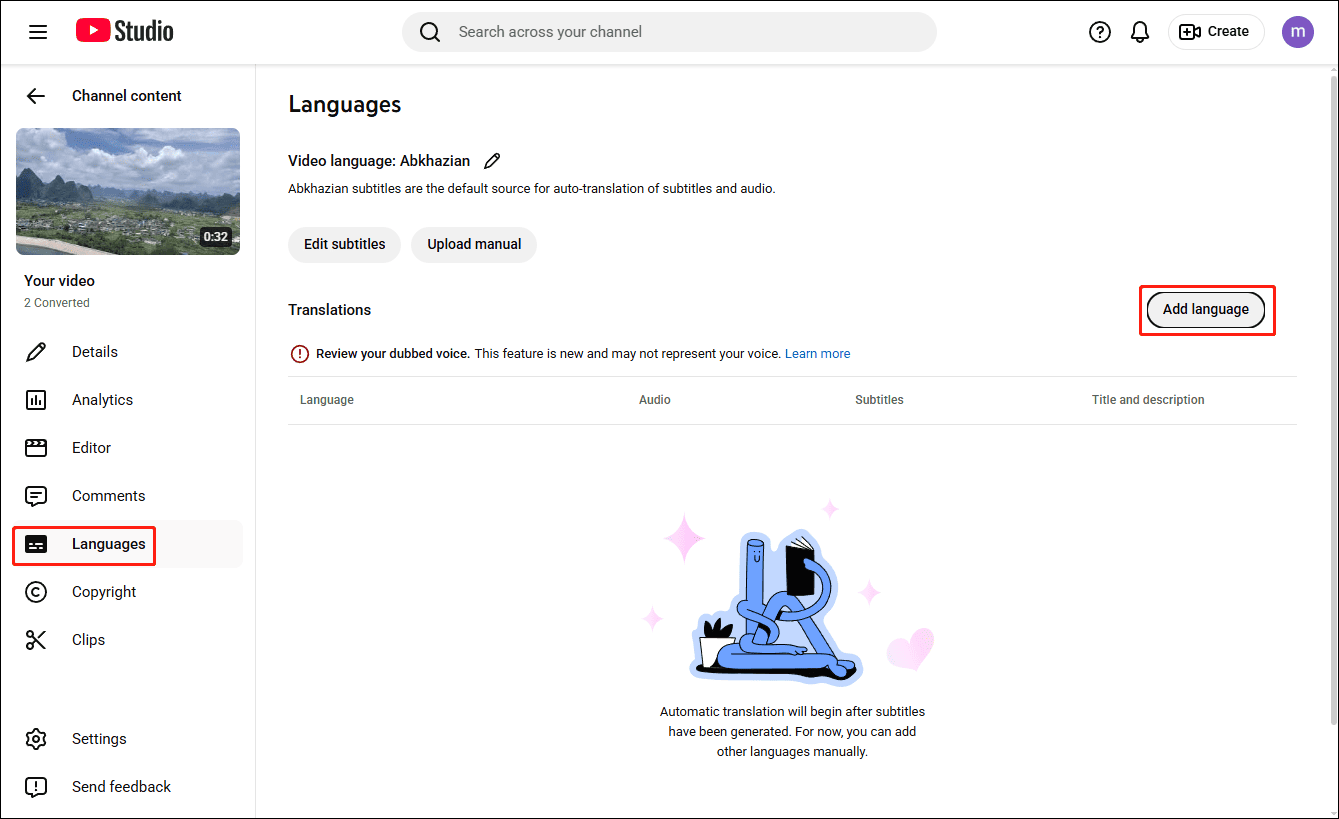
Next, click Add next to Manual subtitles and choose a way to add your subtitles and captions.
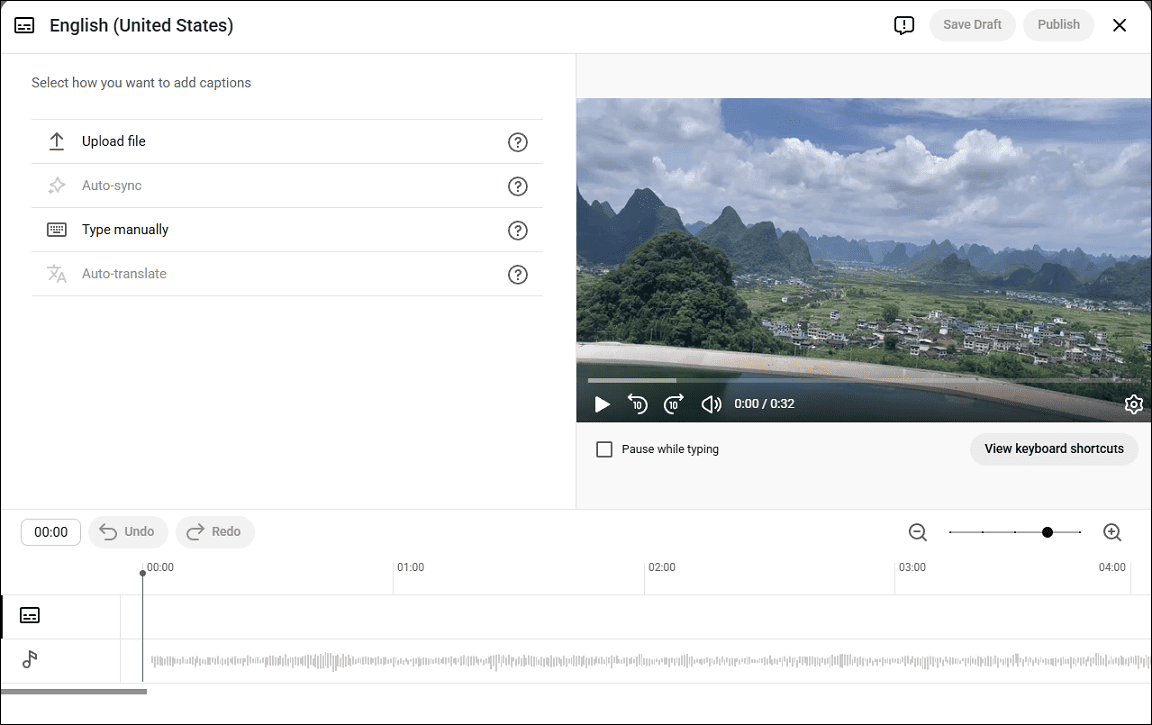
Option 1: Upload file
The subtitle file should contain the text of the dialogue and spoken content in the video, and timestamps to tell when each line of text should appear on screen. This option is only available for the original language.
To add your subtitle file, select Upload file, choose With timing or Without timing, then select Continue, select your file, and click Save.
Option 2: Auto-sync
This subtitle feature can automatically match a script to a video’s audio. Select Auto-sync, type the words in the video or upload a transcript file, choose EDIT, then click SAVE AND CLOSE.
Option 3: Type manually
Alternatively, you can manually enter or paste a transcript of your captions, and you can also edit the timing. Once finished, click Publish.
Option 4: Auto-translate
This feature uses speech recognition technology to translate video content automatically, including captions and audio dub into different languages. Before trying this function, publish captions in the original video language first, and this feature is unavailable for auto-generated subtitles.
The Significance of YouTube Videos
YouTube is not only a simple video-sharing platform, but also an essential search engine in modern life. It significantly influences how people learn, experience culture, and see what’s happening in the world.
In terms of education, YouTube provides an extensive library of lessons and tutorials to help people learn new knowledge and develop skills. In other words, the platform is perfect for self-improvement, not only for entertainment.
YouTube gives everyone a voice – anyone can share what they saw, heard, and thought. Therefore, the platform gives users a chance to learn more about the world, such as buildings in different styles, unique natural landscapes, diverse cultural customs, and different eating habits. What’s more, people can get a sense of different perspectives on the same topic.
In conclusion, YouTube videos are important in every aspect of life and are deeply integrated into daily life.
YouTube Video Types, Specs, & Differences
This section covers the two formats of YouTube content: long videos and Shorts, their upload requirements, and their differences.
YouTube Long Videos
YouTube long videos refer to the traditional landscape (16:9) videos that are longer than 60 seconds. By default, users can upload videos up to 15 minutes long, and verified accounts can share videos up to 12 hours.
The long-form videos on YouTube focus on storytelling, often seen in educational content, common how-to videos, interviews, and other detailed content.
Here are the recommended upload encoding settings for YouTube long videos:
- Format: MP4 (MOV, AVI, WMV, FLV, MPEG4, MPEGPS, 3GPP, and WebM are also acceptable.)
- Codec: H.264 for video and AAC-LC, Opus, or Eclipsa Audio for audio.
- Frame rate: 24, 25, 30, 48, 50, 60FPS (other options are also supported.)
- Bitrate: 8 Mbps for 1080P videos at 24, 25, 30FPS, 12 Mbps for higher frame rates.
- File size: up to 256GB.
YouTube Shorts
Shorts on YouTube are vertical (9:16) videos that can be up to 3 minutes. Initially, YouTube launched the short-form video format in response to the rapid rise of the short video market, especially the explosive growth of TikTok and Instagram Reels.
With the widespread adoption of mobile devices, users increasingly prefer swiping through videos during commuting and breaks. Consequently, YouTube introduced Shorts to retain users and attract new young users and creators.
Here are the upload requirements of YouTube Shorts:
- Format: MP4 or MO4 (MP4 with H.264 codec is recommended.)
- Aspect Ratio: 9:16 or 1: 1
- Recommended resolution: 1920 x 1080 pixels
What’s the difference between regular YouTube long videos and Shorts? Here’s a quick comparison.
Primary Purpose
YouTube long-form videos are designed to provide high-value content across different fields, such as entertainment, education, and vlogs, and meanwhile, help creators build a sustainable, searchable, and monetizable content library.
YouTube Shorts are designed for mobile viewing and keeping up with entertainment and trends. These videos help creators attract new audiences quickly through shorts and get more subscribers who will watch their long videos.
Consumption Style
The main ways people watch long-form videos on YouTube are through search, subscribed channels, and recommendations. They also actively choose which videos to watch, and are more focused than when casually browsing short videos.
Generally speaking, YouTube long-form videos are intent-driven content. People prefer long videos for intentional learning.
YouTube offers a dedicated Shorts tab on the homepage. Once you’re in the entrance, you’ll scroll through the trending topics passively. YouTube Shorts is designed to capture viewers who weren’t actively seeking the creator and convert them into followers.
Unlike YouTube long videos, Shorts are browse-based (interest-driven) videos. The platform recommends content based on viewer interests or trending topics.
Algorithm and Traffic
YouTube long videos focus on the average view duration and total watch time. The platform uses these data and the watch history to suggest videos for users. While long-form content experiences slower traffic growth than Shorts, it performs more stably in the long term.
YouTube Shorts prioritize completion rate and user engagement, including likes, shares, and comments. These short videos can go viral quickly, even for creators with zero subscribers, because their reach depends primarily on rapid audience interaction.
Production
Shorts can be quickly done on a phone. Users can easily record a video within the YouTube mobile app, then they can add music, apply filters, or use other effects to enhance their recording. In just a few minutes, users can create and upload a Short on YouTube. In summary, Shorts are easy to get started with and require no professional skills.
In contrast, creating a high-quality, long-form YouTube video requires more effort and hours of production. The process is much more complex and time-consuming. You have to invest time in choosing a topic, writing scripts, preparing the filming equipment, editing footage, and refining audio. Unlike Shorts, long-form content needs a greater time investment.
What Makes a Good YouTube Video
To create a successful YouTube video, you must make necessary edits and understand the core components of engaging content. In this section, let’s quickly review the essential features of a good YouTube video.
High-Quality Audio & Visuals
In the digital age, audiences have higher expectations for the production standards and quality of videos. They cannot tolerate blurry images, poor sound, or background noise. Therefore, a good YouTube video must be in high resolution, such as 1080P or 4K, and have clear music and narration with appropriate volume. What’s more, proper lighting is also important for great YouTube content.
Engaging Editing & Pacing
When editing videos for YouTube, especially long videos, it’s crucial to keep the pacing and engagement to retain viewers. Therefore, it’s necessary to delete irrelevant sections and rearrange the clips’ order to improve the narrative flow.
Moreover, adding background music, sound effects, filters, and special effects can effectively set the tone and create a unique atmosphere. All in all, create a dynamic rhythm that keeps the audience’s eyes fixed on the screen.
Compelling Storytelling
No matter what kind of video you want to produce, a YouTube how-to video, product reviews, or vlogs, compelling storytelling will grab viewers’ attention. Effective narrative techniques can engage the audience emotionally and intellectually, making the story memorable and impactful.
Clear Purpose
A good video should have a clear purpose. Before you start filming or editing, you should ensure what you want to share with viewers, such as the thoughts and reflections you want to express, and what you want the audience to do after watching your videos, such as buying your products.
Conclusion
Editing YouTube videos is not as hard as you may think. With the right video editor, everyone can make eye-catching videos. This post introduced four excellent video editing applications for YouTube and detailed how to edit YouTube videos using MiniTool MovieMaker and the platform’s built-in video editor. It’s your turn now. Follow the steps above to make your YouTube video.
Finally, if you have any problems while using MiniTool MovieMaker, please email us at [email protected] for help.
How to Edit YouTube Videos FAQ
About The Author

Position: Columnist
Cora is a tech writer specializing in digital media workflows, with over six years of hands-on experience in video post-production, media transcoding, and screen capture. Her writing is always clear and practical. Cora also produces in-depth software reviews for users across skill levels to help them find the right tool and enjoy video editing.
User Comments :