Nowadays, many people enjoy filming or creating videos to document their lives or share on social media platforms. How to edit a video to make it more impressive? Fortunately, this article will provide you with a comprehensive and professional guide. Also, it recommends some top-grade video editors to make the editing process easier and smoother: MiniTool MovieMaker (the best free video editor), CapCut, etc.
Before learning how to edit a video, let’s understand video editing.
What Is Video Editing
Video editing is the process of post-production and arrangement of video footage, creating compelling video content through cutting, rearranging, and adding other elements to enhance the viewing experience, such as effects, music, dialogue, and transitions. Additionally, video editing transforms fragmented footage into coherent narratives through audiovisual processing in post-production, with widespread applications in film, marketing, social media, and other fields.
Types of Video Editing
Knowing types of video editing can help you select the ideal strategy for your requirements and improve the general quality of your video work. Now, let’s explore some typical types of video editing.
Linear vs Non-Linear Video Editing
What Is Linear Video Editing
Linear video editing is a traditional method of editing video or film, where clips are arranged in a specific sequence and edited as they are viewed. You can edit each scene individually rather than adding and editing multiple clips simultaneously. This was the only editing method available in the early days of film editing.
Additionally, the editing process for this method is quite cumbersome, as any changes made to the preceding sections require re-editing the subsequent segments. In short, if you wish to modify any edits, you must start from scratch and review the entire footage again.
What Is Non-Linear Video Editing
Non-linear video editing is a modern digital editing technique that allows creators to cut, rearrange, and modify any frame of a video without regard for the sequence. During non-linear video editing, the original content is not damaged or deleted. This method allows editing to be completed without adhering to a predetermined sequence or following a chronological order.
In addition, with the help of powerful applications like Adobe Premiere Pro, Apple Final Cut Pro, DaVinci Resolve, and MiniTool MovieMaker, non-linear video editing empowers editors to freely manipulate video clips.
More than that, non-linear video editing software enables professional editors to realize their creative vision by offering sophisticated color grading, audio mixing, sound effects, and visual effects tools.
Difference Between Linear Video Editing and Non-Linear Video Editing
Here are some differences between linear and non-linear video editing:
1. Flexibility
With linear editing, the sequence and arrangement of footage are strictly constrained, requiring frame-by-frame editing from start to finish. Moving or reordering video clips is cumbersome and time-consuming.
Nonlinear editing, however, is different. It allows clips to be edited, rearranged, or replaced in any order without affecting other video parts. This flexibility makes video editing more efficient and convenient.
2. Destructive and Non-destructive
Linear editing is typically destructive, involving permanent cuts to the original tape. Nonlinear editing does not damage the original video.
3. Video Quality Preservation and Loss
In linear editing, each copy may result in a degradation of source footage quality. In contrast, during nonlinear video editing, the quality of the original footage is preserved throughout the entire editing process. Since the editing process employs digital operations and lossless processing, no matter how many times modifications are made, there will be no loss in quality.
4. Efficiency
The linear editing workflow has an efficient aspect because the editing process is predetermined. You simply follow the cuts outlined in the film script. However, if you need to modify any segment, subsequent segments must also be re-edited, resulting in reduced efficiency.
Nonlinear editing delivers unparalleled efficiency and scalability, enabling simultaneous work on multiple aspects of a project with real-time adjustments and refinements without interrupting the workflow.
Offline VS Online Video Editing
What Is Offline Video Editing
Offline video editing is the first stage of the video editing process. Full HD or 4K quality video clips are large files, and each modification or edit consumes significant device resources. Therefore, at this stage, editors use low-quality footage to determine shot sequences. This accelerates the editing process and reduces the risk of system crashes.
When working with large files or high-resolution video files, you can utilize offline editing. This process transcodes the footage into a lower-resolution format, significantly accelerating the editing workflow.
What Is Online Video Editing
In film production, the focus of the online editing stage lies in applying final polish using high-quality source footage. At this stage, the primary tasks involve sound editing, sound design, color grading, and color correction, as well as adding special effects or subtitles, thereby crafting a polished final product.
In addition, during the online editing process, editors first use an EDL to perform a rough cut, determining the final video’s presentation in terms of editing points and pacing. They then switch to high-definition footage for fine-tuning, focusing on refining the details.
Nowadays, most online editing has been replaced by video editing software running on non-linear editing systems. For tools like Clipchamp, Canva, or FlexClip, online video editing refers to browser-based editing.
Difference Between Offline Video Editing and Online Video Editing
Offline video editing emphasizes creative storyboarding with low-resolution proxy files to ensure efficiency. In contrast, online editing is the final technical stage in which edited content is reconnected to high-resolution source footage for color grading, visual effects processing, and other refinements. In a nutshell, offline editing creates the structure, while online editing delivers the final polish.
Here’s a breakdown:
1. Purpose
Offline editing primarily focuses on constructing the narrative structure of a video, arranging the sequence of clips, and controlling the pacing and duration. Online editing, on the other hand, is used to polish the video before release, ensuring it is compelling.
2. Media Quality
Offline video editing uses low-quality proxy files of the original video, which reduces system processing time and avoids consuming excessive memory. Online video editing employs the original high-resolution files to ensure the final output meets expectations.
3. System Requirements
Offline video editing doesn’t need to process large and high-resolution files. Therefore, it can run on standard computer systems smoothly and well. Online editing with high-definition video may not be as smooth as offline editing, and occasional lag may occur during the editing process.
4. Results
Offline editing produces rough or refined cuts to determine the video’s structure. Online editing generates the final, polished, and ready-to-publish video files.
How to Edit a Video on Windows
After understanding all about video editing, it’s time to perform it. How to edit a video on Windows computers? First of all, you need a professional and reliable video editor, and I highly recommend MiniTool MovieMaker, which can make the editing process easier.
MiniTool MovieMaker is a top-grade and user-friendly video editor designed for Windows users. It comes with a wide range of editing features, from basic editing to advanced. It can not only trim, split, crop, flip, loop, and rotate a video, but also supports multi-track editing, high-resolution editing, photo collage, copy and paste on the timeline, color grading, audio overlap, etc.
In addition, MiniTool MovieMaker supports various formats, such as MP4, MOV, MKV, AVI, MPG, MP3, AAC, JPG, PNG, and so on. It also offers multiple output video parameters, like frame rate, resolution, and bitrate, allowing you to customize them based on your needs. This application has a great performance, enabling you to edit videos smoothly and efficiently. It can even edit a GIF.
Furthermore, MiniTool MovieMaker has no ads, bundles, or watermarks, providing an enjoyable user experience. Click the download button below to give it a try!
MiniTool MovieMakerClick to Download100%Clean & Safe
#1 Trim a Video
Video trimming refers to the editing process of shortening a video’s length by removing redundant segments at the beginning or end. This technique is commonly used to eliminate blank footage, mistakes, or tighten the narrative pace. If you want to remove the beginning or end of the video, trimming is an ideal method. How to do that? Free video editor without watermark – MiniTool MovieMaker can help you accomplish it. How to edit a video by trimming? Follow the details below.
Step 1. Download and Install MiniTool MovieMaker
Click the download button below to download the program. Then, follow the setup instructions to install it on your computer.
MiniTool MovieMakerClick to Download100%Clean & Safe
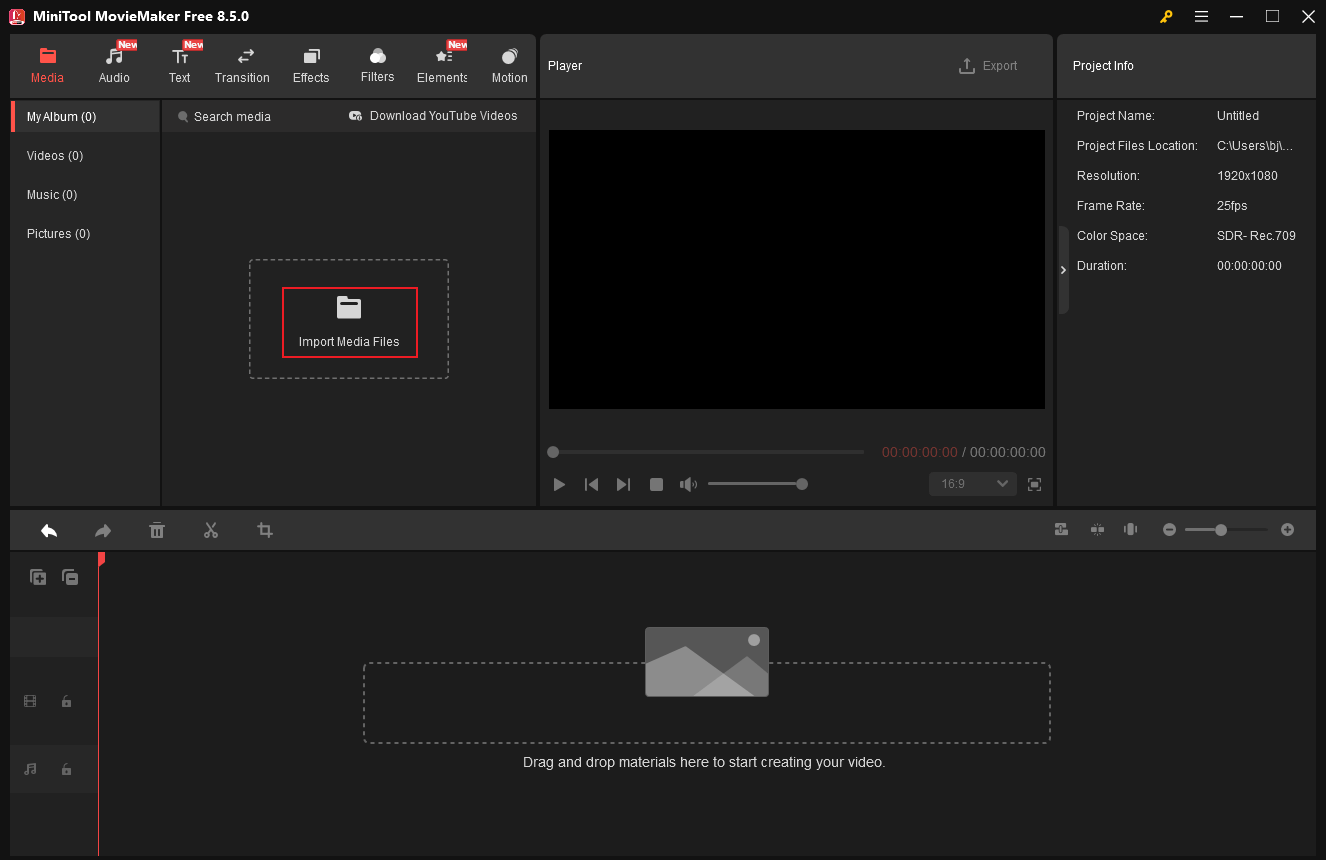
Step 2. Import Your Video
Launch this program and click New Project to enter the main interface. Click the Import Media Files option to add your video.
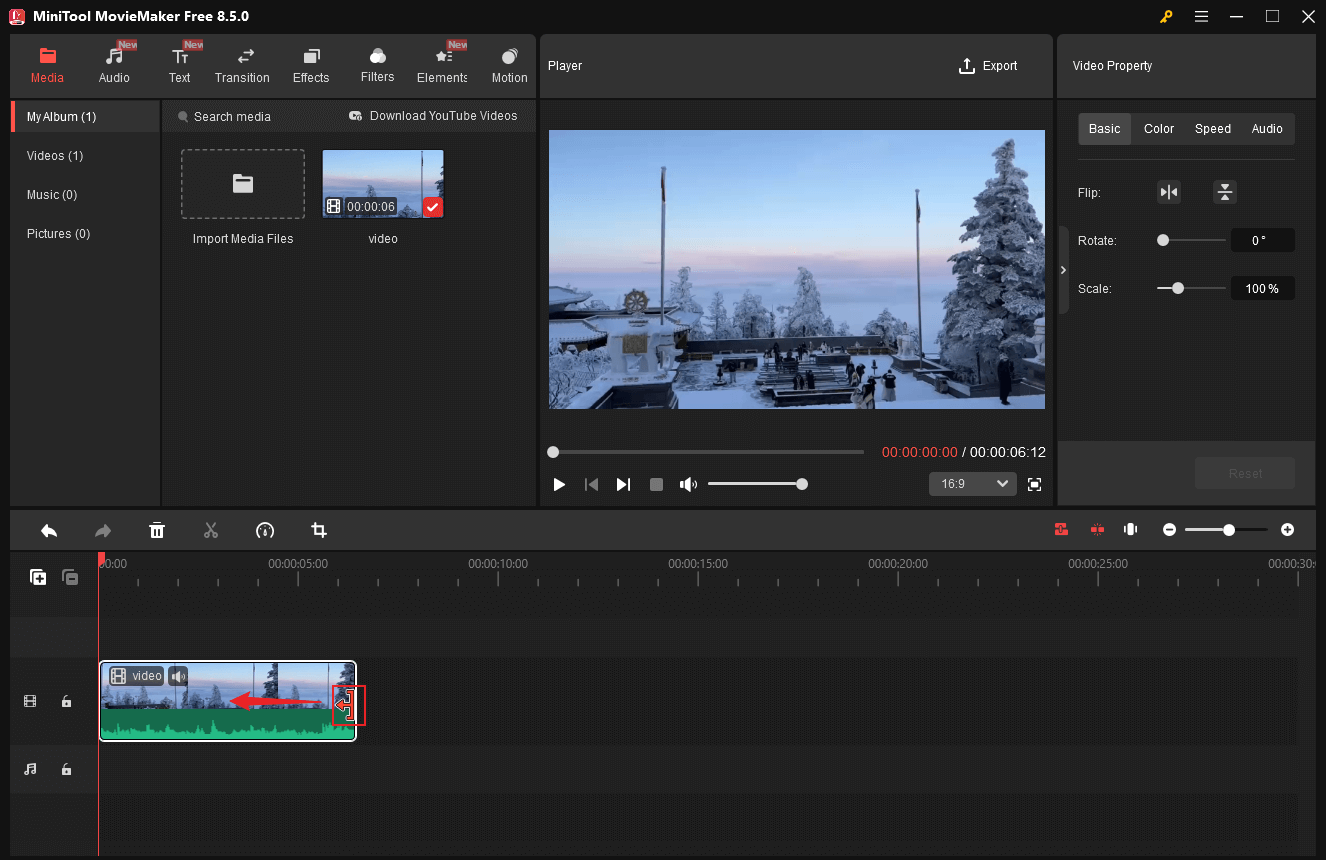
Step 3. Trim Video
Drag the added video to the timeline. Then, hover the mouse cursor over the beginning or the end of the video until the Trim icon appears; drag it inwards to remove the unwanted part.
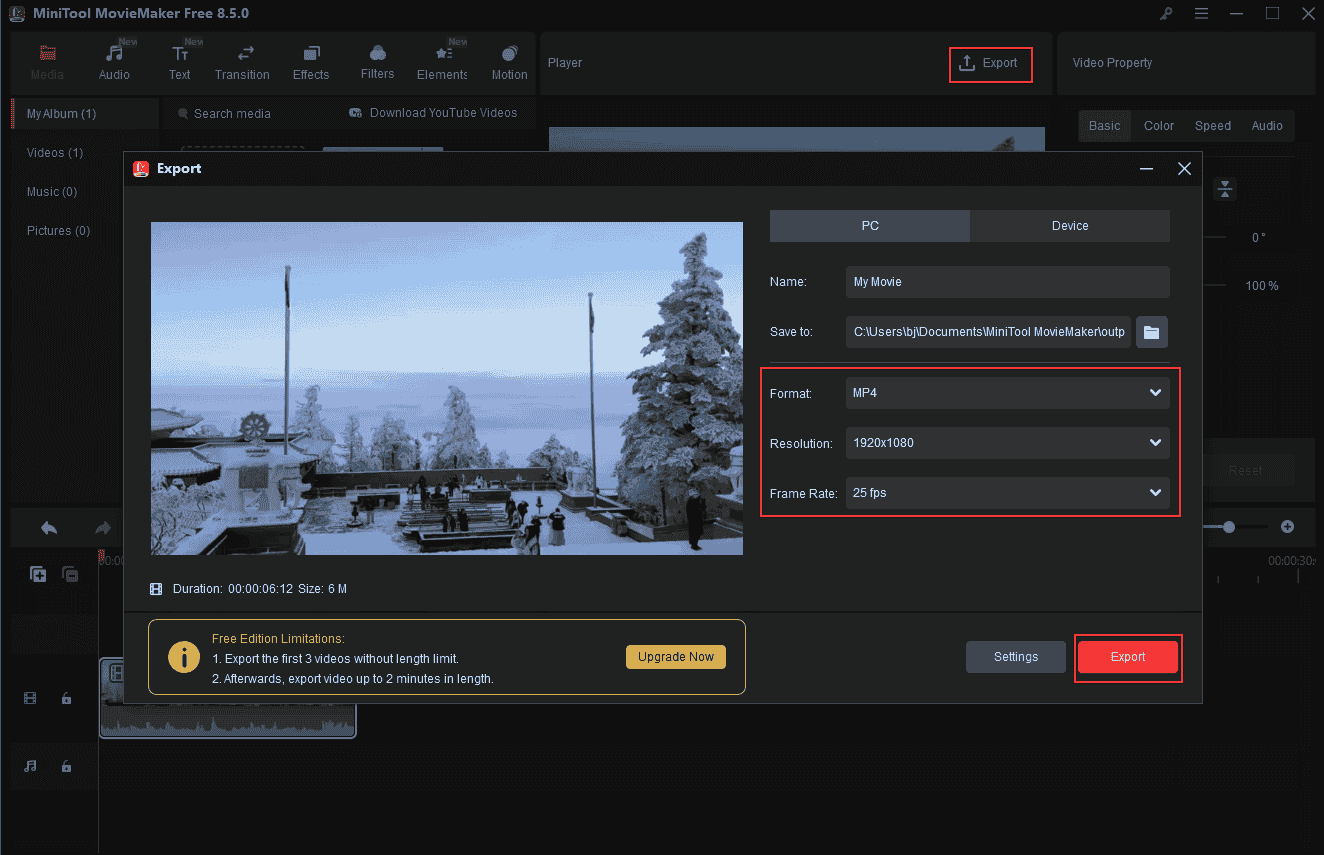
Step 4. Export the Video
Click the Export option at the top right of the Player window to access the Export window. There, you can select an output format and configure the frame rate, resolution, etc. After that, click the Export button to save the video.
#2 Split a Video
Video splitting is the process of dividing a single video clip into two or more separate segments in order to edit, reorganize, or remove undesired parts. This method is commonly used when an undesired segment appears in the middle of the video. To split a video, MiniTool MovieMaker can also do you a favor.
Follow the instructions below.
Step 1. Import the Target Video
Add your video by clicking the Import Media Files option. Then, drag it to the timeline.
Step 2. Split the Video
Move the red playhead to the desired place. Then, click the Scissors icon to cut it into two parts. According to your needs, repeat the operation to split the video into multiple parts.

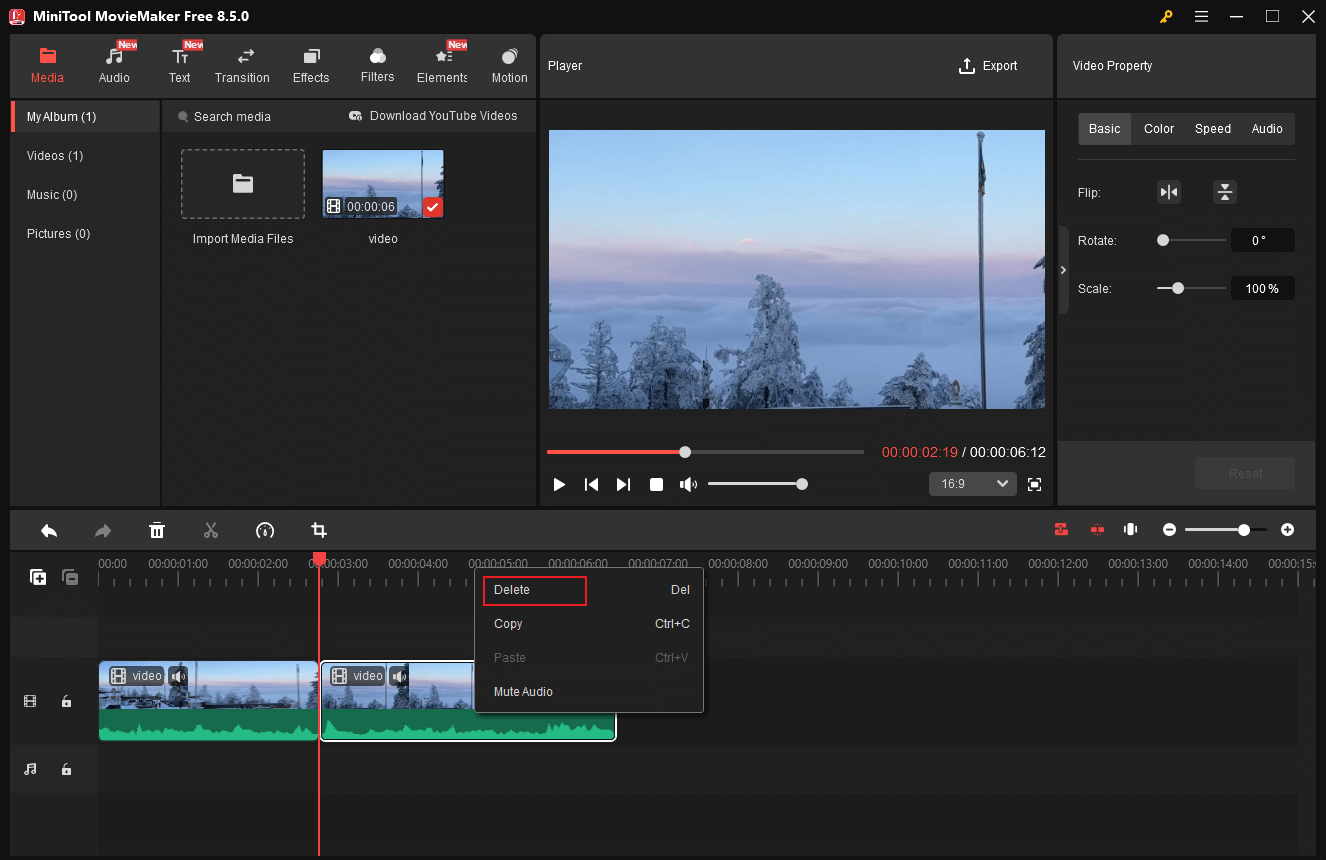
Step 3. Delete the Unwanted Part
Right-click the undesired video clip and choose the Delete option.
Then, export the video.
#3 Crop a Video
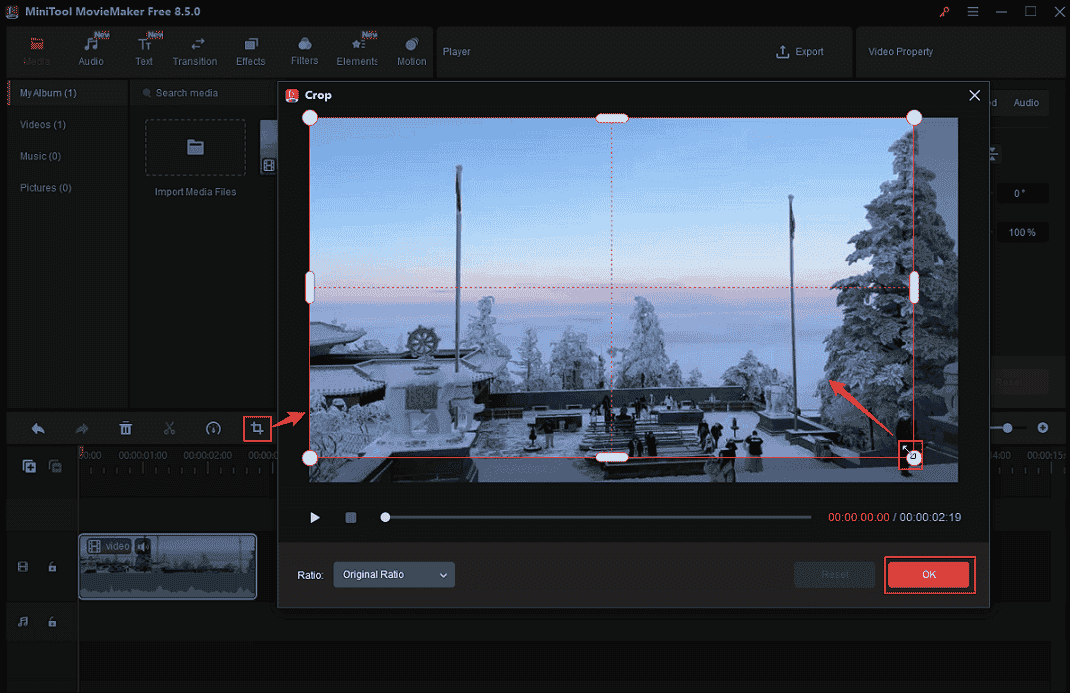
Video cropping refocuses the video content by removing unwanted edges, altering the aspect ratio, or eliminating unnecessary elements. It is commonly used to adapt videos for social media platforms like TikTok or Instagram. MiniTool MovieMaker can easily accomplish video cropping.
After importing your video to the program, drag it to the timeline. Then, click the Crop icon in the timeline toolbar above the timeline to open the Crop window. There, drag the cropping handles inward to crop the video. After that, click the OK button to save the changes.
#4 Rotate a Video
Video rotation is the process of changing the orientation of a video clip by rotating it clockwise or counterclockwise, such as 90°, 180°, or 270°. This editing technique is capable of accurately aligning video footage for viewing, correcting orientation errors, and producing distinctive visual effects. To rotate a video, MiniTool MovieMaker offers a quick way.
In the main editing page with the target video highlighted on the timeline, drag the Rotate slider in the right Video Property section to rotate the video to the desired result. Alternatively, you can input the desired number into the custom box to rotate video accurately.

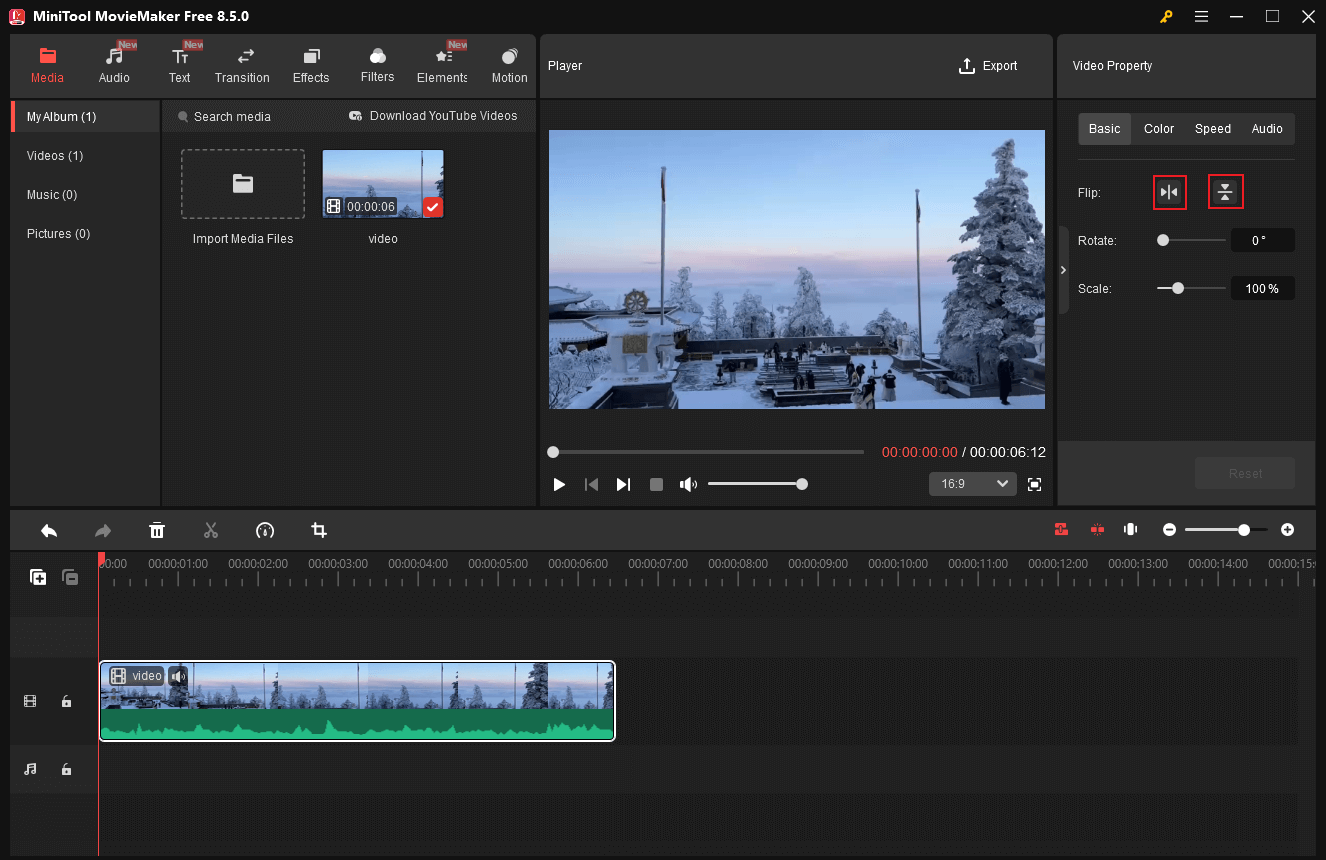
#5 Flip a Video
Video flipping is a video editing technique that mirrors and flips video footage, either horizontally or vertically. It is used to correct improper camera orientation and enhance visual continuity within a clip. How to flip a video on Windows? Use MiniTool MovieMaker.
In the editing page, click the video on the timeline to activate the top-right Video Property section. There, you can flip the video horizontally or vertically.
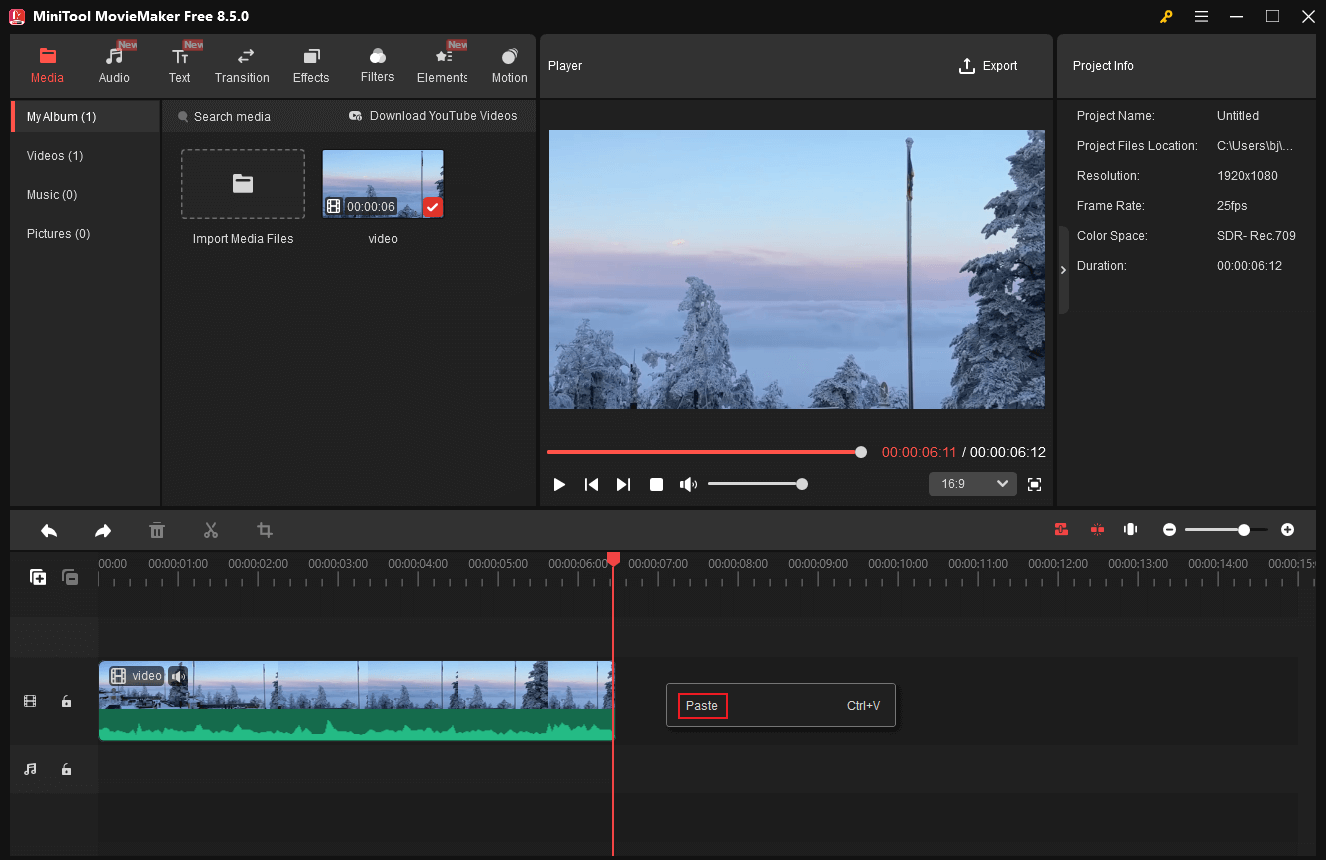
#6 Loop a Video
Video looping refers to the automatic repetition of a video clip from the beginning after it finishes playing, creating a continuous, infinite, or looping playback. It is commonly used in GIF animations, social media content, website backgrounds, and other areas. Now, use MiniTool MovieMaker to complete the task.
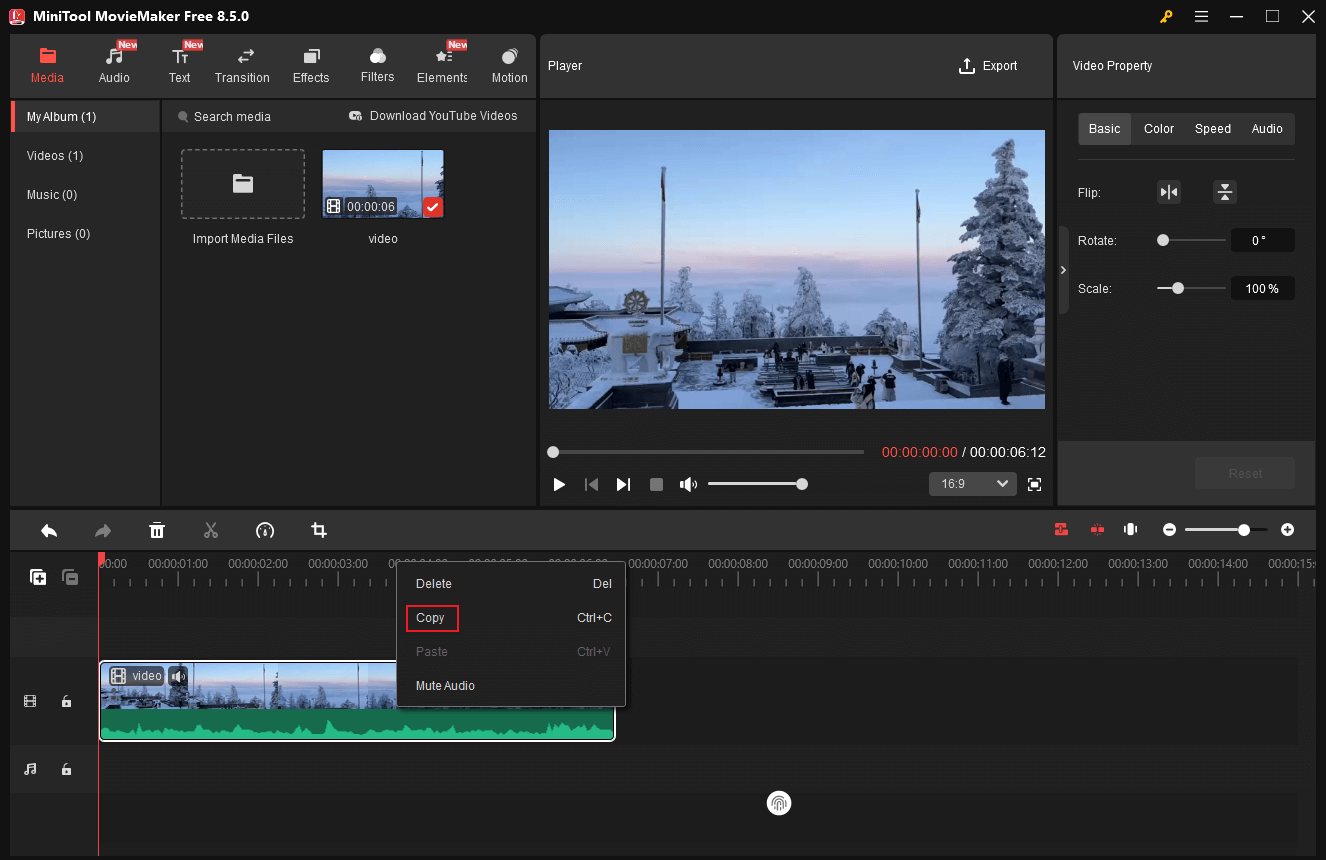
Step 1. Copy the Video Clip
In the editing page, right-click the video on the timeline and choose the Copy option.
Step 2. Create a Video Looping
Right-click on the timeline and choose the Paste option. Then, the copied clip will appear at the end of the original video clip. Repeat the step to create more loops.
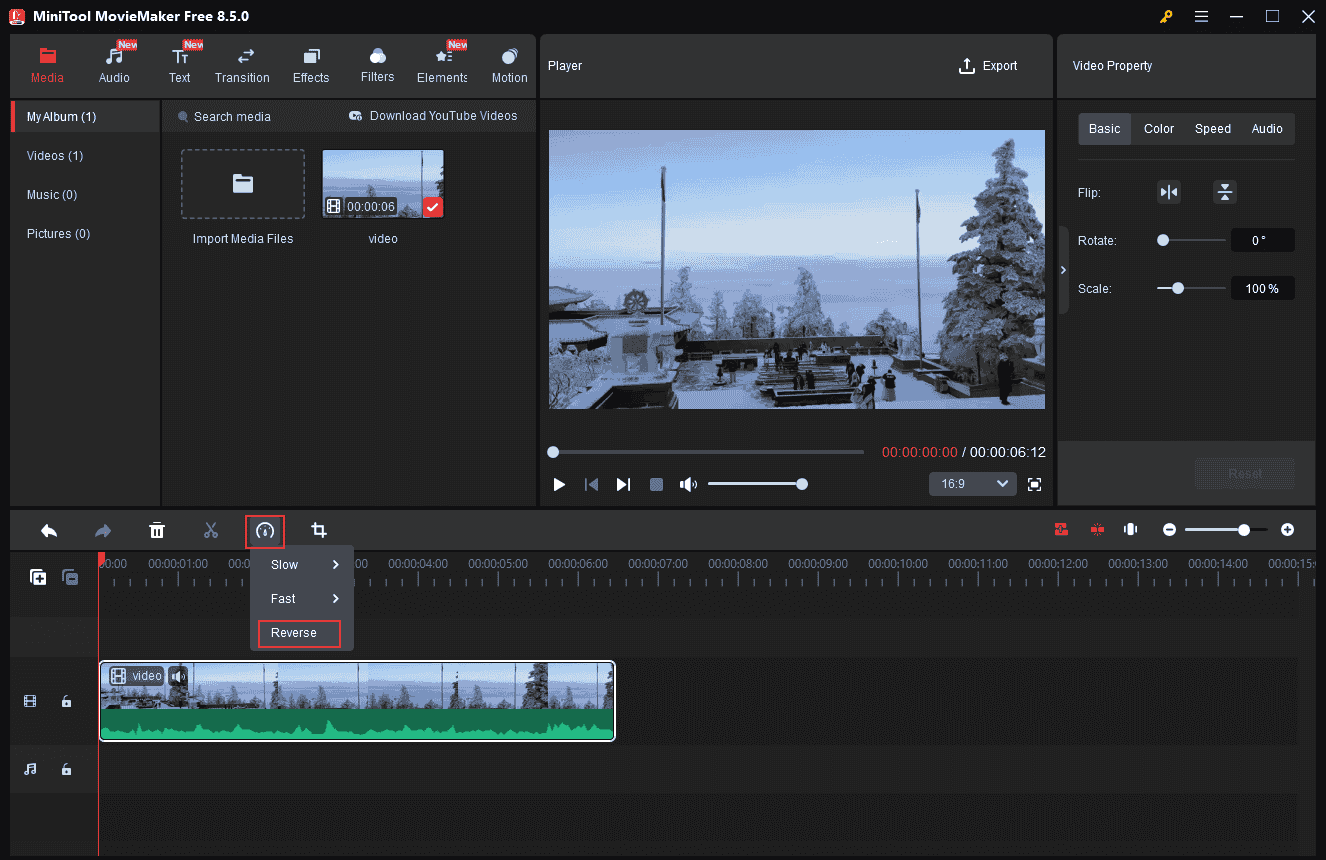
#7 Reverse a Video
Video reversing is a video editing technique that plays footage backward from start to finish, reversing the on-screen action sequence. It is commonly used to create highly creative, comical, or magical visual effects for social media platforms.
In MiniTool MovieMaker’s editing page, highlight the video clip on the timeline, click the Speed icon in the timeline toolbar, and select the Reverse option.
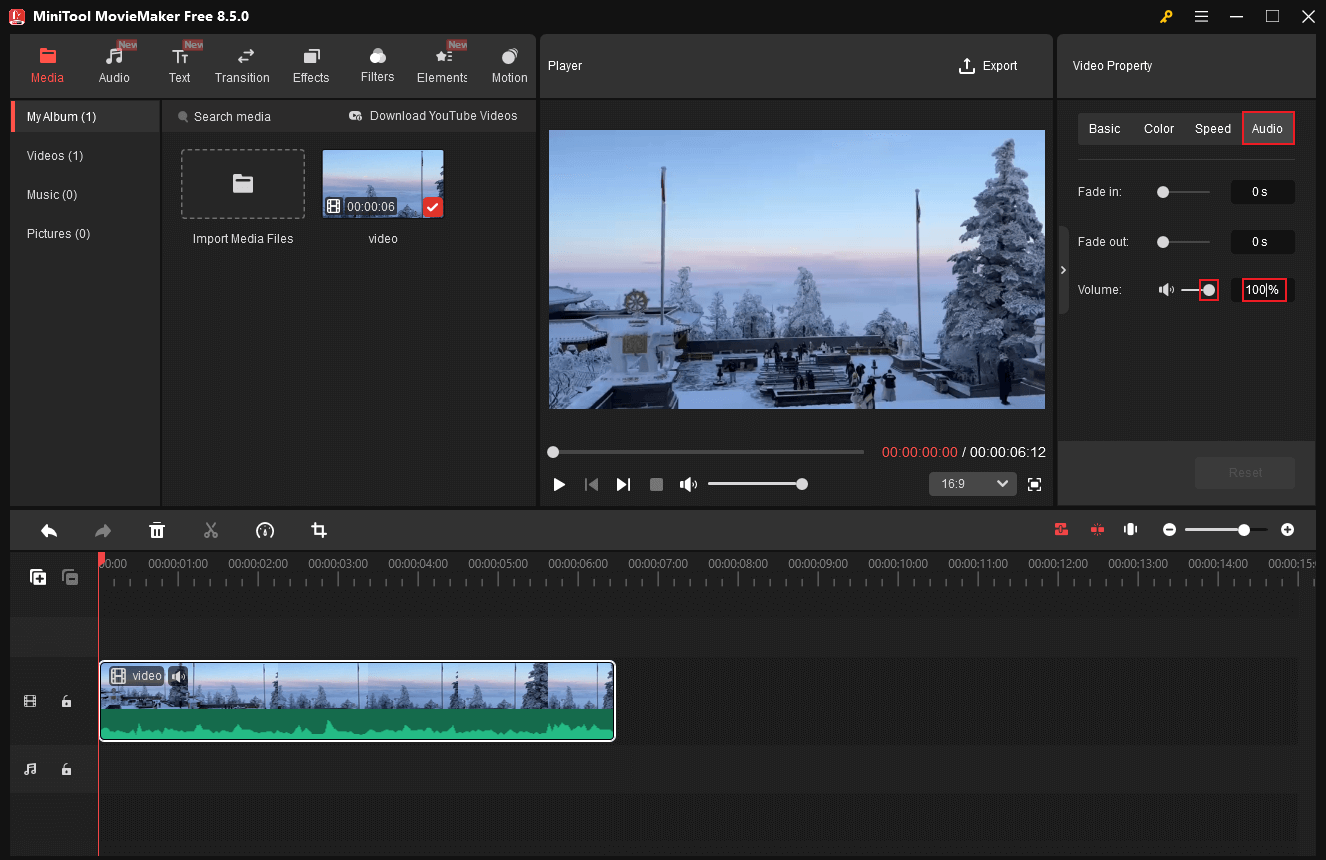
#8 Edit Video Volume
Editing video volume is crucial for ensuring consistent audio levels, improving speech clarity, and creating a professional, engaging viewing experience. In audio files, if dialogue is too loud, lower its volume to achieve a more balanced overall sound. With the free video editor, you can adjust video volume with no effort!
After importing your video and dragging it to the timeline, choose the Audio tab in the top-right Video Property section. Then, drag the Volume slider to edit the video volume. Also, you can input an accurate volume number into the custom box.
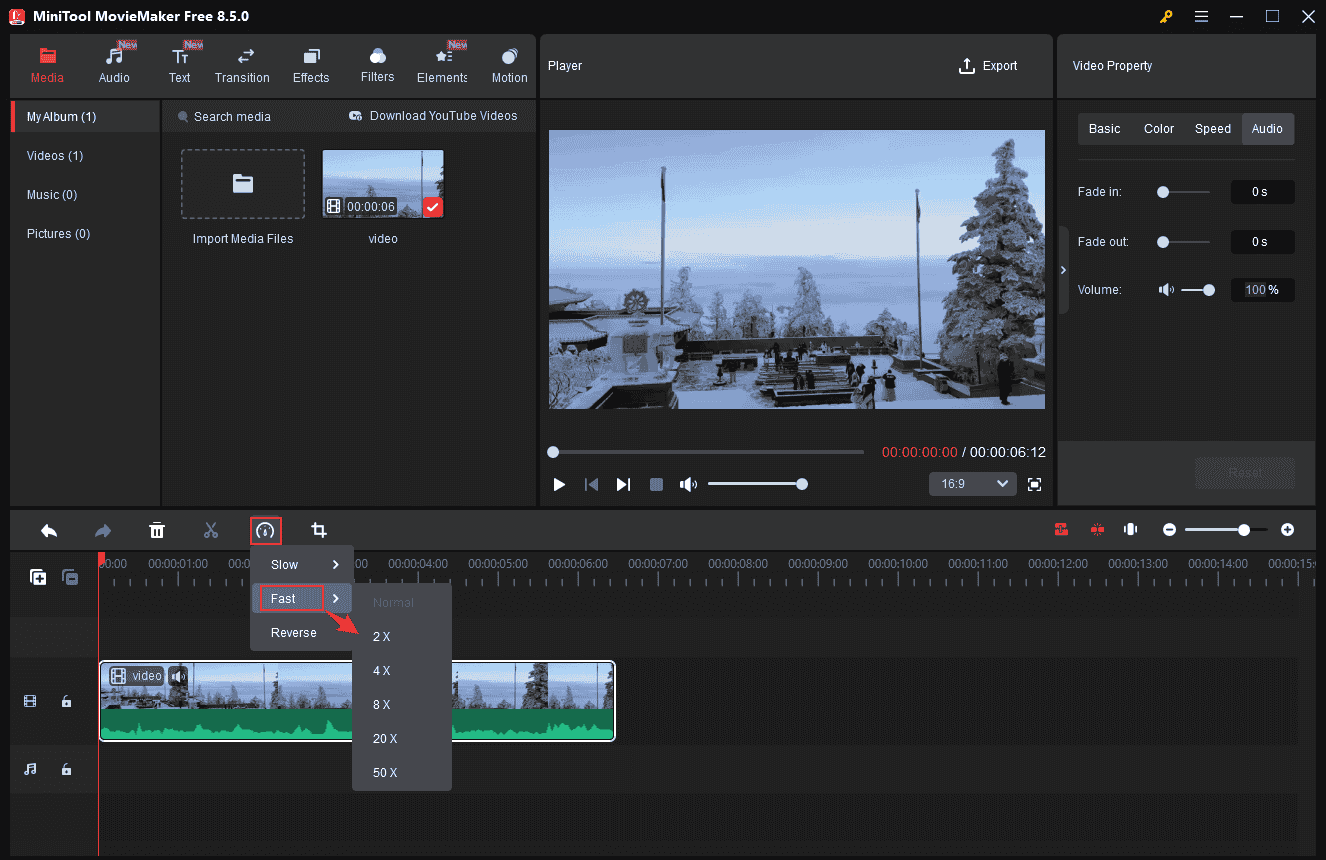
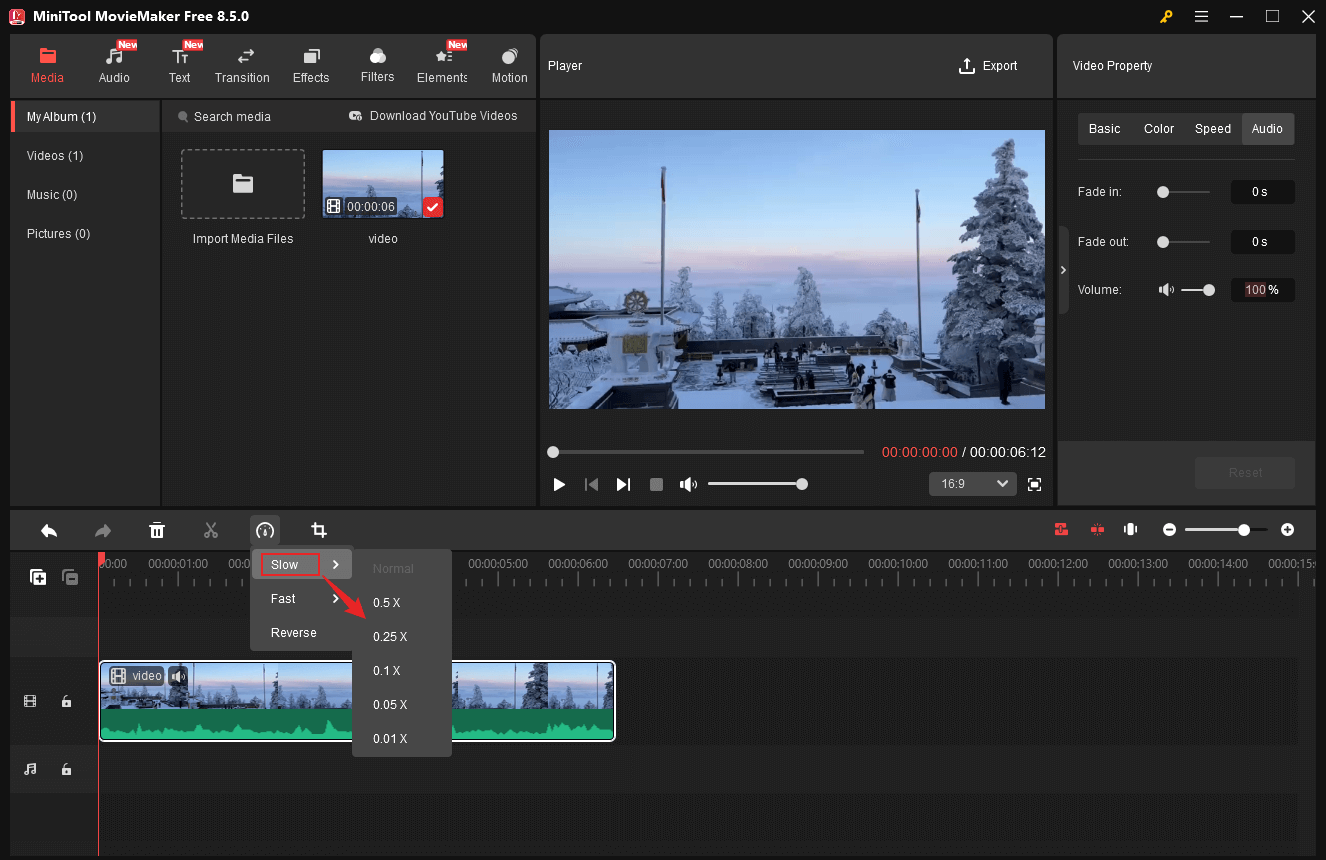
#9 Change Video Speed
Video speed editing (speeding up or slowing down) is primarily used to enhance narrative impact, control the pacing of footage, and highlight pivotal moments. It transforms lengthy, monotonous footage into compelling content, accommodates runtime constraints, or creates visually striking effects.
Speeding up a video can make it more dynamic and captivating, preventing viewers from feeling bored. Slowing down video speed allows viewers to focus on key details and see a specific frame clearly.
How to change video speed? Meet our old friend – MiniTool MovieMaker.
9.1 Speed up a Video
In the editing page, click the Speed icon above the timeline, click Fast, and choose the desired speed.
9.2 Slow Down a Video
In the drop-down menu, choose the Slow option, and select the speed you want.
#10 Merge Videos
Video merging combines multiple video clips into a single complete file, enabling seamless transitions. Merging video segments results in a smoother, more engaging visual appearance, with scenes transitioning effortlessly. In addition, video merging allows you to easily combine old footage or scattered clips into a brand-new, complete, or longer video and accomplish video content repurposing.
How to merge videos on Windows? Follow the step-by-step guide below.
Step 1. Import Videos to MiniTool MovieMaker
Click the Import Media Files option to add all the videos you want to merge.
Step 2. Arrange the Videos
Drag the imported videos to the timeline one by one. Drag video clips along the timeline to arrange them in the order you want.
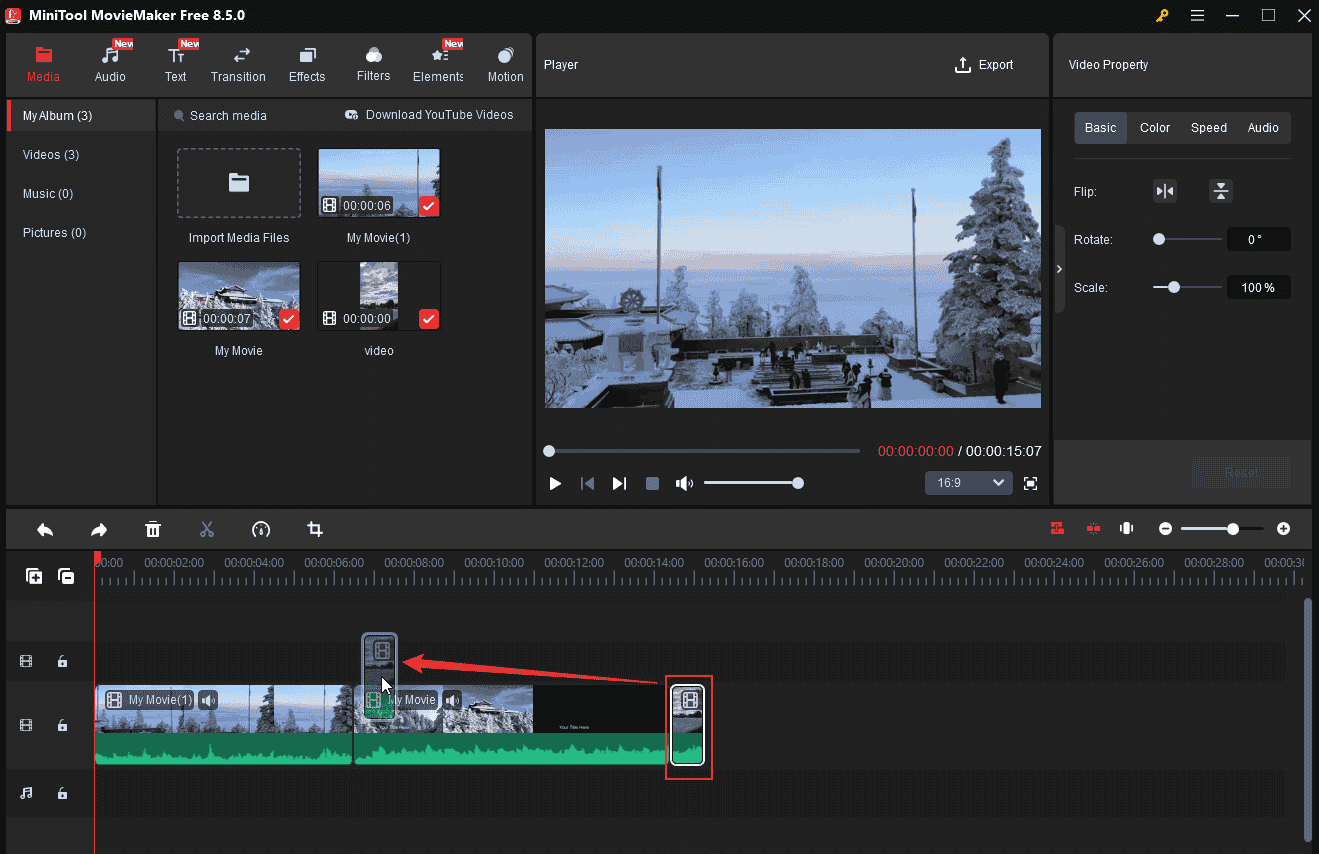
Step 3. Export the Video
Click the Export option at the top right to save the merged video.
#11 Color Correct a Video
Video color correction is an indispensable step in the post-production workflow, aimed at adjusting footage to appear natural, consistent, and realistic, ensuring visual consistency and accuracy. It can correct issues such as white balance errors, improper exposure, and inconsistent lighting across different lenses, thereby creating a natural, professional, and consistent visual effect. Below is how to edit a video by correcting its color.
Highlight the target video clip on the timeline. In the Video Property section, choose the Color tab, then drag the Contrast, Saturation, or Brightness slider to adjust the video color based on your needs. Also, you can expand the 3D LUT list and choose the option you want.
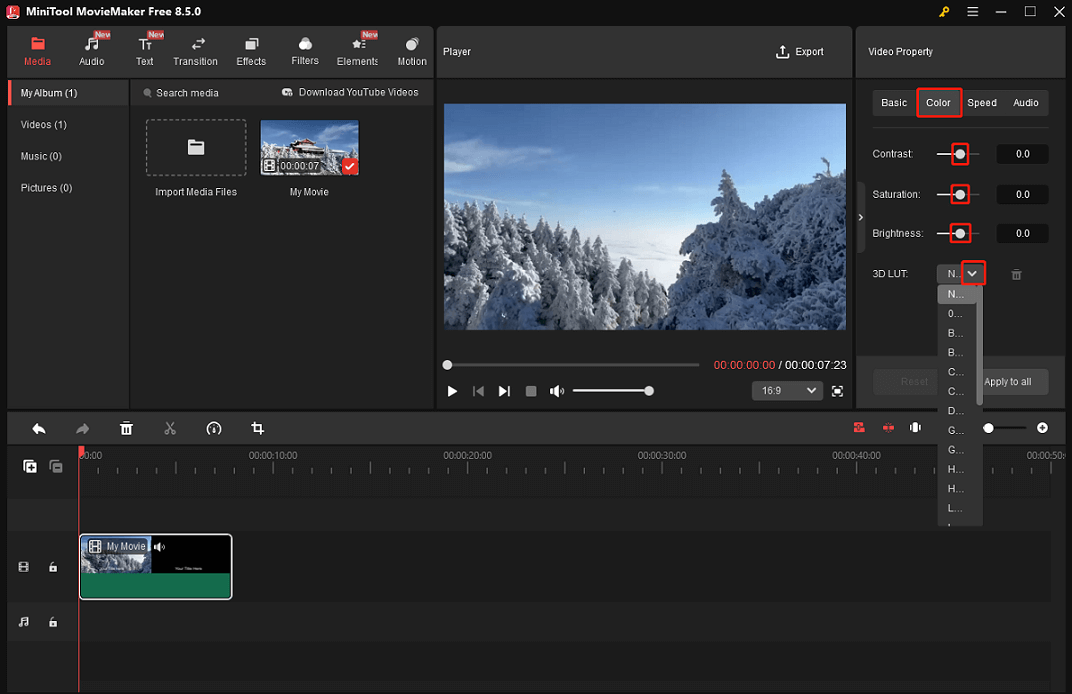
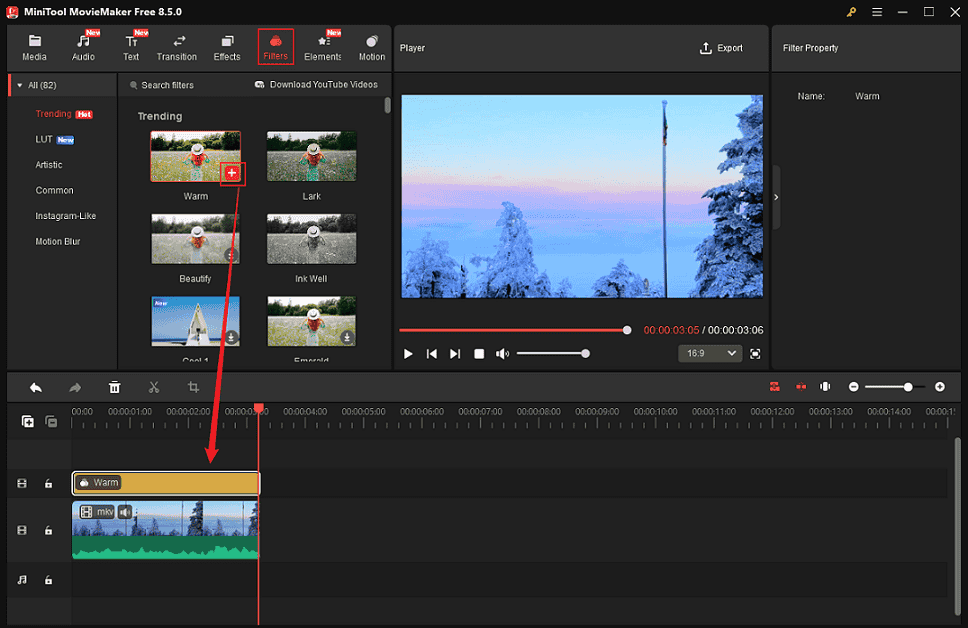
Applying a filter to a video can change its color. MiniTool MovieMaker provides a wide range of filters. Use them to make your video more appealing. Go to the Filters section, download the desired filter, and add it to your video.
#12 Add Audio to a Video
Music and sound effects can set the tone for a video and influence the audience’s feelings. Adding audio to videos creates an immersive, professional, and captivating viewing experience. Plus, doing this captures audience attention, amplifies emotional impact, and enhances storytelling effectiveness. High-quality audio ensures clear communication of information, boosts viewer retention, and makes videos more memorable.
MiniTool MovieMaker features an audio library that includes various background music and sound effects, allowing you to add them to your video for free.
MiniTool MovieMakerClick to Download100%Clean & Safe
12.1 Add Music to a Video
Music can directly influence emotions. Adding background music to videos helps create an emotional atmosphere, evoke emotional resonance, and mask background noise. This transforms an ordinary or silent video into a professional and engaging final piece. Just follow the instructions below to add music to your video.
- Add music from your own collection: Click the Import Media Files option in the Media section to add music from your local folder. Then, add it to the timeline.
- Add music from the audio library: Go to the Audio section, download the desired audio, and add it to the timeline.
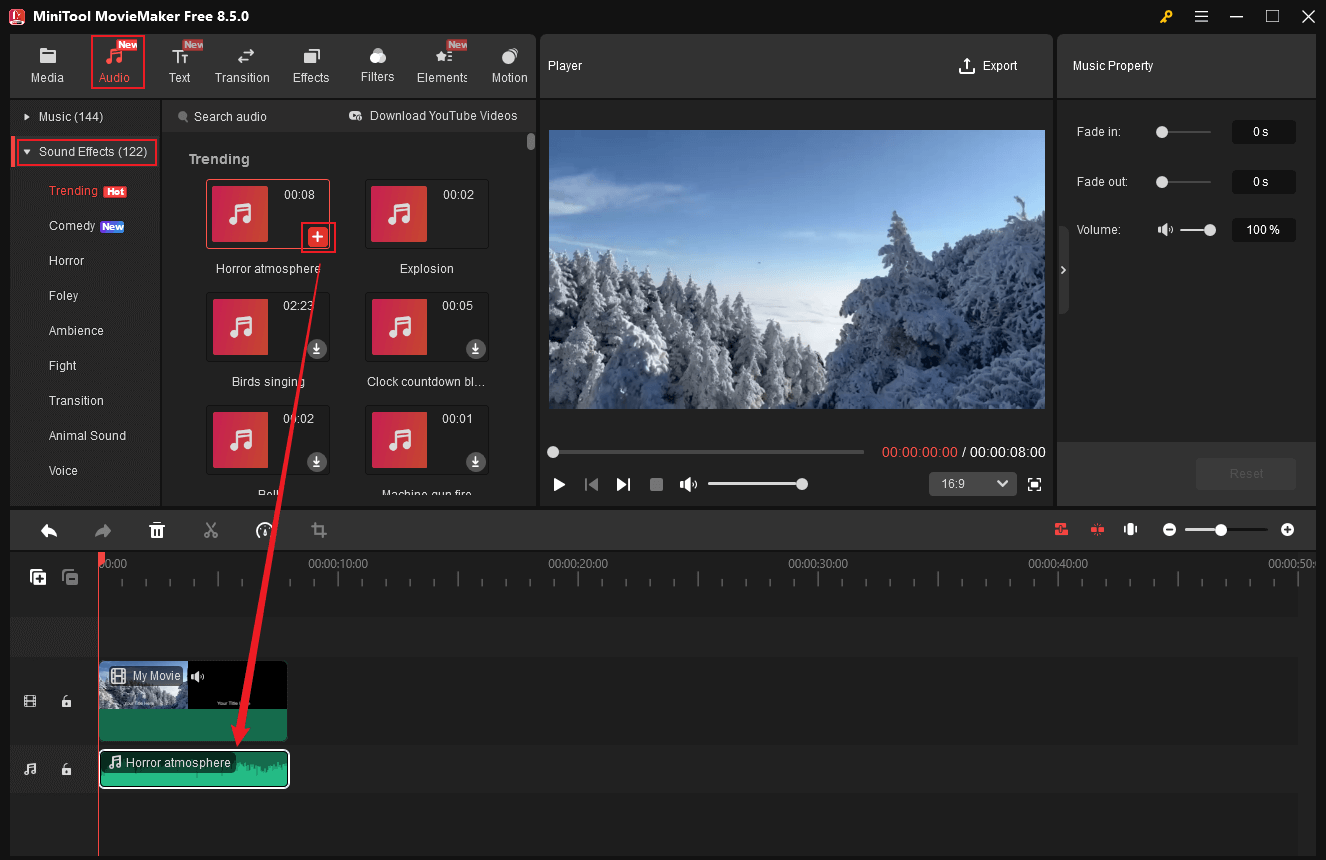
12.2 Add Sound Effects to a Video
Sound effects are perfect for setting the mood and highlighting key moments in videos. To add sound effects to your video, go to MiniTool MovieMaker’s Audio section, expand the Sound Effects list, download and add the desired sound effect to the video. Additionally, you can apply a fade-in/out effect to the sound effect and adjust its volume in the Music Property section.
#13 Add Transitions
Video transition is a post-production editing technique used to connect two shots or scenes. It is used to create video continuity, control pacing, and more. Common transition types include hard cuts, fades in/out, dissolves, and wipes. Adding transition effects to videos can enhance smoothness, create atmosphere, capture viewers’ attention, and boost engagement by increasing visual interest.
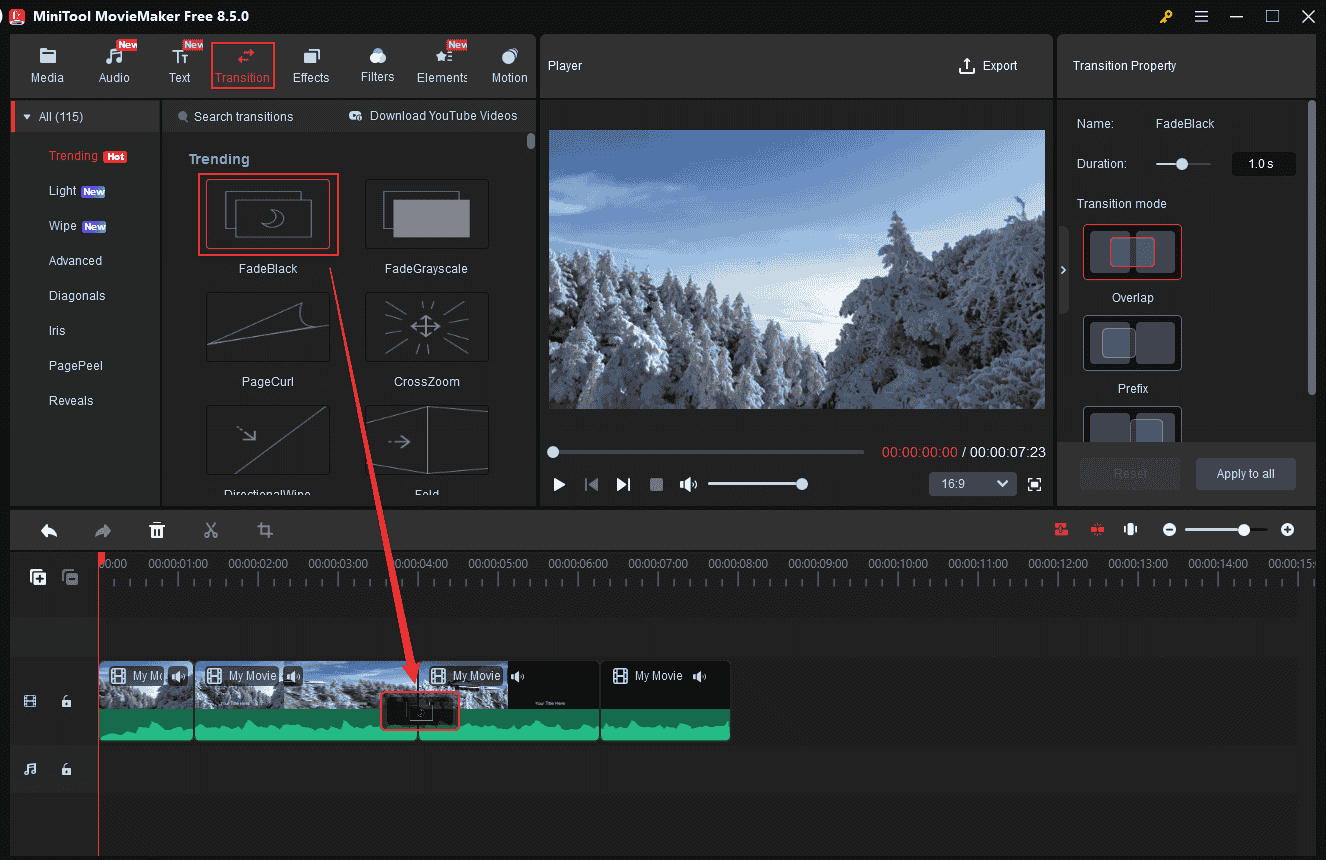
MiniTool MovieMaker’s resource library provides various transitions. Firstly, get your video clips ready on the timeline. Then, go to the Transition section, download the transition effect you want, and drag it to the timeline between the two video clips where you want the effect to appear. There are multiple transition modes you can choose, such as overlap, prefix, etc. Also, you can adjust the transition duration.
#14 Apply Effects
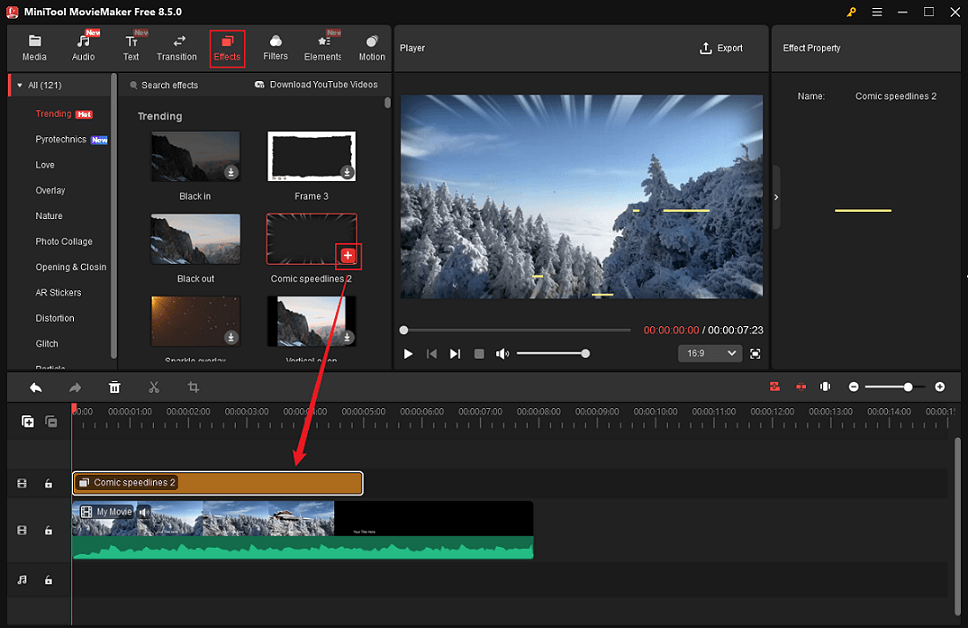
Video effects refer to the digital modification, enhancement, or processing of video footage, adding creative elements, and creating specific atmospheres to elevate visual quality. These effects cover a wide range, including color grading, lighting adjustments, image stabilization, and more. The program’s Effects library offers a wide range of effects, enabling you to add them to a video as you prefer.
In the main editing page with your video clip ready, go to the Effects section, pick the preferred one, download and add it to the video.
#15 Text and Graphics
Adding text and graphics to videos, such as subtitles, animated elements, etc., can enhance storytelling and interactivity.
15.1 Add Captions to a Video
Adding captions to videos makes complex information easier to understand. It also enables individuals with hearing impairments to watch videos and understand content in silent environments.
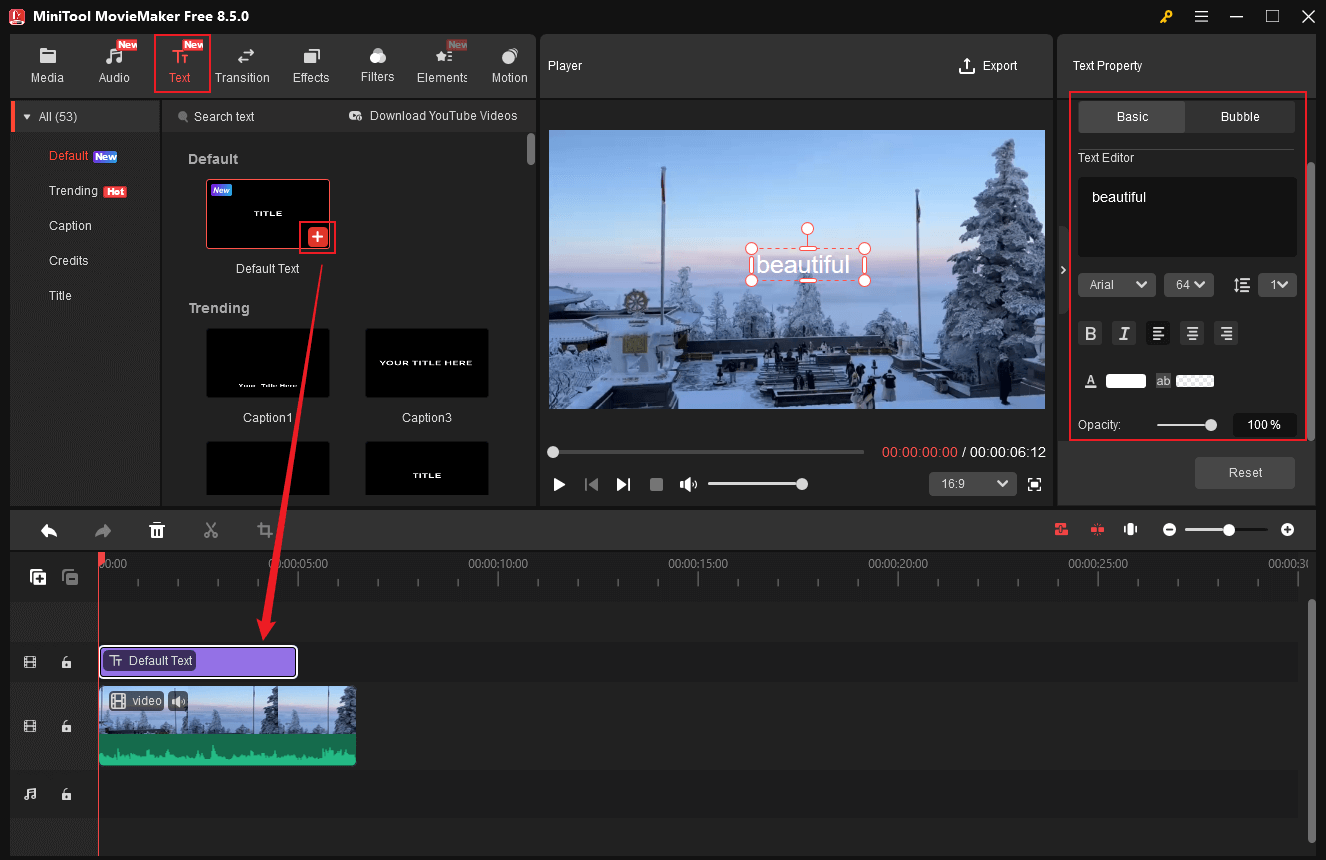
MiniTool MovieMaker provides various caption styles and empowers you to configure the text font, size, color, alignment, and more. To add captions to the video, go to the Text section first and choose a preferred caption style (here, I choose Default Text). Then, input text into the Text Editor box in the Text Property section. Set the text font, color, alignments, etc., based on your needs.
There are various credits and title styles in the Text library. Choose the one you prefer and use it in your video.
15.2 Add Animated Elements to a Video
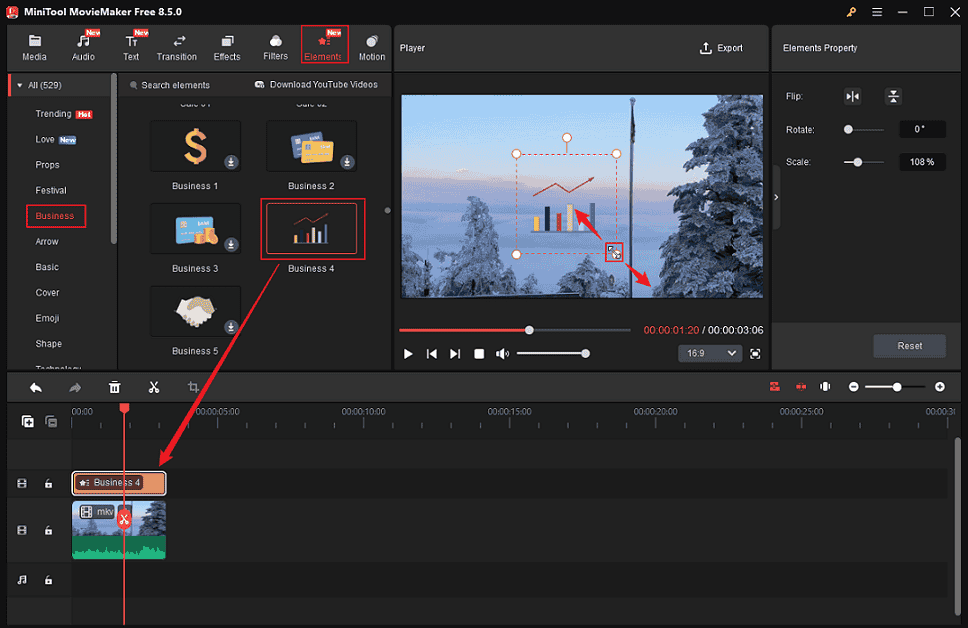
MiniTool MovieMaker’s Elements library provides a variety of animated stickers across categories, including business, festival, basic, emoji, mood, etc. These animated stickers make videos more engaging and effectively capture viewers’ attention.
In the editing page, go to the Elements section and choose the element you want. For example, navigate to the Business list, download and add Business 4 to the video. In the Player window, highlight the sticker. Drag one of its corners to scale the element.
#16 Layering and Compositing
Video layering is simply stacking different elements, such as video clips, text, images, music, etc., on top of each other in editing software. Each layer works on its own, so you can add things like captions, logos, or background music without changing the original video.
For example, you add a voiceover to a product demo clip. In addition, there are several uses for video layering, such as adding subtitle bars to emphasize important information, merging background music or narration with ambient sound effects, adding logo watermarks to preserve brand continuity, and overlaying text captions or titles to improve accessibility.
Video compositing blends multiple layers into one seamless shot. It is an advanced technology that merges stacked elements. However, compositing stresses blending these layers together to create a seamless, cohesive scene – even when the pieces were shot separately or in various environments – as opposed to conventional layering, which concentrates on stacking elements. Video compositing technology is used in a variety of professional video productions, including marketing videos, films, and television shows.
16.1 How to Perform Video Layering
How to lay a picture or text in a video? Use MiniTool MovieMaker. Its multi-track editing feature enables you to create a picture-in-picture effect. Just follow the step-by-step guide below.
Step 1. Import Your Video
Click the Import Media Files option to add your video to the program. Next, drag it to the timeline.
Step 2. Perform Video Layering
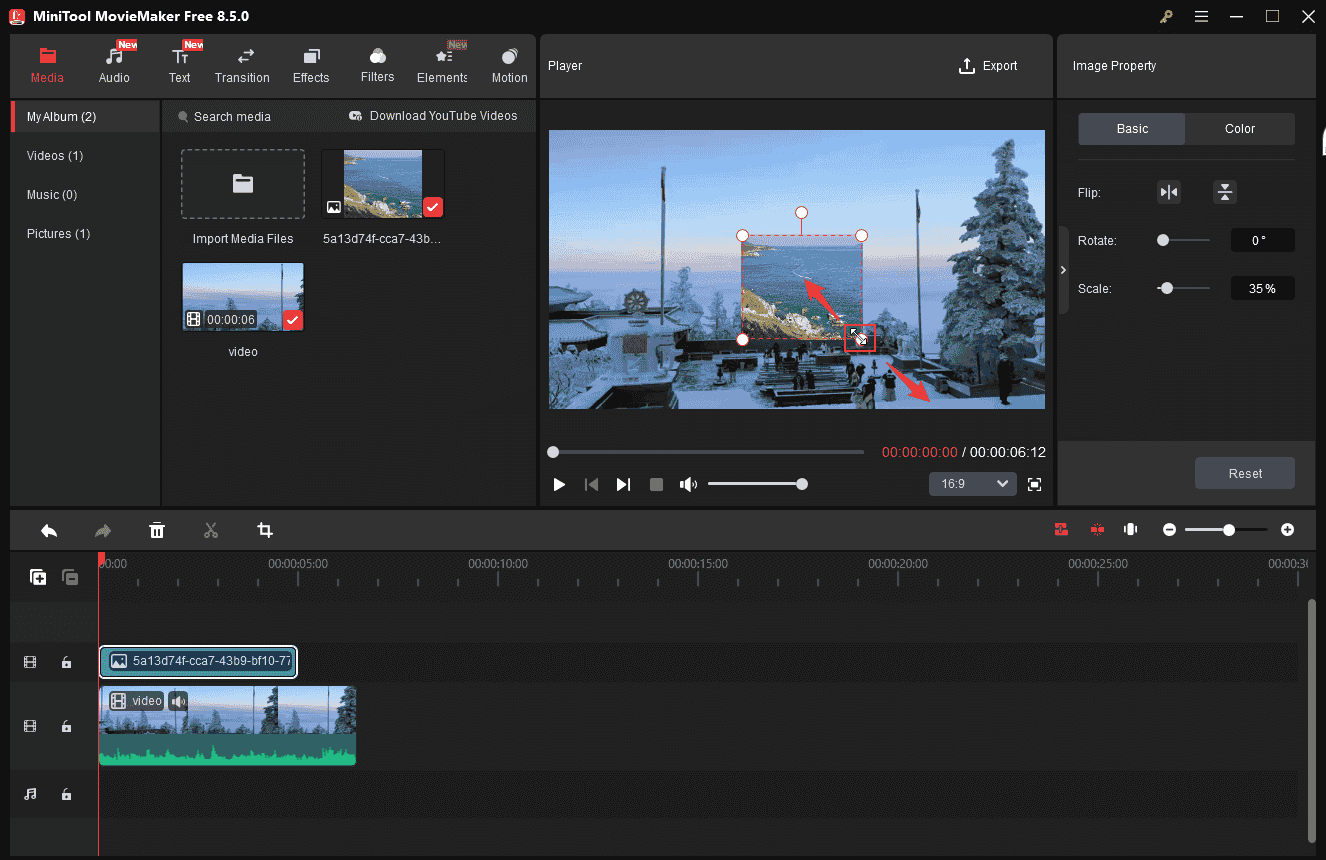
Lay a Picture
Click the Import Media Files option again to add the target picture. Next, drag it to the top of the video layer on the timeline. Then, in the Player window, drag one of the four corners of the picture to scale it and adjust its position.
Lay Text
Navigate to the Text section, choose a text style, and drag it to the timeline. In the top-right Text Property section, input text into the Text Editor box. Then, you can adjust the text font, size, color, etc.
16.2 How to Perform Video Compositing
Adobe Premiere Pro is a powerful video editing tool that features advanced functions, helping you composite videos.
Step 1. Start a New Project
Import your assets like footage, audio, overlays (green screen/graphics), etc.
Step 2. Add Layers on the Timeline
Add all the added assets to the timeline. Then, trim or align all layers to make the duration proper.
Step 3. Isolate Overlays
- Picture: Directly drag it to V2 with no keying needed.
- Masking: Go to Effect Controls, choose Opacity, set a mask, and feature edges.
- Green Screen: Add Ultra Key effects to the clip, use the eyedropper tool to pick up the green color, and adjust Tolerance + Edge Feather.
Step 4. Align and Adjust Overlays
- Transform: Go to Effect Controls, choose Motion, and then adjust the scale and position.
- Blend: Adjust opacity or use blending modes to achieve natural blending.
Step 5. Audio Compositing
Base audio uses A1, and overlay audio uses A2/A3.
Step 6. Export the Video
Go to File, choose Export, click Media, set an output video format, and click Export.
#17 Slow Motion
Video slow motion is a sophisticated visual effect that plays footage at a frame rate slower than the original recording speed. Its purpose is to showcase rapid movements clearly, highlight key details, or enhance dramatic impact—prioritizing smooth, high-quality playback. This effect is typically achieved through high-frame-rate filming. Slowing down high-frame-rate footage maintains fluid motion, preventing stuttering or jerky visuals.
Are slow motion and slow down the same thing? The answer is no. Slowing down a video is a fundamental and straightforward editing technique that reduces the playback rate of raw footage. It is a basic technical step, not intended to achieve refined results. When applied to standard-frame-rate footage, this method often causes stuttering and frame skipping because the original frame count is insufficient to fill the gaps created by the slowed playback. It is suitable for quick edits that meet basic requirements, not for meticulously crafted final results.
In short, slowing down a video is merely a basic speed-reduction operation in editing, which typically results in degraded footage quality. In contrast, video slow motion is a high-quality effect achieved through sophisticated processing, enabling smooth slow-motion playback that enhances image clarity or visual impact.
How to turn an existing video into slow motion? CapCut can help. It is a powerful video editor that can complete the task efficiently and effectively. Follow the details below.
Step 1. Download and Install CapCut
Go to CapCut’s official website to download and install it on your PC. Then, launch it.
Step 2. Import Your Video
Click Create project to enter the main page. Then, click Import to add your video and drag it to the timeline.
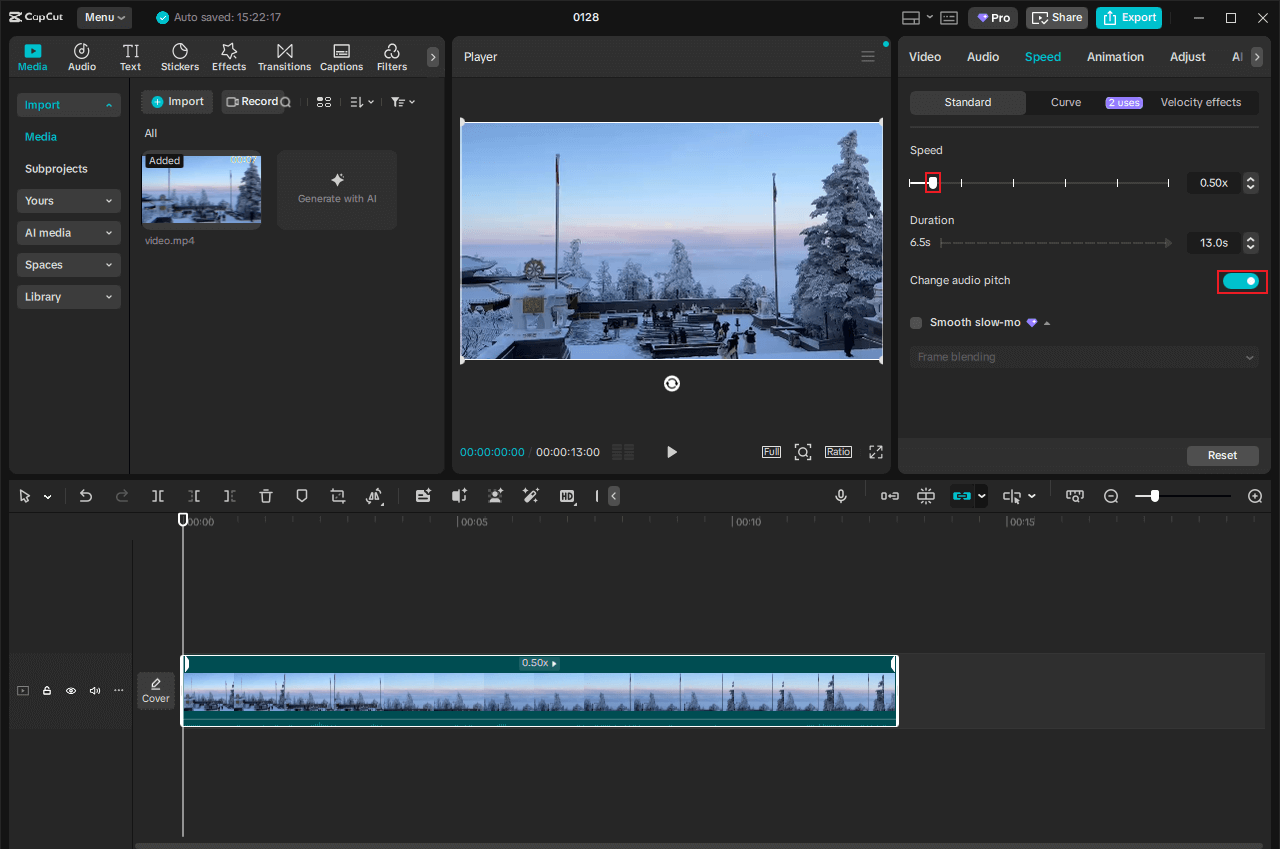
Step 3. Activate Speed Controls
Select the clip on the timeline and click Speed in the right-side panel.
Step 4. Slow Down the Video
Drag the Speed slider left to slow down the video. Enable the Change audio pitch option to keep the audio natural.
Step 5. Smooth Slow-Mo
Turn on the Smooth slow-mo option. Choose Frame blending or Optical flow as you prefer.
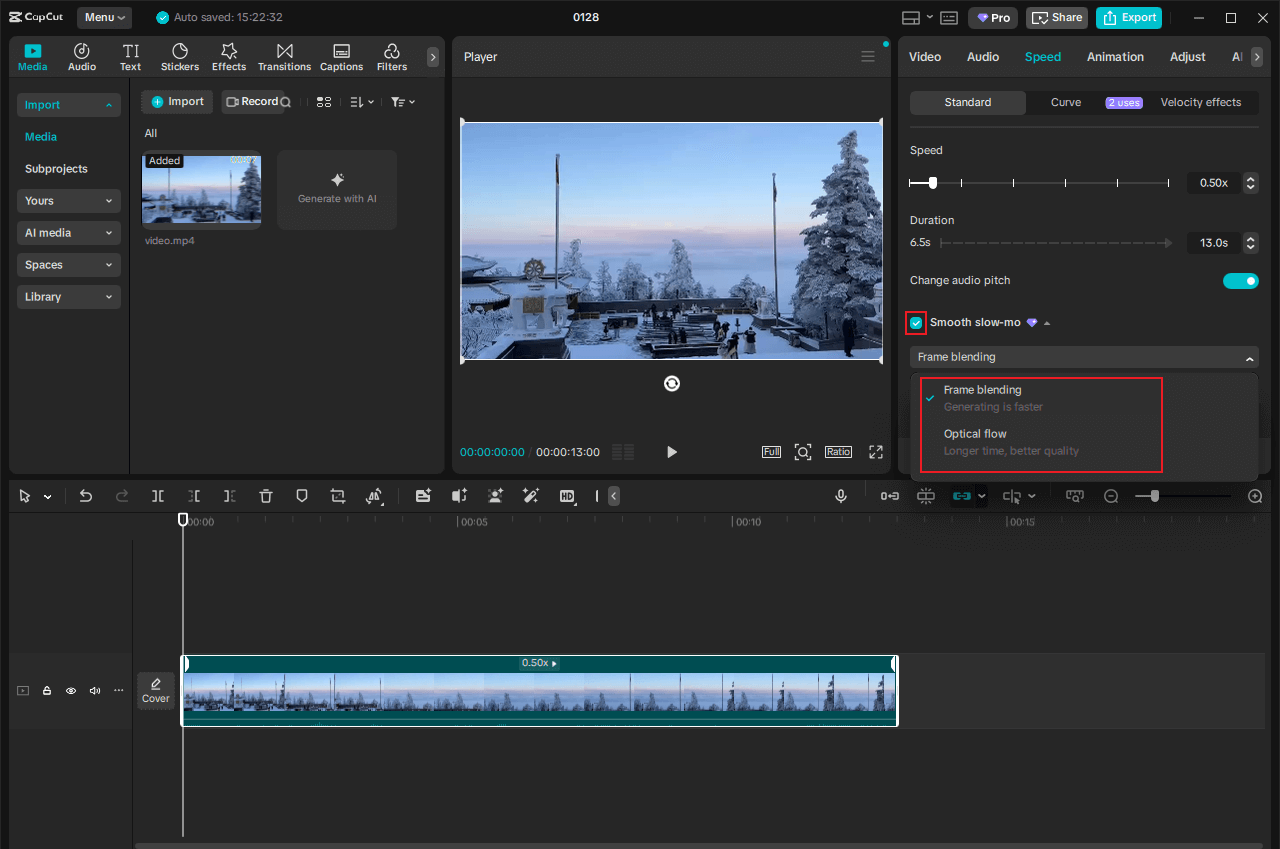
Step 6. Export the Video
Click the Export option at the top right to save the video.
#18 Masking & Tracking
Video masking is an editing method that allows you to draw virtual outlines, or masks, over specified regions of video footage. These masks act similarly to stencils. They can hide areas within or outside of the outline, apply blur effects, add special effects, or substitute content—all while keeping the rest of the video intact. Video masking is usually used to blur sensitive information, highlight a product feature, replace a video background, and more.
Video tracking refers to the process where editing software automatically follows moving objects, people, or areas within a video, eliminating the need for manual frame-by-frame adjustments to effects or masks.
Masking and tracking often complement each other. For example, you can first mask an object in a video, then use tracking to ensure the mask remains aligned as the camera pans or zooms. Video masking and tracking offer tremendous value for software videos. You can highlight key tools, blur distracting elements, or add overlays that move in sync with dynamic elements, making it easier for viewers to understand.
How to do masking & tracking in a video? Adobe Premiere Pro can help! Download and install this application from its official website and start your project.
Step 1. Import Your Video
Import your video clip and drag it to the timeline.
Step 2. Activate the Effect Controls
Choose the target video clip on the timeline and open the Effect Controls panel.
Step 3. Create a Mask
Expand Opacity in the Effect Controls panel and select a mask tool. You can choose a mask shape or use the Pen Tool to create custom shapes.
Step 4. Refine the Mask
Adjust the mask based on your needs.
- Feather: Soften edges (10–30px for natural blending).
- Expansion: Shrink/grow the mask slightly.
- Invert: Mask out the area instead of in (use for blurs).
Step 5. Create Auto-Mask Tracking
#1. Go to Effect Controls, choose Opacity, click Mask 1, and select Mask Path.
#2. Select a tracking method under Mask Path:
- Position: Tracks movement only.
- Position & Rotation: Tracks movement and rotation.
- Position, Scale, & Rotation: Tracks movement + rotation + scaling.
Step 6. Start Tracking
Click the Track Forward option to start tracking. It will take a few seconds to analyze the clip.
Step 7. Apply Effects to the Masked Area
Add the desired effects to the clip. Then, in Effect Controls, open the effect, click fx, and click Apply to Mask. Change the effect settings to just target the masked region.
Step 8. Export the Video
Go to File, click Export, and choose Media. Choose the desired format and click Export to render the final result.
#19 Fade in/Fade out
Video fade-in is a fundamental video effect where the screen starts as pure black and gradually brightens, slowly revealing the video content. This effect gently opens a video or new scene, guiding the viewer’s gaze smoothly into the frame.
Video fade-out operates oppositely. The video content gradually darkens until the screen turns completely black. Fade-out is typically used to conclude a video or scene, or to transition smoothly to the next segment, ensuring the video clip’s conclusion flows naturally and avoiding abrupt cuts.
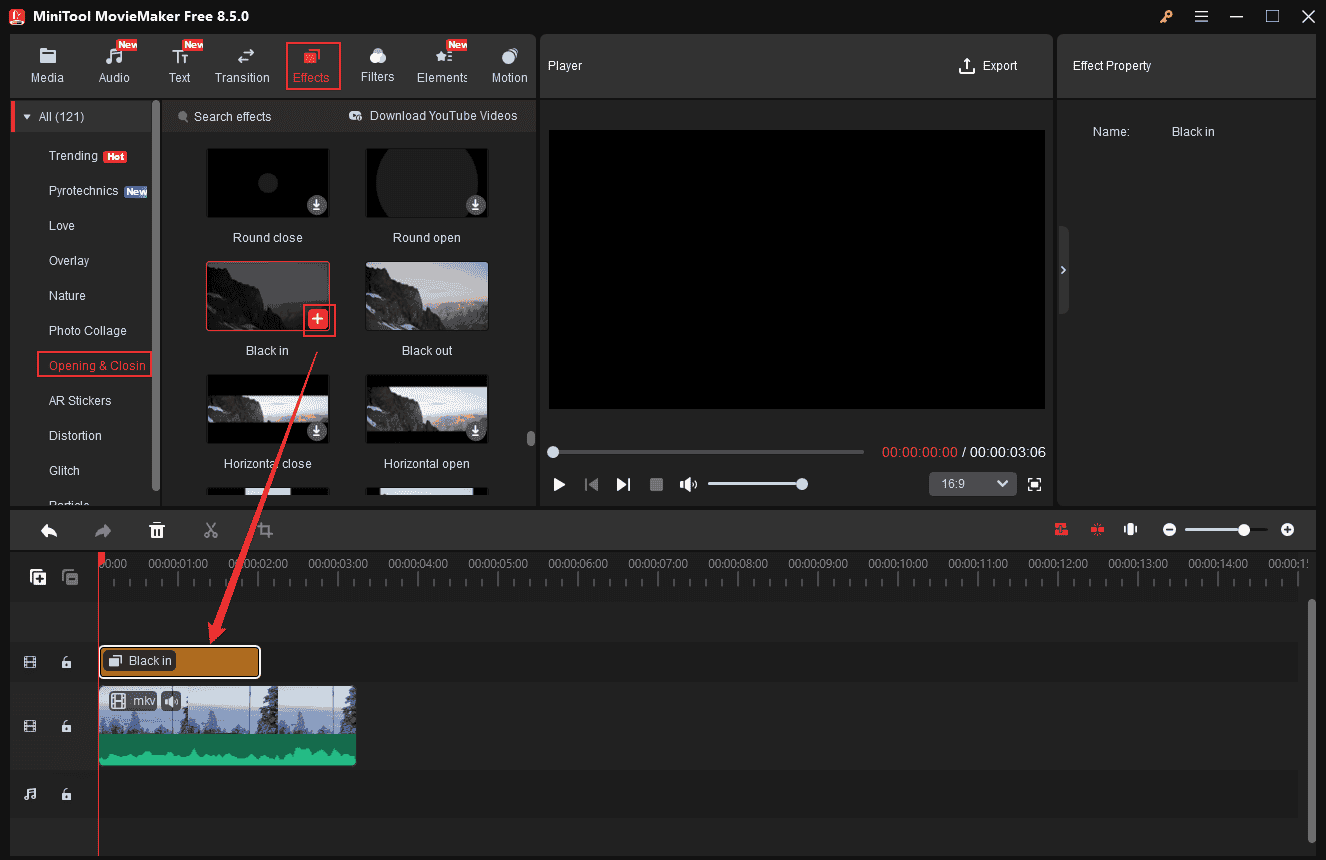
How to do fade in/out in a video? Use MiniTool MovieMaker.
Step 1. Get the Video Ready
Import your video and drag it to the timeline.
Step 2. Apply Video Fade in
Highlight the video on the timeline. Navigate to the Effects section, choose Opening & Closing, download and add the Black in effect at the beginning of the video.
Step 3. Apply Video Fade out
In the Effects section, select the Black out option to create a fade-out effect at the end of the video.
Moreover, to create a unique and interesting video opening or closing, you can choose other effects, such as round open/close, horizontal open/close, vertical open/close, etc.
#20 J-Cut/L-Cut
J-cut and L-cut are two fundamental yet powerful transition techniques in video editing. They seamlessly connect different clips, making the video flow smoothly and naturally, captivating the viewers rather than appearing abrupt or jarring. Both techniques achieve smooth scene transitions by adjusting the audio and video timing of the two clips.
What is a J-cut? The name of the J-cut stems from the shape it forms on the video timeline, resembling the letter J. The audio for clip B will begin playing before its video appears on screen. The video for clip A will remain visible slightly longer, while the audio for clip B will start playing earlier. This way, the audio can guide the audience into the next scene, making the transition smooth and natural.
What is an L-cut? In an L-cut, the video from clip B plays first, followed by the audio from clip B. Even after the video switches to clip B, the audio from clip A continues to play. For example, clip A is a close-up of an object, while clip B shows someone speaking directly to the camera. When using L-cut editing, the audio from clip A continues playing as the video transitions to clip B. This maintains audio continuity, preventing viewers from feeling jarred during scene changes.
In Summary
Mastering basic video editing techniques, such as cutting, fades, masking & tracking, and understanding how to leverage tools like MiniTool MovieMaker, CapCut, or Premiere Pro, is essential to transforming raw footage into a polished, cohesive video masterpiece.
This post introduces what video editing is, the types of it, and how to edit a video from various aspects. Hope this article can be helpful! You can contact us via [email protected] if you have any questions about using MiniTool MovieMaker. Alternatively, you can send me messages directly on X, and I’ll help you as soon as possible.
Edit Video FAQ
1. Launch Clipchamp and import your video.
2. Drag the video into the timeline and edit it by trimming, cropping, etc.
3. Click the Export button to save the edited video.
If you’re on Windows 10, use Photos Legacy.
1. Canva
2. Descript
3. Riverside
4. CapCut5. Adobe Premiere Pro
User Comments :