If you want to increase your product exposure and conversion rate, please read this article from MiniTool MovieMaker (one of the best free video editing software). It will cover what a shoppable video is, its benefits, and how to create a shoppable video.
In today’s digital age, video content has become an indispensable marketing tool. More and more businesses are using visual media to capture the audience’s attention. Creating a shoppable video is a smart and effective way to promote products and drive sales. In this guide, I will introduce how to create a shoppable video to help you.
What Is a Shoppable Video
A shoppable video allows viewers to make purchases directly from the video. The key feature of shoppable videos is the ability to click on or interact with the video content, which will then take the viewer to a product page or purchase option. These videos typically have clickable links, product tags, or hotspots integrated within them.
For example, imagine watching a fashion tutorial on Instagram. As the host shows different outfits, clickable links or tags appear on the screen. If you like a pair of shoes shown, you can click on the link, and it will take you to the product page where you can make a purchase. Therefore, we can see that shoppable videos are designed to turn passive video watchers into active buyers. This creates a seamless experience that combines entertainment with online shopping.
The Benefits of Creating Shoppable Videos
Shoppable videos have quickly gained popularity in the digital marketing world due to the many benefits they offer to businesses and marketers. The following are some main benefits.
- Increased Conversions: Shoppable videos make it easier for customers to purchase products, eliminating the need for additional steps like searching for the product elsewhere. This seamless integration increases the likelihood of conversions.
- Enhanced User Experience: Shoppable videos provide a convenient way for users to shop without interrupting their viewing experience. It feels natural for users to click on a product that interests them within the video, leading to smoother transactions.
- Increased Engagement: In general, videos attract more attention than static images or text. By combining video content with the ability to shop instantly, you can increase the chances of engaging your audience and keeping them interested.
- Better Product Exposure: By putting shoppable videos on Instagram, TikTok, and YouTube, your videos will go viral, increasing exposure for your product and increasing the chances of being bought.
- Simple and Affordable Making Process: You don’t need to spend a lot of time and money to make a shoppable video. Just follow the steps mentioned in this article to make a video and then add a product link on social media like TikTok, Instagram, etc.
Key Elements of a Shoppable Video
Creating an effective shoppable video involves more than just integrating clickable links. Here are the key elements you need to consider when designing your shoppable video:
1. High-Quality Video Content
The foundation of a good shoppable video is high-quality content. Whether you’re creating a product demo, tutorial, or a simple showcase, the video should be engaging, clear, and visually appealing. The goal is to capture the audience’s attention and make them interested in the products you’re promoting.
2. Interactive Function
Interactive features are the heart of shoppable videos. It refers to clickable product links or product labels. It lets viewers be able to click on the product they see in the video and be redirected to the purchase page.
3. Call to Action (CTA)
A strong call to action (CTA) is essential in a shoppable video. This encourages viewers to take the next step, whether it’s clicking on a product tag or making a purchase. Your CTA should be clear, direct, and placed strategically throughout the video. Phrases like “Buy Now”, “Learn More” or “Get Yours Today” are effective examples. Make sure your CTA doesn’t feel pushy but is integrated naturally into the content of the video.
4. E-Commerce Integration
For a shoppable video to be successful, you must sync it with your e-commerce platform. The ability to sync the video with your product catalog is essential. This ensures that the products featured in the video are always up-to-date and inventory is accurately reflected in real-time.
5. Mobile Optimization
Most viewers watch videos on mobile devices, so your shoppable video needs to be mobile-optimized. Make sure your video content is adaptable to mobile devices. Additionally, the video itself should be loaded quickly and be visually clear on smaller screens.
How to Create a Shoppable Video
Now that you understand the benefits and key elements of shoppable videos, let’s walk through the process of creating one.
1. Plan Your Content
The first step in creating shoppable videos is to plan out your video content. What type of video will best showcase your products? Some common formats include:
- Product Demo Videos: Show how your product works or highlight its features.
- Tutorial Videos: Teach viewers how to use your product or incorporate it into their daily lives.
- Behind-the-Scene Videos: Give viewers a glimpse into how your products are made or what goes on behind the scenes of your brand.
- Unboxing Videos: Unbox your products in real time to create excitement and anticipation.
2. Film the Video
Once you’ve planned your content, it’s time to film. Pay attention to lighting, camera angles, and sound quality. The video should look professional, as high-quality content will inspire trust and encourage viewers to buy.
Keep the video short and to the point, especially if it’s a product demo or tutorial. The ideal length is usually between one to three minutes, as this is long enough to showcase your product without losing viewer interest.
3. Edit the Video
After filming, you’ll need to edit the video to make it polished and engaging. Use video editing software to trim unnecessary footage, add transitions, and include any on-screen text or graphics. Of course, you need to select a video editor first. Here, I recommend MiniTool MovieMaker for you, an intuitive and user-friendly video editing application. In this section, I will show you how to create a shoppable video using this free video editor without watermark.
Step 1: Install MiniTool MovieMaker
Before you start editing, you need to download and install MiniTool MovieMaker on your computer. Just click the button below and follow the on-screen instructions to do it.
MiniTool MovieMakerClick to Download100%Clean & Safe
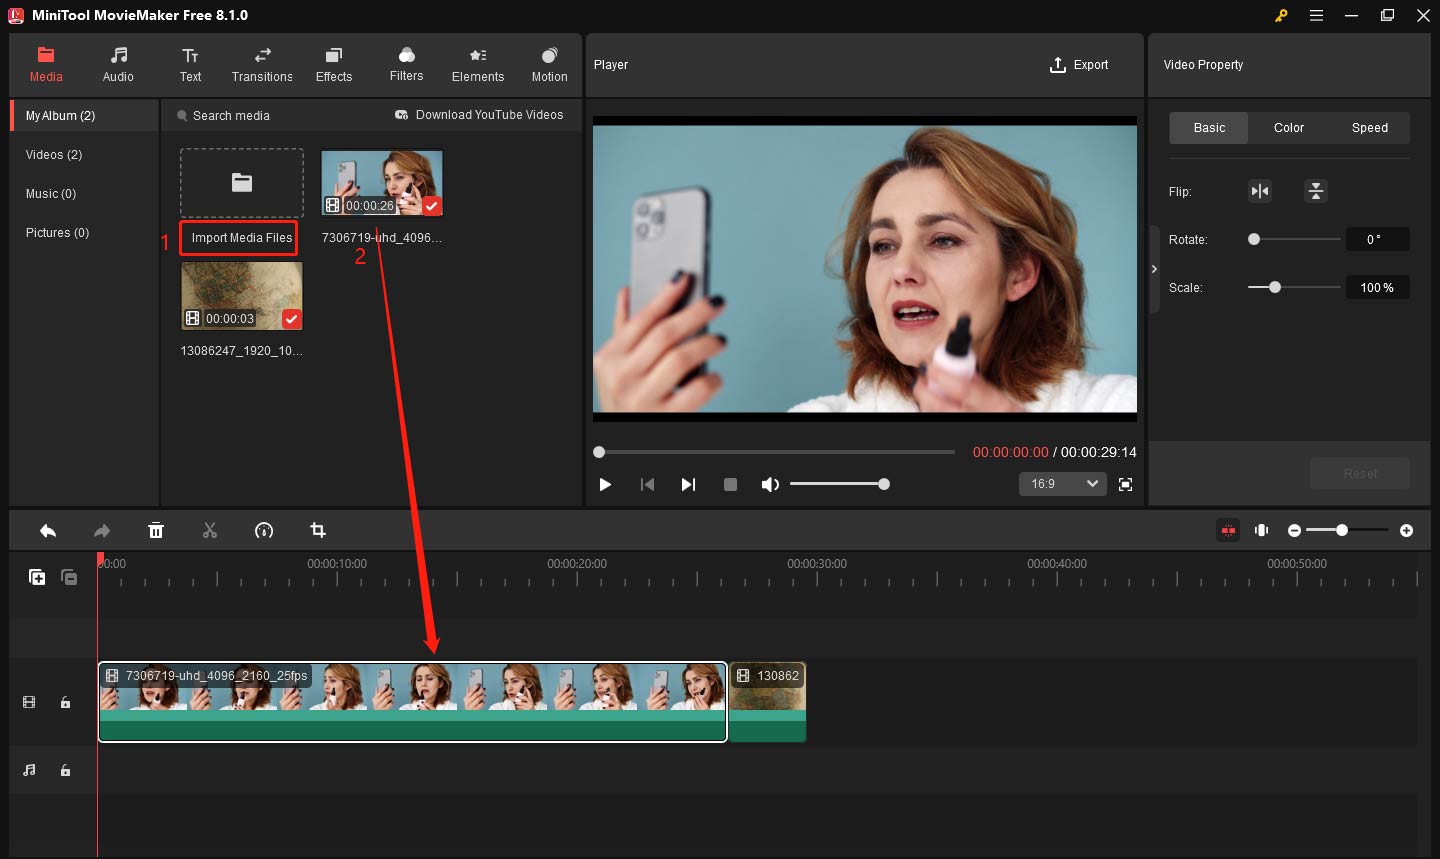
Step 2: Import Your Video Clips
Launch this software and close the promotion window. In the main interface, click Import Media Files to import the raw footage you filmed. You can also directly drag and drop the files into the media library. Then, drag and drop your video clips onto the timeline at the bottom of the screen.
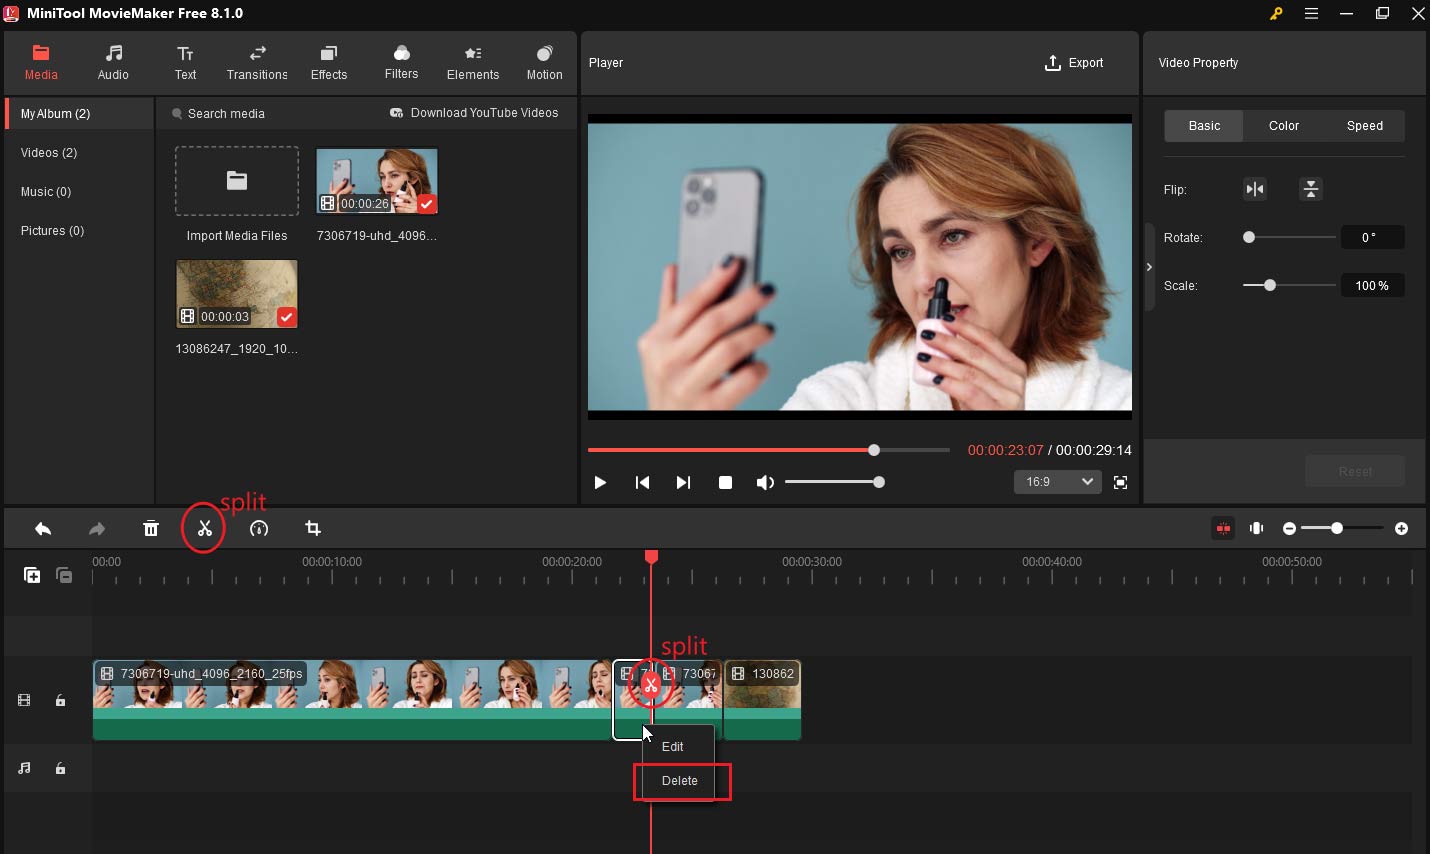
Step 3: Remove Unwanted Parts
Removing the unwanted parts of your video is the first thing in the editing process. By this step, you’ll eliminate unnecessary footage and focus on the most important parts, keeping your viewers engaged. Here is how to use the split tool to remove the excess in the middle segment. Of course, if you want to remove the beginning or end part, you can trim video.
- Select the video clip you want to edit in the timeline.
- Move the playhead to the start point of the unwanted part and click the Split (scissor) icon on the playhead or the timeline toolbar.
- Move the playhead to the endpoint of the unwanted part and click the Split icon again.
- Delete the unwanted sections by selecting them and choosing the Delete option.
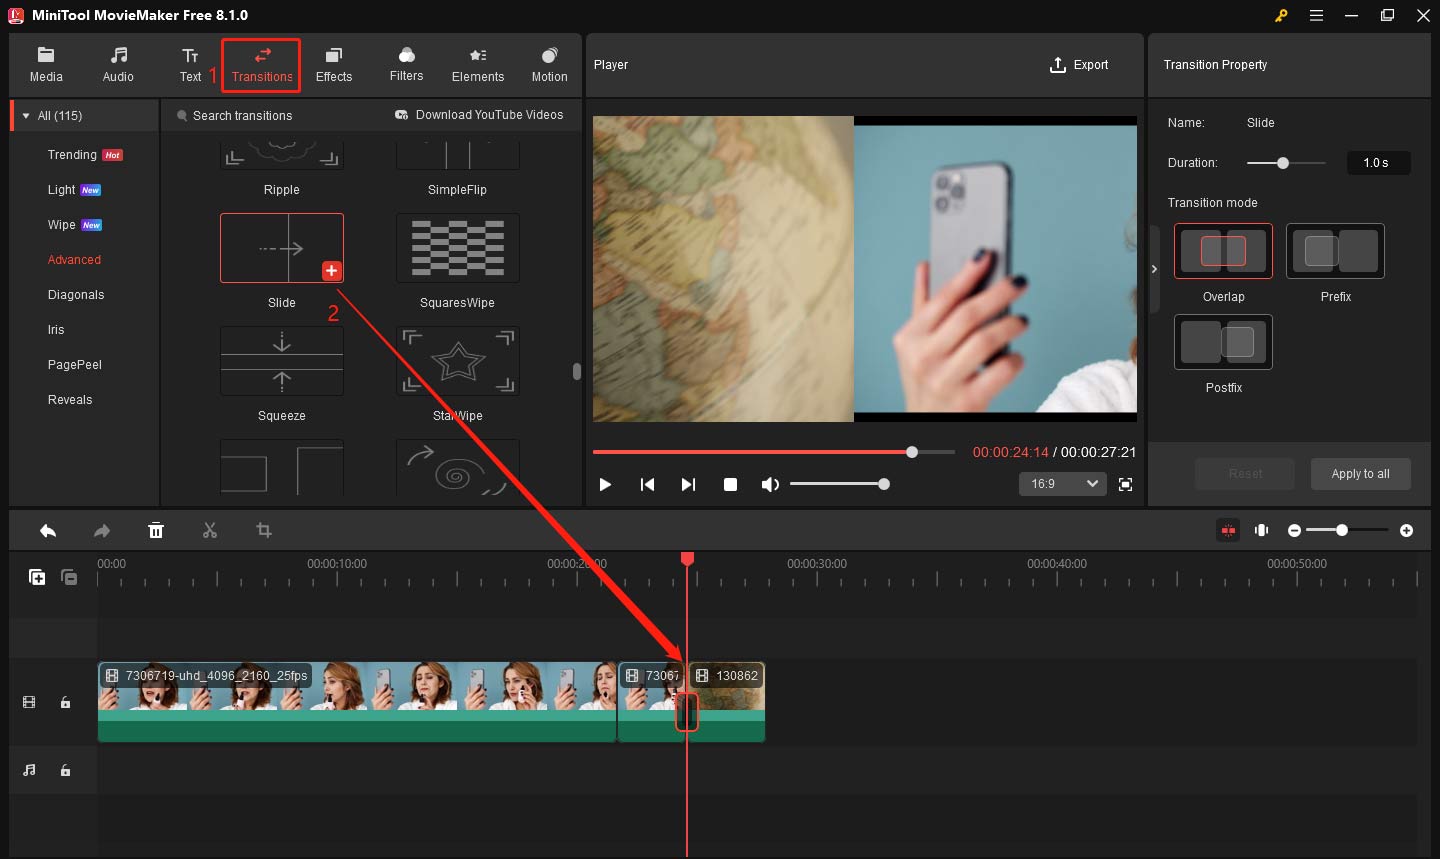
Step 4: Add Transitions
MiniTool MovieMaker provides a variety of transitions that can be used to enhance the flow of your video. To apply a transition between two clips:
- Select the Transitions tab located in the upper menu.
- Choose a transition style from the library, such as fade, slide, or dissolve.
- Drag the transition to the position between the two clips on the timeline.
Step 5: Add Music
Music can enhance the mood of your video and keep your viewers engaged. Here is how to add music:
- Click on the Import Media Files button again and select the audio file you want to add. Alternatively, go to the Audio tab and select the appropriate music from the built-in music library.
- Drag the audio file to the audio track below the video clips on the timeline.
- Adjust the audio to match the length of your video by trimming or fading out at the end.
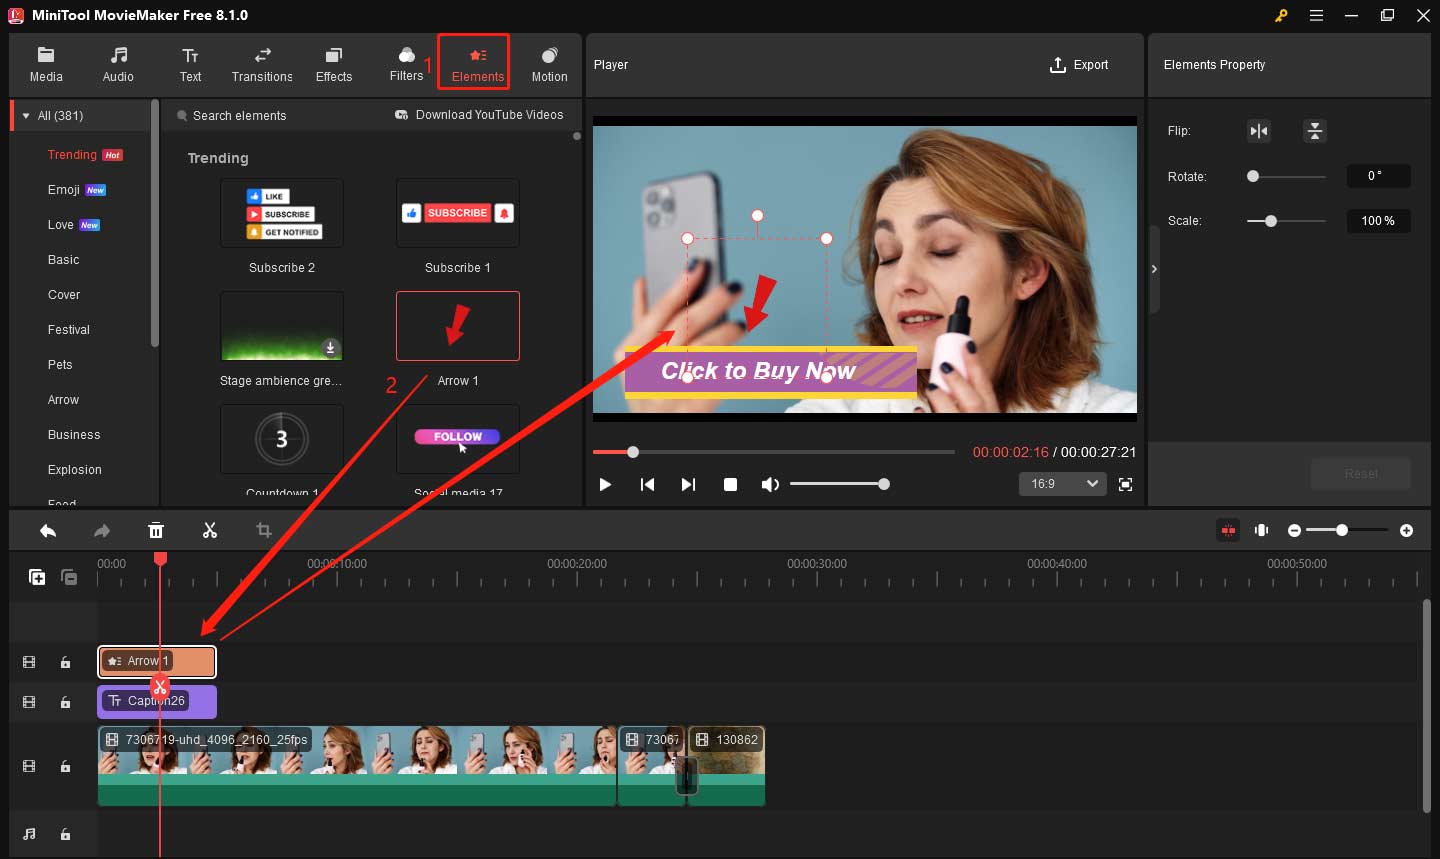
Step 6: Incorporate Interactive Shoppable Elements
Now comes the most important part: making the video shoppable. While MiniTool MovieMaker itself doesn’t have a built-in feature for directly adding product links, you can use text and animate elements to create interactive cues that guide viewers to take action. For more advanced interaction, you can use platforms like TikTok or Instagram that support shoppable videos to add links after you export them.
Add Text Overlays
- Click on the Text tab at the top.
- Choose a text template like a lower third and drag it to the appropriate place above your video clip.
- Double-click the text box on the preview screen to enter your desired text like “Click to Buy Now”.
- Go to the Text Property window, and you can customize the font, size, and color to suit your video style.

Add Animated Elements
- Click the Elements button in the top toolbar.
- Select a fake hotspot icon and drag it above the video clip on the timeline.
- Move the playhead on the timeline to make it go through the target element, then you can drag your mouse to adjust the icon’s position and size on the preview screen.
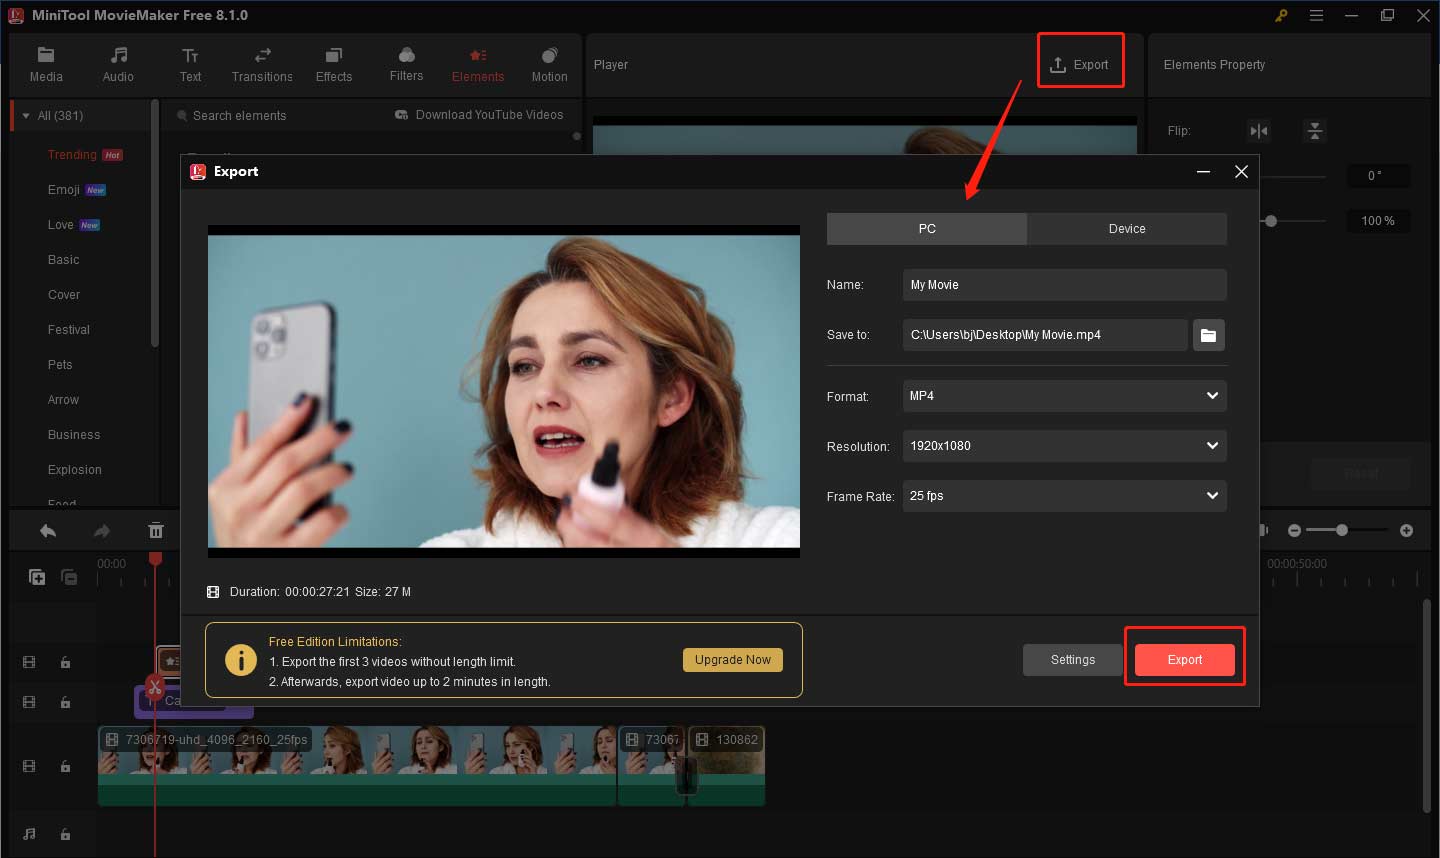
Step 7: Export Your Video
After finalizing your video, it’s time to export it. Click on the Export button in the top-right corner of the screen. Choose the desired video format (MP4, MOV, AVI, etc.) and resolution. Click Export and wait for the video to render.
Other features of MiniTool MovieMaker:
- Multi-track Editing: Supports multi-track editing, allowing you to work with multiple video, audio, and image tracks simultaneously for more complex projects.
- Speed Control: Offers speed adjustment tools, enabling you to create slow-motion or time-lapse effects for dramatic emphasis in your video.
- Video Effects Library: Includes a variety of built-in video effects, such as filters and color corrections, to enhance the visual appeal of your video.
- Audio Editing: Provides the ability to adjust audio levels and add fade effects to audio.
- Export in Multiple Formats: Supports exporting videos in various formats (MP4, AVI, MOV, etc.), ensuring compatibility with different platforms and devices.
MiniTool MovieMakerClick to Download100%Clean & Safe
4. Add Shoppable Features
Once your video is edited, it’s time to add the interactive features that make it shoppable. You can use TikTok, Instagram, or Amazon to add product links. These three platforms allow you to add clickable links to your videos for free, so you don’t have to worry about spending money.
5. Publish and Promote Your Video
After adding the product link, publish it on your chosen platform and start promoting it. Share it on social media, send it out through email newsletters, or run targeted ads to reach your desired audience. The more people who watch your video, the more likely it is to generate sales.
Tips for Creating a Engaging Shoppable Video
To make your video truly engaging and effective, keep these tips in mind:
- Tell a Story: People love stories. Don’t just show your products—show how they fit into real-life scenarios. This will make your video more relatable and memorable.
- Be Authentic: Looking for celebrities to recommend your products can greatly increase their credibility.
- Highlight Key Benefits: Focus on the key benefits of your products. Show how they solve problems or improve the viewer’s life in some way.
- Keep It Interactive: Don’t just make the video shoppable—make it interactive. Ask questions, encourage comments, or use interactive polls to engage viewers.
- Use Engaging Thumbnails: The thumbnail is the first thing viewers will see, so make sure it’s eye-catching and enticing.
- Offer Special Discounts: Use the video to offer exclusive discounts or promotions for viewers who make a purchase through the video.
Bottom Line
In conclusion, creating a shoppable video is a powerful way to engage your audience and drive sales. By using tools like MiniTool MovieMaker, you can easily produce visually attractive content. This is all about how to create a shoppable video. Finally, if you have some problems editing your shoppable videos with MiniTool MovieMaker, please feel free to contact us via [email protected] for help.
About The Author

Position: Columnist
Yulia has a great passion for life. She enjoys photography and travel, and is always eager to record cherished moment through her lens. This also led to her strong interest in video editing, and she kept learning multimedia-related knowledge, hoping to bring readers better advice on images, audio, video, and related topics.
User Comments :