Have you ever watched a speed painting video? Do you want to make a speedpaint video? If you have this idea, please read this article from MiniTool MovieMaker – one of the best free video editing software, and it will detail how to make a speedpaint video.
Creating a speedpaint video is an excellent way to show your art. It’s not just about creating something beautiful and it’s also about letting others experience your creative process in a fast-forwarded way. If you don’t know how to make a speedpaint video, don’t worry – this guide will walk you through the entire process step by step.
Whether you’re an experienced artist or just starting, you’ll learn everything you need to know, from planning to editing, and how to use a video editing tool like MiniTool MovieMaker to polish your video.
What Is a Speedpaint Video?
A speedpaint video is a time-lapse or accelerated video that shows the process of creating a painting. The video usually shows how a piece of artwork is made, but it speeds up the entire process so that viewers can see the artwork develop in a few minutes, rather than hours. These videos are popular on platforms like YouTube, Instagram, and TikTok, as they give viewers an insight into the artist’s work and skills.
Why Make a Speedpaint Video?
Now that you know what a speedpaint video is, you may wonder why you should make one speedpaint video. There are many benefits to creating and sharing your own speedpaint videos.
- Share Your Artistic Process: One of the main reasons is to share the artistic process. Many people are curious about how an artwork is created, and speedpaint videos offer a way to show this.
- Showcasing Your Skills: Speedpaint videos help you demonstrate your artistic techniques to others.
- Building a Portfolio: Speedpaint videos are a great way to build an online portfolio and gain recognition for your work.
- Increase Your Visibility: Sharing speedpaint videos on platforms like YouTube, Instagram, or TikTok can help you gain visibility as an artist. If your video is engaging and well-edited, it has the potential to go viral.
- Improve Your Skills: As you record your process, you can review your work, track your improvement, and find areas where you can enhance your technique.
How to Make a Speedpaint Video?
Making a speedpaint video may sound like a complicated task, but with the right tools and a little practice, you can easily create a professional-looking video. In this section, I’ll show you how to make a speedpaint video from start to finish.
1. Plan Your Artwork
The first step in making a speedpaint video is to decide what you’re going to paint. You can choose a concept based on your interests, a commission, or something you’re passionate about. Having a clear idea of what you want to create will make the process smoother. You can sketch your idea on paper or digitally before you start painting. A quick sketch will act as a roadmap, ensuring that your painting process stays on track.
2. Set Up Your Workspace
Before you begin painting, it’s important to set up a clean and organized workspace.
- Choose a Comfortable Spot: Whether you’re working traditionally with paints and brushes or digitally with a tablet, make sure you have a comfortable workspace. If you’re working traditionally, choose a well-lit area to capture clear footage of your process.
- Prepare Your Tools: Gather all the tools you will need for your artwork. This includes your paintbrushes, canvas, palette, or tablet and stylus. Having everything in place before you start will help the process go smoothly.
3. Record Your Artwork Process
The next step is to record your artwork as you create it. There are different ways to do this, depending on whether you’re working traditionally or digitally.
- Traditional Art: If you’re painting or drawing with traditional materials, you’ll need to record the process using a camera or smartphone. Place your camera or smartphone on a tripod or a stable surface, ensuring that it has a clear view of your artwork. You need to make sure the camera can capture both the canvas and your hands as you work.
- Digital Art: If you’re creating artwork on a digital platform, you can use screen recording software to capture your process. After recording, save the footage in an easy-to-edit format such as MP4 or MOV.
4. Finish Your Artwork
Continue painting as usual. As you work, remember that speedpaint videos are typically fast-paced. You don’t need to worry about taking breaks or slow moments in the recording. This is a time-lapse, so everything will be sped up later. Focus on your art and enjoy the process. In addition, you don’t need to add too many extra details or make the artwork very complicated. Simple and clean pieces often make the best speedpaint videos.
5. Edit Your Video with MiniTool MovieMaker
Once your painting session is over, the next step is to edit the video to create a time-lapse effect. This free video editor without watermark – MiniTool MovieMaker can help you speed up your footage, add transitions, and make your video look professional. Let’s see how to make a speedpaint video in MiniTool MovieMaker.
Step 1: Download and install MiniTool MovieMaker
If you don’t already have MiniTool MovieMaker, you can click the button below to download free video editor. It’s a free application available for Windows. Once installed, open the software, and you’re ready to start editing your speedpaint video.
MiniTool MovieMakerClick to Download100%Clean & Safe
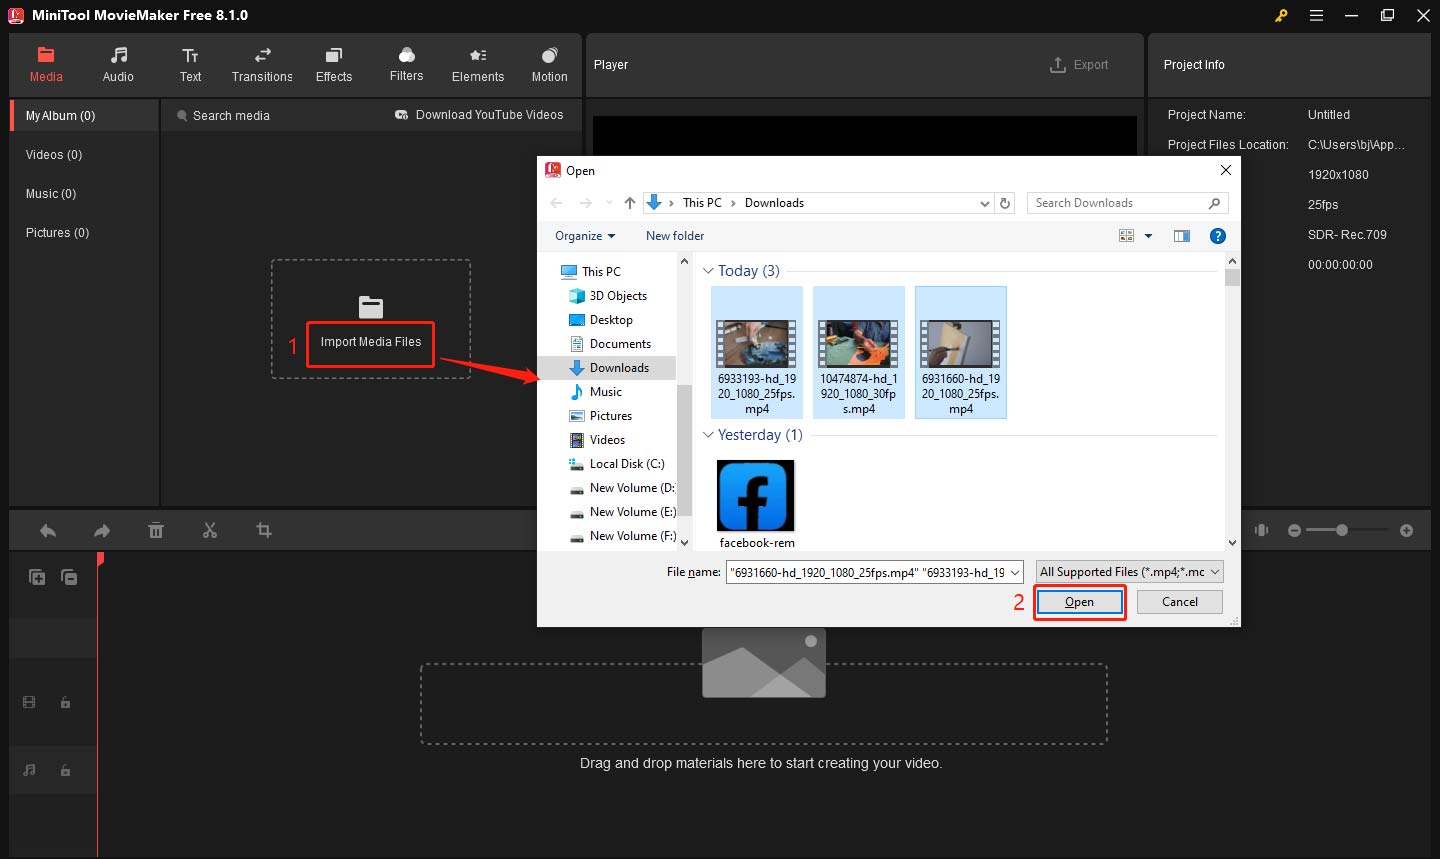
Step 2: Import Your Drawing Footage
After launching this software, close the promotion window and click the Import Media Files button. Select the painting video files you recorded and click Open. You can import multiple clips if you have several video files showing different stages of your drawing. These clips will appear in the media library. Drag and drop them onto the timeline in the order you want them to appear in the video.
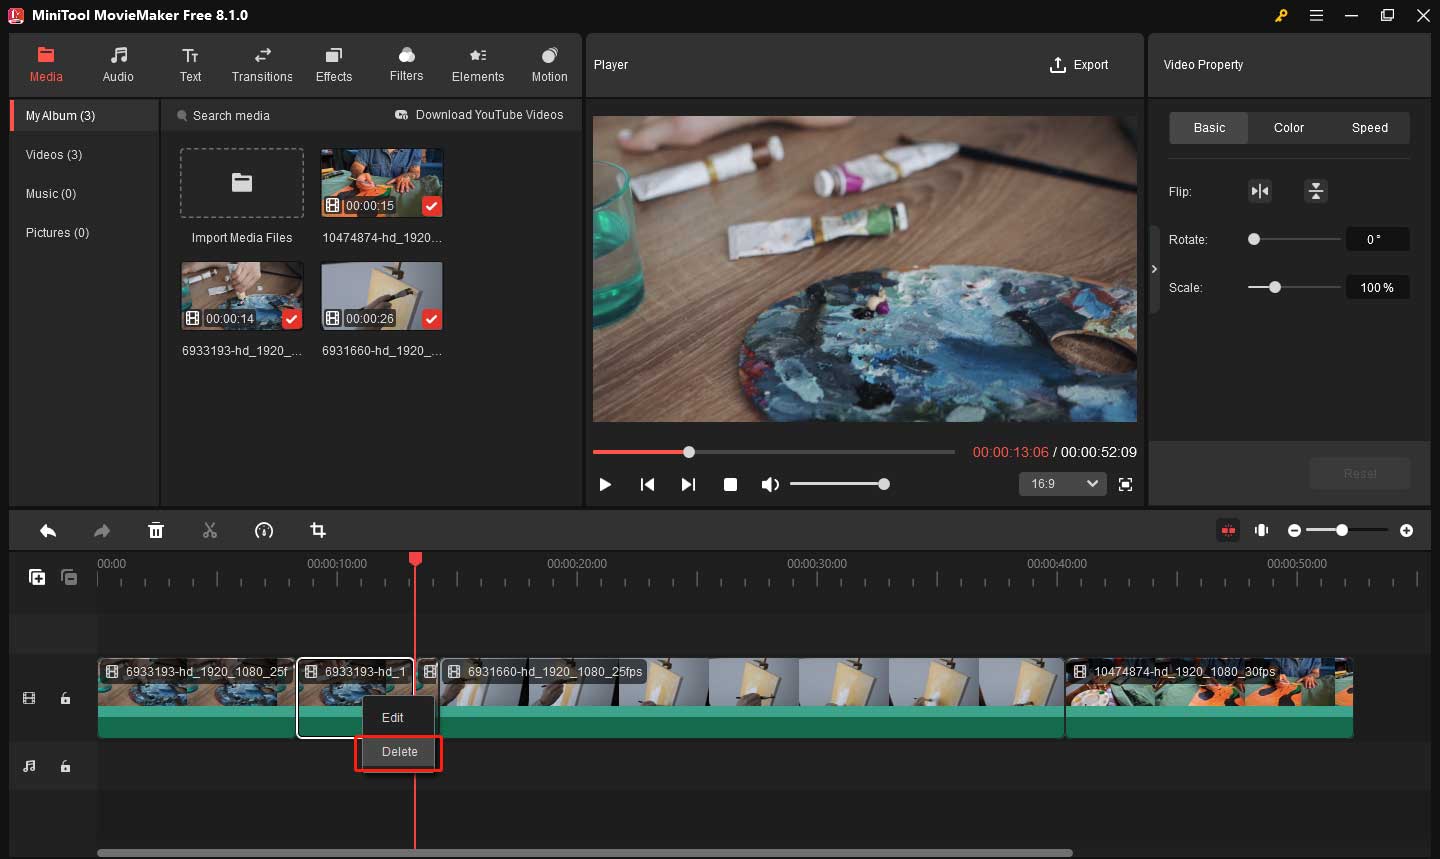
Step 3: Cut Unnecessary Sections
Your recording might include moments where nothing is happening (e.g., waiting for paint to dry, long pauses, or even mistakes). You can use the split tool in MiniTool MovieMaker to remove these unnecessary segments. Here’s how to do it:
- Move the playhead to the point where you want to start splitting and click the scissors icon on the playhead.
- After splitting, move the playhead to the end of the section you want to cut.
- Click the scissors icon again to split the video at this point. Now, you’ll have isolated the unnecessary section of the video.
- Select the unwanted section, right-click on it, and choose Delete or press the Delete key on your keyboard.
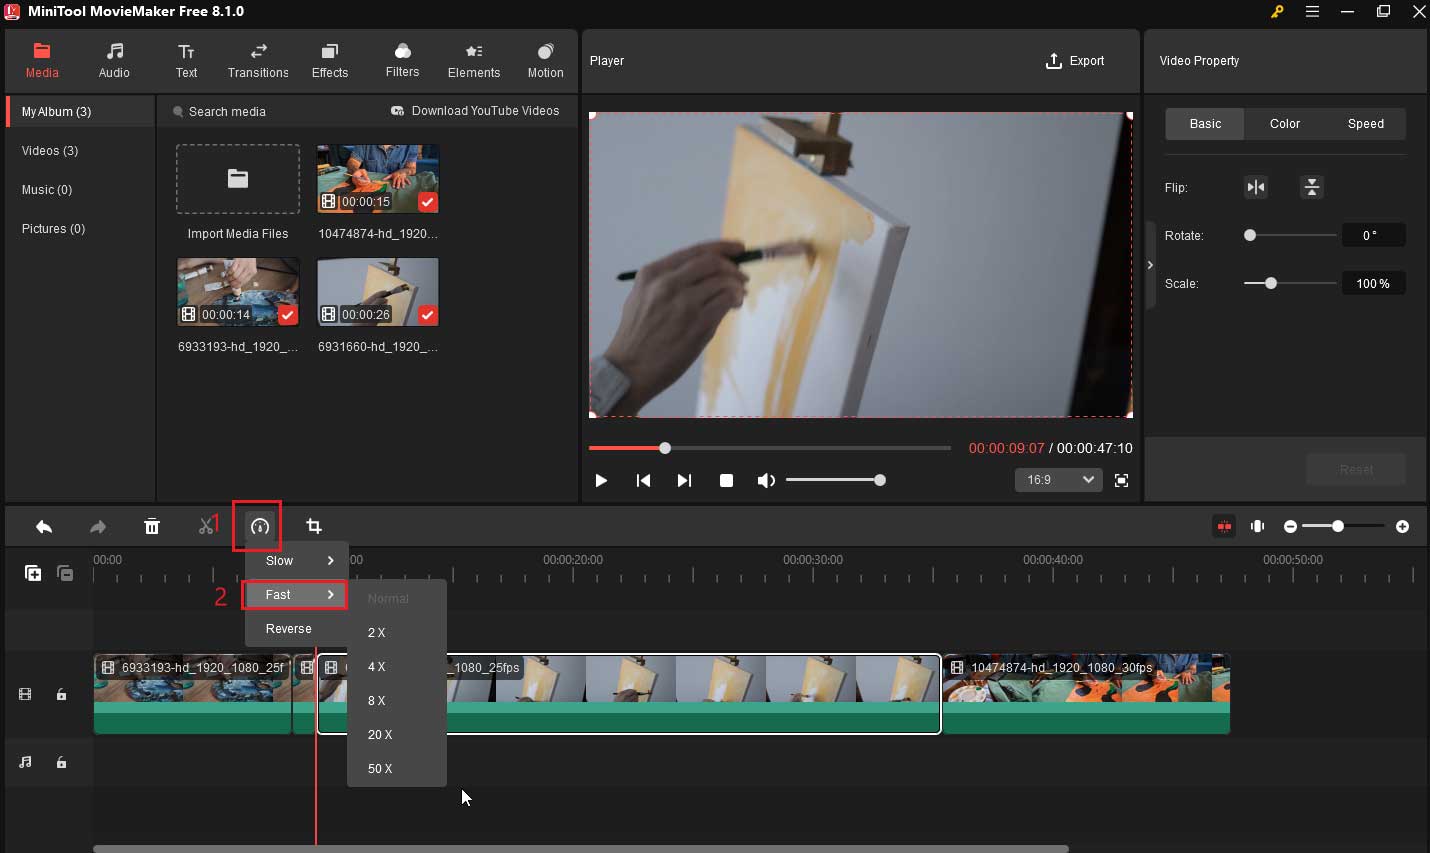
Step 4: Speed Up Your Video
To make a speedpaint video, you need to speed up your drawing footage. This will condense a long process into a short video. MiniTool MovieMaker allows you to easily adjust the speed of your video.
- Select the video clip on the timeline.
- Choose the Speed icon (dashboard) on the timeline toolbar.
- Choose the Fast option from the dropdown menu.
- Adjust the speed according to your preference. You can speed up the video by 2x, 4x, 8x, 20x, or even 50x depending on the length and your artistic process.
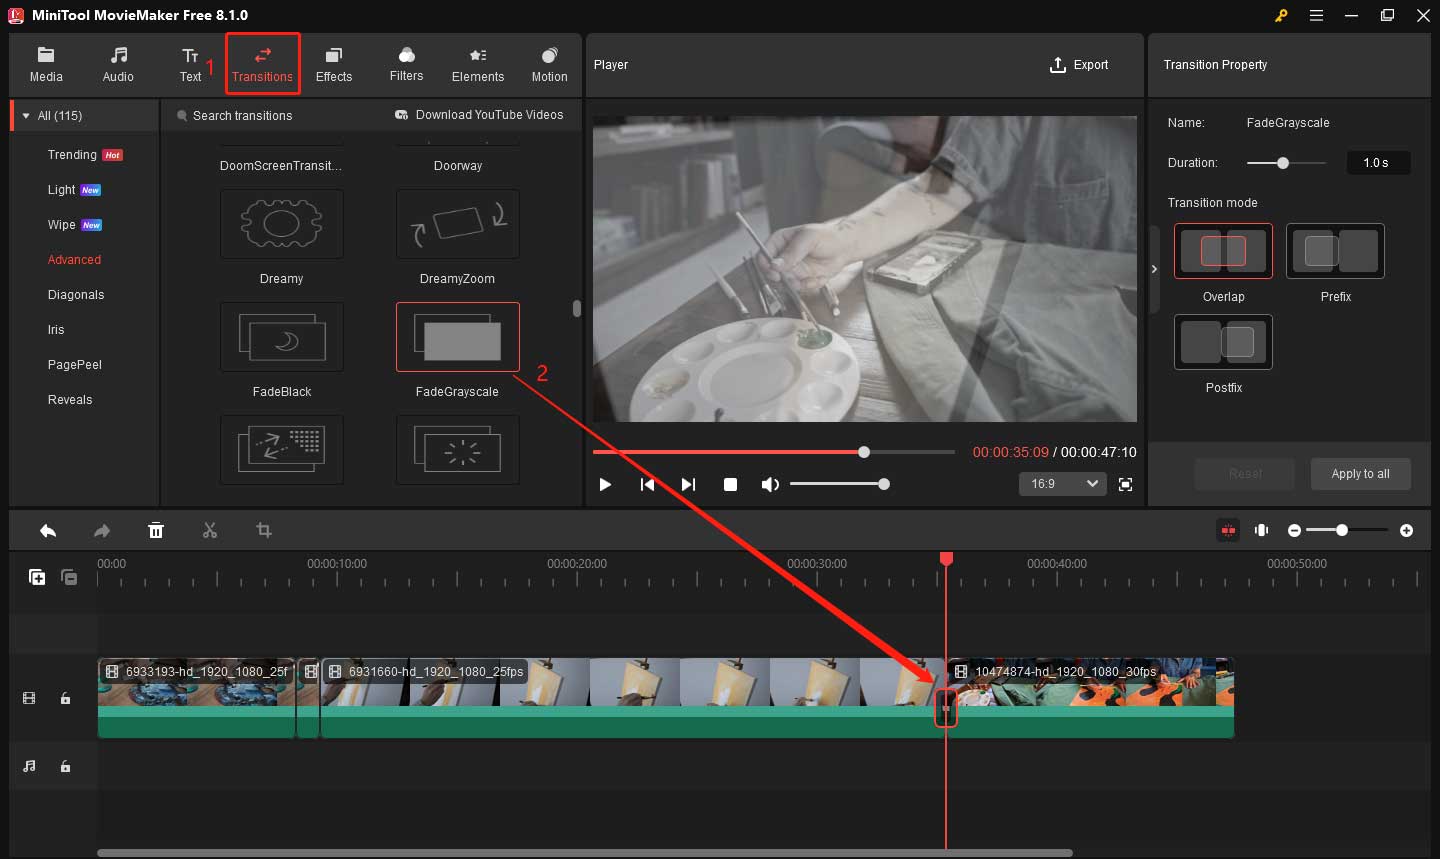
Step 5: Add Transitions
If you have multiple clips for different stages of your drawing, you can add transitions between them to make the video flow smoothly. MiniTool MovieMaker offers various video transitions like fades, dissolves, and slides.
- Click on the Transitions tab at the top.
- Choose a transition effect that fits your style.
- Drag the selected transition onto the space between two clips on the timeline.
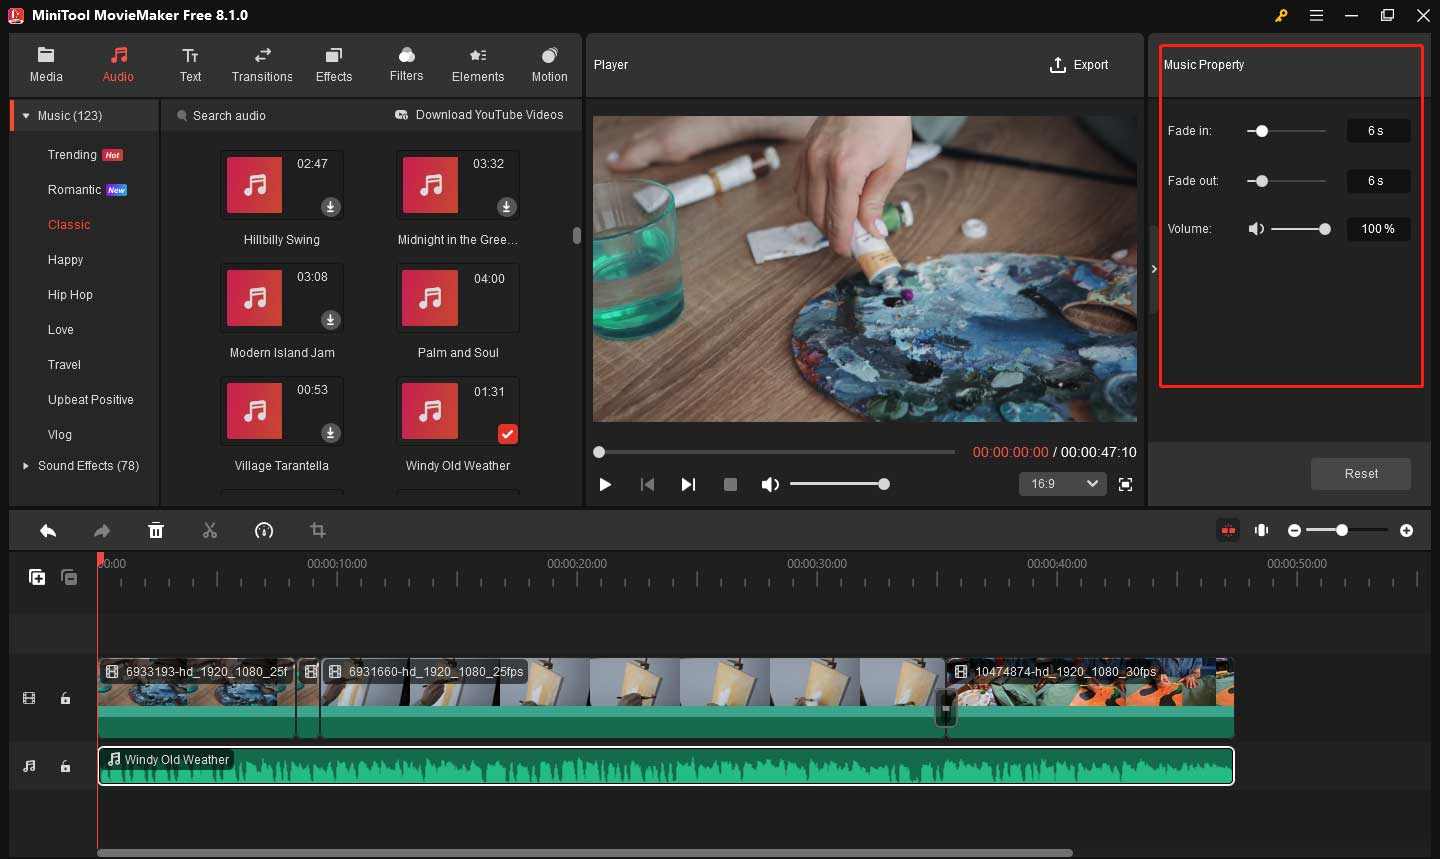
Step 6: Add Background Music
Adding background music to your speedpaint video can make it more engaging. You can choose music that complements the pace of your drawing or adds to the mood of the artwork. Click the Audio button in the top menu to access the music options. Choose appropriate music from the built-in library and drag it to the audio track.
To make the background music better fit into your video, you can add a fade effect to the music.
- Click the audio on the timeline.
- Go to the Music Property window.
- Drag the Fade in or Fade out slider to apply the fade effect.
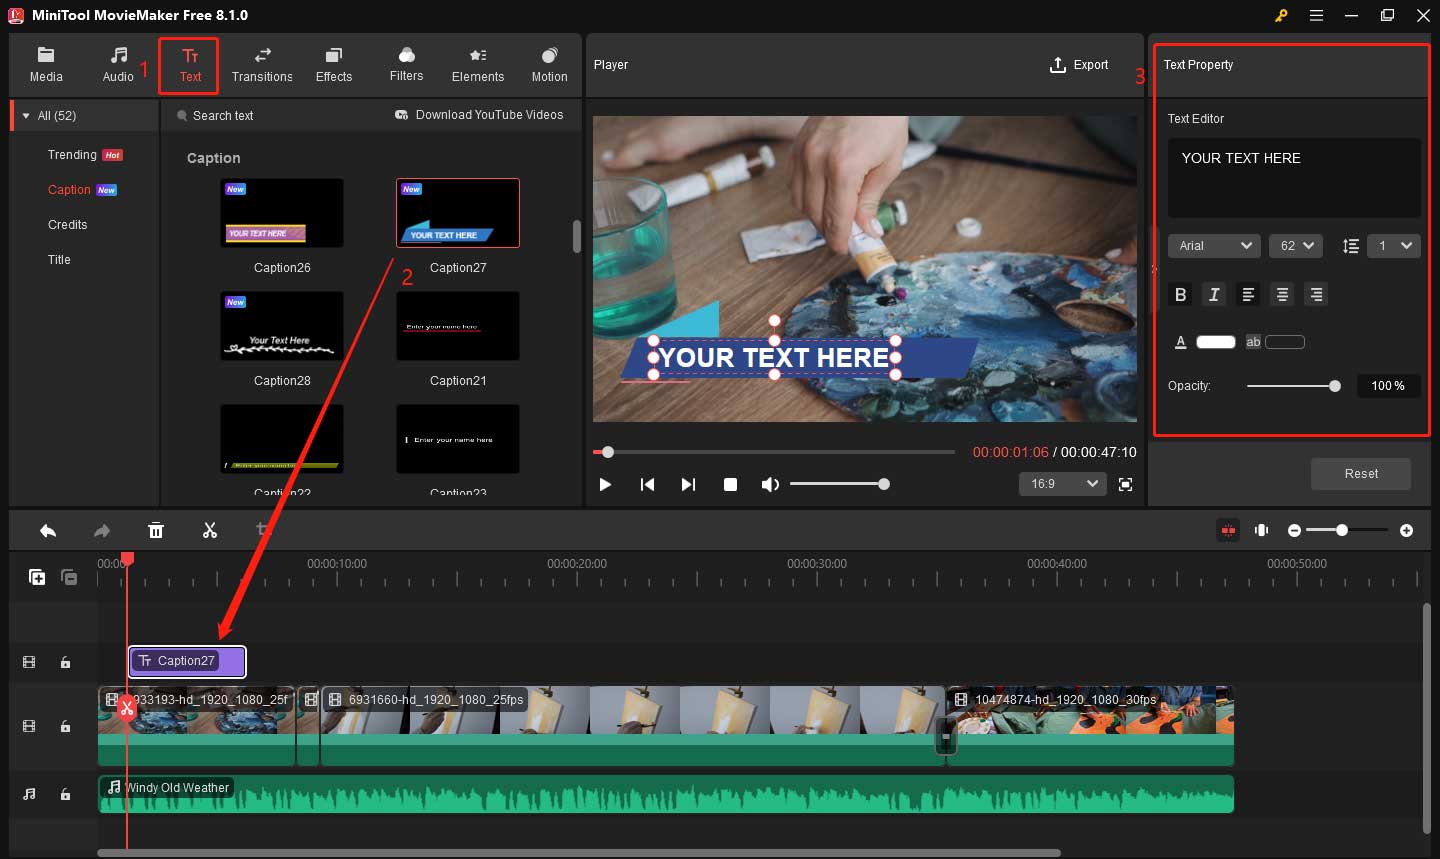
Step 7: Add Text
To help your viewers understand the stages of your drawing, you can add text at the beginning of the video to introduce it or add captions to specific parts of the drawing process.
- Click on the Text option in the top toolbar.
- Choose a text template and drag it above the video clip where you want it to appear.
- Go to Text Property, enter your text content in Text Editor, and customize the text by changing the font, size, color, etc.
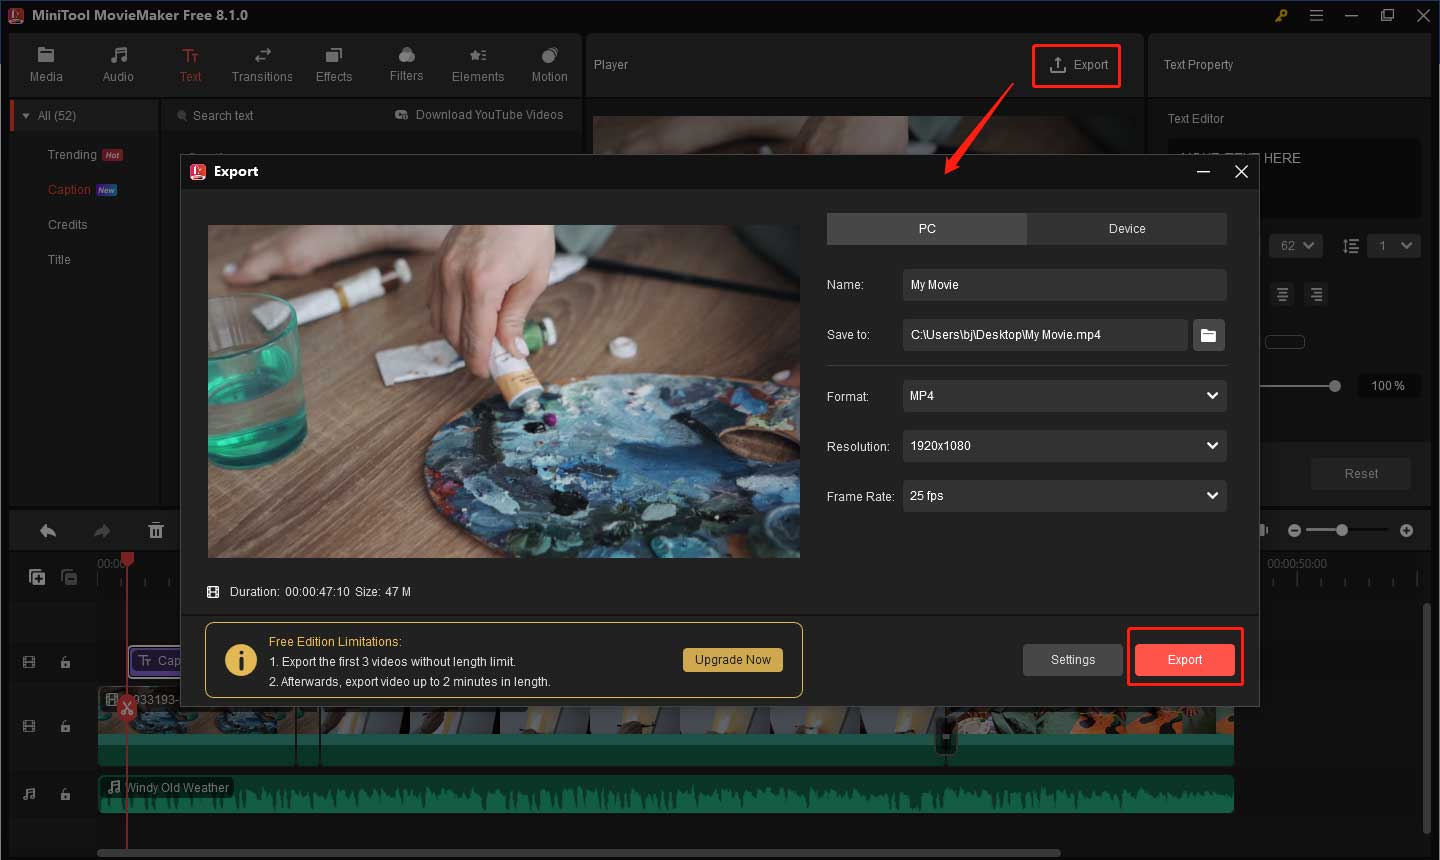
Step 8: Preview and Export Video
Before exporting, click the play icon to watch the video from beginning to end to make sure everything looks good and flows smoothly. Once you’re happy with the video, it’s time to export it. Click the Export button in the top-right corner of the screen. Set the video name and file location. Then, choose an appropriate format for your platform (MP4 is usually the best choice for most platforms). After selecting your settings, click the Export button.
MiniTool MovieMakerClick to Download100%Clean & Safe
Here are some other features of MiniTool MovieMaker.
- Multi-Track Editing: It allows you to combine multiple video clips, images, and audio files in one timeline. It makes editing more flexible, letting you create more dynamic and rich video effects easily.
- Various Effects and Filters: MiniTool MovieMaker comes with a wide range of effects and filters to enhance your videos. From color correction to artistic filters, these tools let you customize your clips and achieve the desired mood or style.
- Create video from images: It allows you to easily convert collections of images into engaging videos. With just a few clicks, you can arrange images in order, add transitions, and adjust the timing to create a seamless video presentation from your pictures.
- High-Quality Export Options: When you’re ready to finalize your video, the software supports exporting in high-definition formats. This ensures that your project maintains excellent quality when shared or uploaded to various platforms.
6. Share Your Speedpaint Video
Now that you’ve created your speedpaint video, it’s time to share it with the world. Upload your video to YouTube, Instagram, TikTok, or any other social media platform to showcase your work. Don’t forget to use relevant hashtags, and descriptions to help your video get discovered.
Tips for a Great Speedpaint Video
Here are some tips to help you create an engaging and professional speedpaint video.
Keep the Video Condensed: While it’s tempting to include every single detail of your process, it’s important to keep the video short and fast-paced. Most viewers prefer videos that are around 3-5 minutes long. Focus on the most important steps in your process and cut out any unnecessary parts.
Use Clear and Steady Footage: Make sure your footage is clear and steady. Shaky or blurry footage can distract viewers from your artwork and make the video look unprofessional. Use a tripod or a stabilizer to keep your camera steady.
Choose the Right Music: Background music can enhance the viewing experience, but be sure to choose music that complements the style of your artwork. Avoid loud or distracting music that can take away from the focus of the video.
Edit for Clarity: Make sure your video is easy to follow. Use simple editing techniques to speed up the footage, cut out unnecessary sections, and add transitions where needed. This will help the video feel polished and professional.
Bottom Line
This is all about how to make a speedpaint video. Making a speedpaint video is a excellent way to share your artistic process with others, allowing you to condense hours of creativity into a captivating visual experience. Whether you’re using it to build an online presence or simply document your work, the key is to enjoy the process and continue honing your craft.
With each new speedpaint video, you will get better work and have something different. Finally, if you have some problems editing your speedpaint video with MiniTool MovieMaker, please feel free to contact us via [email protected] for help.
About The Author

Position: Columnist
Yulia has a great passion for life. She enjoys photography and travel, and is always eager to record cherished moment through her lens. This also led to her strong interest in video editing, and she kept learning multimedia-related knowledge, hoping to bring readers better advice on images, audio, video, and related topics.
User Comments :