

To trim audio, upload a file to the target tool or platform, move the trim handles to set the beginning and end of the desired selection, and export the result. For Windows users who want quick cuts, try MiniTool MovieMaker (best video editing software for beginners). Use PowerPoint for no installation; VLC is also worth a try if you have it installed; consider Audacity for professional processing; for online use, Audio Trimmer is a reliable choice.
Before importing a large audio file to a space-limited MP3 player, you can trim it to the length you want. How to trim an MP3 to remove the beginning or the end of an audio file? In general, as long as you use an audio trimmer, you can easily change the length of the audio file.
How to Trim Audio: 5 Methods
Fast Track Steps:
- Open an audio trimmer on your PC.
- Import the target audio file.
- Drag the sliders to select the section you want to retain.
- Save the trimmed audio file.
To trim audio files, you can try the following audio trimmers:
- MiniTool MovieMaker
- PowerPoint
- VLC
- Audacity
- Audio Trimmer
Here is a concise comparison table of these audio trimmers:
| Tool | MiniTool MovieMaker | PowerPoint | VLC | Audacity | Audio Trimmer |
| Platform | Windows | Win/Mac | Cross-platform | Cross-platform | Online |
| Price | Free + paid | Requires Office | Free | Free & open-source | Free |
| Batch Processing | Not supported | Not supported | Not supported | Supported | Not supported |
| Current Status (2026) | Actively updated | Actively updated | Actively updated | Actively updated | Actively updated |
| Input Audio Formats | MP3, M4A, M4R, WAV, FLAC, AAC, AMR, APE, MMF, WV | A wide range of audio formats | Almost all audio file types | A wide range of audio file formats | MP3, WAV, WMA, OGG, M4R, M4A, and more |
| Output Audio Formats | MP3 | MP3 | MP3, OGG, FLAC, etc. | WAV, MP3, FLAC, and others | MP3, M4R |
Method 1. Use MiniTool MovieMaker
MiniTool MovieMaker is a free video editing software program designed for beginners. In addition to the video editing capabilities, the software also offers several simple audio editing tools. It lets you trim, split, and merge audio files, fade in or fade out music, adjust audio volume, and extract audio from video.
 MiniTool MovieMaker
-
 Split and trim videos to remove redundance.
- Change video aspect ratio to match screen sizes.
- Add bubble texts, bgm, transitions, and more effects.
- Create PiP or split-screen videos by multitrack editing.
How to trim MP3 or other audio files? Here is a guide.
1: Download and install the audio trimmer
Download and install the software. After that, launch it and close the pop-up window to enter the main interface.
2: Import audio files
Click the Import Media Files button to import your audio files, then click the plus icon (+) on the target file or directly drag and drop it to the timeline.
3: Trim the audio file as you like
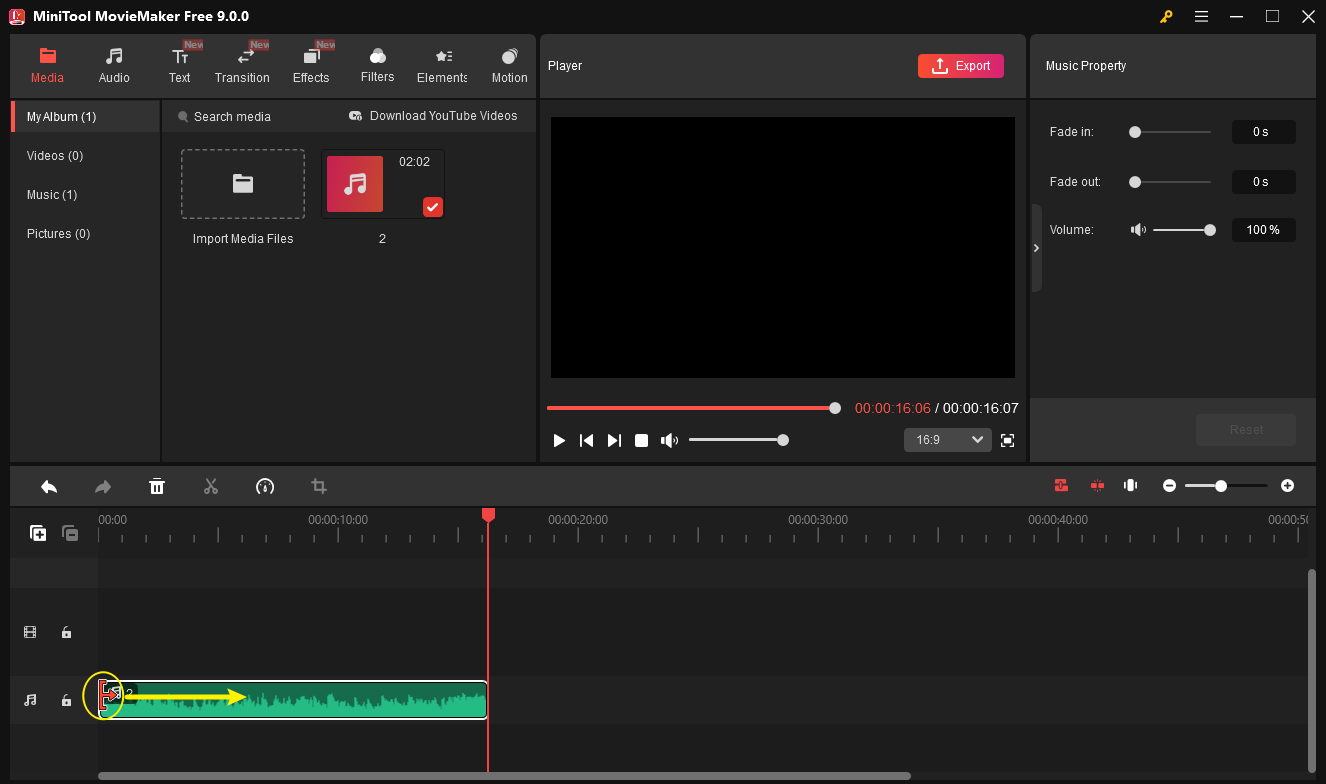
Select the audio file first. Hover over the beginning or end of the audio clip, and the Trim symbol shows up. Drag the icon forward or backward until the trim line moves to the edge of the part of the audio you want to keep.
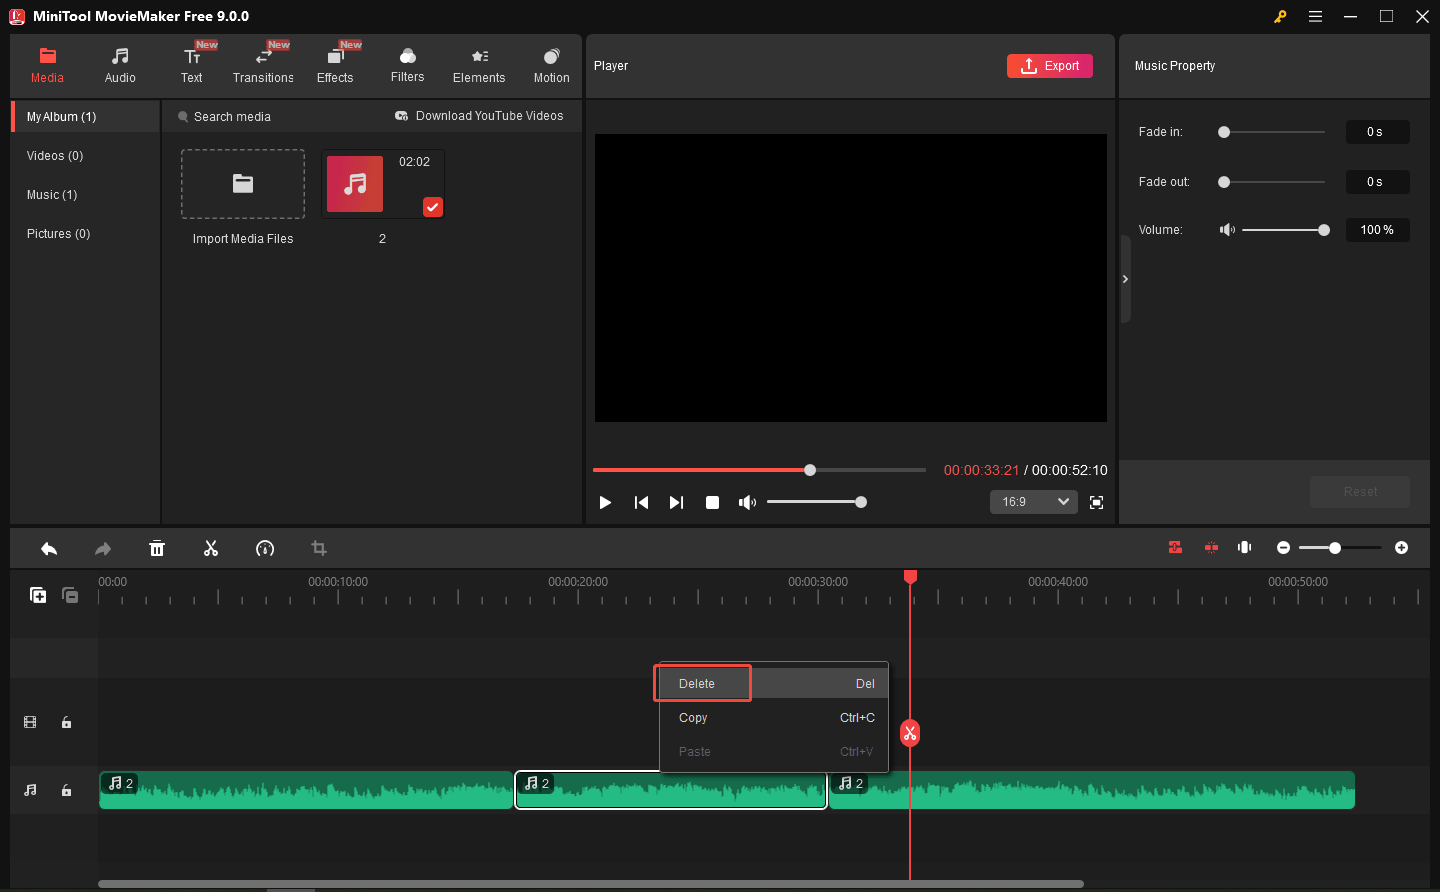
If the unwanted part of the audio is in the middle, you can use the Split tool to move the playhead to the beginning of the clip you don’t want and click the scissor icon to split, then move the playhead to the end of the undesired clip to split; at this point, you’ve split the part you don’t need. Then right-click the unwanted part and click Delete; thus, you can remove the split part.
4: Edit audio files more
MiniTool MovieMaker not only lets you split or trim audio files, but it also allows you to edit other aspects of the audio file.
- Fade music: Click the audio file, and adjust the fade-in and fade-out effects in the Music Property.
- Merge audio: Drag and drop multiple audio files into the timeline, split or trim audio files as you like, and export these files as an MP3 file. For more details, please see the audio merger.
5: Export and save the audio
After editing, you can click the Export button. Change the output format from MP4 to MP3, and click Export again to save the audio file.
Pros:
- A simple interface that’s easy to navigate.
- Handles popular audio formats.
- Precise trimming.
Cons:
- Only compatible with Windows.
Trimming is intuitive. You drag the left or right edge of your clip in the timeline to shorten it, or you can use the Split tool to cut it at the cursor location.https://www.pcmag.com/reviews/minitool-moviemaker
Method 2. Use PowerPoint
PowerPoint allows you to insert audio or record audio for presentations. It also lets you trim audio or apply the fade-in/out effects. If you don’t want to install software, then it is a great way to trim audio files on your desktop.
1: Import an audio file to the presentation
Open your presentation, add a slide, click Insert on the top toolbar, then click Audio on the right side, and select Audio on My PC to open the desired file.
2: Enable the audio trimmer
Click the speaker icon on the slide, go to the Playback tab in the PowerPoint ribbon at the top of the window, and click Trim Audio.

3: Trim the audio
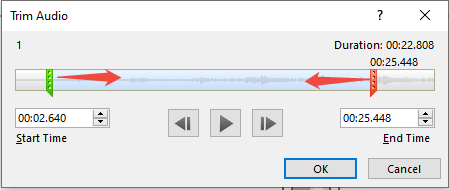
In the Trim Audio dialog box, drag the green marker (on the left) to set a new starting point, and drag the red marker (on the right) to set a new ending point. Alternatively, you can type precise start and end time values directly into the boxes.
4: Play and save audio
Click the Play button to check your selection, use the frame buttons to fine-tune if needed, and click OK to apply the changes. Next, right-click the speaker icon and select Save Media as to export the trimmed audio as an MP3.
Pros: Easy to use.
Cons: It lacks advanced features for editing audio or video files.
Method 3. VLC Media Player
Can you trim audio in VLC? Of course, you can. While it does not have a real trimmer tool, it does this by recording the desired selection while playing audio.
1: Set a save location for the trimmed (recorded) audio
Open VLC and go to Tools > Preferences. Then, click on the Input / Codecs tab. Next, find Record directory or filename and click Browse to choose where you want to save your trimmed audio file. Finally, Click Save.
2: Enable Advanced Controls
From the top menu, click View > Advanced Controls. Then, new playback buttons will appear above the standard play/pause buttons at the bottom, including a Record button.
3: Record and trim the audio
Go to Media > Open File and select your audio file. Drag the slider at the bottom to where you want to start recording the audio, then click the red Record button and immediately play the audio.
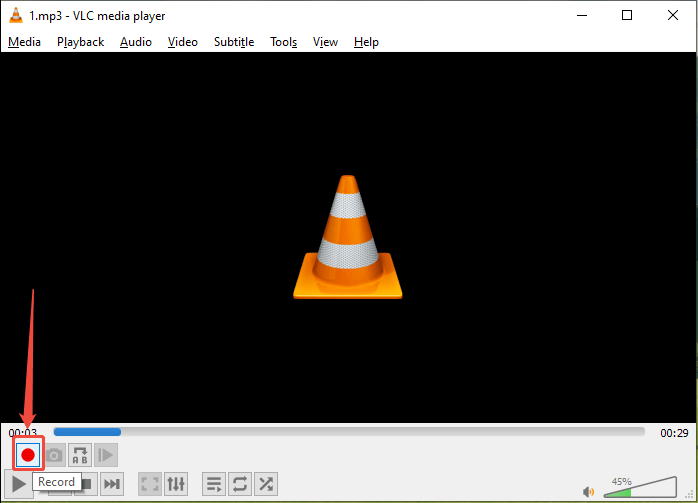
Play the audio until it reaches the exact point where you want it to end, and click the Record button again to stop the recording.
Pros
- Free
- Supports Windows, Android, iOS, and Mac.
Cons: The editing functions in VLC are limited.
Method 4. Use Audacity
Audacity is a professional, open-source audio editor working on Mac, Linux, and Windows devices. This tool is designed for professional users because of its intimidating interface.
To keep it competitive with other audio editors, Audacity is constantly being updated with new features and plugins. For instance, Gsnap, the best third-party Audacity plugin, lets you add auto-tune effects to your sounds.
Here is how to trim audio in Audacity:
1: Open an audio file
After launching Audacity, click File > Open to add an audio file from your computer.
2: Select the desired part of the audio
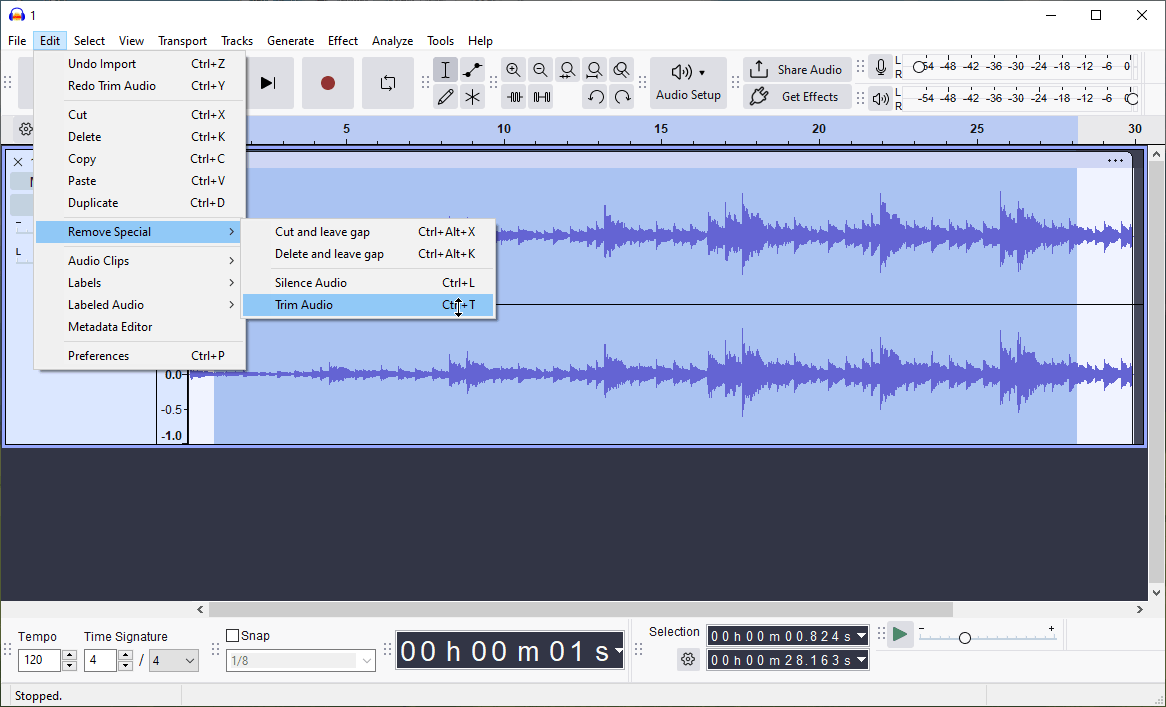
First, click and drag across the blue waveform to select the part you want to save. Everything before and after the highlighted part will be deleted.
3: Trim the audio
In the top menu, select Edit > Remove Special > Trim Audio.
4: Save audio
Click File > Export audio and configure the settings to save the trimmed audio.
Pros
- Lots of editing options ideal for dialogue, sound effects, and trimming music tracks.
- Supports multitrack audio and batch processing.
Cons
- Multitrack audio support is exceedingly basic.
- Some tools are inconsistent in design.
A powerful, free, and open-source audio editor that's been around for years, Audacity is still the go-to choice for podcasts, sound design, and other quick-and-dirty audio work.https://www.pcmag.com/reviews/audacity
Method 5. Use Audio Trimmer
If you want to trim audio files online, you can try Audio Trimmer. It is a simple, free MP3 cutter that lets you trim audio files without installing any software.
1: Upload audio
Go to the Audio Trimmer website and click the Choose File button to upload your audio file.
2: Trim audio
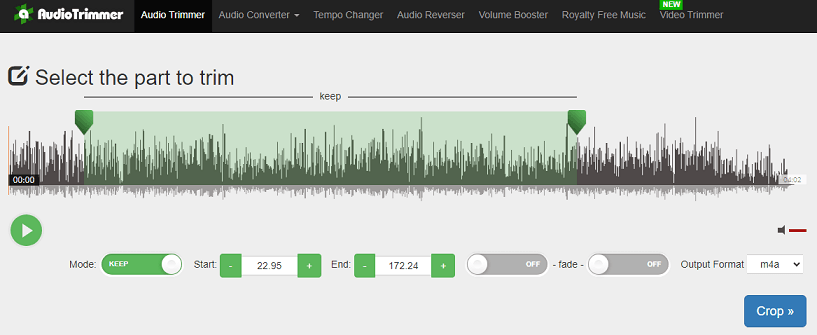
Click and drag the handles to select the part you’d like to trim. Or enter the correct time value to fine-tune your selection.
3: Save the audio
Optionally, toggle the fade buttons to add a fade-in or fade-out effect. Click Crop to start the trimming process. Once done, download the M4A file.
Pros:
- Totally free and easy to use.
- Supports many languages.
- Converts video or audio to MP3.
Cons: This website contains some ads.
Bottom Line
With these 5 tools, you can easily trim audio on your desktop, even if you’re a beginner. They support all popular audio formats and let you remove unwanted parts from the beginning and end with a few clicks.
If you encounter any issues while using MiniTool MovieMaker, email [email protected] for assistance.
People Also Ask
1. Find and select the recording in Voice Memos.
2. Tap the three-dot button, then tap Edit Recording.
3. Drag the trim handles from the left or right edges toward the center to specify the portion you want to keep.
4. Tap Trim to remove everything outside that area, or tap Delete to remove just the selected part.
5. Tap Done and choose to save the audio.
To trim other audio files, you can use the GarageBand app.
About The Author

Position: Columnist
Cora is a tech writer specializing in digital media workflows, with over six years of hands-on experience in video post-production, media transcoding, and screen capture. Her writing is always clear and practical. Cora also produces in-depth software reviews for users across skill levels to help them find the right tool and enjoy video editing.
User Comments :