Why Need to Annotate a Video?
Before learning how to annotate a video, you need to know what a video annotation is. Video annotation is an essential part of video editing.
Annotating videos is the process of adding visual elements to them, such as text, images, arrows, circles, etc. These elements can provide additional context, highlight important information, or make the video more engaging for viewers. Annotating videos can be very helpful in various settings, including educational content, tutorials, promotional videos, and more.
Here are some key reasons why you need to annotate a video:
- Clarify and Explain: Sometimes, videos might have complex information that could confuse viewers. Annotations help clarify these points. For example, you can add text or arrows to point out specific details that need further explanation.
- Draw Attention to Key Points: In many videos, some parts are more important than others. For instance, in a product review, you may want to highlight key features of the product. Annotations help focus viewers’ attention on these parts.
- Improve Engagement: Engaging viewers is crucial for keeping them interested throughout the video. Adding annotations like pop-up text or interesting shapes can keep your viewers engaged. You can even use annotations to add some personality to your videos.
- Enhance Accessibility: Adding captions or subtitles as annotations can make it easier for people to understand, especially for those with hearing impairments.
4 Best Video Annotation Tools
When it comes to video annotation, several tools can help you achieve professional results. Below are four of the best video annotation tools available:
MiniTool MovieMaker
MiniTool MovieMaker is one of the easiest video editing tools that allows you to add annotations quickly and effortlessly. It is especially useful for beginners and people who need to annotate videos without much prior experience. This tool offers a variety of features like adding text, shapes, and other effects. You can also add subtitles, making it an excellent choice for educational videos.
Why Choose MiniTool MovieMaker?
- User-Friendly Interface: The simple interface makes it easy for you to navigate, even if you have never edited a video before.
- Text and Shape Annotations: You can add text, arrows, circles, and other shapes to emphasize key points in your video.
- Customizable Options: MiniTool MovieMaker allows you to customize the colors, fonts, and placement of text.
- Free to Use: The free version of MiniTool MovieMaker offers a wide range of features, making it accessible to people on a budget.
MiniTool MovieMakerClick to Download100%Clean & Safe
VEED
Veed is an online video editor that provides a convenient platform for video annotation. With this tool, you can add text, shapes, and interactive elements to videos. It’s easy to use and doesn’t require you to download anything. You can work on your video directly in your browser, making it very convenient.
Why Choose VEED?
- No Downloads Required: You don’t need to install anything. Just upload your video to the website and start editing.
- Draw and Add Annotations: With Veed, you can draw, or add text, arrows, images, and progress bars to enhance your video content.
- Various Formats: It supports various video formats like MP4, AVI, FLV, and more.
Kapwing
Kapwing is another excellent online video editing tool that helps with video annotations. It’s simple to use and offers a variety of options for annotating videos. You can add text, images, arrows, and more to your videos.
Why choose Kapwing?
- Text and Interactive Elements: You can add text, shapes, arrows, and more to your video to highlight key points.
- Cloud-Based Editing: Because Kapwing is cloud-based, you can edit and share videos anytime, making it convenient for remote projects.
Premiere Pro
Premiere Pro is one of the most powerful video editing tools on the market. It is primarily aimed at professionals looking to create high-quality annotated videos. Premiere Pro gives you full control over text, graphics, and animation, making it a great option for detailed and complex video annotations.
Why choose Premiere Pro?
- Complete Control: You can control your video annotations more precisely, including text, shapes, and animations.
- Advanced Editing Tools: Premiere Pro offers professional-grade tools for cutting, adjusting, and enhancing your video.
How to Annotate a Video?
Now that we’ve known the best video annotation tools, let’s go through the steps to annotate video using MiniTool MovieMaker – a free video editor without watermark. This will give you a clear understanding of how to annotate a video.
Step 1: Download and install MiniTool MovieMaker
Click the button below to download free video editor, and follow the on-screen instructions to complete the installation process. Once installed, launch this software on your computer.
MiniTool MovieMakerClick to Download100%Clean & Safe
Step 2: Import Your Video
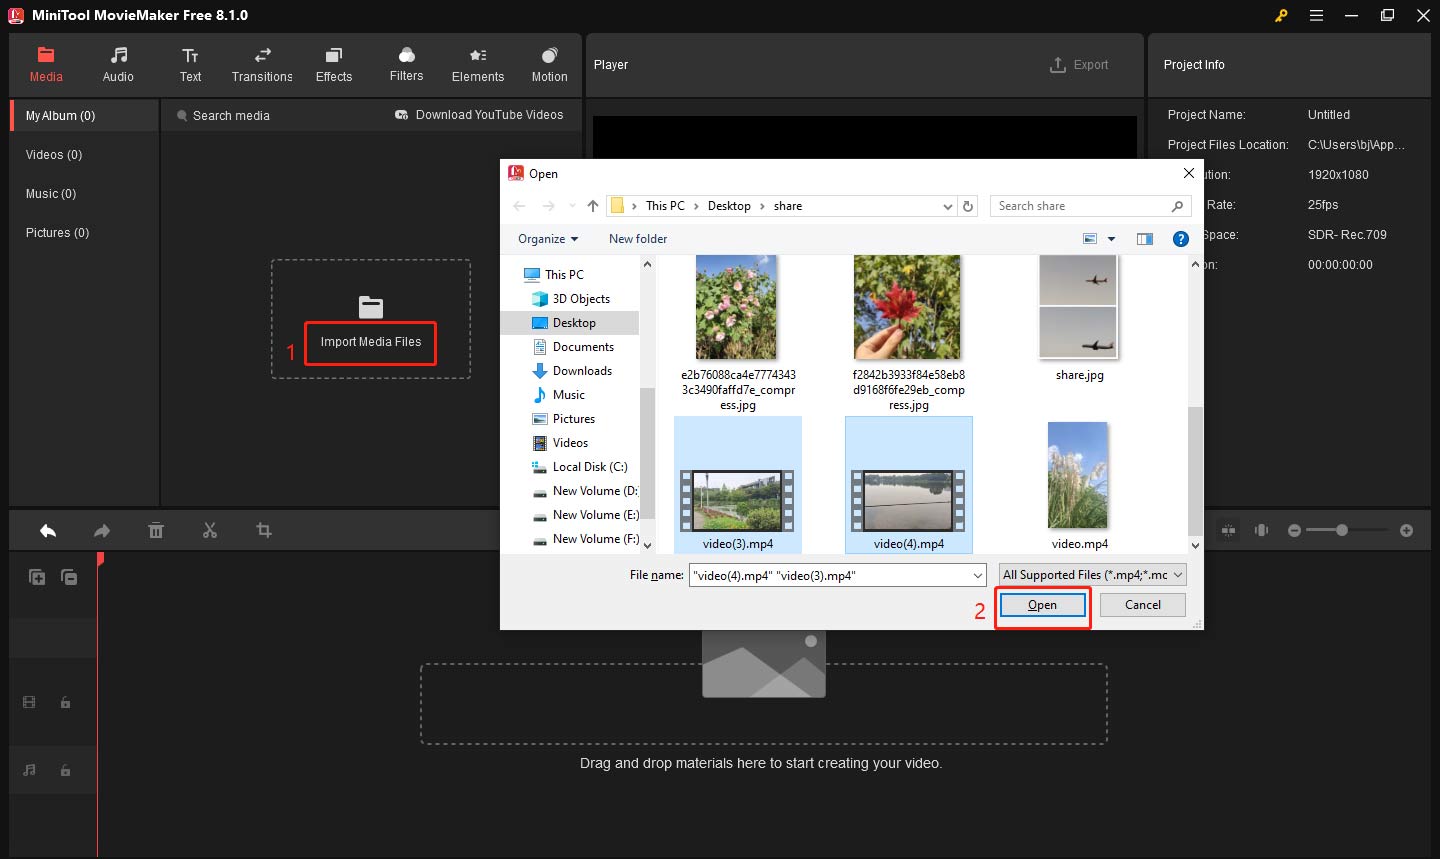
Once the software is up and running, the next step is to import the video you want to annotate. Here’s how to do it:
- Click on the Import Media Files button on the main interface.
- Browse your computer for the video file you want to edit, select it, and click Open.
- The imported video will appear in the media library section on the left side of the screen.
Step 3: Add the Video to the Timeline
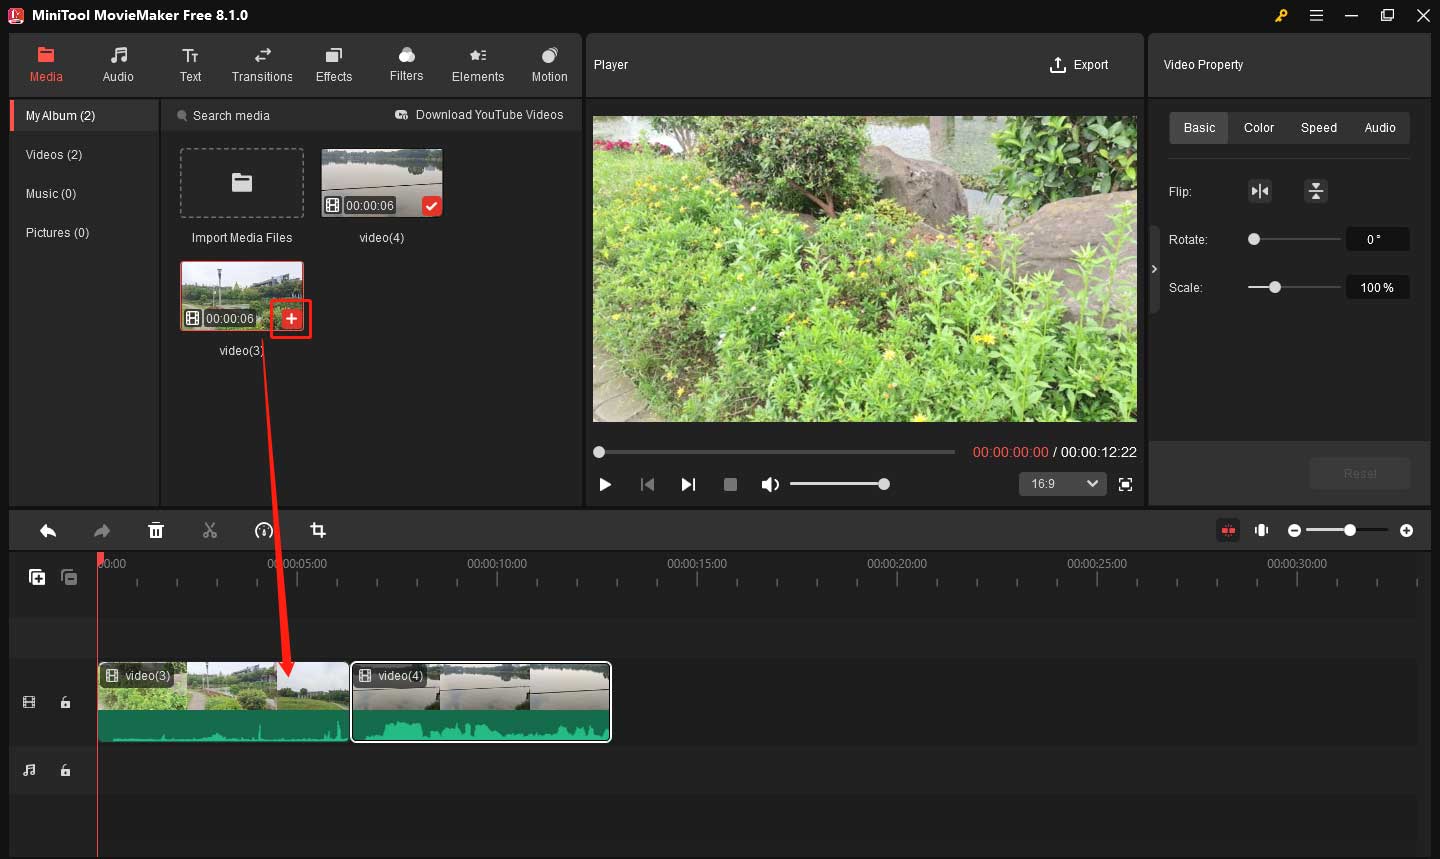
The timeline is where all the editing happens. To begin annotating, you need to add your video to the timeline. Click the plus (+) icon on the target video file or drag and drop it to the timeline.
Step 4: Annotate Video with Image
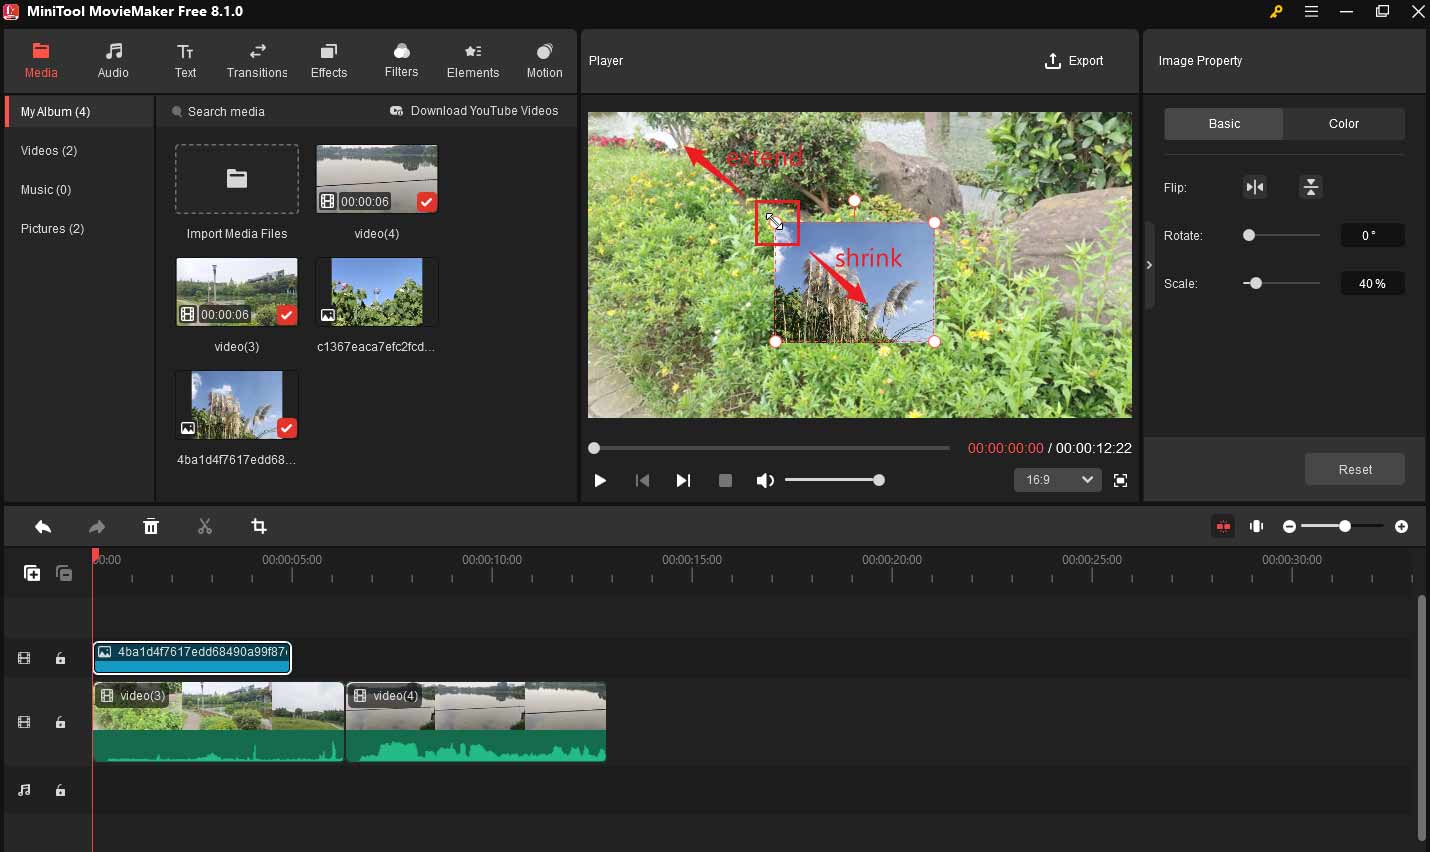
Images are a great way to add emphasis to your video. Whether you’re adding logos, screenshots, or other visuals, MiniTool MovieMaker makes it easy. In the media library, click the Import Media Files button again to upload the image you want to add, and drag the image to the timeline above the video track. You can adjust the duration of the image by dragging the edges of the image clip in the timeline.
Resize the image:
- Click the image in the Player window.
- Put your mouse on either point of the four directions.
- Your mouse cursor will turn into a double-headed arrow, pull it inwards to shrink the image or outwards to extend the image.
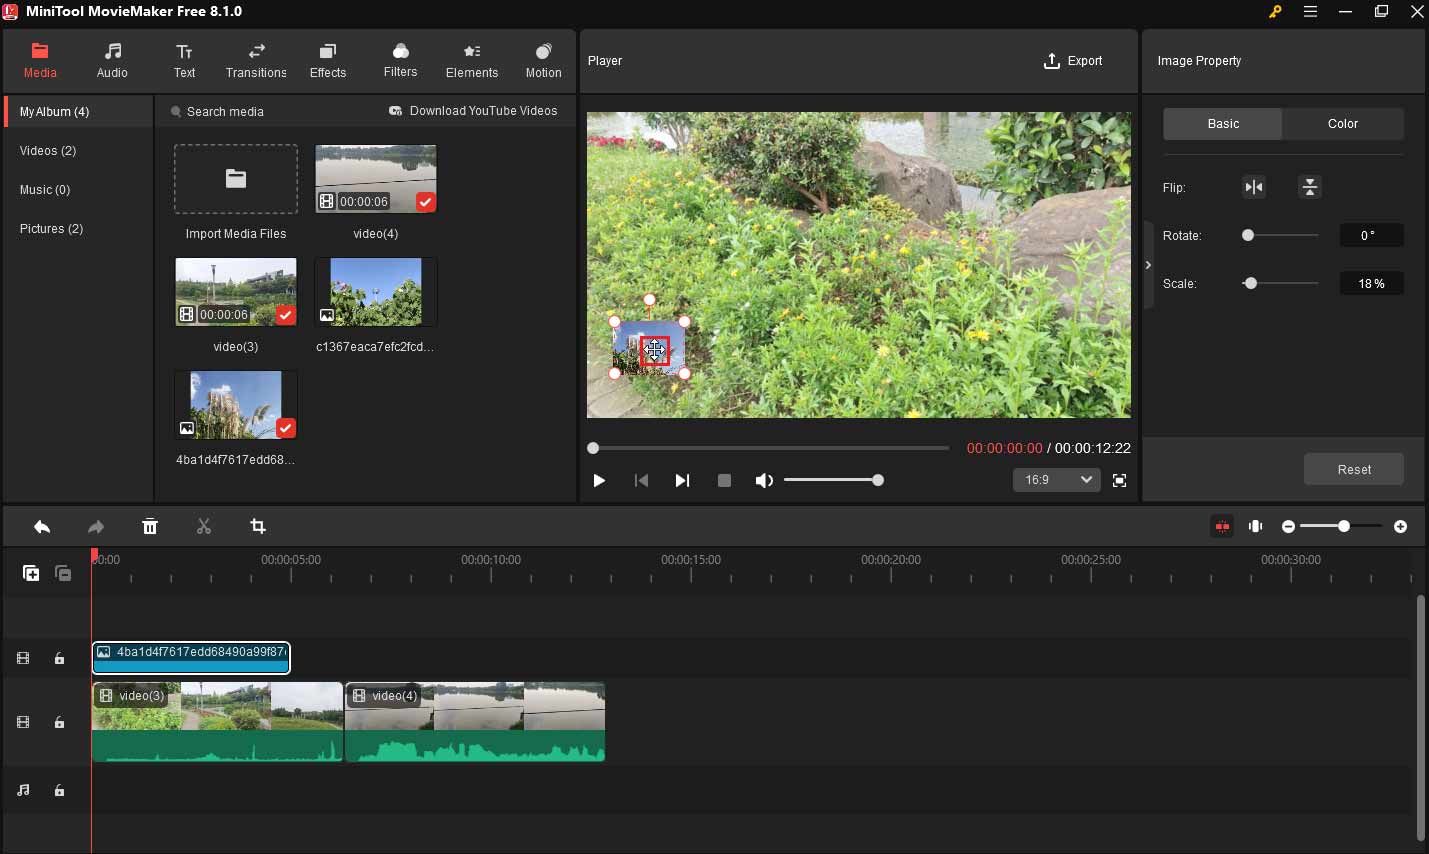
Position the image:
- Click the image in the Player window.
- Place your mouse in the middle of the image.
- When your mouse turns into a four-headed arrow, position the image where you want it to appear on the screen.
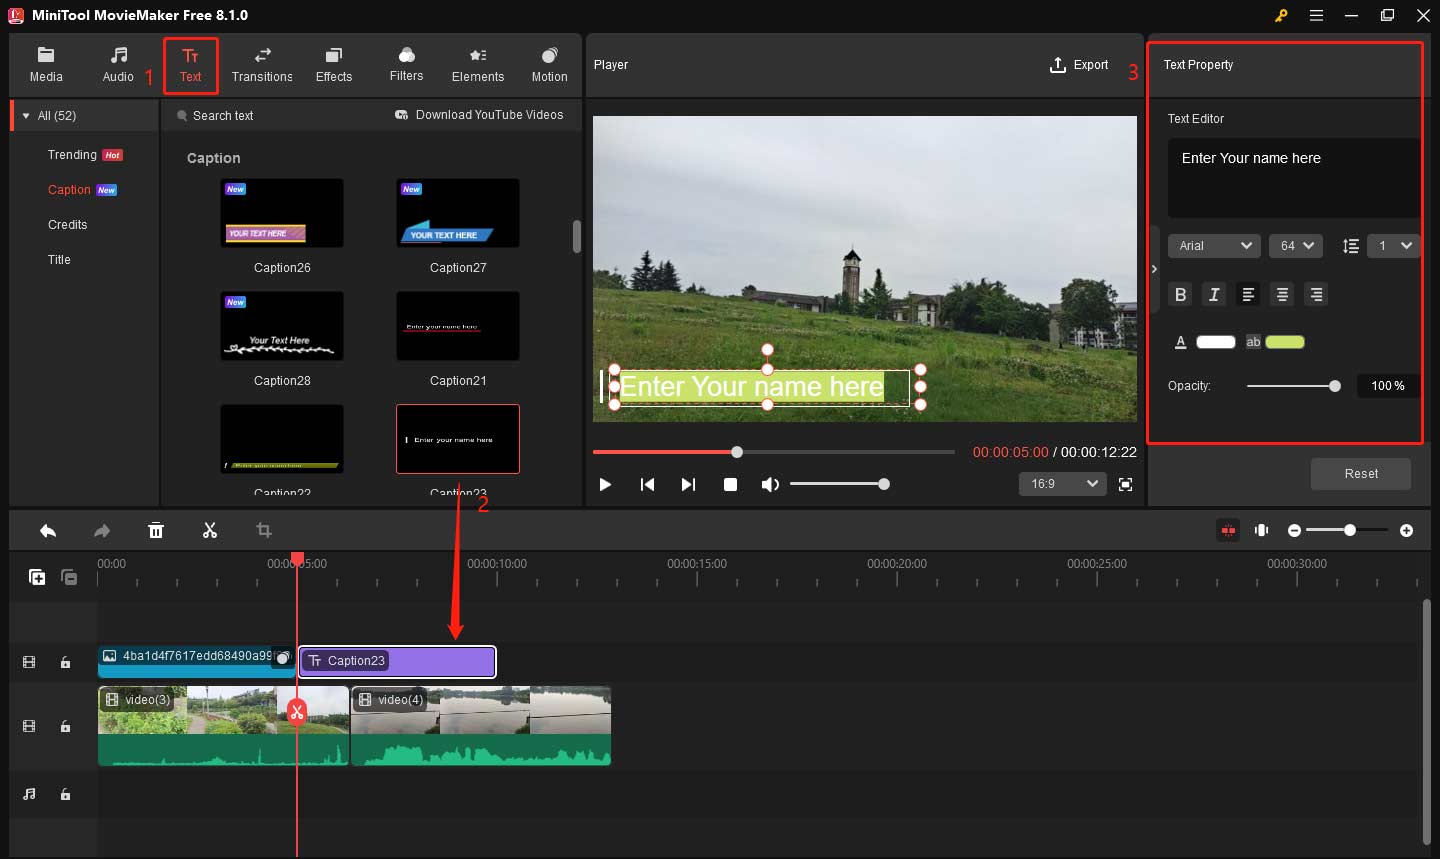
Step 5: Annotate Video with Text
Adding text annotations is another powerful way to communicate with your viewers. Whether you’re adding titles, captions, or notes, here’s how to do it:
- Click on the Text option located in the toolbar above the preview window.
- A list of text templates will appear, and you need to choose the text style that fits your video’s theme.
- Drag the text template onto the timeline above your video track.
- Go to the Text Property window and type the message you want to display in Text Editor.
- Adjust the font, size, color, and more on the screen to match your video’s content.
- Set the text duration by dragging the edge of the text in the timeline.
Step 6: Annotate Video with Arrow
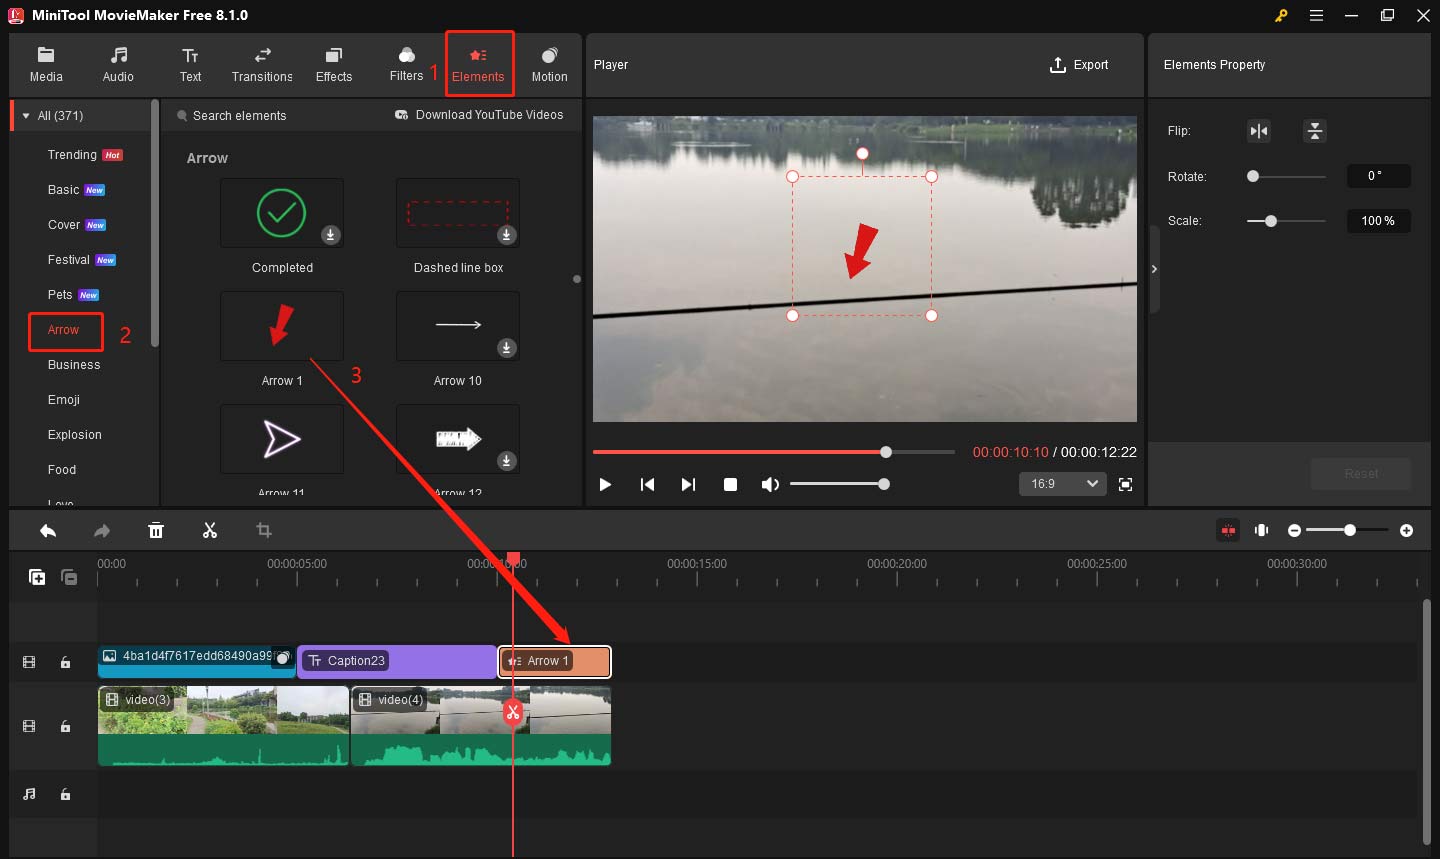
Arrows can help guide your viewers’ attention to specific areas in the video. Whether it’s highlighting a product feature or pointing out an important detail, here’s how to add arrows to your video:
- Click on the Elements button in the top toolbar.
- Choose the Arrow option.
- Browse through the available arrows and select the arrow you want to use.
- Drag and drop the arrow sticker onto the timeline where you want it to appear.
- Position the arrow on the preview screen by dragging it to the desired location.
- Adjust the size and duration of the arrow to suit your needs.
Besides adding arrows, you can also add other elements that you feel can annotate the video, like circles and emojis.
Step 7: Preview and Export
After adding your annotations, it’s time to preview your work and make sure everything looks good. Click the Play (space) button in the preview window to watch your video with all the annotations. Check that all annotations appear at the right time and position. Make sure that the text is legible, the images are in place, and the arrows point to the correct elements.
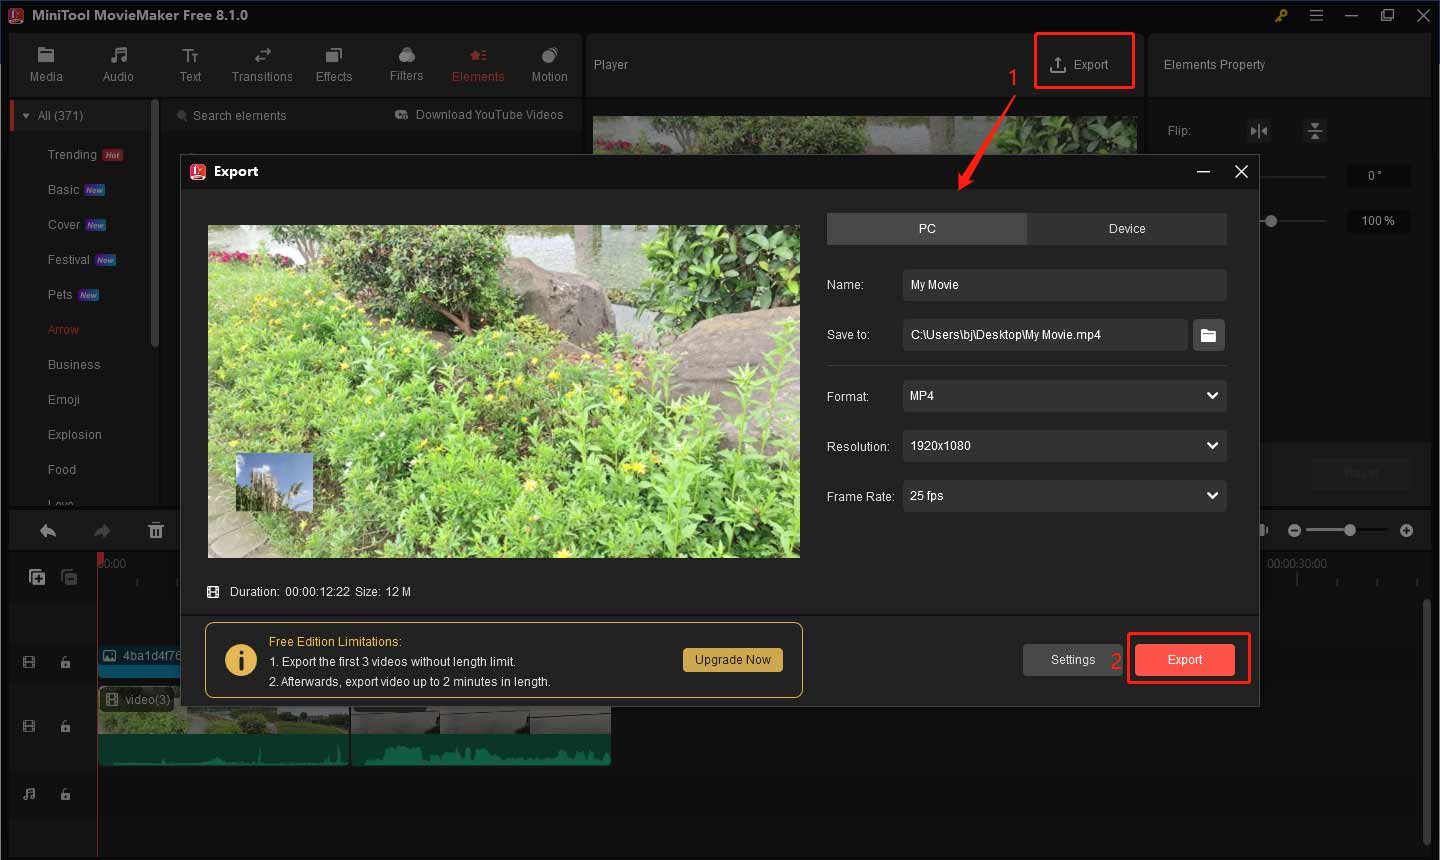
If you’re satisfied with the result, it’s time to export your video. Click on the Export button in the top-right corner of the screen. Choose the desired video format, resolution, and file location. Click Export to save your annotated video to your computer.
Here are some other features of MiniTool MovieMaker:
- It offers a wide range of editing functions, such as trimming, splitting, and merging clips. These tools allow you to quickly adjust the video length or combine multiple clips into one seamless video, perfect for various editing projects.
- It has a collection of built-in video effects and filters. You can easily add these creative effects to your video to enhance its visual appeal, giving it a more professional or unique touch.
- It provides audio editing tools, so you can adjust the audio levels within the video, mute specific sections, or add background music and sound effects to set the right mood and tone for your video content.
- It supports importing and exporting videos in multiple formats, ensuring compatibility with a variety of devices.
Top Tips for Creating Video Annotation
Here are some tips to help you create effective and visually appealing annotations for your videos:
Clarify Your Annotation Purpose
Before diving into the annotation process, take a moment to define your goals. Whether you’re looking to increase viewer engagement, provide explanations, or improve accessibility, understanding the purpose of your annotations will help you make the right decisions throughout the process.
Keep It Simple
Don’t add too many annotations to your video. Focus on key points and keep the text short and clear. Simple annotations are often the most effective.
Use Contrasting Colors
Make sure your text and shapes stand out from the background of the video. Use contrasting colors for better visibility. For example, use white or yellow text on dark backgrounds and black text on light backgrounds.
Mind the Time
Ensure that annotations appear at the right time in the video. They should stay on screen long enough for viewers to read, but not so long that they become distracting. Adjust the time of each annotation to match the flow of the video.
Note the Position
Annotations should enhance the video, not distract from it. Make sure your annotations don’t obscure important visual elements in the video. Position them in areas that don’t detract from the main content.
Test for Different Screen Sizes
Videos are watched on various devices, each with different screen sizes and resolutions. Before finalizing your annotations, test how they look on different devices to ensure they are legible and appropriately placed for all viewers.
Bottom Line
Video annotation is a powerful tool for enhancing your video content. Learning how to annotate a video can significantly elevate the quality. Whether you are creating tutorials, educational videos, or simply adding fun visual elements, annotations help to guide the viewer’s attention, making the video more informative and engaging. By using the right video annotation tools like MiniTool MovieMaker, you can create high-quality annotated videos.
So, start annotating your videos today and see how it can elevate your content. Finally, if you have some problems editing your video with MiniTool MovieMaker, please feel free to contact us via [email protected] for help.


User Comments :