This post from MiniTool MovieMaker (a Windows movie maker) will show you how to brighten a dark photo. Explore this post for effective techniques and tools to make dark photos brighter and enhance your images effortlessly.
Many reasons can make photos look dark, such as underexposure during shooting, light sources, dirty lenses, degraded camera sensor performance, and inappropriate camera app settings. If you have some dark photos, you may want to brighten them for a better viewing experience and image quality. So, how to brighten a dark photo?
In image post-processing, there are different methods for adjusting the light and dark effects of the picture. Here are five effective ways.
Method 1: Use the Image Brightness/Contrast Adjustment Tool
Brightness and contrast are crucial parameters in image editing that affect visual effects and detail presentation.
What Is Brightness
Brightness describes the image’s brightness level, determining the overall light-dark relationship. The brightness adjustment can directly change the image’s lightness and darkness.
When the brightness increases, the image will become brighter, the shadow area will be reduced, and the image transparency will be enhanced, thus creating a clear and bright visual experience. On the contrary, lowering the brightness will darken the image and add a sense of mystery.
What Is Contrast
Contrast refers to the degree of difference between the brightest and darkest parts of an image. Increasing contrast will make the difference between light and dark in the image more vivid and the details more prominent. Conversely, reducing contrast will decrease the difference between light and dark, making the image appear softer.
Overall, brightness and contrast play a vital role in image processing. Reasonable adjustment of brightness and contrast is one of the key steps to obtain high-quality images and effectively brighten dark pictures.
How to Brighten a Dark Photo by Adjusting Brightness and Contrast
On Android: The Google Photos app is the one-stop solution for organizing, editing, and sharing pictures and videos. It allows you to rotate and crop photos, and add filters and offers multiple adjustment tools. For instance, use the Brightness tool to adjust the image’s lightness or darkness, use Highlights to adjust the detail in the brightest areas, use HDR effect to enhance the brightness and contrast across the image, and more.
Just open your photo in Google Photos, click Edit > Adjust, and follow the above tools to brighten it.
On iPhone: Likewise, iPhone users can make adjustments to brighten images in the default Photos app, the home for your photos and videos to view, edit, manage, and share your amazing moments. Regarding editing capabilities, the Photos app offers light and color adjustments, filter effects, stickers, text, and more.
How to brighten a dark photo with the Photos app on an iPhone? Go to the Photos app, tap your photo to open it, and click the Adjust button. Swipe left under the photo to see the lighting adjustments you can make. Tap the lighting settings like brightness, highlights, exposure, and shadows to brighten your pictures.
On Windows: MiniTool MovieMaker is designed as an easy-to-use video editor without watermark that can help everyone, especially beginners, create video from images in minutes, but most of its editing features can be applied to photos, such as text, stickers, frames, overlays, color adjustments, filters, and more.
How to make a dark photo brighter with MiniTool MovieMaker? Follow the steps below:
Step 1. Click the button below to download and install this simple photo editor on your PC.
MiniTool MovieMakerClick to Download100%Clean & Safe
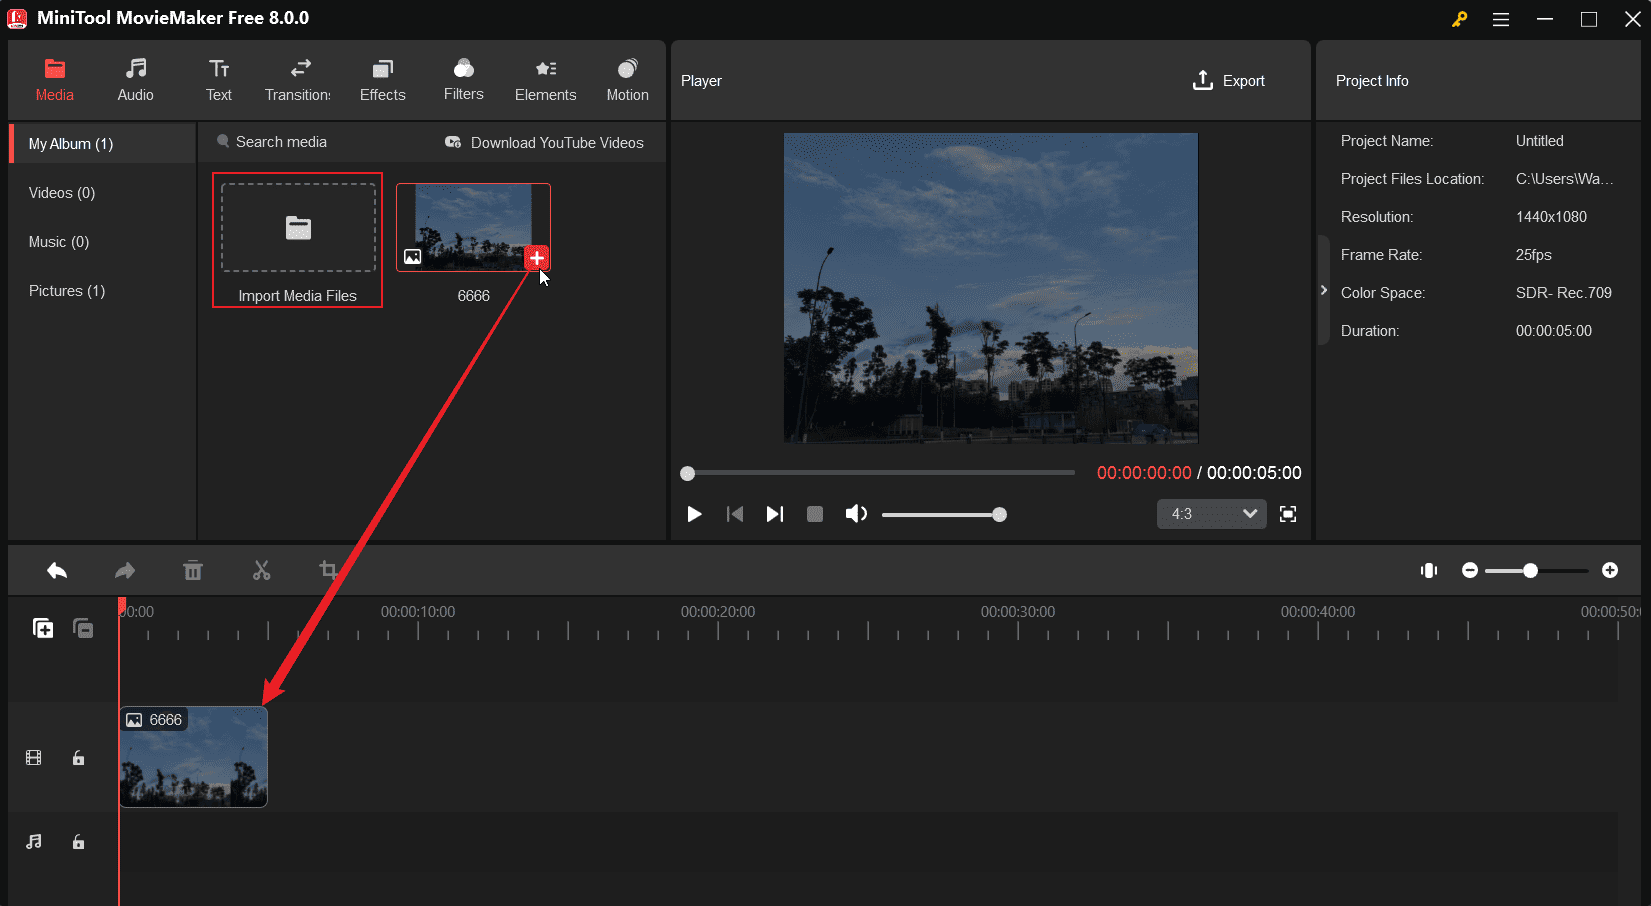
Step 2. Launch MiniTool MovieMaker and close the project library window to enter the main user interface. Click the Import Media Files button to import your photo. You can open PNG, JPG, JPEG, GIF, BMP, ICO, and TIF files in this program. Then, click the + icon on the picture or drag and drop it to the timeline.
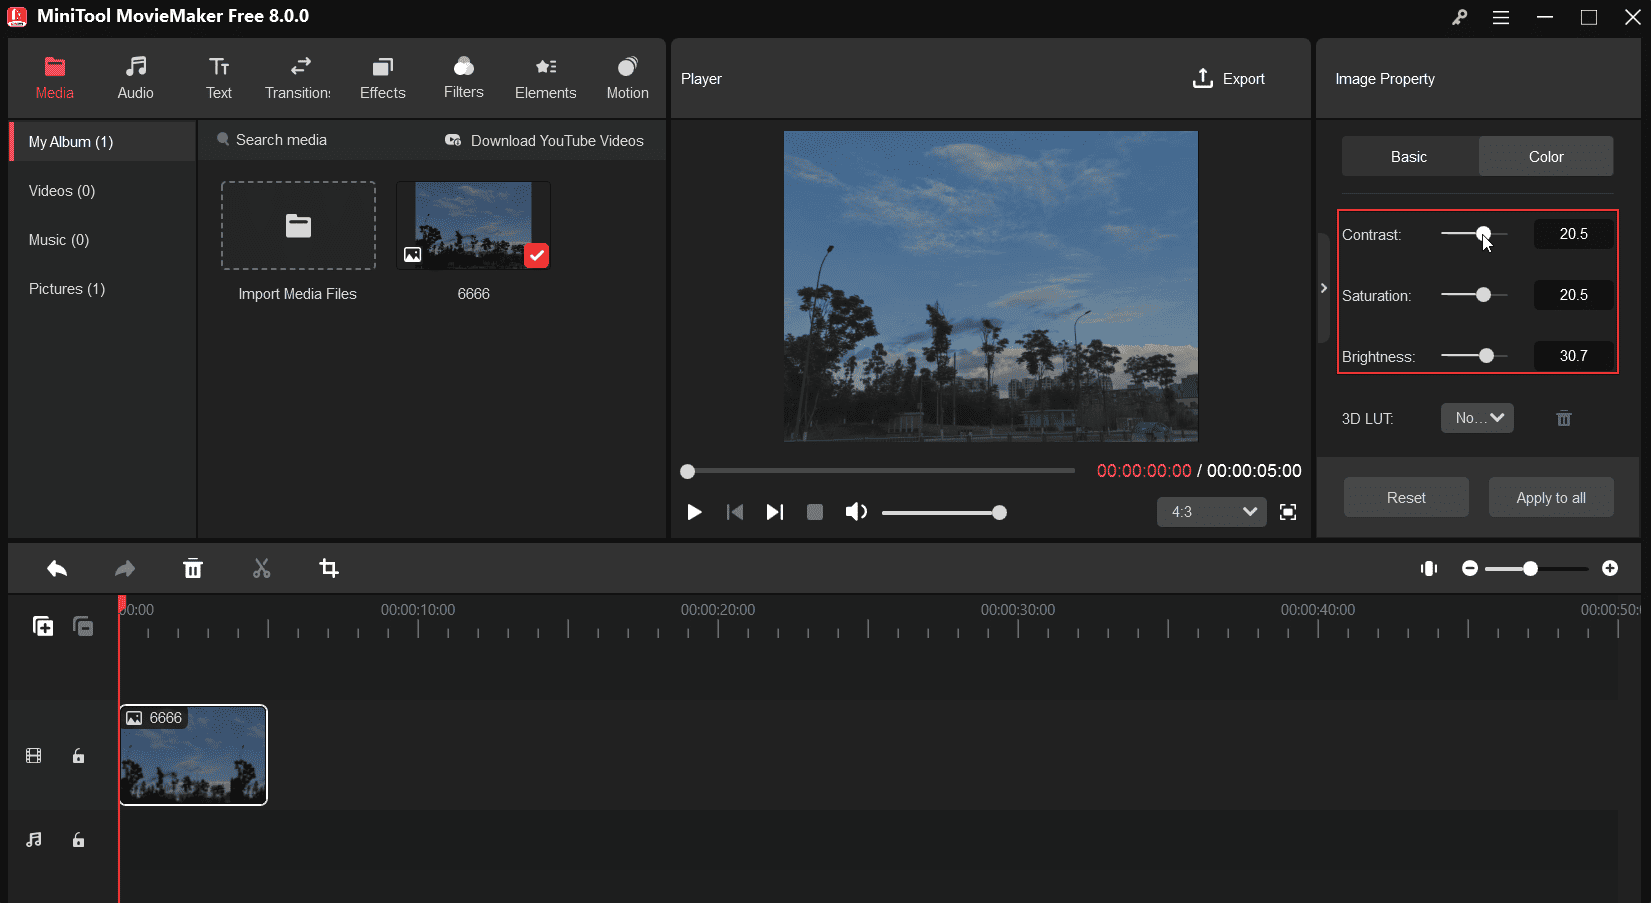
Step 3. Click the photo on the timeline to open Image Property. Switch from the Basic tab to Color and you can see 3 options: Contrast, Saturation, and Brightness.
Move the Contrast and Brightness sliders to the right and check the visual effect simultaneously. Meanwhile, you can adjust Saturation to achieve visual balance and make the picture more harmonious and unified.
Step 4. If you’re happy with the result, click the Export button in the upper right corner. In the Export window, open the Format drop-down list and select GIF. Finally, click the Export button to save the photo. Once done, click the Find Target button to locate your picture.
Other features of MiniTool MovieMaker:
- Rotate photos/videos up to 360 degrees and flip them.
- Crop photo/video to remove unwanted parts on the top, bottom, right, and left.
- Apply trendy transitions between photos and videos.
- Use motion effects to add movement and energy to static images.
- Change the aspect ratio of photos and videos.
- Create picture-in-picture effects.
- Split, reverse, and trim video clips.
- Change the video playback speed.
- Extract audio from the video.
Method 2: Use Filter Effects
Alternatively, you can use filters to brighten your pictures. Filter is an important tool in image editing for various artistic effects. Choosing a filter that suits your photo style can effectively enhance the brightness of your photo. For example, warm-toned filters can add warmth to photos and videos.
What is the best photo filter app? You can try the following two options.
Snapseed
Snapseed is a professional photo editor and one of the best photo filter apps for Android and iOS devices. It includes multiple filters, such as lens blur, frames, black and white, and more. For instance, the HDR Scape filter can create a larger-than-life look for images and lets you adjust Brightness to lighten or darken the whole picture.
Additionally, you can try other filter effects and edit the available parameters such as brightness, contrast, and saturation to adjust the image’s lightness.
Furthermore, Snapseed offers other options to control the tonality of an image. The Tune Image tool enables you to edit the image’s brightness, contrast, saturation, ambiance, shadows, highlights, and warmth. If you want to brighten parts of your photo, the Selective tool can help you achieve that.
MiniTool MovieMaker
MiniTool MovieMaker provides a variety of filters. You can try these filters and edit the color parameters at the same time to brighten your dark photos.
MiniTool MovieMakerClick to Download100%Clean & Safe
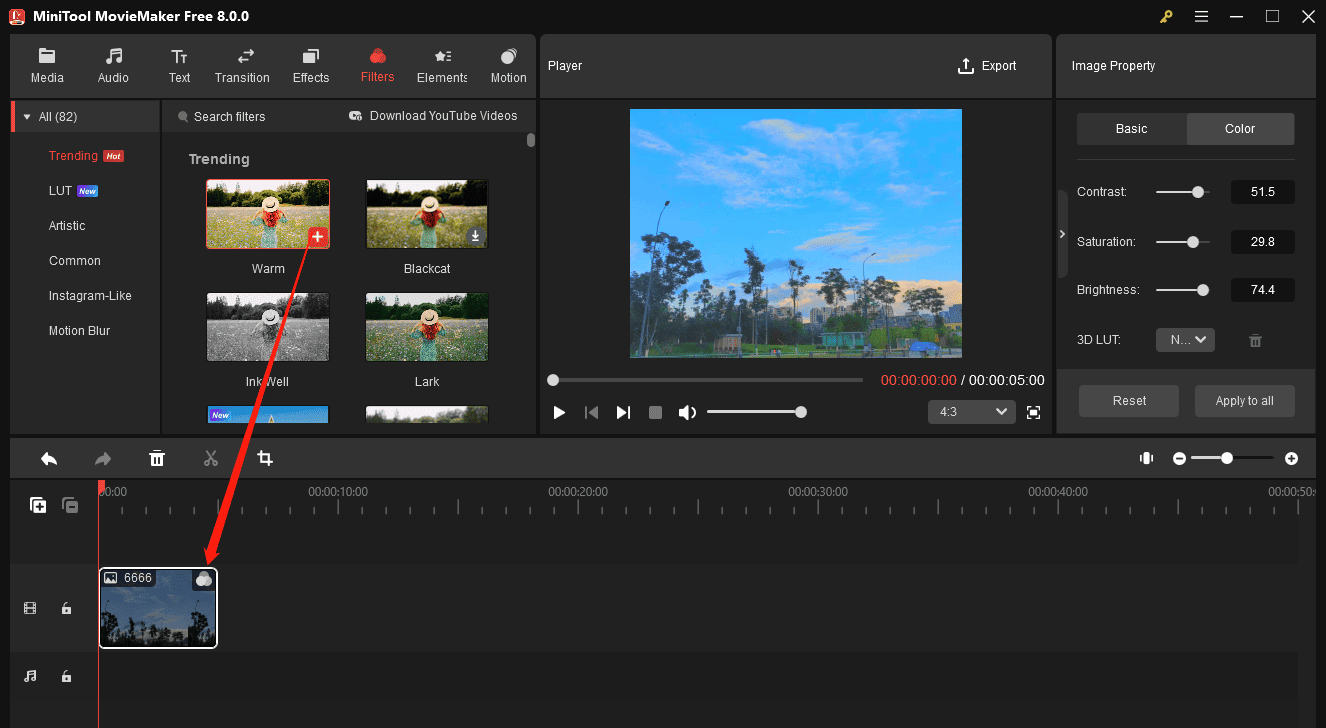
Steps to add a filter to a photo in MiniTool MovieMaker:
Go to the Filters tab at the top, click the small download icon on the target filter effect, and drag it to the image on the timeline. Then, you can see a filter icon in the top right of the clip on the timeline.
Method 3: Brighten a Photo with Exposure Adjustment
In photography, exposure refers to the amount of light reaching your camera’s sensor and directly affects the lightness and darkness of the photo. When the exposure is high, the image will become brighter; when it is low, the image will become darker.
In photo editing, exposure adjustment can be achieved by increasing or decreasing the exposure value. Increasing the exposure will make the photo brighter, while increasing the saturation and contrast at the same time will make the picture more vivid. On the contrary, decreasing these values makes the image darker.
Exposure adjustment is an important technique in image processing. Reasonable exposure can ensure that the details of the photo are clear and the colors are full. Overexposure will make the picture too bright and lose details, while underexposure will make the image too dark and details unclear.
How to brighten a photo through exposure adjustment? Try Pixlr Editor, an online photo editor with a diverse range of editing tools, such as text, drawing tools, filters, effects, and more.
Step 1. Go to the Pixlr Editor website and click the Open image button to open your picture.
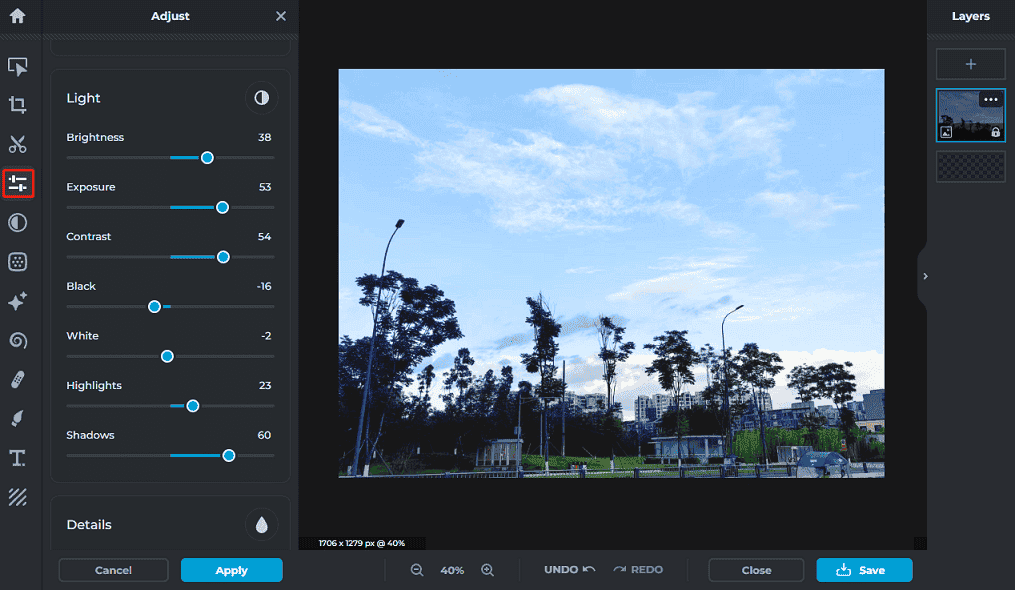
Step 2. Click the Adjust button below the scissors icon on the left sidebar to enable the adjustment tools.
Step 3. Go to the Light section, drag the Exposure slider to the right to increase its value, and you will find the picture becomes brighter. Meanwhile, you can edit other light parameters to make the photo look better.
Step 4. To export your image, click the Save button at the bottom and select an output format.
Method 4: Try Curves Editing in Image Processing
After learning the 3 simple ways to brighten a dark image above, we’ll discuss a more advanced strategy to gain more control over your photo’s brightness and color. That’s the Curves tool.
The Curves tool changes the brightness and contrast of an image by adjusting its tone curve. The color of an RGB image consists of three channels: red, green, and blue. Selecting different channels can alter the values of these colors respectively, thereby changing the color and brightness of the image. Compared to the first 3 methods, the Curves tool allows finer control over the brightness and contrast of the entire image or parts of the picture.
In short, moving the curve upward can make the image brighter, and conversely, moving the curve downward can make the overall image darker.
In general, the Curves tool plays an indispensable role in image processing. Professional image editing software like Photoshop and Lightroom offers this powerful tool for adjusting image brightness, contrast, and color balance.
How to brighten a dark picture via the Curves tool online? Try Fotor, a full-featured online photo editor on your browser.
Step 1. Visit the Fotor website and sign in with your account.
Step 2. Click the Edit a photo option and click the Open image button in the middle of the screen to import your picture.
Step 3. Select the Adjust tool on the left sidebar and then choose Curves to open the Curves editing panel. Then, move the curve upward to darken your image. You can also add key points anywhere on the curve and move these points to allow for fine adjustments to areas of varying brightness.
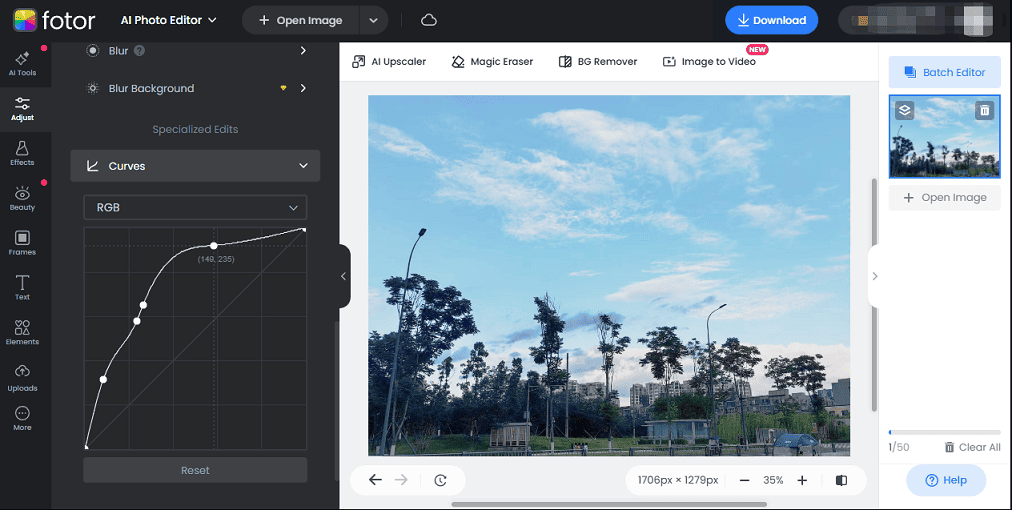
Step 4. If you’re happy with the result, click the Download button and select PNG or JPG to save the picture to your PC.
Method 5: Use the Power of AI to Brighten Images
Now, with the rise of AI-powered image editors and enhancers, image editing is easier than ever. In addition to the traditional methods mentioned above, you can now use AI image tools to brighten dark photos. Here are 3 AI image brightness enhancers worth a try.
YouCam AI Image Brightener
It provides a direct way to brighten images with advanced AI lighting technology. Open your picture saved in JPG, JPEG, PNG, TIFF, and GIF formats and brighten it with one click. This online image editor also lets you remove objects, resize photos, colorize pictures with AI power, and more. Besides, this service offers YouCam Enhance for smartphone users to edit and enhance photos.
Phot.AI Photo Brightener
Phot.AI Photo Brightener is also a great online solution for fixing the light in your images and making them brighter. Once you upload a photo, the service will automatically identify areas where brightness needs improvement and adjust the contrast and lighting in the photo for best results. By the way, it supports JPEG, PNG, JPG, BMP, and WebP formats.
Photoleap by Lightricks
Photoleap by Lightricks is another effective AI image brightness enhancer powerful enough to lighten an entire image or specific areas with AI brightening tools. You can also start with its filters to brighten dark photos for quick results or adjust brightness, exposure, contrast, shadows, and highlights for precise control.
Conclusion
Sometimes, your precious moments are not preserved perfectly due to poor lighting conditions when shooting. This problem is frustrating, but it can be fixed in image editing. This post explains how to brighten a dark photo with 5 tips and corresponding tools. Now, it’s your turn. Select a way to turn your dark or underexposed photos into well-lit work.
Finally, if you have any questions about using MiniTool MovieMaker, please contact us at [email protected] for help.




User Comments :