If you want to urge people to protect the environment, you can try making an environment video. Do you know how to make an environment video? In this article from MiniTool MovieMaker (a free video editor), I will introduce how to create an environment video from all aspects.
The Importance of Making an Environment Video
Before learning how to create an environment video, we should understand its importance. In today’s society, environmental issues have become the focus of global attention. Whether it is climate change, air pollution, or the destruction of ecosystems, these issues are profoundly affecting the planet’s future. The popularization of environmental awareness is a responsibility that can no longer be delayed.
As a powerful communication tool, environment video can effectively attract public concern for environmental protection.
Spreading Environmental Awareness
Through intuitive visual presentation, environment videos make environmental issues concrete and easy to understand. The images, music, and text in the video can directly convey environmental protection information and help viewers understand the consequences of environmental damage.
Encouraging Positive Action
A heart-touching environmental short video can arouse viewers’ concern for environmental issues and inspire them to take practical action. By showing successful environmental cases, solutions, and individual or collective efforts, an environment short video can motivate more people to participate in environmental protection in their daily lives.
Promoting Environmental Policies
Environment videos can also effectively communicate environmental policies and initiatives. Governments, NGOs, and environmental groups can use environmental short videos to communicate policies and calls for action. It can make more people aware of existing environmental policies and their significance.
Key Elements of an Effective Environmental Video
Creating an effective environmental video requires more than just good footage. It’s about telling a compelling story and engaging your audience. Here are some key elements to consider when making an environmental video.
1. Clear Message and Focus
The most important aspect of any video is a clear message. Decide on one central idea or theme, such as climate change, pollution, or conservation. A focused message ensures that your audience understands the purpose of the video and why it matters. Keep the narrative simple and direct to avoid confusion.
2. Strong Visuals
Visuals are essential in environmental videos. The natural world is beautiful, and your video should highlight this. Use high-quality footage that showcases stunning landscapes, wildlife, or environmental challenges. If you don’t have the right equipment, you can also find relevant videos that you can use for free, but only if you have permission from the content creator.
3. Emotional Impact
An effective environmental video must evoke emotion. Whether it’s a sense of urgency, hope, or compassion, your video should stir something in the viewer. Emotional storytelling can drive action. Show real-life examples of how environmental issues affect people, animals, or entire ecosystems. The goal is to make the audience feel connected to the issue, motivating them to take action.
4. High-Quality Sound and Music
Sound is just as important as visuals. Clear narration, natural sounds, and background music can significantly enhance the mood of the video. Choose appropriate music according to the video’s tone. A hopeful theme might have happy music, while an urgent topic might require a serious or dramatic score.
5. Call to Action
At the end of the video, you should make a call to action. After showing the issue, encourage your viewers to do something about it. Whether it’s reducing plastic use, supporting a cause, or getting involved in local environmental projects, make sure your call is clear and actionable. A strong call helps transform awareness into action.
How to Create an Environment Video
Creating an environment short video can be a meaningful experience. It allows you to share important messages and raise awareness about environmental issues. Here’s a full guide on how to create an environment video.
Planning Your Environment Video
Before you start filming, it’s important to plan your video. Think about the message you want to share. Do you want to highlight pollution, promote wildlife conservation, or show the beauty of nature? Your video should have a clear focus.
Start by writing down your ideas. Create an outline or storyboard to organize your thoughts. This will help you stay on track and make the filming process easier. Also, decide on the length of the video. A short and focused video is often more effective than a long one.
Collect Video Material and Filming Your Content
To create an effective environment short video, start by collecting relevant data and materials. Research facts, statistics, and examples that support your message. When filming, choose locations that reflect the theme, such as natural habitats or eco-friendly spaces. Use clear and high-quality equipment to shoot your video content.
Experiment with different angles to add variety. Don’t forget to record natural sounds or interviews to enrich your content. Gather extra footage to give yourself more options during editing. This way, you’ll have a strong foundation for telling a compelling environmental story.
Choosing the Right Editing Tools
To create a professional-looking video, you’ll need the right environment video maker tool. There are many environment video maker options available. Some popular choices for beginners include iMovie and Filmora. For more advanced editing, you might use Adobe Premiere Pro or Final Cut Pro.
Here, I recommend you use MiniTool MovieMaker, a free video editor without watermark. The software has an intuitive interface and offers powerful features to help you create a professional-looking video without any experience.
Here are some key features of this environment video maker:
- Easy-to-Use Interface: MiniTool MovieMaker has a simple drag-and-drop interface, making it easy for beginners to edit their videos. You don’t need any editing experience to get started. All the tools you need are clearly labeled and easy to access.
- Powerful Editing Tools: You can merge, trim and split video clips with ease. This allows you to remove unwanted footage and arrange your clips. You can also rotate or flip your clips if needed.
- Add Transitions and Effects: MiniTool MovieMaker provides a wide range of transitions and effects that can make your video more dynamic and engaging. You can add smooth transitions between clips or use effects to highlight key moments.
- Add Text: Adding text to your video is simple. You can insert captions, subtitles, or call-to-action messages to highlight important information, such as environmental facts or statistics, helping viewers better understand your message.
- Export in Various Formats: Once you’ve finished editing, you can export your video in a variety of formats, suitable for sharing on social media, websites, or other platforms. The software supports popular formats like MP4, MOV, AVI, and more.
Edit Your Video
Let’s see How to create an environment video in MiniTool MovieMaker
Step 1: Download and Install MiniTool MovieMaker
Click the button below to download free video editor. After the file is downloaded, follow the on-screen instructions to install this environment video maker. Once the installation is complete, launch the program, and you’ll be ready to start creating your video.
MiniTool MovieMakerClick to Download100%Clean & Safe
Step 2: Import Media Files
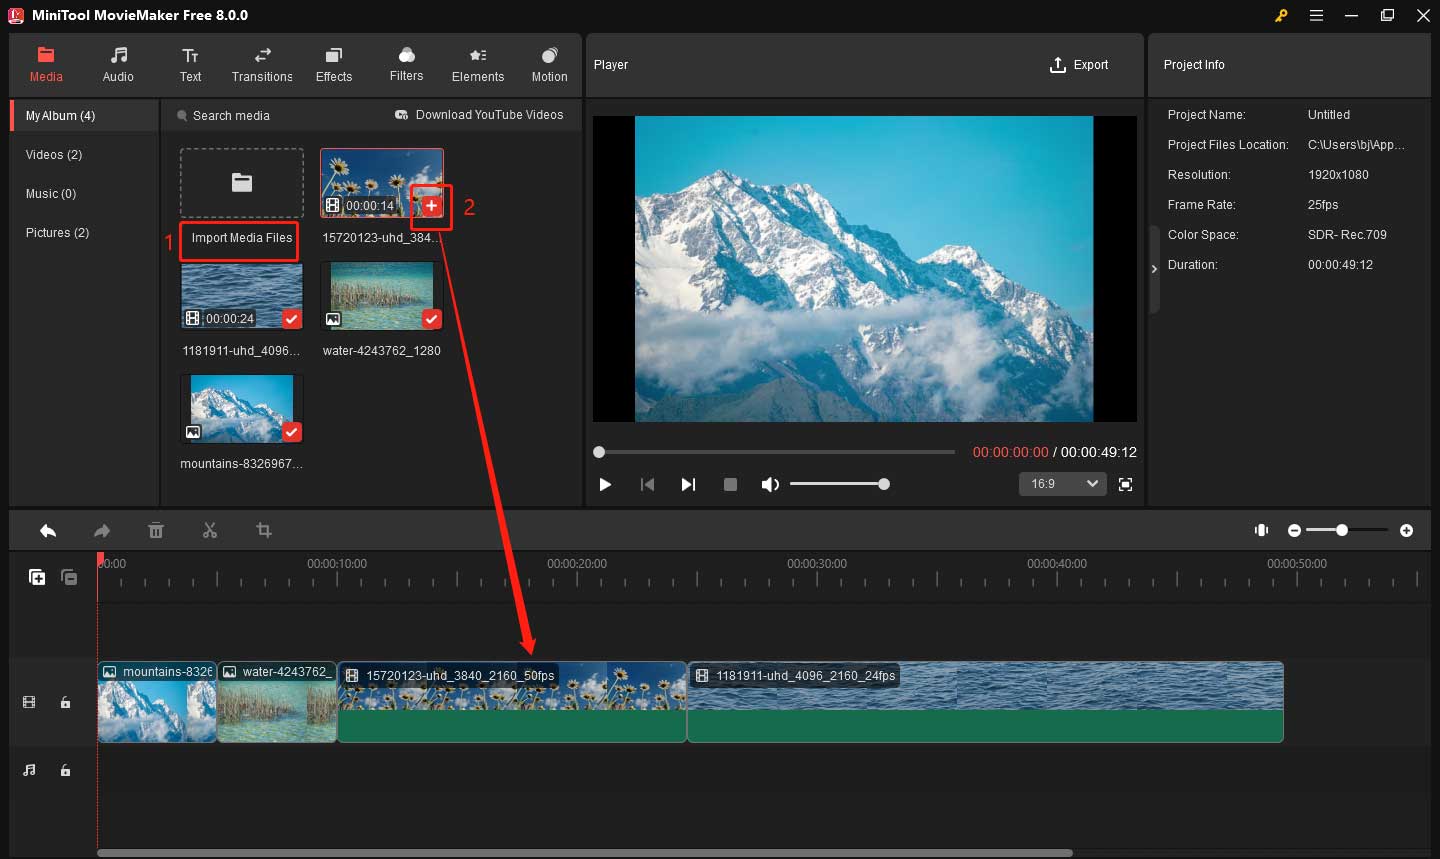
Before you start editing, you need to import your media files into MiniTool MovieMaker. Click Import Media Files to add your video clips and images. You can either drag the files into the software or browse through your folders to find the materials you want. After that, click the plus (+) icon on the target video to add it to the timeline.
Step 3: Trim Video
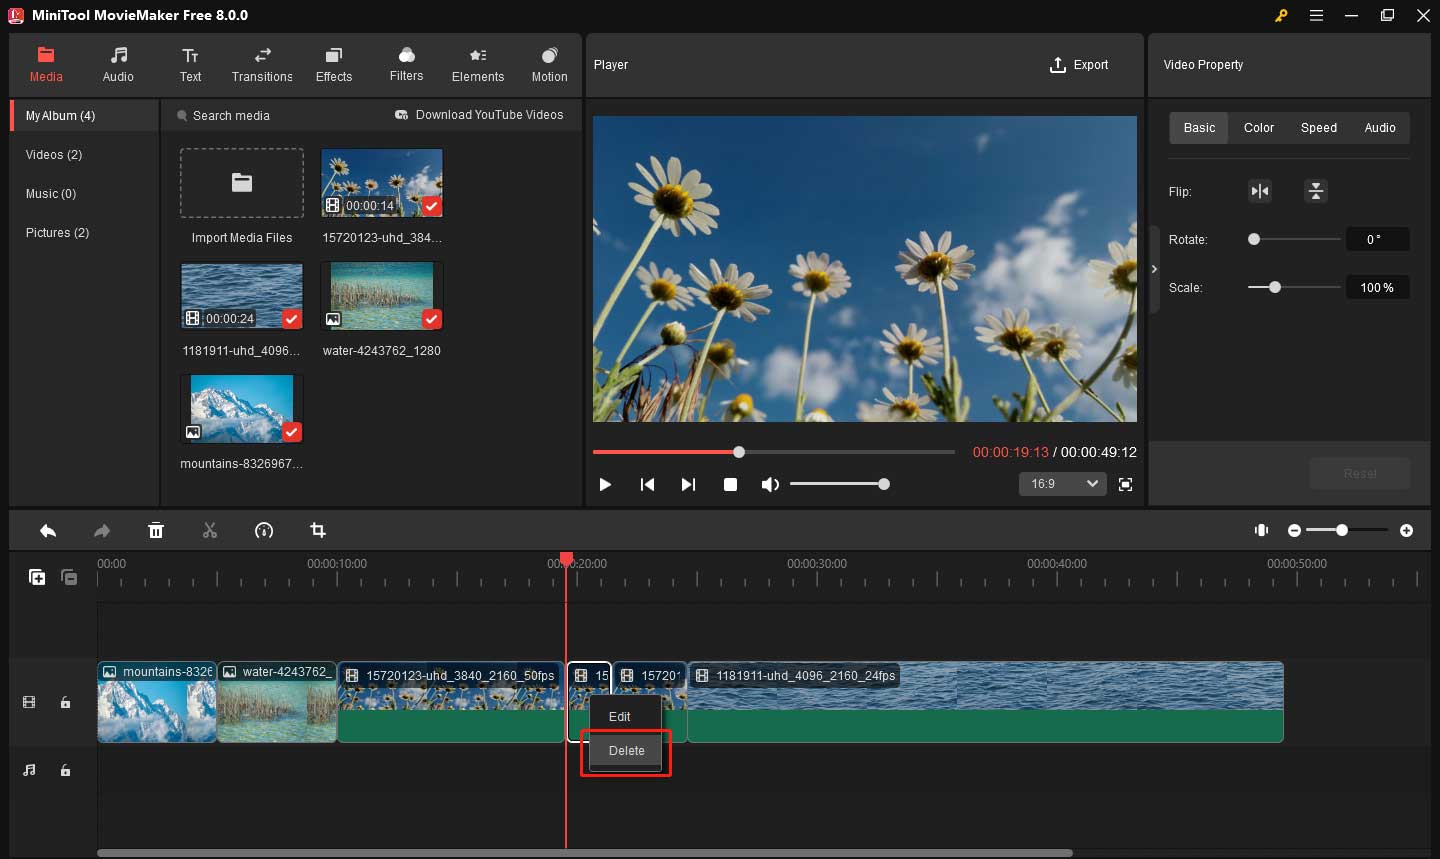
If there are any unnecessary parts in your video, use the split tool to remove them. It helps your video stay concise and focused on the message you want to convey. Follow the steps below to do this:
- Click on the clip to highlight it in the timeline
- Drag the playhead to the beginning of the unwanted part and click the scissors icon on the playhead.
- Drag the playhead to the end of the unwanted part and click the scissors icon on the playhead.
- Right-click on the unwanted clip and choose Delete to remove it.
Step 4: Add Text
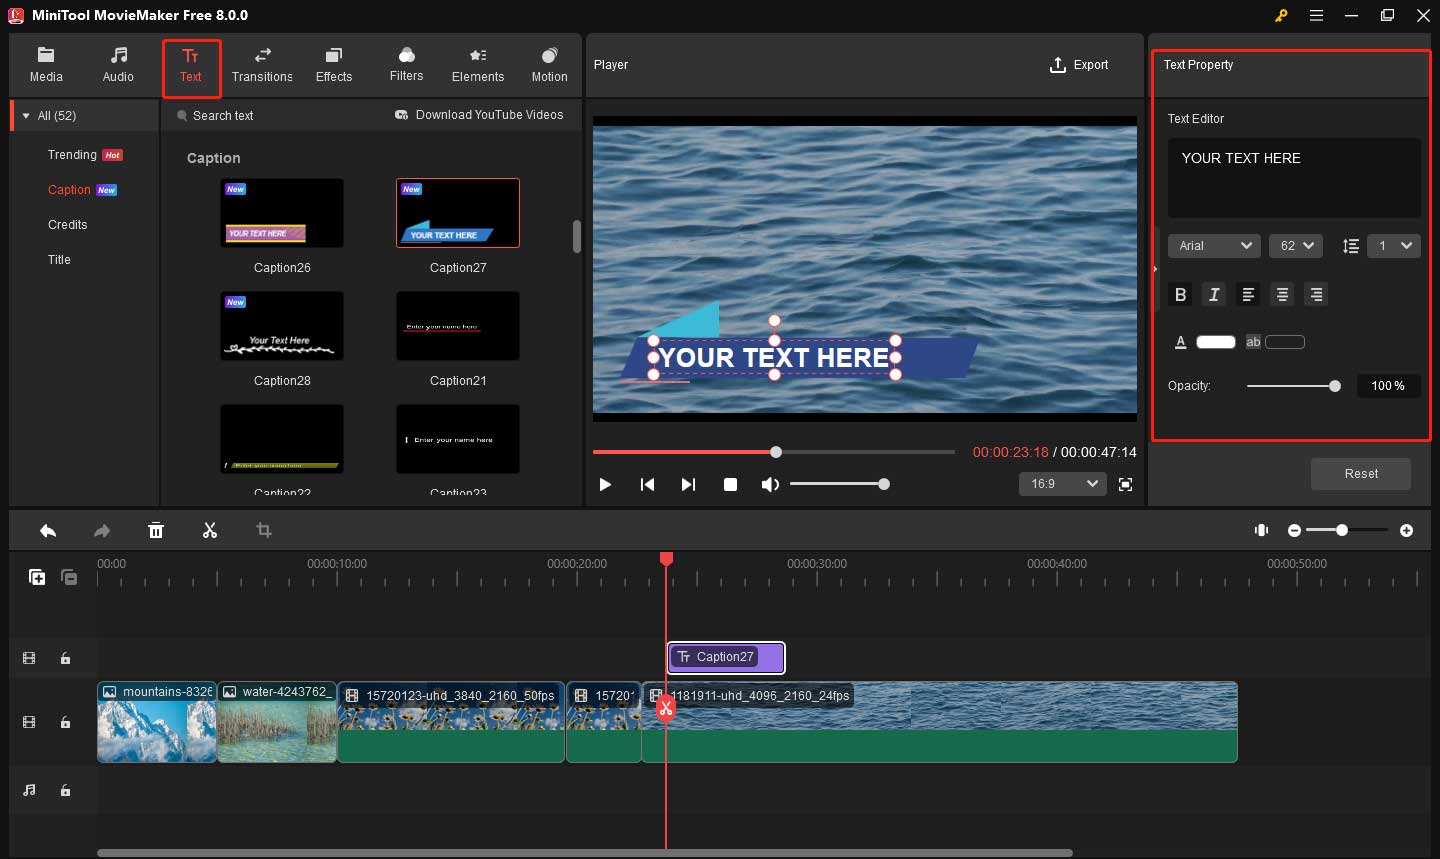
Text is a great way to emphasize key points in your environment short video. You can add titles, captions, or statistics that support your message. For instance, if you show footage of polluted oceans, you could add text saying: Over 8 million tons of plastic enter our oceans every year.
To add text, click the Text button in the top toolbar. You will see three text types including Caption, Credits, and Title. Select the right text type according to your needs. Then, find your favorite text template, download it, and drag it to the timeline where you want it to appear. Go to the Text Property window, and you can change the font, size, and color to suit the style of your video.
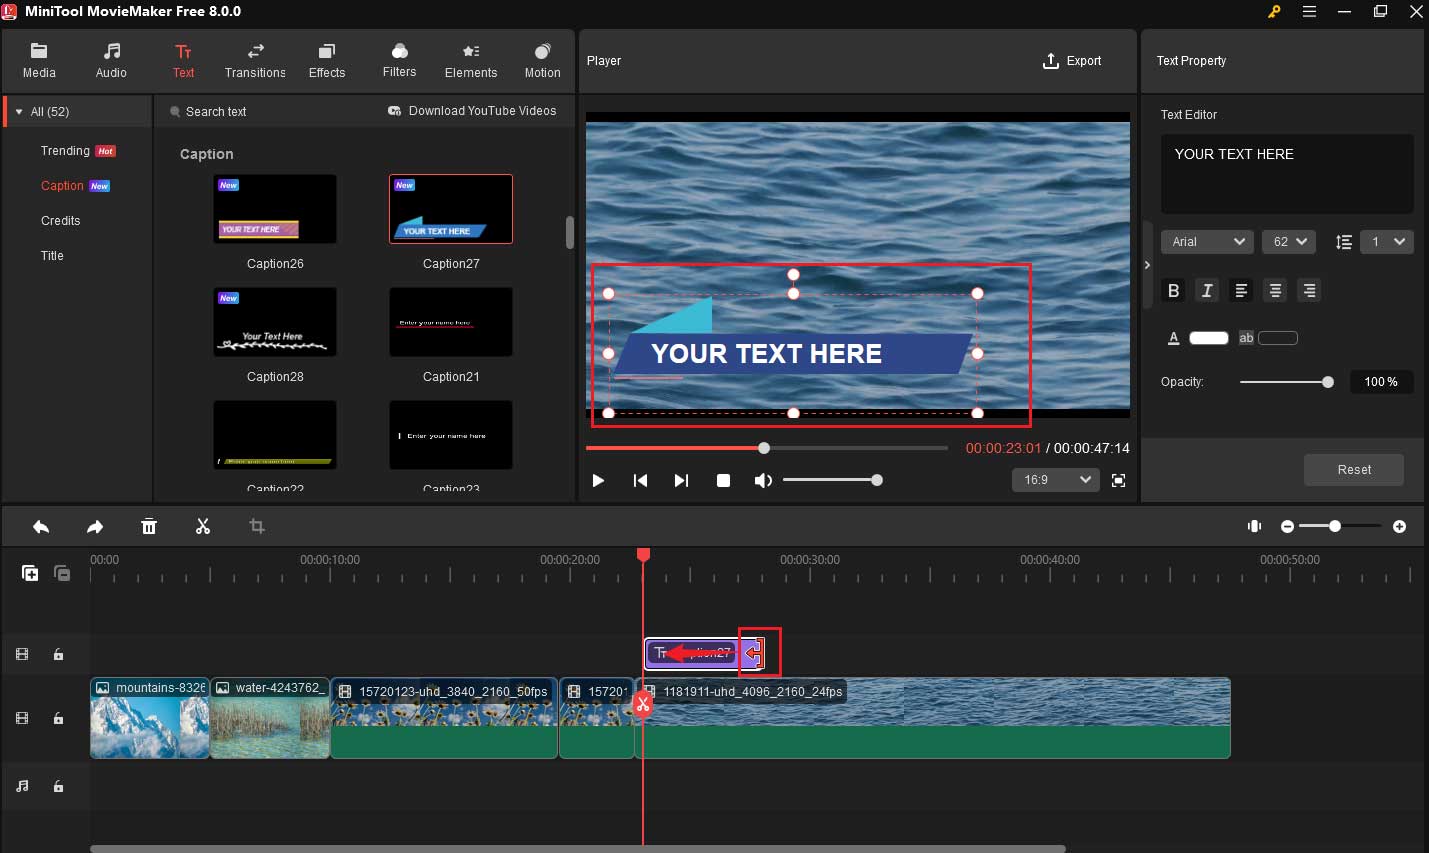
To adjust the text position, you can click and drag your text in the Player window. In addition, you can also adjust the duration of a text layer by dragging its edge.
Step 5: Add Background Music
Background music can enhance the emotional impact of your video. To add music, click the Import Media Files button again and import your audio file. If you don’t have the right music, you can go to the Audio window to find it. After finding the desired music, download it and drag it to the audio track below the video timeline.
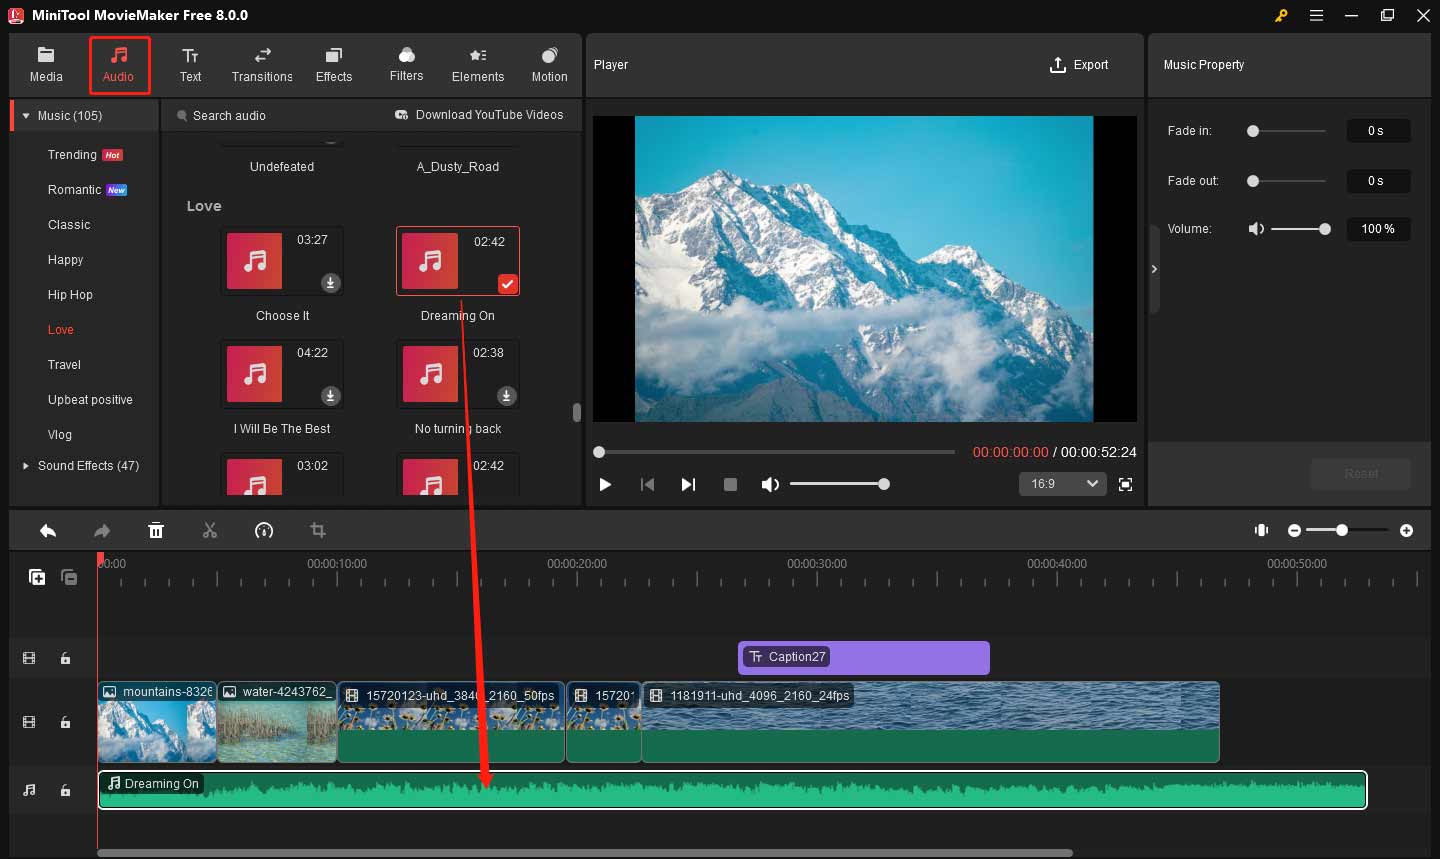
If the music is too long or too short, you can trim it to match the video length. To do this:
- Click the audio in the timeline.
- Put your mouse on the start or end of the audio.
- When the mouse cursor turns into a square bracket with an arrow. Drag the mouse inwards to shorten your audio.
In the Music Property window, you can adjust the volume to make sure the music doesn’t overpower any voiceover or important sounds in your video. You can also add fade effects to your audio to make a smooth transition.
Step 6: Add Filters
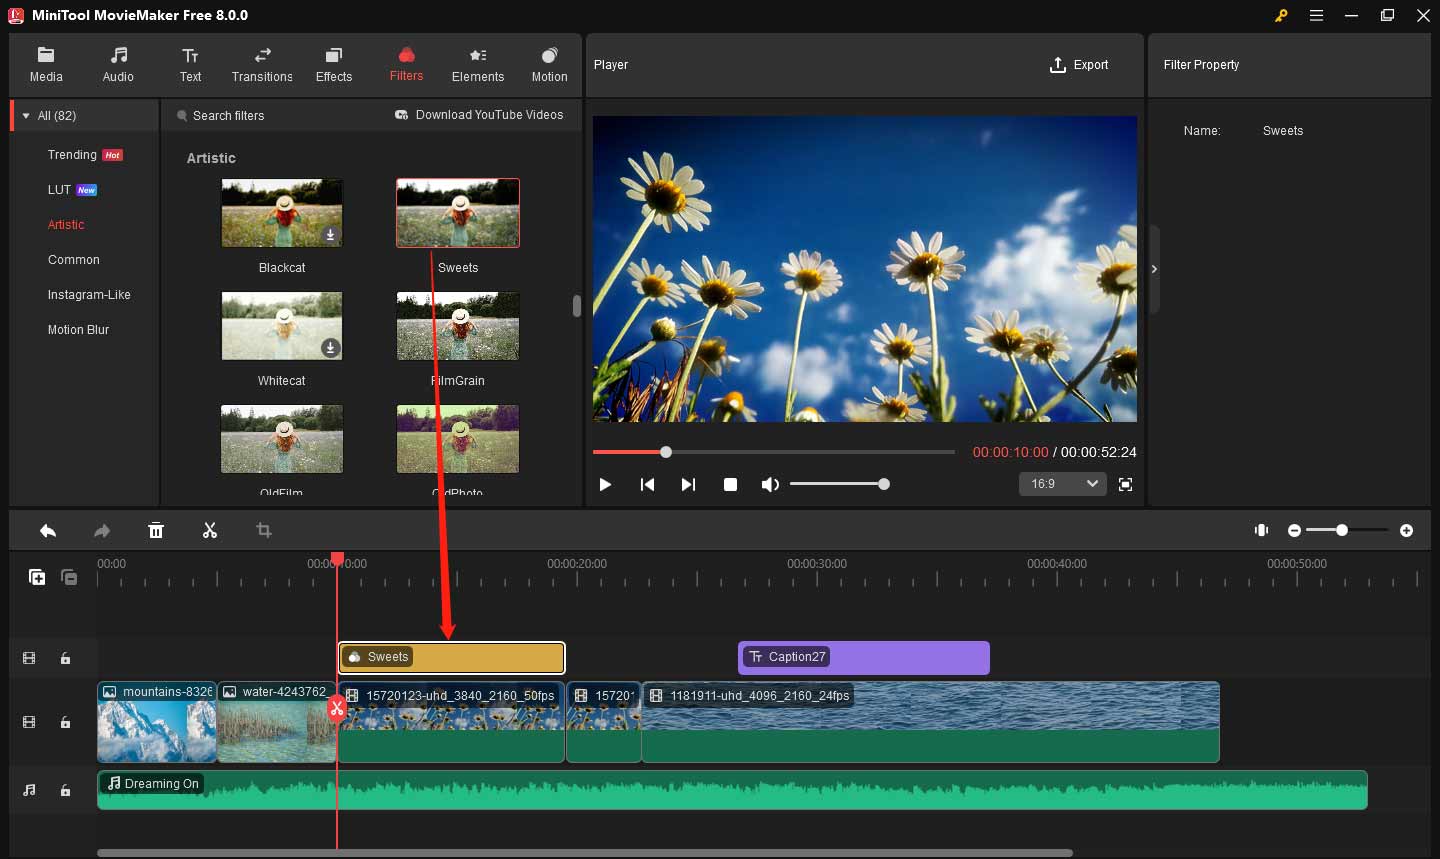
Filters can help set the mood of your video, whether you want a bright and happy vibe or a more serious tone. For example, you can use the Outdoor Action filter to make your outdoor scenes more vivid and colorful. Or, you can use a Black & White filter to get a dramatic effect when showing issues such as deforestation or pollution. To add a filter:
- Click the Filters button in the top toolbar.
- Find an appropriate filter and download it.
- Drag the filter to the timeline above the video clip you want to apply it to.
Step 7: Preview and Export Your Video
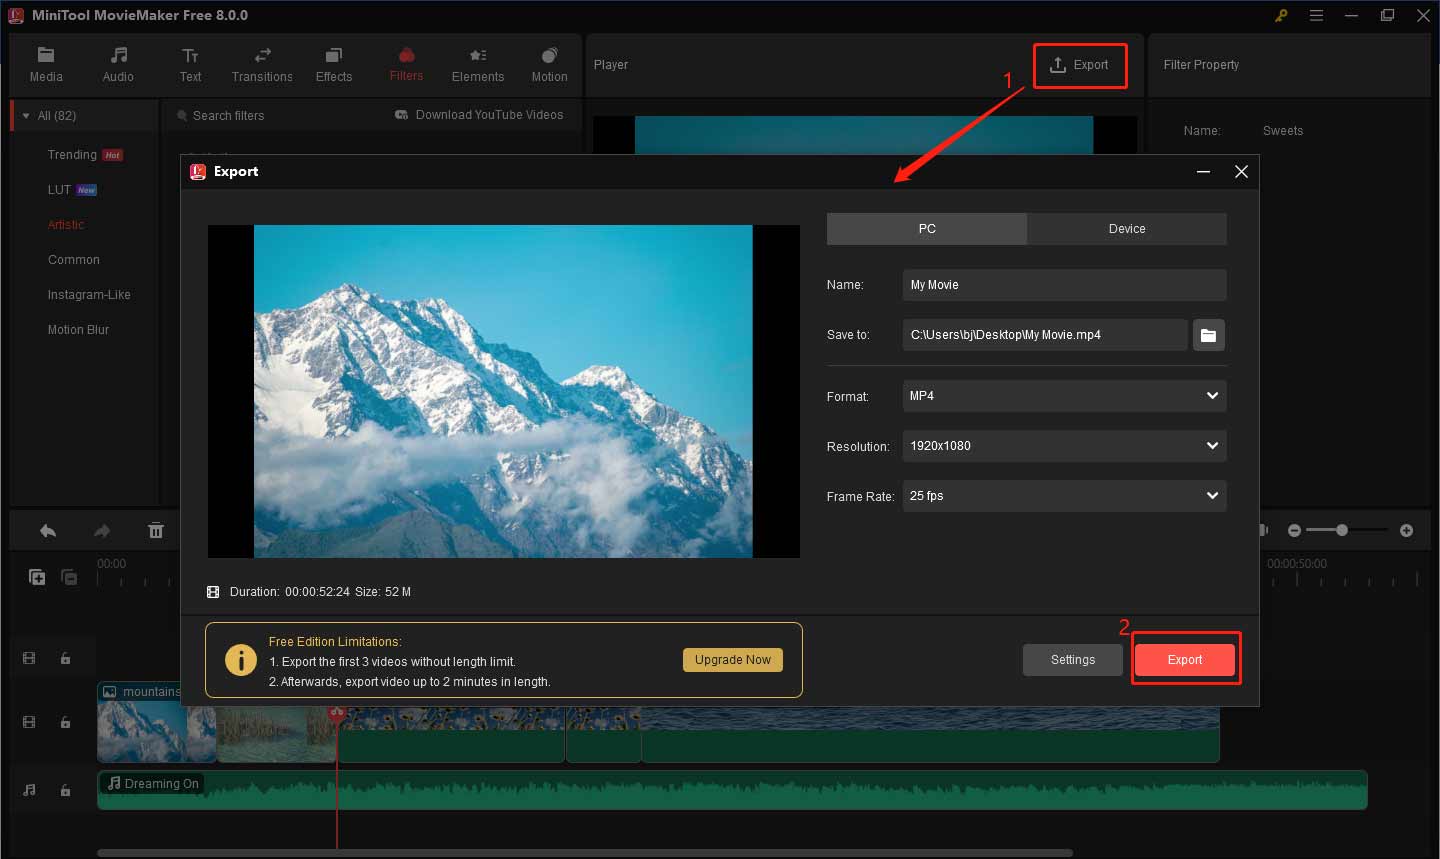
After completing all editing, it’s time to preview it and make any final adjustments. Click the play button in the preview window to watch your video from beginning to end. If you’re happy with the video, you can click the Export button in the top-right corner of the screen. In the output window, you can set the video name, location, format, and resolution. Finally, click Export again.
Post Your Video
Once your video is ready, it’s time to share it. Choose the right platform for your audience, such as YouTube, Instagram, or Facebook. Write a clear and catchy description, including relevant hashtags to reach a wider audience. Make sure to add any important links, like environmental organizations or resources.
Engage with viewers by responding to comments. You can also collaborate with influencers or groups focused on sustainability to increase visibility. Posting your video regularly and promoting it can help spread your environmental message to more people.
Bottom Line
In summary, knowing how to create an environment video is about capturing the right moments and telling a clear story. Start by planning your shots carefully, focusing on the environment you want to show. Pay attention to light, sound, and the overall mood of the video. Editing is crucial to make sure your message is clear and impactful. Keep your video simple, engaging, and informative.
By following these steps, you can create an environment video that effectively raises awareness and inspires action. If you have some problems editing your environment videos with MiniTool MovieMaker, please feel free to contact us via [email protected] for help.



User Comments :