With the development of digital information, more types of data transfer come into being like video streaming. Thus, more and more people need to create videos to express what they want others to know. So, they need a video creator or editor to help them complete the task.
There are numerous video editing programs and video-making software in the market including many products developed or provided by famous enterprises like Microsoft, Apple, Adobe, etc. Yet, does Google have a video editing program? Let’s see!
Does Google Have a Video Editor?
Does Google have video editing software? The answer is yes. Of course, Google has video editing software and more than one. The following will introduce the popular ones to you.
Google Photo Video Editor
First of all, let’s see the most popular Google video editor – Google Photos. Although Google Photos is usually defined as a photo/video sharing and storage service that mainly manage pictures and videos, it can also be used to create videos, which is what many users don’t know.
Google Photos’ different kinds of machine learning enable photo content recognition. Thus, it automatically generates albums and animate similar pictures into quick videos as well as display old memories at significant times and improve the photos/videos quality.
Anyhow, you are able to edit your videos with filters, special effects, and more from your mobile devices in Google Photos.
Google Android Video Editor
Firstly, let’s introduce how to take advantage of the Google Photos app on Android smartphones.
For preparation, you need to download and install Google Photos on your Android mobile from Google Play Store. Please pay attention to the below items.
- Some video editing functions like crop, filters, and straighten are only available on Android phones with no less than 2 GB RAM and running Android 6.0 and higher versions.
- Other video editing features such as trim and rotate are still available on Android devices with at least 512MB of RAM.
After successfully installing Google Photos on your machine, just sign in with your Google account. Then, you can start editing your video from launching the application.
# Trim, Mute, Stabilize, or Export a Still from Your Video
Just follow this guide.
- Open the video you want to edit.
- Tap the Edit icon.
- Tap and drag the trim handles to choose the video period that you want to keep. It will automatically cut off the rest part of the video. If you want to save a copy of the video with your edits, just click Save copy at the bottom right corner.
- Tap the speaker icon to mute or unmute your video.
- Tap the blank square icon with a solid black square within to stabilize the video.
- To export a frame from the video, just tap Export frame.
# Crop/Rotate Your Video
You can crop or rotate a video with the following instructions.
- Open the target video in the Google Photos video editor.
- Tap Edit > Crop.
- If you’d like to resize the video to a different aspect ratio, just tap the Aspect ratio icon and select your desired shape.
- If you want to change the perspective of the video, just tap the Transform icon and drag the dots to the edges of your video or tap Auto.
- To rotate the video 90 degrees, tap Rotate icon. If you just want to make minor adjustments to straighten the video, use the dial above the Rotate icon.
- To automatically straighten the video, tap Auto. This utility’s availability depends on the target video.
Similarly, if you want to save a copy of the video with your adjustments, make use of the Save copy option at the lower right.
# Add an Effect to Your Video
To assign an effect to a video, do this:
- Open your video.
- Go to Edit > Adjust.
- Pick up the effect you prefer and navigate to the dial.
- Brightness: adjust the exposure.
- Contrast: adjust the difference in tones.
- White point: adjust the brightest value.
- Highlights: adjust the detail in the brightest areas.
- Shadows: adjust the detail in the darkest areas.
- Black point: adjust the darkest value.
- Saturation: adjust the intensity of colors.
- Warmth: adjust the color temperature.
- Tint: adjust the hue.
- Skin tone: adjust the saturation of the skin-colored tones.
- Blue tone: adjust the saturation of the blue tones such as sky or water.
- Vignette: reduce the brightness around the edges of the video.
- Tap Done to complete.
If you want to undo an effect, just deselect the option or use Cancel.
# Add a Filter to Your Video
In the color filters part, you can apply one of the usual filters (e.g. Plama or Metro) to your video.
- Open your video in Google Photos Movie Maker.
- Move to Edit > Filters.
- Choose a filter.
- If you’d like to change the strength of the filter on the video, just tap the filter again and move the dial.
That is done. If you want to delete a filter, select None.
# Draw on or Highlight a Video
Besides, you can draw on or highlight a video in Google video maker.
- Start the video you plan to edit.
- Switch to Edit > Markup.
- To draw on the video, tap the Pen icon and start drawing as you like.
- To add highlights, just select the Highlighter.
- Tap Done to finish.
Still, tap Save copy to save a copy of the video with your changes.
Google Video Maker App on iPhone/iPad
In addition to the Android operating system (OS), you can also apply Google video creator – Google Photos app on iOS and iPad OS. Within those Apple mobile devices, you can do the above editing operations as well. The way is nearly the same as that in Android devices.
Google Chromebook Video Editors
There are many Google movie making software on Chromebook.
Google Photos
What’s the best video editing software for Google Chromebook? Of course, that’s Google Photos too! Google rolled out the video editing features in Google Photos to its Chromebook in 2022. With the new version of Google Photos on Chromebook, you can create end-to-end videos from various video clips, music, pictures, title cards, and so on with a few taps.
Moreover, you are provided with beautiful video themes to choose from. No matter you start from a theme or a blank slate, you can trim video footage; change its brightness, contrast, shadows, and more; apply one of the Real Tone filters; add a song to your video; add a title card to describe your masterpiece…
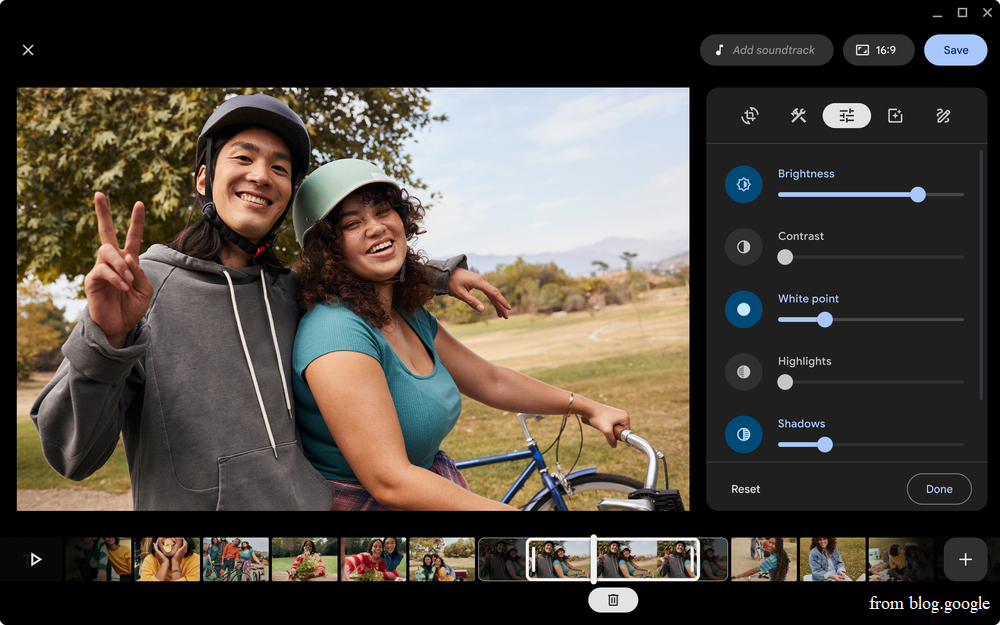
Google video editing software on Chromebook integrates with Chromebook’s Gallery and Files apps. Thus, if you open a video in the Gallery program, you can continue editing it in Google Photos with a tap. Besides, you are able to take advantage of the media files you saved on your Chromebook to compose your video.
LumaFusion
If you want more professional video editing, you can use the LumaFusion app on Chromebook. LumaFusion’s multitrack video editor allows you to add audio tracks, sound effects, images, visual effects, transitions, distortions, narration, color grading, and so on to your video.
Canva
Canva is a free video and photo editor. It can create videos, social media posts, photo collages, etc. Canva is famous for its one-tap animations and fun music for Instagram stories and video collages.
Google Drive Video Editor – Movie Studio Video Editor Google
MovieStudio is an online Google video editor to create, edit, and record videos. With it, you can add video clips, audio, images, as well as texts to create your customized video. Here are the main features of MovieStudio.
- Works with Google Drive
- Supported media file formats: MP4, WEBM, MP3, GIF, PNG, JPG, and TEXT.
- Add and edit video clips: you can add local resources or directly add online video clips by offering their URL links.
- Add and edit sounds.
- Add texts to your video.
- Record video clip to insert into the target video: the recorded footage are imported into the Gallery together with other materials.
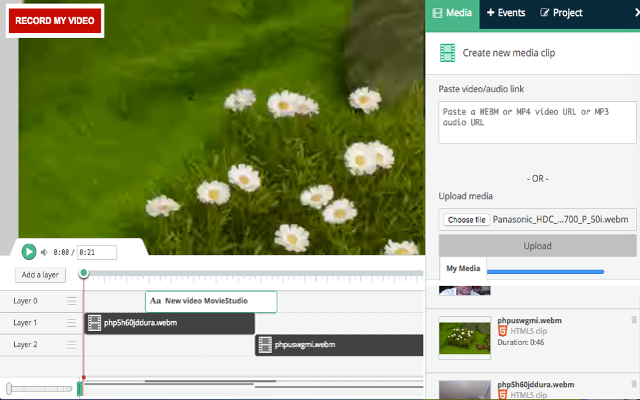
How to Use MovieStudio to Edit a Video?
In general, there are a few steps to make a video with MovieStudio.
- Download and install MovieStudio app on your PC.
- Open MovieStudio and go to its main interface.
- Add the source media files (videos, audio, pictures, texts, etc.) either from local storage or online locations to the tool’s Gallery platform.
- Drag those media files to the below layers in the timeline.
- Edit your video in the following aspects:
- Extend or shrink the length of the video.
- Prolong or shorten the audio.
- Turn off the video portion of your clip.
- Turn off the audio portion of your clip.
- Turn the volume down.
- Decorate your video with texts in the Events tab.
- Adjust the time point (start time and end time) of the texts.
- Personalize the font and color of the texts.
- Manage how texts transition on and off the canvas.
- Add pics into your video from Events.
- Decide the time point of the added photos.
- Finally, export your edited video in MP4 format.
Google Movie Maker for Windows & Mac
To be strict, there is no Google video editor for Windows or Mac computers. That is to say, Google Photos isn’t available on desktops. You can only access Google Photos storage indirectly from Google Drive on Windows and Mac devices.
Fortunately, you can take advantage of Google movie editor alternatives to create and edit videos on desktop computers. For example, MiniTool MovieMaker for Windows 7/8/10/11 and iMovie for Mac PCs.
The following will take Google movie maker for Windows 7/8/10/11 – MiniTool MovieMaker for instance to show you how to create/edit a video on Microsoft OS.
MiniTool MovieMakerClick to Download100%Clean & Safe
Step 1. Download and install MiniTool MovieMaker on your Windows PC.
Step 2. Launch this program and enter its main interface.
Step 3. Click Import Media Files in the upper left under the Media tab to add video clips, songs, or pictures to its library.
Step 4. Drag and drop the imported media files onto the below timeline.
Step 5. Move to the Transition tab to add transitions between video clips or graphics on the track. You can specify the mode of the transition in the Transition Property section which appears when you select the target transition.
Step 6. Go to the Effect tab to apply a filter to the desired clip or image.
Step 7. Navigate to the Text tab to add text to your video. You can also add a title or credits to your video. You can change the font, size, color, opacity, etc. of your added texts in the Text Property.
Step 8. In the Motion tab, you can pick up a motion for the target photos or video.
Step 9. Switch to the Elements tab to decorate your video with animated stickers. You can flip/rotate the stickers or change their scale in the Elements Property.
Step 10. Adjust the duration, contrast, saturation, and brightness of the pictures or video clips; add 3D LUT to them; flip or rotate videos or images; change the video speed or reverse it.
Step 11. Fade in or fade out your audio file or change its volume to a proper level in Music Property.
Step 12. Export the well-edited video in different formats or compatible with different devices.
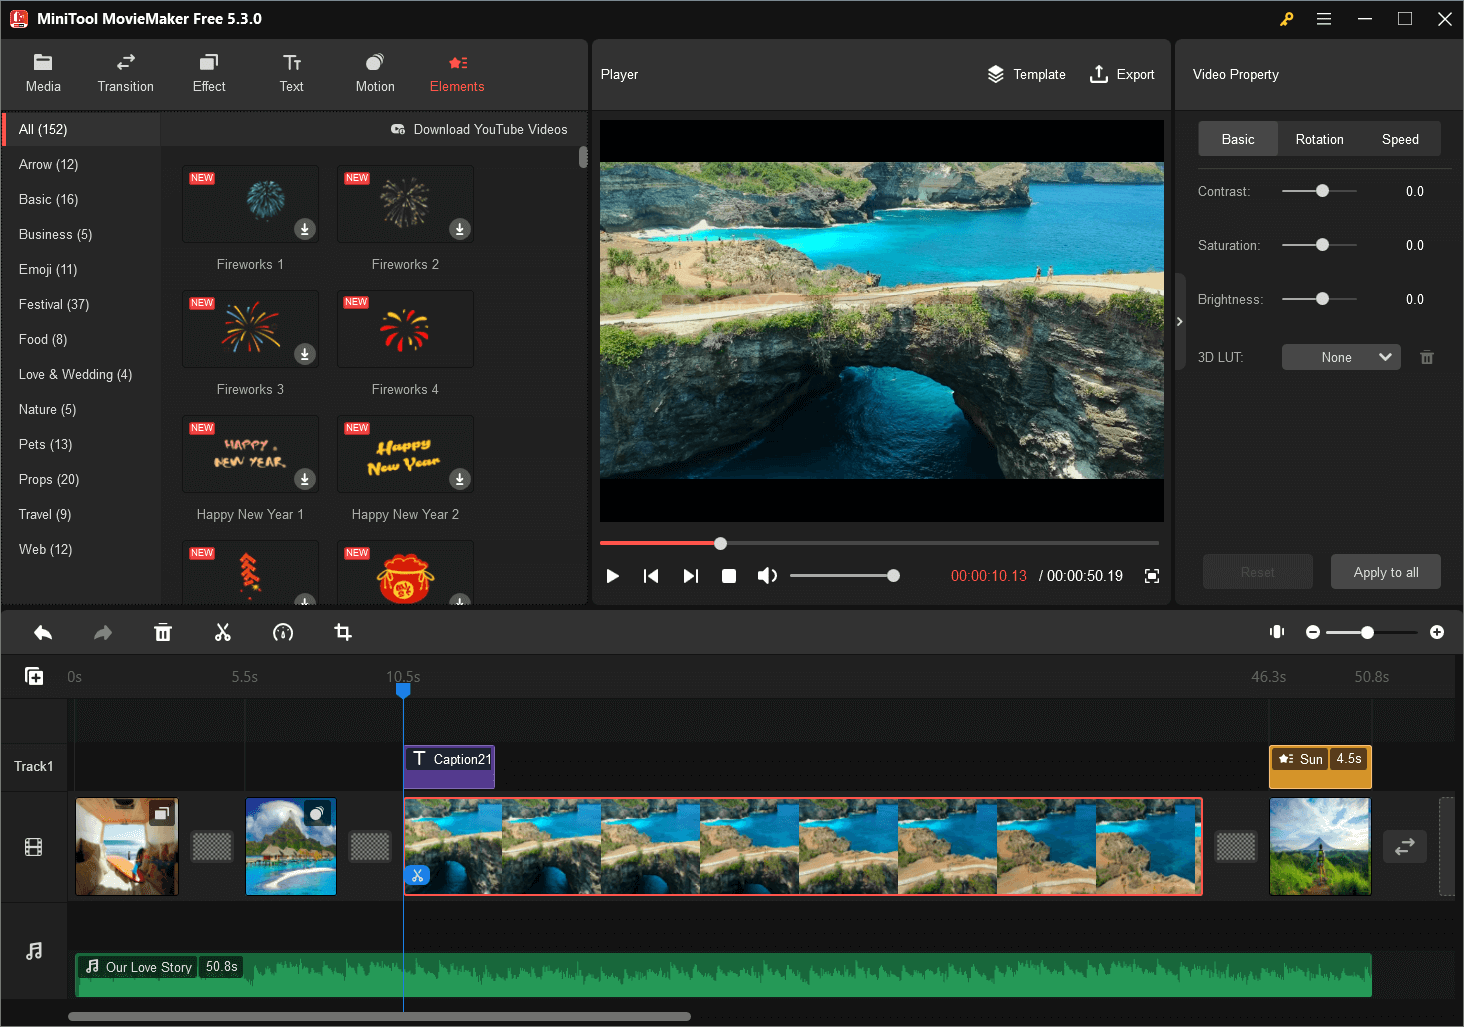
You are able to set up the encoder, resolution, bit rate, frame rate, and quality of the edited video before exporting.
Related articles:



User Comments :