The secret to making outstanding videos is lurking in the details. Arranging video snippets into a cohesive structure is quite simple, yet applying seamless transitions and visual effects is what will win over audiences.
In the last few years, the white flash transition has gained widespread popularity, as we’ve seen in famous reality shows and a variety of other kinds of videos. This easy yet effective video editing trick can assist you in producing more visually appealing content, thus we decided to walk you through a few methods of making the flash transition in video editors, like MiniTool MovieMaker and Premiere Pro. Scroll down for the specifics.
Learn About the Flash Transition
The flash transition is typically used to indicate a change in time or spot or to highlight a certain moment in a video. It’s a fast and dramatic transition mimicking the effect of a camera flash, thus the name.
This transition works by briefly raising the video’s brightness to a high level and then rapidly lowering it back to normal. This produces a “flash” effect that you can customize in terms of intensity and duration.
In addition, it can be added to any portion of the video and changed to fit the mood and style of the project.
How to Make Flash Transitions in MiniTool MovieMaker?
MiniTool MovieMaker, a free download video editor, can help you easily create amazing flash transitions in videos. Also, you can find light leaks, brushes, chessboards, diamonds, spirals, reveals, and more in its transition library.
This movie-making program runs on Windows 7/8/8.1/10/11. It supports virtually every common video, photo, and audio file format. These include MP4, WMV, AVI, PNG, GIF, MP3, WAV, FLAC, and so on.
MiniTool MovieMaker has an intuitive and easy-to-operate user interface, perfect for both new and seasoned video content creators. With its flexible and powerful editing tools, you can perform various edits on your videos in minutes to give them a visually compelling look.
Guide to Making Flash Transitions in Your Video
How to use MiniTool MovieMaker to add flash transitions to your video and edit it further? Check out our step-by-step instructions:
Step 1. Open MiniTool MovieMaker
Get the MiniTool MovieMaker software installation package by clicking the download button below.
MiniTool MovieMakerClick to Download100%Clean & Safe
Immediately open the installation package you received. Then follow the on-screen directions to install the software.
Start MiniTool MovieMaker on your Windows PC. Close the pop-up window(s) to gain access to its editing interface.
Step 2. Import the pictures and video footage
Click anywhere in the dotted box that says Import Media Files. This will direct you to select local photos and video footage and import them into this movie-making application.
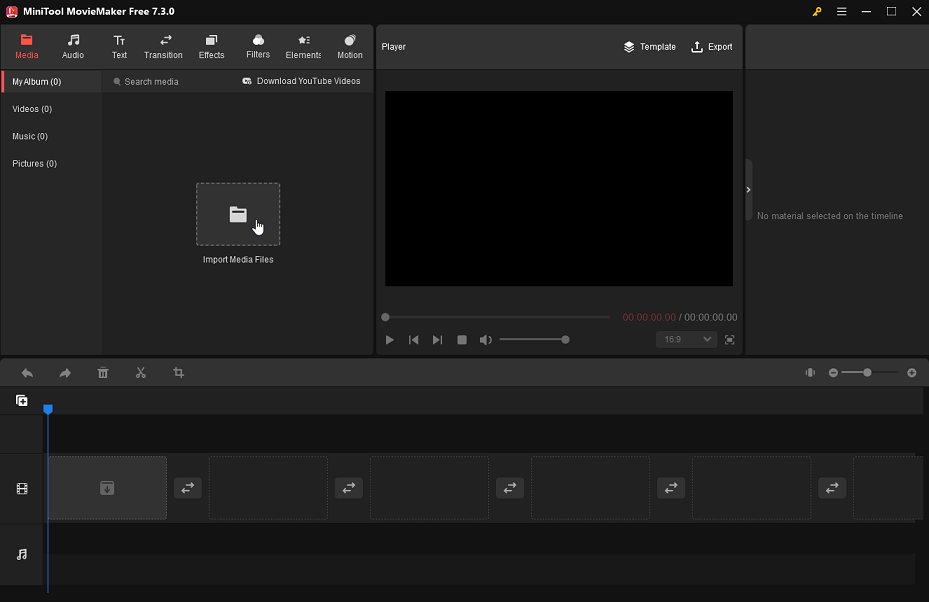
Drag and drop the video and image clips you imported onto the video track on the timeline below. And, hit Zoom to Fit Timeline on the toolbar to make all clips fit the timeline.
Step 3. Add the flash transition(s)
Now, try these 3 solutions to apply the flash transition(s) between video and image clips.
Option 1: Add a flash transition between two clips
Go to the top tab called Transitions. You can find this visual effect by typing “flash” in the search bar in the upper left corner and pressing Enter. Or, select the Advanced sub-tab on the left side and scroll down to locate this transition effect.
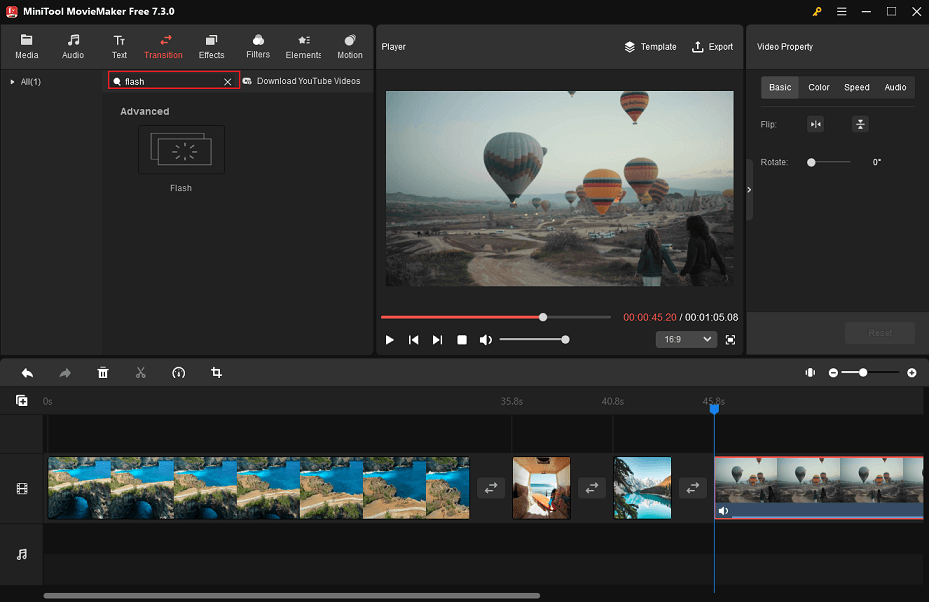
After that, determine which two clips on the video track you want to add the flash transition to. Select the previous clip and click the + icon to connect the camera flash transition to the next clip in the sequence. Alternatively, drag and drop the flash transition between the two target clips.
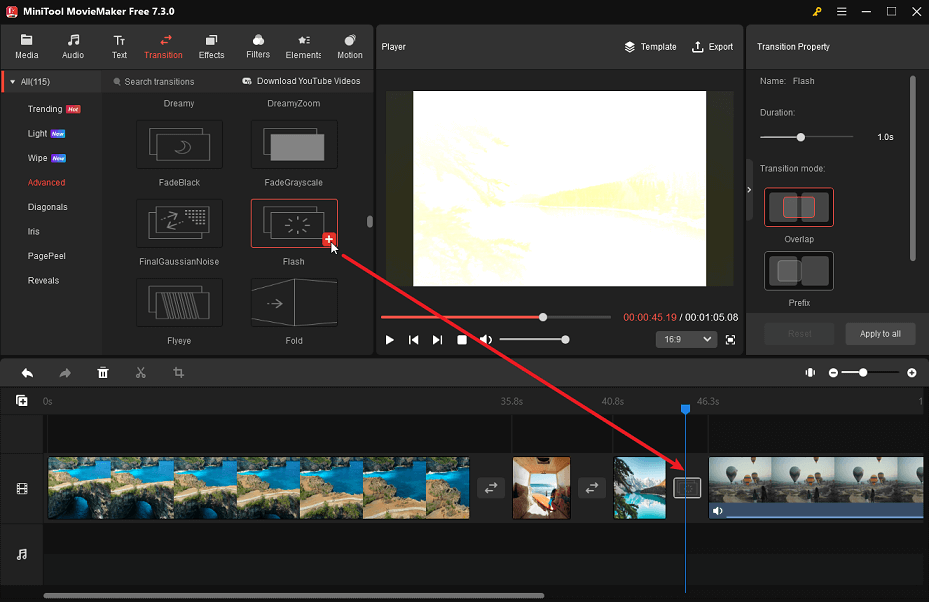
Option 2: Add a flash transition between multiple clips
Hold down the Ctrl key and highlight multiple clips where you want to add the same flash transition next to them. Right-click Flash inside MiniTool MovieMaker’s transition library and select the Apply to Selected Clips option. This will create flash transitions across multiple clips in the sequence.
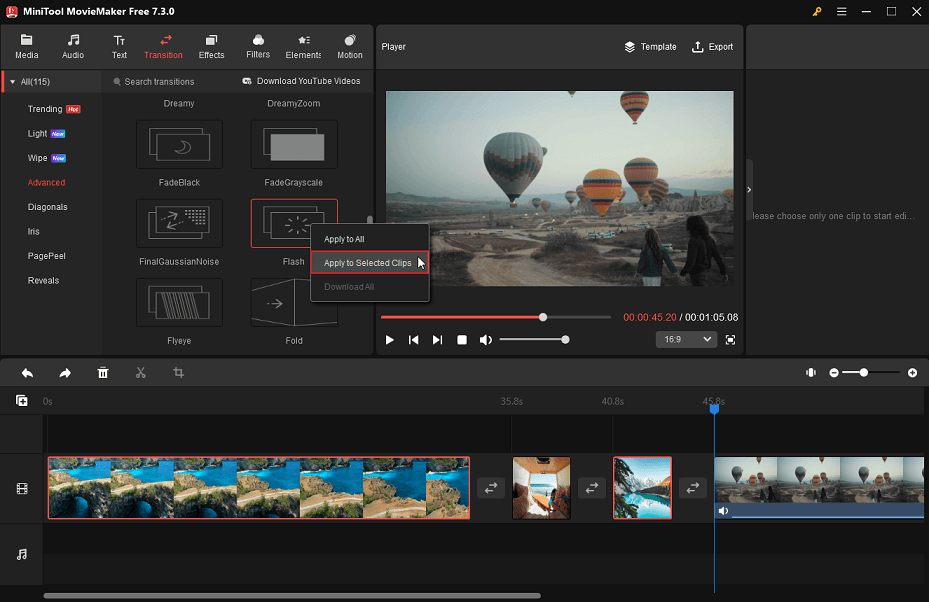
Option 3: Add a flash transition to all clips
To add the same flash transition to all clips in the sequence, simply right-click Flash and select Apply to All.
Step 4. Customize the flash transition(s)
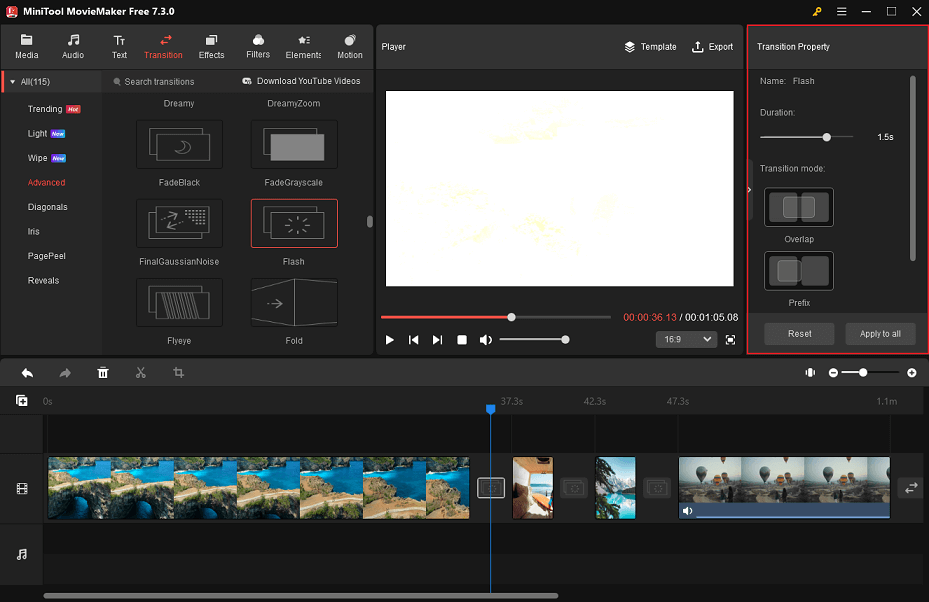
The software allows you to change the duration and mode of any transition effect to meet your specific needs. Do the following:
- Click on the flash transition you want to edit on the video track.
- Turn your attention to the Transition Property area.
- Move the Duration slider to adjust accordingly.
- Under Transition mode, set Overlap, Prefix, or Postfix as appropriate.
Step 5. Include a sound effect in your video
As well, you can opt to apply a wonderful sound effect to enrich your video. To access MiniTool MovieMaker’s sound effect collection, go to the top Audio tab and then select the Sound Effect sub-tab.
Place the mouse cursor over the Download icon of the desired sound effect and press the left mouse button. This will help you get the sound effect you want.
Position the playhead at the start of the video. Next, click + to include the downloaded sound effect into the audio track on the timeline.
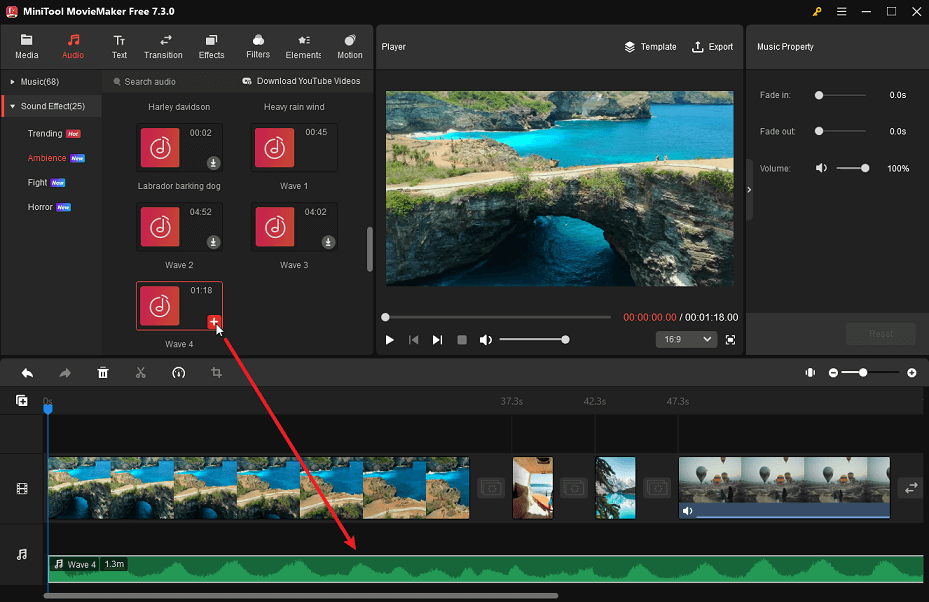
In the Music Property section, you can fade in/out the sound effect and adjust its volume by moving the corresponding sliders.
Step 6. Export your video
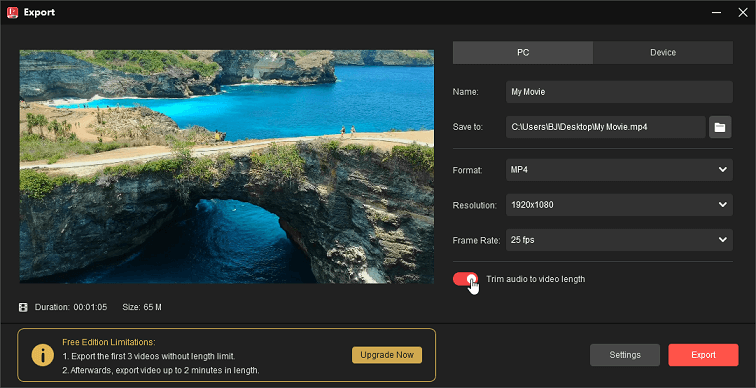
As soon as you have a preview of the final video and you are satisfied with it, you can click the Export button at the top to perform the export configuration. Under the default PC tab, name your final video and choose where to save it. Also, specify the most appropriate video output format, resolution, and frame rate.
Do not forget to activate the Trim audio to video length button if the previously included sound effect exceeds the video’s length. Lastly, click the Export button at the bottom to save the video to your Windows PC.
MiniTool MovieMaker’s Important Features
- It is an excellent video editor without watermark.
- You can use it to make a transition between two video clips.
- You can easily apply filters to videos with its help.
- You will be able to use it to add motion effects to your videos.
- The application contains built-in movie templates.
- It only takes a few minutes to make video from images.
- You will be able to use it to add a title, captions, and the end credits to your video.
- You can split, trim, flip, rotate, crop, and reverse the video.
- You can speed up or slow down the video.
- The software supports exporting your 1080P video.
How to Create Flash Transitions in Premiere Pro?
In this section, you will learn how to create the flash transitions in Premiere Pro. Before starting to create any of the modifications of such a visual effect, ensure that the material is placed properly on the timeline.
Way 1. Make White Flash Transition Using Color Matte
Here is a quick method for making the white flash transition between clips using the Color Matte in Adobe Premiere Pro.
Step 1: In the Project Panel, click the New Item option and then select Color Matte… from the drop-down menu.
Step 2: Leave the default Video Settings. Utilize the Color Picker to modify the color of the item to white. Confirm the modifications by hitting the OK button. Provide a name for the new matte.
Step 3: Drag the color matte you just made from the Project Panel and put it right over the cut between the two clips. Change the duration of the matte by dragging one of its ends left or right, and then place the playhead at the beginning.
Step 4: Access the Effect Controls panel. Decrease the Opacity value to 0 and add a keyframe. Then move the playhead to the center of the Color Matte clip. Increase the Opacity value to 100 and include a keyframe. Position the playhead at the end of the clip, adjust the Opacity back to 0, and insert the ending keyframe. Review the outcomes and make any necessary modifications.
Way 2. Make Flash Transition Using the Lightning Effects Flash
The following are the steps you need to take to create the flash transition using Lightning Effects Flash in Adobe Premiere Pro.
Step 1: Click the New Item option located in the Project Browser and then select Black Video… from the menu.
Step 2: When the New Black Video window shows on the screen, simply hit the OK button since the new video you are making will have the same settings as the sequence you are now working on.
Step 3: The new black video will appear in the Project Panel. All you need to do is drag and drop it onto the video track above the one where the two clips are. Ensure that the black video extends over two clips. Put the playhead at the same spot where one clip ends and another begins.
Step 4: Go to the Effects panel. Locate the option Lighting Effects and apply it to the black video. After applying the effect, you need to go to the Effect Controls panel and click the drop-down arrow beside the option Light 1.
Step 5: Change the Center feature to make the spotlight you applied to the black video go off. Apply a Minor Radius keyframe. Move the playhead five frames to the left. Apply another Minor Radius keyframe and do the same thing after you move the playhead ten frames to the right.
Step 6: Jump to the keyframe that’s farthest to the left. Decrease the Minor Radius value to 0. In the middle keyframe, set the same value to 100. Reduce it back to 0 on the third keyframe.
Step 7: Alter the black video’s blend mode to Screen. This will make the videos visible on the track below.
Conclusion
After reading the entire article, you now have a basic understanding of the flash transition. It can simulate a camera flash between the clips. Furthermore, you can create the flash transition with video editors, such as MiniTool MovieMaker and Premiere Pro.
Please contact us at [email protected] if you have any questions while using MiniTool MovieMaker.
Recommended Readings


User Comments :