In this post, we’ll show you how to reverse a clip in DaVinci Resolve and its alternative – MiniTool MovieMaker.
Effects and filters make videos more engaging and beautiful. One of these popular video effects is the reverse effect, which allows you to play your video backwards starting from the end. Short video apps like TikTok and Snapchat, as well as many video editing apps like CapCut, Adobe Premiere Pro, and DaVinci Resolve have reverse video effects.
In this guide, we’ll walk you through the clear steps to reverse a clip in DaVinci Resolve. Let’s get started.
How to Reverse a Clip in DaVinci Resolve
It’s easy to create videos that play in reverse in DaVinci Resolve. You can follow the steps below to reverse a video in Davinci Resolve.
Step 1. Download DaVinci Resolve from the official website and install it on your computer. It’s free to download and the free version won’t add a watermark to your video.
Step 2. Launch DaVinci Resolve, right-click on the Media Pool, select Import Media to open your video, and drag and drop it to the timeline.
Step 3. Click Edit at the bottom to open the edit page. It’s simple and intuitive and includes various editing tools.
Step 4. There are 3 methods to reverse a video in DaVinci Resolve.
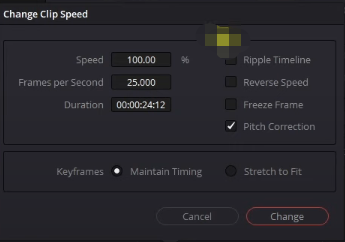
Option 1: Right-click on the clip on the timeline and select Change Clip Speed from the menu list. Then, uncheck the Reverse Speed option. Also, you can adjust the video playback speed, change the frame rate, make a freeze frame, etc. Click Change to apply your settings.

Option 2: Also on the Edit page, right-click on the video you want to add the reverse effect, and choose Retime Controls from the list. Then, you’ll see an inverted triangle next to 100%, click this button and select Reverse Segment from the pop-up menu.
Option 3: From the Edit page, select the video on the timeline and click the Inspector icon at the top right corner. Under the Video tab, expand the Speed Change option, and click the arrow pointing to the left to reverse the video.
Step 5. Preview your video or continue editing. After that, click Deliver at the bottom to change render settings and export the video from DaVinci Resolve.
How to Reverse a Video in MiniTool MovieMaker
Most video editing applications let users make a video play backwards. In addition to DaVinci Resolve, you can also try its alternative – MiniTool MovieMaker to reverse clips.
MiniTool MovieMaker is an easy-to-use and feature-rich video editor. It lets you reverse videos, change video speed, crop videos, apply filters, add stickers, and more. After editing, this video editor enables you to export videos in 1080p for free and without watermarks.
Here’s how to reverse a video in MiniToiol MovieMaker.
Step 1. Download and install MiniTool MovieMaker on your PC. Then, open it and close the promotion window.
MiniTool MovieMakerClick to Download100%Clean & Safe
Step 2. Click Import Media Files to upload your video and drag it to the timeline.
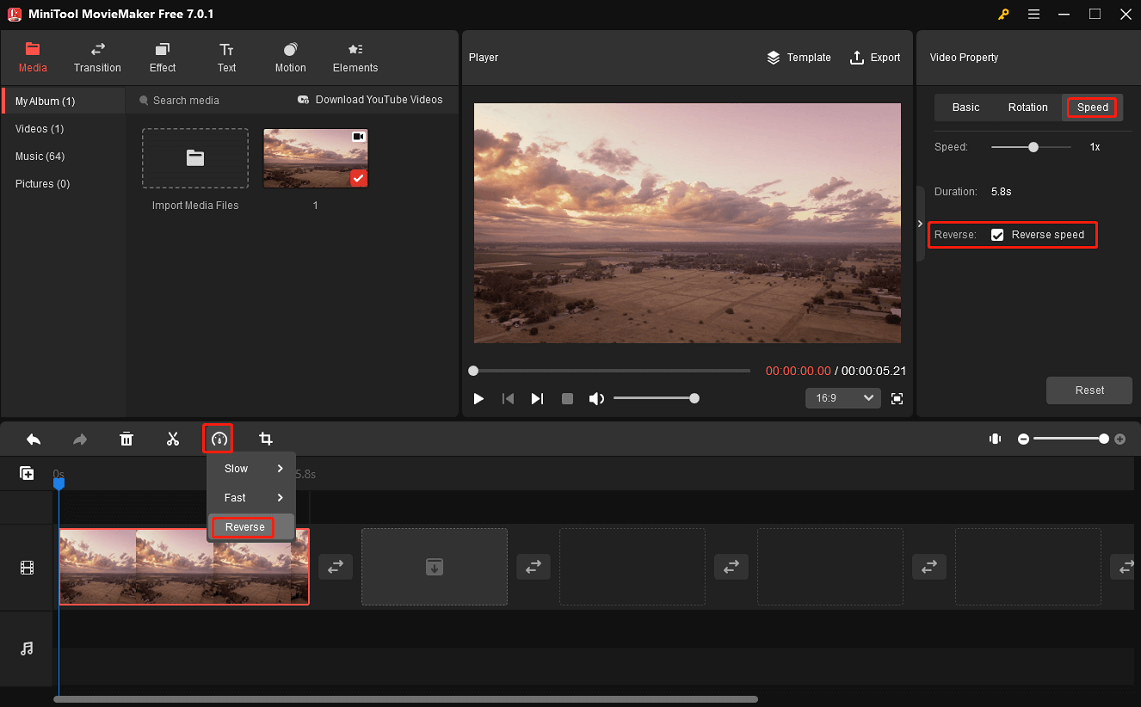
Step 3. Select the clip on the timeline to highlight it. Go to the Speed tab in the Video Property section and check the Reverse speed option. Alternatively, click the Speed button above the timeline and select Reverse.

Step 4. Tap Export at the top right to open export settings, and click Export to export the reversed video.
Conclusion
Now you can follow the above steps to reverse a clip in DaVinci Resolve, and this application gives you 3 options. If you don’t know how to change video speed in DaVinci Resolve, you can also follow the steps above to find the tool you need.
You may also like:


![How to Stabilize Video in DaVinci Resolve [Complete Guide]](https://images.minitool.com/moviemaker.minitool.com/images/uploads/2023/04/davinci-resolve-stabilize-video-thumbnail.jpg)

User Comments :