This post from MiniTool MovieMaker will teach you how to speed up video in After Effects and how to create slow motion in After Effects with 2 methods.
Adobe Premiere Pro and After Effects are both powerful applications for video editing. The former is mainly used to cut, arrange, and enhance your footage. The latter is mainly used to create motion graphics and add visual effects to your video.
But you can still do some basic editing in After Effects like video playback speed adjustment. You might already know how to speed up and slow down videos in Premiere Pro, but how to speed up video in After Effects?
Adobe Premiere Pro and After Effects are suitable for different parts of the video post-production process. To learn more differences between the two Adobe video editors, you can check this post: After Effects vs Premiere Pro: Which Program Is Right for You.
How to Speed up/Slow Down Video in After Effects
In After Effects, it’s easy to create fast motion and slow motion by using time-stretching and time-remapping effects.
Way 1: Using time-stretching
Time-stretching refers to speeding up or slowing down an entire video at the same speed, and the audio and original frames in the clip will be redistributed along the new duration.
Here’s how to speed up or slow down a video in After Effects using time-stretching.
Step 1. Launch After Effects on your computer, click File > Import > File to choose your video, and click Open. Then, drag and drop the video into the timeline.
Step 2. In the timeline, right-click on the video layer, and select Time > Time Stretch.
Step 3. The Time Stretch window appears, and you’ll see the original duration of this video and the Stretch Factor value is 100.
To speed up the video, you should change the Stretch Factor value to a number less than 100.
For example, if you enter 50 in the Stretch Factor box, you’ll double the video speed. Under Time Stretch, you can see the New Duration number is cut in half. Click OK to save changes.
Instead, to slow down the video in After Effects, you should change the Time Stretch to a number greater than 100.
For example, if you change the Time Stretch number from 100 to 200, you will slow down the video and the duration will be doubled. Click OK to save changes.
Once you go back to the timeline, you’ll find the video timeline still keeps the original length. You should increase the duration of the Composition to view the video completely.
Go to the project panel, click on your composition and choose Composition Settings, change the Duration number to the current video length in the Composition Settings window, and click OK.
Step 4. Preview your video. You can continue to edit the video or export it.
Related: How to Export After Effects to MP4 with/Without Media Encoder
Way 2: Using time-remapping
In After Effects, you can also use the time-remapping effect to change the time frame of your video footage by increasing or decreasing the speed of the time frame between your chosen keyframes.
Through time-remapping, you can create fast motion and slow motion in a video. It means you can make parts of a video go faster, parts go slower, and parts keep regular.
Step 1. Follow the instructions in above step 1 to add your video in After Effects.
Step 2. In a composition or timeline panel, right-click on the footage, and select Time > Enable Time Remapping. Then, you can see two keyframes in your video layer, one at the beginning of the video, and one at the end of the video.
Step 3. If you want to speed up the whole video, drag one of the keyframes closer to the other one. To slow down the video, drag one of the keyframes further to the other one.
Step 4. To create both fast motion and slow motion in the video, first, you should scroll through your video and look for the key moments, and click the Add keyframe button to add new keyframes as you like.
Then, you can drag the keyframes to increase or decrease the speed of any part of your video.
Step 5. Preview your video and export it.
![What Is a Velocity Edit & How to Make a Velocity Edit [Solved]](https://images.minitool.com/moviemaker.minitool.com/images/uploads/2021/11/velocity-edit-thumbnail.jpg)
An Easier Way to Speed up/Slow Down Video
Alternatively, you can try MiniTool MovieMaker to speed up or slow down your video. MiniTool MovieMaker is a great video editor for everyone to create amazing videos.
MiniTool MovieMaker lets you adjust video speed, crop, trim, and split videos, add pan and zoom effects, apply video filters, add stickers, and more.
Here’s how to speed up or slow down a video with MiniTool MovieMaker.
MiniTool MovieMakerClick to Download100%Clean & Safe
Step 1. Download and install MiniTool MovieMaker on your PC. Then, launch it.
Step 2. Click Import Media Files to upload your video and drag it to the timeline.
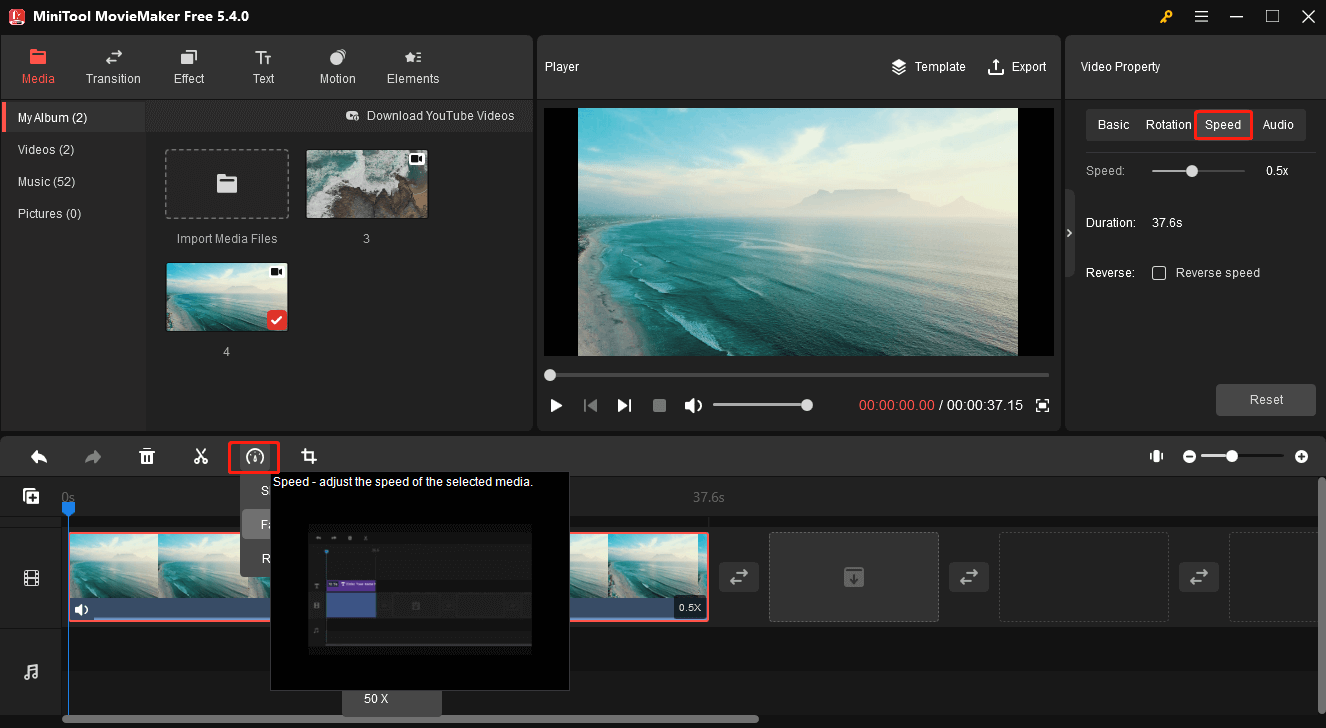
Step 3. Click the video on the timeline, and click the Speed button. Next, click Fast and choose from 2X, 4X, 8X, 20X, and 50X to speed it up. To slow it down, choose Slow and choose from 0.5X, 0.25X, 0.1X, 0.05X, and 0.01X
Alternatively, go to the Speed tab in the right Video Property, and move the Speed slider to change the video speed.
Step 4. Click Export to save the video to your computer.
Conclusion
This post offers a clear guide on how to speed up or slow down videos in After Effects. You can follow the above steps to edit the playback speed of your footage to create fast motion or slow motion.
About The Author

Position: Columnist
Cora is a tech writer specializing in digital media workflows, with over six years of hands-on experience in video post-production, media transcoding, and screen capture. Her writing is always clear and practical. Cora also produces in-depth software reviews for users across skill levels to help them find the right tool and enjoy video editing.
User Comments :