How to crop video in DaVinci Resolve? This post from MiniTool MovieMaker gives you 5 methods with clear instructions.
DaVinci Resolve is a powerful video editing application with many advanced features like color grading and video stabilization. In addition, this program has all the basic editing tools like cropping. In this guide, you’ll learn how to crop a video in DaVinci Resolve with 5 methods.
How to Crop Video in DaVinci Resolve
First, you should download and install DaVinci Resolve on your computer. This video editor is compatible with Windows, macOS, and Linux, and you can download it from the app’s official website.
Now, let’s see how to crop video in DaVinci Resolve.
Step 1. Launch DaVinci Resolve on your computer.
Step 2. Right-click on the Media Pool and select Import Media to open a video you want to crop and drag and drop it to the video timeline.
Step 3. In DaVinci Resolve, you can crop a video with several methods. Let’s check them one by one.
Option 1: Manually crop video
At the lower left of the video preview window, you can see a rectangular button, just click it and select Crop, and you’ll see 8 white dots on the viewer. Drag these dots to crop the video as you like.
When dragging any point, the entire frame will change according to a certain proportion. You can’t just crop one side and keep other sides. If you only need to remove details on the top, bottom, right, or left of the video, jump to the next method.
Option 2: Crop video in Inspector
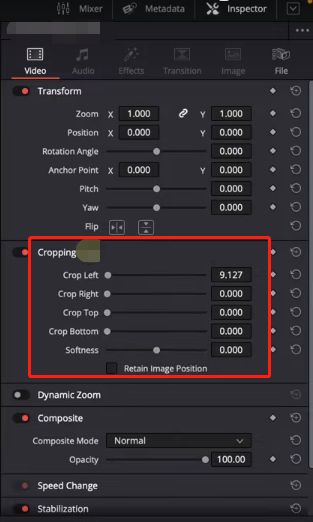
Select the video on the timeline, under the Video tab on the right, click Inspector ta the top right, and then click Cropping to expand the settings. Now, you can crop the video from whatever side you’d like by dragging the sliders next to Crop Left, Crop Right, Crop Top, and Crop Bottom.

Option 3: Zoom to Crop
If you want to crop video without changing the aspect ratio in DaVinci Resolve, you can zoom in on the video to keep the desired portions, and this way won’t create black bars.
How to zoom to crop video in DaVinci Resolve? You can click the rectangular button below the video viewer, choose Transform, and drag any dot to zoom in on the video.
Option 4: Cropping by adding a letterbox
In DaVinci Resolve, you can add a letterbox effect with different aspect ratios to make your video look more cinematic. This is also a way to crop the video from the top or bottom. To do this, click Timeline, select Output Blanking, and choose an aspect ratio from the dropdown list.
Option 5: Cropping by changing timeline resolution
This will change the resolution of your entire project instead of the single video. Click File > Project Settings, set Timeline Resolution to Custom, and change the number of pixels you want to fit. Next, go to Image Scaling, scroll down to Input Scaling, and choose Scale full frame with crop.
Step 4. After cropping, export video from DaVinci Resolve.
An Alternative Way to Crop Video
In addition to DaVinci Resolve, there’re many other video croppers like MiniTool MovieMaker. Compared to DaVinci Resolve, MiniTool MovieMaker is easier to use and perfect for beginners. This video editor lets you crop videos, adjust video speed, change aspect ratio, apply filters, and more.
Here’s how to crop video with MiniTool MovieMaker.
MiniTool MovieMakerClick to Download100%Clean & Safe
Step 1. Download and install MiniTool MovieMaker on your computer. Launch this program and close the pop-up window.
Step 2. Click Import Media Files to add the video you want to crop and drag it to the timeline.
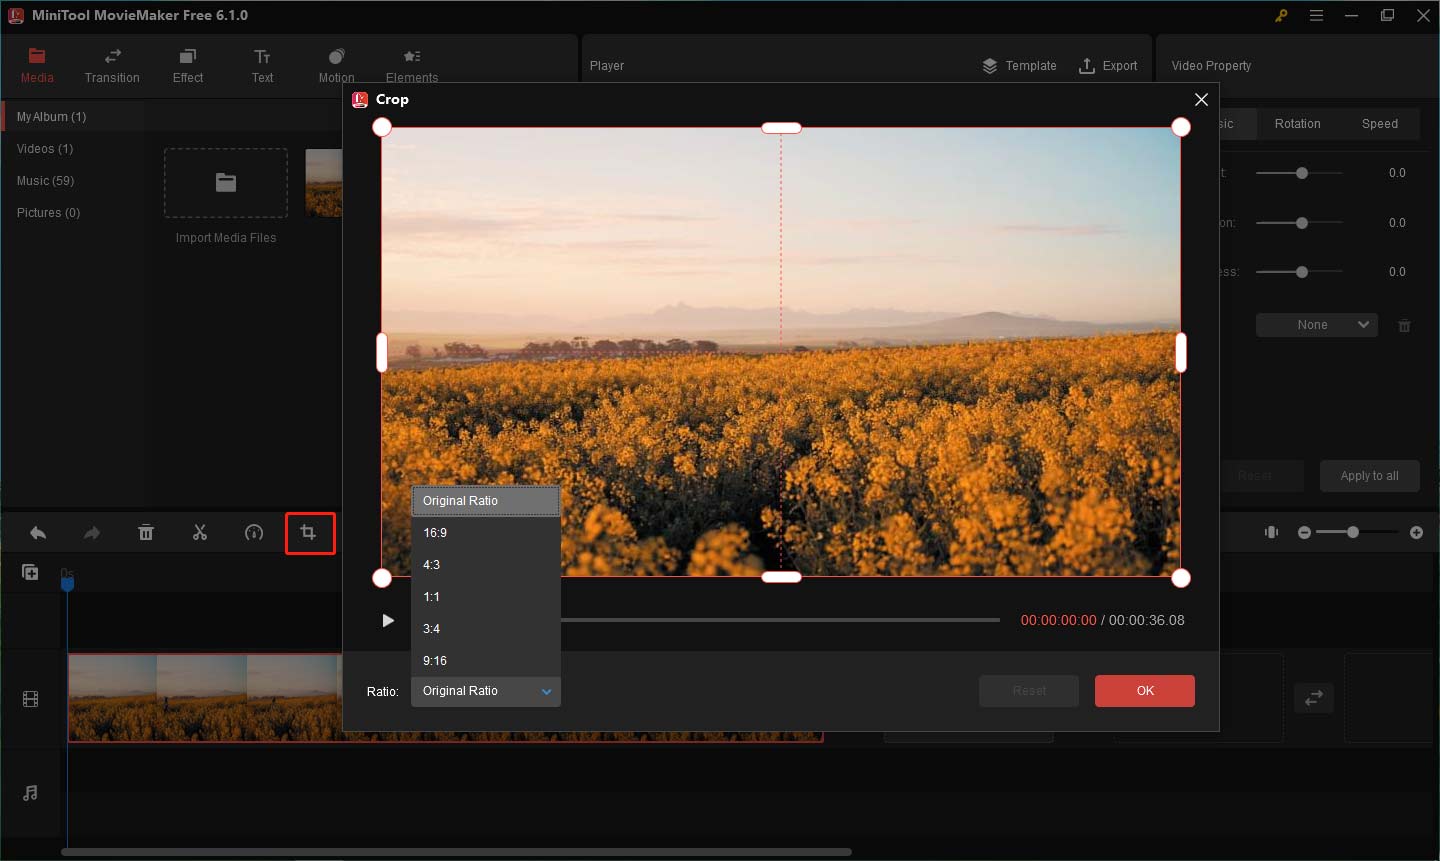
Step 3. Select the clip on the timeline and click the Crop icon.

Step 4. You can drag any side of the rectangle to manually crop the video or click Ratio to choose a preset ratio to crop the video and click OK to apply changes.
Step 5. Click Export to export the cropped video.
Conclusion
With these 5 options, you can quickly crop a video in DaVinci Resolve. Choose the way according to your need.


![How to Fix the DaVinci Resolve Media Offline Issue [Full Guide]](https://images.minitool.com/moviemaker.minitool.com/images/uploads/2023/03/davinci-resolve-media-offline-thumbnail.jpg)
User Comments :