Looking for a video cutter? This post explores 7 of the best video cutters, including desktop software like MiniTool MovieMaker, a user-friendly Windows video editor, along with Windows Photos app, Microsoft Clipchamp, CapCut, and Bandicut, as well as online tools like Kapwing and Clideo, to help you achieve professional-quality cuts with ease.
When it comes to video editing, cutting is one of the most basic yet essential features in the entire process. No matter what kind of video, from social media clips to professional ads, cutting often seems simple at first. However, when I actually start working with footage, I find that it’s not as easy as it looks. Issues like black frames or rough cuts often occur.
To make this process easier, especially for beginners, I have tested and selected 7 practical video cutters that I find helpful for making more precise cuts efficiently. Before diving into these tools, I’ll first explain what a video cutter is and share the key factors I consider when choosing one.
What Is a Video Cutter
Definition
As the name suggests, a video cutter is a tool used in non-linear editing systems to trim digital video clips and split them into segments for rearranging or removing unwanted parts.
From my perspective, cutting is more than just deleting sections, and it plays a key role in shaping raw footage into a compelling story by improving the overall flow and highlighting important moments. It can also help reduce file size, making videos easier to store and share.
Video Cutting vs Trimming vs Splitting
Although video cutting, trimming, and splitting are all used to refine raw footage, I find that they differ in how they handle video.
Splitting simply divides a clip into two or more parts at specific points, while trimming removes unwanted sections from the beginning or end of a clip to shorten it. Cutting, on the other hand, is more flexible as it combines both trimming and splitting, allowing me to remove sections not only from the start or end but also from the middle of a clip.
How to Choose the Best Video Cutter
To choose the best video cutter, I consider several key factors, such as simplicity, format support, and personal needs. In that case, the video cutter software not only helps me cut videos quickly and precisely but also ensures good output quality and a smooth editing process.
1. Ease of Use
Ease of use is always the first thing I pay attention to, especially since there are various options available, ranging from dedicated video cutters to video editing software with cutting features.
A clean interface and simple yet effective controls can save me a lot of time and help me achieve more professional results. If a tool is too complicated, it can be frustrating to use, especially if it has a steep learning curve. Hence, I usually prefer video cutters with an intuitive layout and drag-and-drop functionality.
2. Format Support
Format support is another important factor I consider. A good video cutter software should offer broad format compatibility, allowing me to work with different types of video files without limitations. Common formats such as MP4 and MOV should be supported for both import and export.
Besides, if the format support is limited, it can be a hassle, as I may need to convert files before editing, which can reduce video quality. For this reason, I tend to choose tools that handle multiple formats smoothly without requiring extra steps.
3. Cut by Frame & Zoomable Timeline
Precision is key when I want my edits to look professional. A video cutter that supports cutting by frame lets me trim or split clips exactly at the right moment, down to milliseconds if needed. Coupled with a zoomable timeline, I can see each frame clearly and make adjustments with fine control. Tools without these features can make detailed editing slow and frustrating, so I usually prioritize software that gives me this level of accuracy.
4. Export Options
Export options also matter a lot to me. I usually check whether a tool supports exporting videos with different settings, such as resolution, bitrate, frame rate, and quality. For example, when I’m creating content for social media, I may need specific formats or smaller file sizes for uploading.
While testing different tools, I also noticed that some exported videos come with a watermark, which means I have to remove it to get a cleaner result. To avoid this, I tend to choose video cutters that offer watermark-free exports along with flexible export settings, so I can easily control video quality and file size.
5. Extra Features
In addition to basic cutting functions, extra features such as basic adjustments, transitions, filters, text overlays, and audio editing can be very useful. With these features built in, I can complete most editing tasks without switching to another tool, which makes the whole process more efficient and flexible.
Quick Comparison of the Best Video Cutters
Based on the factors above, I tested multiple video cutters and created a quick comparison table to help simplify the selection process.
| Software | Platform | Cut by Frame | Zoomable Timeline | Trim | Split | Best For |
| MiniTool MovieMaker | Windows | √ | √ | √ | √ | Beginners |
| Photos app | Windows | × | × | √ | × | Quick basic trims |
| Microsoft Clipchamp | Windows / Web | √ | √ | √ | √ | Without watermark |
| CapCut | Windows / macOS / Android / iOS / Web | √ | √ | √ | √ | Short-form video |
| Bandicut | Windows | √ | × | √ | √ | Speed & precise |
| Kapwing | Web | √ | √ | √ | √ | Online precise |
| Clideo | Web | × | × | √ | √ | Simple trimming |
Top 5 Desktop Video Cutters
Let’s have a closer look at the 5 desktop video cutters.
#1. MiniTool MovieMaker
Let’s begin with undoubtedly the most beginner-friendly video cutter designed for Windows users, MiniTool MovieMaker. I find it very easy to turn raw footage into well-edited clips with just a few simple steps.
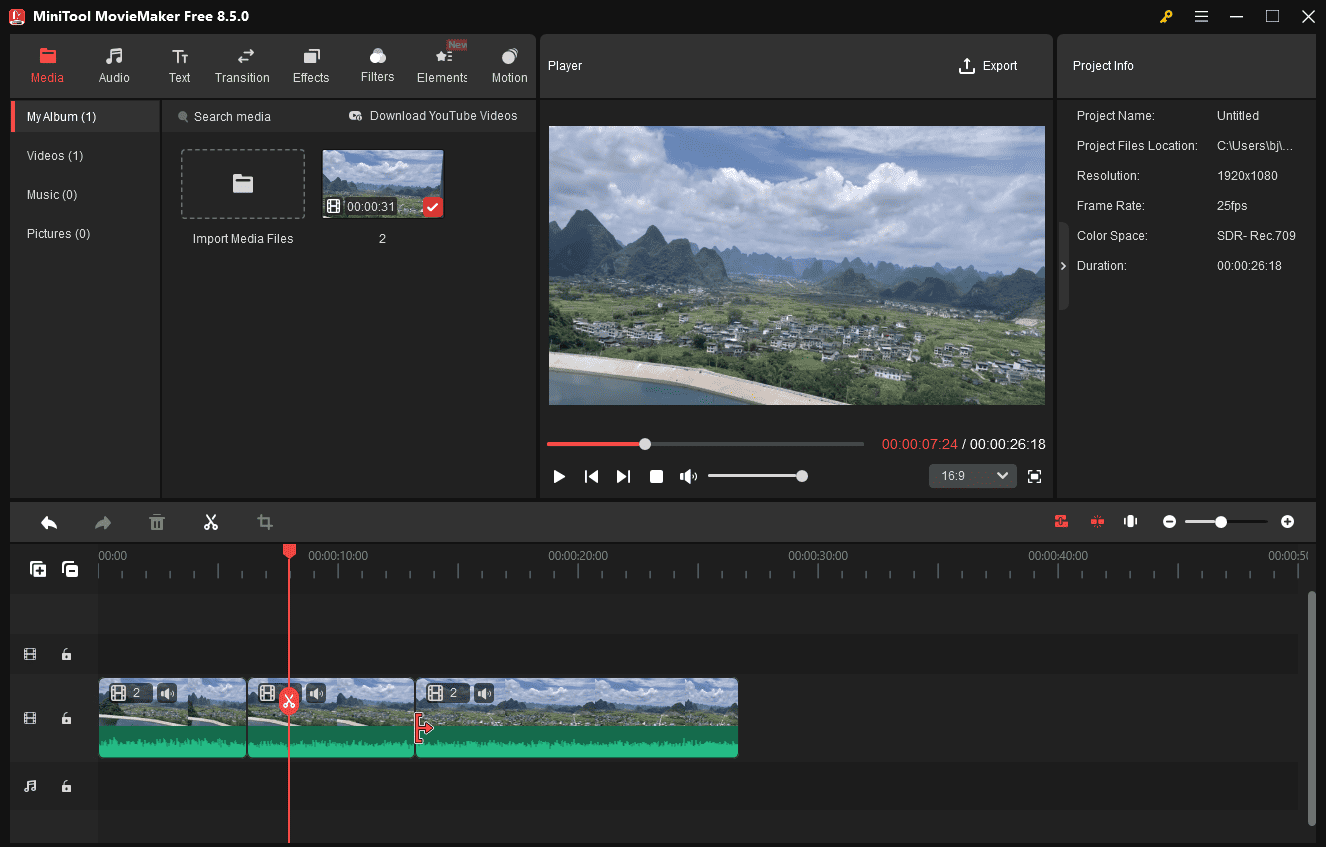
I usually start by importing my video, adding it to the timeline, and dragging the cursor to trim unwanted parts. When I need to cut a specific section, I move the playhead and use the split function. After that, I can easily remove or rearrange clips to achieve the result I want.
Thanks to its clean and intuitive interface, this tool works well even for users without much editing experience. Besides basic cutting, it also includes features like video merging, audio trimming, and audio combining, making it a practical all-in-one editor.
MiniTool MovieMakerClick to Download100%Clean & Safe
Key Features
What makes MiniTool MovieMaker a good video cutter? Here are the key benefits I found.
1. Multi-Format Support
MiniTool MovieMaker supports a wide range of formats. I can import videos in formats like MP4, VOB, MOV, MKV, 3GP, AVI, FLV, RMVB, WEBM, MPG, and WMV, and export them in popular formats such as MP4, AVI, MOV, WMV, MKV, and WEBM. In some cases, I can even use it as a simple video converter.
2. Frame-by-Frame Precision
With a zoomable timeline, I can zoom in to adjust the timeline scale from as little as 0.01 seconds up to 30 minutes. This allows me to make precise, frame-by-frame cuts when needed.
3. Multi-Track Editing
As a multi-track video editor supporting 9 video tracks and 2 audio tracks, MiniTool MovieMaker allows me to manage multiple clips across different tracks. By holding the Shift key, I can split multiple clips simultaneously. The same approach also lets me delete selected clips at once, which significantly speeds up the editing process.
4. Automatic Ripple Editing
When I trim unwanted parts at the beginning, gaps or black frames may appear on the timeline. The automatic ripple mode helps me remove these gaps instantly, keeping the entire timeline clean and seamless.
5. Keyboard Shortcuts
It includes useful keyboard shortcuts, such as Ctrl + Z (undo), Ctrl + Y (redo), Delete (remove clips), and Space (play/pause), which help speed up my workflow.
6. Additional Editing Tools
After cutting videos, I can further enhance them using built-in editing tools. Besides basic options like rotating clips and adding transitions, it also offers more advanced features such as picture-in-picture effects and text overlays.
7. Customizable Export Options
When exporting videos, I can rename files, choose the save location, and adjust settings like format, resolution, frame rate, quality, encoder, and bit rate. It also provides presets for popular devices like iPhone, smartphones, and Galaxy Note.
Pros
- Free, no-bundle, no ads, watermark-free video cutter.
- Intuitive interface and no steep learning curve.
- Wide format support for various needs.
- Drag-and-drop editing with helpful keyboard shortcuts.
- Flexible video cutting options, including trimming and splitting.
- Frame-level precision editing.
- Necessary functions for effective video editing.
- Supports exporting 4K/1080P videos for free.
Cons
- Only available on Windows.
- Free version limits export length to 2 minutes after the first three unrestricted exports.
Best for
MiniTool MovieMaker is ideal for beginners who want a straightforward, easy-to-use video cutter software. Its simple interface and intuitive controls make learning and editing quick and stress-free.
My Own Experience with MiniTool MovieMaker
When I first downloaded and installed MiniTool MovieMaker, I noticed that the installation process was quick and lightweight, which made a good first impression. As someone who occasionally works with video editing tools, I found it easy to get started right away.
After launching the software, I was guided by simple prompts that helped me understand how to import clips and use the timeline. This made the initial learning process much smoother, especially compared to more complex editors.
As I continued using it, I quickly became familiar with the basic functions. Whether I was trimming, splitting, or rearranging clips, everything felt smooth and responsive. I didn’t have to spend much time figuring out how things worked, which saved me a lot of effort.
One thing I particularly liked was how easy it was to remove unwanted sections without leaving gaps. The automatic ripple feature helped keep the timeline clean, so I didn’t have to manually fix black frames.
Overall, I find MiniTool MovieMaker very practical for everyday editing tasks. It may not be as advanced as some professional tools, but for quick video cutting and simple edits, it works efficiently and gets the job done without unnecessary complexity.
#2. Windows Photos
Since I’m using a Windows computer, I first looked for a built-in solution that could work as a video cutter for PC without requiring any extra downloads. Fortunately, Windows provides two native options: Photos and Microsoft Clipchamp.
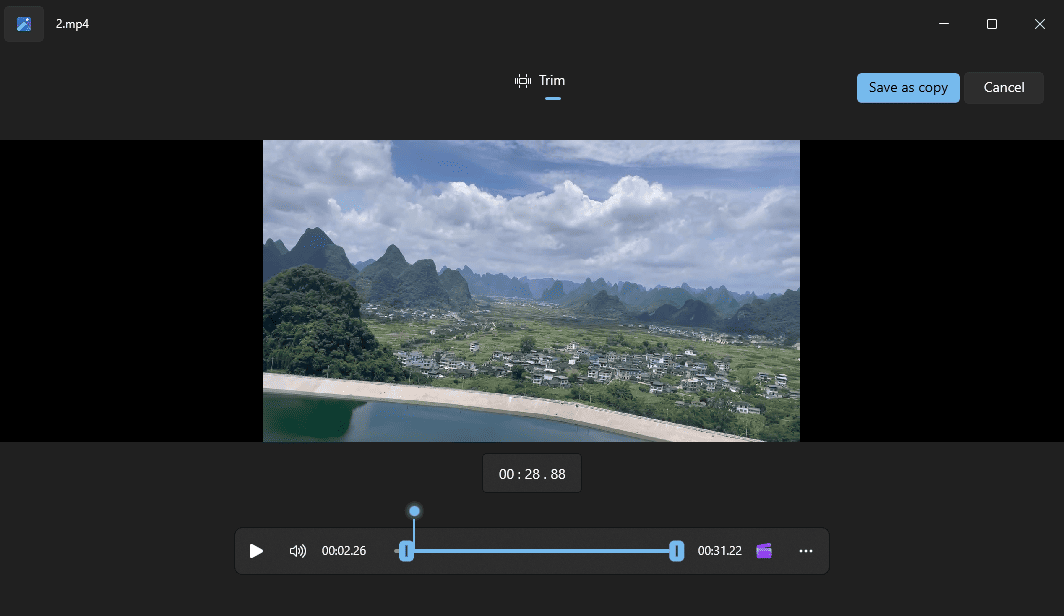
Photos is mainly designed for viewing, organizing, and sharing photos and videos, and it includes a simple video trimmer feature for basic editing needs. First introduced in Windows 8, it is still available in Windows 11, with added features like iCloud integration and an improved slideshow experience.
From my experience, this tool is better suited for quick and straightforward tasks rather than advanced editing. As a free video cutter, it allows me to trim videos by setting the start and end points, but it doesn’t offer more flexible controls like splitting, multi-track editing, or detailed adjustments.
Key Features
Here’s why Photos is a good video trimmer.
1. Flexible Import Options
Photos allows me to open videos from different sources, not just my local drive. I can work with clips stored on an SD card, USB drive, phone, or other external devices. It is also compatible with common formats like MP4, MOV, AVI, WMV, and 3GP.
2. Intuitive Trim Controls
The trimming interface is simple and easy to understand. A visual slider appears directly on the playback bar, where I can drag the handles to set the start and end points. This makes it a convenient video trimmer for quickly cutting out unwanted parts.
3. No Quality Loss Output
After trimming, I can save the result as a new file without noticeable quality loss. This is useful when I just need a quick video trimmer without re-encoding or degrading the original footage.
4. Simple Sharing Options
Once the clip is ready, I can store it locally and share it through email, social platforms, or other apps installed on my computer, making it easy to distribute the final video.
Pros
- No installation required since it comes pre-installed with Windows.
- Completely free to use with no time limits or watermark.
- Clean and straightforward interface, easy to navigate.
- Allows importing clips from external devices like cameras and smartphones.
- Shows precise timestamps when trimming, making it easier to cut at exact points.
- Lets me save a trimmed copy or capture a frame as a JPG image.
Cons
- Only basic video trimming is available, with no frame-by-frame precision.
- Lacks additional tools beyond simple cutting.
- Limited output options, with no control over format, bitrate, or frame rate.
Best for
Photos is a practical choice when I only need a quick and free video cutter for basic video trimming. It works best for quickly trimming clips without installing any extra software.
My Own Experience with Photos
When I first used Photos, I found it a bit confusing. Since my media files were stored in a separate folder instead of the default Pictures directory, nothing showed up when I opened the app. At first, I tried dragging a video directly into the interface, but nothing happened. After moving a clip into the Pictures folder, it finally appeared and worked as expected.
During trimming, one detail I found particularly helpful was the time indicator. As I adjusted the trim handles, it displayed the exact timestamp, which made it easier to cut at a specific point. If the mouse wasn’t precise enough, I could use the arrow keys on my keyboard to fine-tune the selection. Each press moves the position by about 0.1 seconds, which felt much more controlled than dragging the cursor.
#3. Microsoft Clipchamp
Microsoft Clipchamp is another video cutter for PC that works seamlessly within the Windows ecosystem. It comes pre-installed on Windows 11, and I can also access it through the Microsoft Store on Windows 10 or use the web-based version without installing anything.
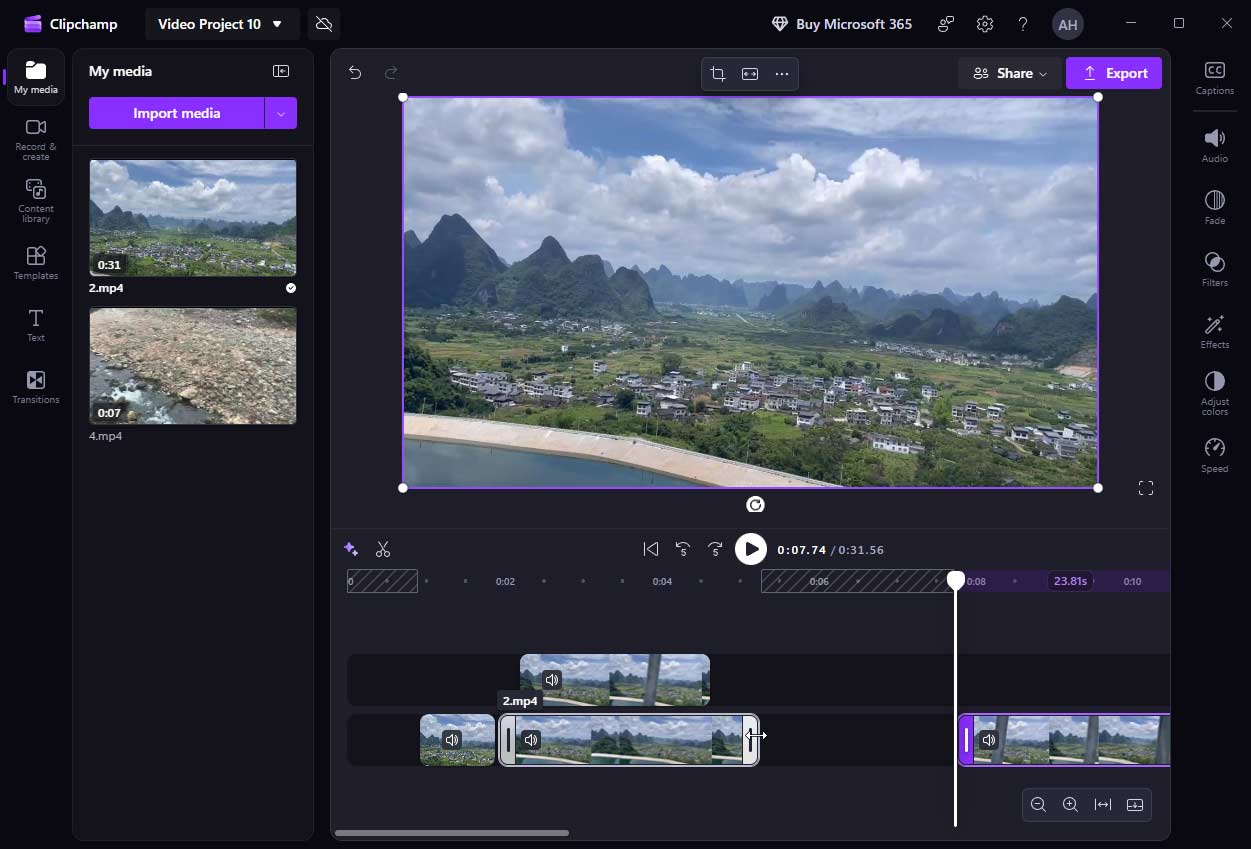
Compared to Photos, Clipchamp gives me more ways to work with video clips. As a video cutter, I can trim footage, split it into smaller parts, remove unwanted sections in the middle, and rearrange clips on the timeline.
The zoomable timeline makes these adjustments easier. I can zoom in to fine-tune the cut point or zoom out to view the overall structure of the video. This makes it more practical when working with longer clips or multiple segments.
Key Features
Why do I consider Microsoft Clipchamp a reliable video cutter? Here are the reasons.
1. Broad Format Compatibility
Clipchamp works with a wide range of video formats. I can import files like MP4, MOV, WEBM, AVI, DIVX, FLV, 3GP, WMV, VOB, and MKV, which saves time when handling clips from different sources.
2. Accurate Timeline Cutting
The zoomable timeline helps me cut videos more precisely. When I zoom in, I can see exact timestamps and adjust the clip length more accurately, which is useful when I need to trim at a specific moment.
3. Multi-Clip Editing
I can select several clips on the timeline at once and apply actions like split or delete together by holding the Shift key. This is helpful when I want to clean up multiple segments without repeating the same step one by one.
4. Handy Keyboard Shortcuts
Clipchamp includes useful shortcuts that speed up my workflow. For example, pressing S splits a clip instantly, and Ctrl + = zooms in on the timeline, making it easier to adjust cut points without relying only on the mouse.
5. Built-in Creative Assets
In addition to cutting videos, Clipchamp offers a built-in library with music, text styles, stickers, shapes, and ready-made templates. With these resources, I can quickly apply a template and then customize it by adding titles, background music, or simple visual elements, without needing to create everything from scratch.
Pros
- No installation needed on Windows 11 since it is pre-installed.
- Easy to learn, even for beginners.
- Frame-accurate controls and visible timestamp.
- Allows trimming, splitting, and removing multiple clips in one go.
- Includes extra elements like transitions, music, stickers, and templates.
Cons
- 4K export requires a paid upgrade.
- Only exports in MP4 format with limited control over output settings.
Best For
Microsoft Clipchamp is best for users seeking a video cutter that exports without a watermark. It offers a zoomable timeline, frame-by-frame cutting, easy splitting of clips, and a variety of additional editing features for creating polished videos quickly.
My Own Experience with Microsoft Clipchamp
In my testing, I noticed that Clipchamp sometimes takes longer to launch. After looking into it, I found that it relies on an internet connection for loading projects and saving progress. Because of this, I make sure my connection is stable to avoid interruptions or potential data loss.
When trimming a video, I found that removing a section at the beginning may leave a black gap on the timeline instead of automatically closing it. I usually need to delete or adjust it manually to keep the video continuous.
One thing I do like is the built-in warning system. When I try to export a project with gaps still in place, a pop-up reminder appears. It gives me the option to remove all gaps at once, fix them manually, or keep them as they are. This makes it easier to catch mistakes before exporting and improves the overall editing experience.
#4. CapCut
CapCut is a video cutter designed mainly for creating short-form content. I can use it on Windows, macOS, Android, and iOS, and it also provides a browser version, so I can switch between devices when needed.
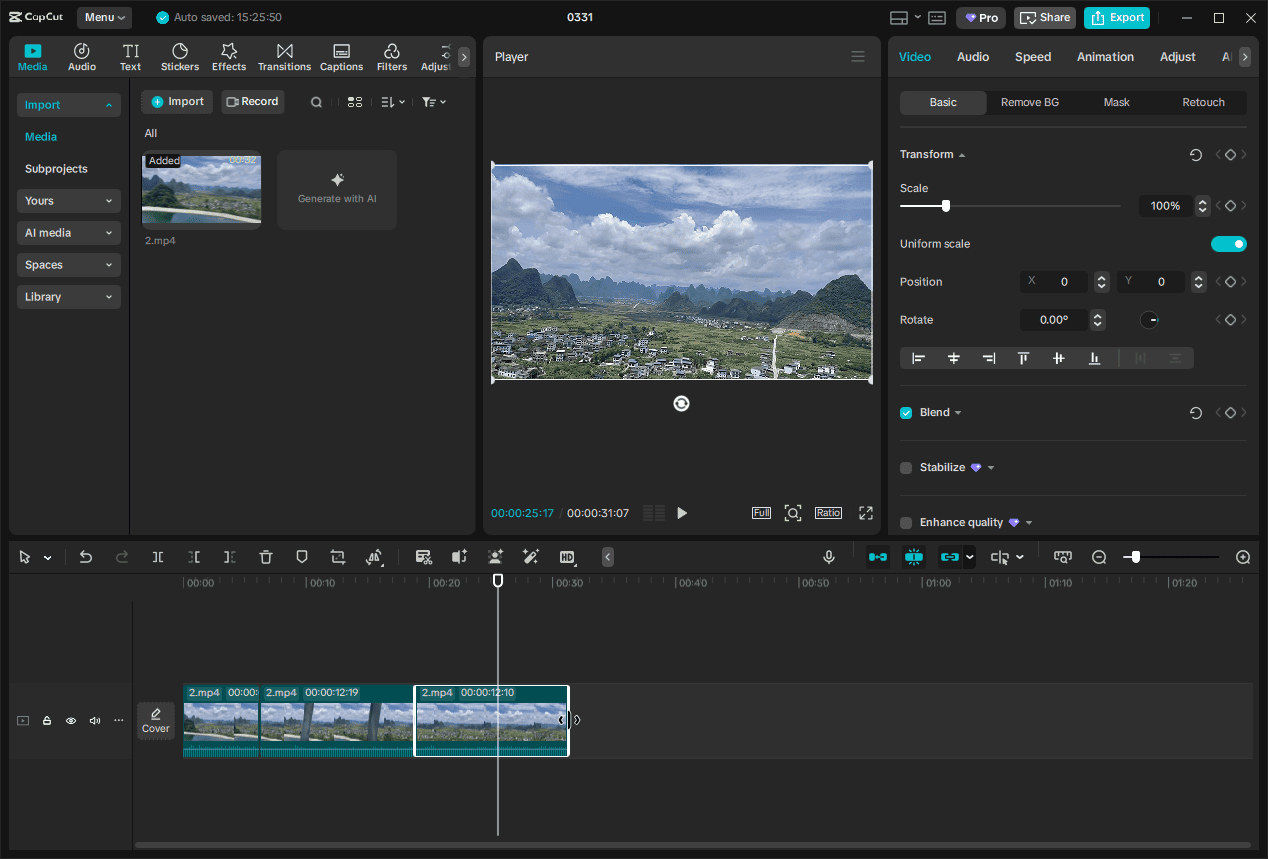
When working with CapCut, I don’t need to spend much time arranging clips on a timeline. I can quickly cut out the parts I don’t need and move straight to refining the video. This makes it a practical choice when I want to turn raw footage into a short video in a short amount of time.
Key Features
Here’s why CapCut works well as a video cutter.
1. Extensive Format Compatibility
CapCut works with a wide range of video formats, including MP4, MOV, AVI, WMV, 3GP, FLV, MPEG, VOB, 3G2, MOD, RMVB, TOD, F4V, DV, DVR-MS, MXF, OGG, M2TS, and WEBM. I can also export videos in MP4 or MOV, which are widely accepted by most social platforms.
2. Frame-Level Precision
CapCut allows me to cut videos with frame-level accuracy by zooming into the timeline and fine-tuning the cut points. This makes it easier to trim clips at the exact moment without missing important frames. When I remove a section, the remaining clips automatically snap together, keeping the timeline clean.
3. One-Click Cut Actions
CapCut includes tools like Delete Left and Delete Right, which let me remove unwanted parts instantly based on the playhead position. This helps me clean up clips much faster compared to manual trimming.
4. Template-Based Creation
Instead of starting from scratch, I can pick a ready-made template and replace it with my own clips. This is especially helpful when I want to create a polished short video quickly.
5. Advanced Output Controls
CapCut allows me to adjust export settings such as resolution, frame rate, bitrate, and format. This gives me flexibility when preparing videos for different platforms.
Pros
- Works across desktop, mobile, and web, making it easy to switch between devices.
- Beginner-friendly layout while still offering enough depth for more advanced edits.
- Supports frame-level precision for accurate cutting, splitting, and trimming.
- Includes templates, effects, and visual elements for quick video creation.
- Provides adjustable export settings for different platforms and needs.
Cons
- It can be clunky for long-form and large video projects.
- Some advanced features, such as background removal require a paid subscription.
Best for
CapCut is ideal when I want to create short videos quickly without spending too much time on detailed adjustments. It works especially well for social media content where speed and visual style matter more than complex editing.
My Own Experience with CapCut
When I open CapCut, I often see a pop-up notification about keyboard shortcut conflicts. While it doesn’t affect editing directly, it can feel a bit distracting, especially when I just want to start working on a project.
What I like most is the quick delete feature. Instead of dragging trim handles, I can simply place the playhead at a point and remove everything to the left or right with one click. It feels much faster than traditional trimming, especially when I’m working on short clips.
Another thing I noticed is how easy it is to move from cutting to enhancing the video. After removing unwanted parts, I can immediately apply a template or add effects without switching tools. This makes the whole process feel more continuous and efficient.
When handing short videos, the overall experience is smooth and fast. However, when I tried working with longer footage, the timeline became a bit harder to manage, and the workflow didn’t feel as efficient as it does with shorter clips.
#5. Bandicut
I previously used Bandicam for screen recording on Windows and later came across Bandicut from the same company, which is designed specifically for cutting videos. It is a lightweight video frame cutter that lets me cut, split, and merge clips while keeping the original quality.
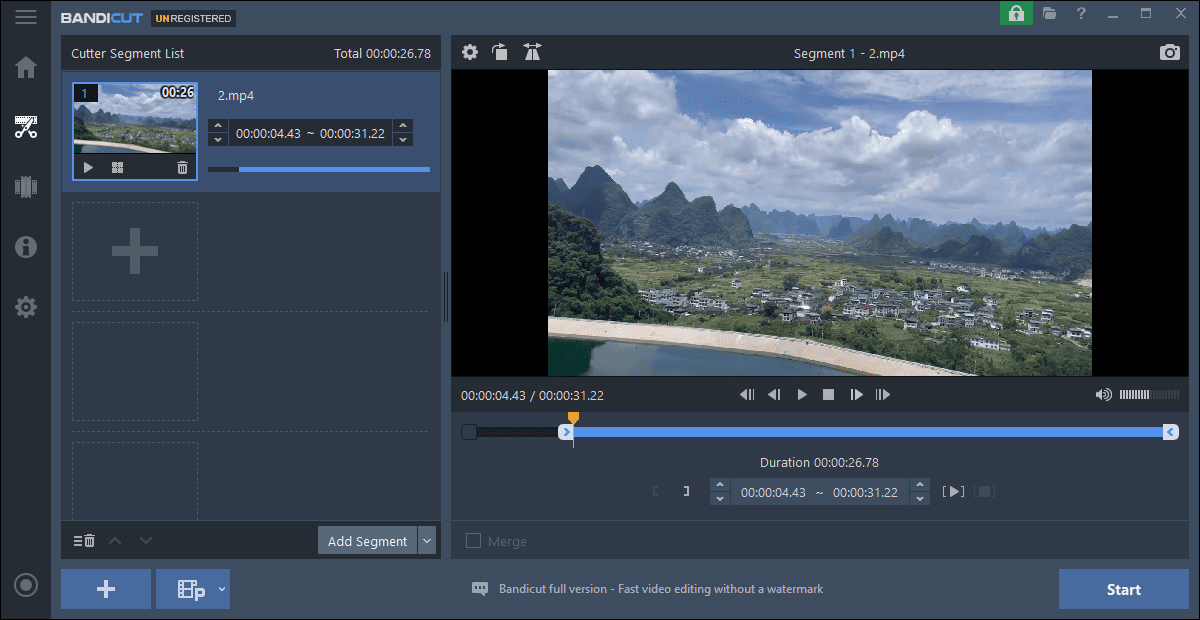
When splitting videos, Bandicut provides two practical options. I can choose to divide a video into a specific number of segments, or split it based on a set duration. Once I set the rule, the software automatically generates all the segments for me, which is much faster than cutting them one by one.
For simple trimming, I can still adjust the start and end points using a slider, similar to a basic video trimmer. However, what makes Bandicut stand out is its focus on speed and precision rather than visual editing features.
Key Features
The following features make Bandicut a professional video frame cutter.
1. Support for Diverse File Types
Bandicut handles massive input formats, including AVI, MP4, MOV, MKV, WEBM, FLV, WMV, and more. It also allows me to export videos in formats like MP4, AVI, MKV, and WEBM, or extract audio as an MP3 file when needed.
2. High-Speed and Encoding Modes
Bandicut offers two cutting modes. In High-Speed mode, I can cut videos instantly without re-encoding, which keeps the original quality and saves a lot of time. In Encoding mode, I can reprocess the video if I need to adjust format or compression settings.
3. Frame-Level Cutting Accuracy
I can cut videos with frame-level precision, which is useful when I need to trim at an exact moment without affecting nearby frames.
4. Direct Upload Options
After editing, I can upload videos directly to platforms like YouTube or Vimeo, which simplifies the sharing process.
Pros
- Clean and task-focused interface with separate modes for trimming, splitting, and joining.
- Supports frame-level precision for accurate cutting.
- High-speed mode processes videos quickly without re-encoding, preserving original quality.
Cons
- Only available on Windows.
- The free version adds an ad clip at the end of exported videos.
- Lacking essential editing features such as a multi-track timeline, transitions, and text overlays.
Best For
Bandicut is a great video frame cutter when I need to cut videos quickly while keeping the original quality. It works best for users who value speed and accuracy over visual editing features.
My Own Experience with Bandicut
I downloaded and installed Bandicut from its official website, and the whole process was quick and straightforward. When I first opened it, the interface immediately stood out—it’s clean and clearly organized, with separate sections for different tasks, which makes it easy to get started.
What I noticed most is that the workflow is quite different from timeline-based editors. Instead of dragging clips around, I work on one video at a time and choose a specific function, such as trimming or splitting. For splitting, I can either divide the video into a set number of segments or cut it based on a fixed duration. Once I set the option, the software processes everything automatically, which saves a lot of time compared to manual cutting.
However, one downside is the watermark in the free version. After exporting, an extra ad clip is added to the end of the video. This means I need to remove it separately if I want a cleaner final result, which can be inconvenient.
Top 2 Online Video Cutters
When I don’t want to install any software, online video cutters can be a convenient alternative. The following tools allow me to trim and edit videos directly in a browser.
#1. Kapwing
Kapwing is an all-in-one online video cutter that goes beyond basic cutting. It allows me to cut videos frame by frame with a zoomable timeline, making precise edits easy. Besides cutting, I can add subtitles, text overlays, and stickers, resize videos for different social media platforms, and apply simple edits like transitions or background adjustments.
Its multi-track editing and AI-powered Smart Cut also help remove silences or unwanted gaps automatically, making it a versatile tool for both quick edits and more polished online content—all without installing any software.
Key Features
Here are the key features that make Kapwing a good video cutter.
1. Precision Cutting Controls
Kapwing lets me cut videos with a high level of accuracy. I can zoom into the timeline, use the Split button or press S, and drag the handles to remove specific parts, including sections in the middle of a clip.
2. Auto Gap Removal
When I delete a segment, the remaining clips automatically snap together. This helps me avoid empty spaces on the timeline and keeps the video continuous without extra adjustments.
3. AI-Powered Smart Cut
The Smart Cut feature automatically detects silences and pauses in my video or audio. It highlights these parts and removes them in one go, which is especially helpful when editing interviews or talking-head videos.
4. Collaborative Editing Workflow
Since Kapwing runs in the browser, I can work on projects across devices and share them with others. It also allows me to handle multiple clips on the timeline, making it easier to edit longer or more complex videos.
Pros
- Frame-by-Frame timeline that provides precise cutting.
- Includes useful tools like auto gap removal and AI-based Smart Cut.
- Supports collaborative editing for team-based projects.
Cons
- Free version has limitations, including MP4-only export and a watermark on output videos.
- Performance depends on internet connection, and editing can be slow or laggy, especially with larger files.
Best for
Kapwing is a good option when I need an online video cutter with more flexibility. It works well for quick edits, subtitles, and short-form content without installing any software.
My Own Experience with Kapwing
When I opened Kapwing on my computer, the first thing I noticed was that it felt a bit slow to load and respond. Since I had used it before, a pop-up appeared saying that free users can only keep a limited number of active projects. To continue, I had to lock some previous projects, which felt slightly inconvenient.
After entering the editor, I started trimming unwanted sections. At first, I noticed that removing a part left a gap on the timeline. Later, I found the auto gap removal (ripple) feature, which automatically closes these spaces. Once I used it, the workflow became much smoother.
However, I did experience performance issues while editing. When adjusting clips on the timeline, the preview window sometimes turned blank or lagged behind my actions. This made precise editing a bit harder and interrupted the overall experience.
#2. Clideo
Clideo is a free video cutter that focuses on simplicity rather than offering a full editing timeline. Instead of placing everything in one workspace, it provides separate tools for tasks like cutting, trimming, merging, and rotating videos. This makes the process more straightforward, especially when I only need to complete one task at a time.

When trimming a video, I can simply upload the file, set the start and end points, and export the result in just a few steps. The interface is clean and easy to follow, so I don’t need to spend time learning how the tool works.
Key features:
Here are the reasons why Clideo is a good video trimmer.
1. Beginner-Friendly Workflow
Clideo is very easy to use, even for beginners. Each tool is designed with a simple interface, so I can complete tasks without needing to learn complex editing steps.
2. Two Cutting Modes
When trimming a video, I can either keep the selected part (Extract Selected) or remove the selected section (Delete Selected). This makes it flexible depending on whether I want to keep or cut out a segment.
3. Quick Processing
I can drag the markers to set the start and end points, and the video can be processed in just a few seconds, which is ideal for quick edits.
4. Wide Format Compatibility
Clideo supports common video formats such as MP4, MOV, and AVI, making it easy to work with most files without conversion. After editing, I can export the video in different formats depending on my needs.
Pros
- Offers to add fade-in and fade-out effects.
- Keeps the original video quality intact.
- Beginner-friendly interface that makes video cutting straightforward.
Cons
- Cutting precision is limited to seconds, not individual frames.
- Lacks advanced editing tools such as effects, transitions, or text overlays.
- Adds a logo watermark to exported videos for free users.
- Limits uploads to files up to 500 MB for free users.
Best for
Clideo is ideal when I need to quickly trim or cut a video without navigating a complex editor. It’s perfect for short clips or simple edits.
My Own Experience with Clideo
When I first open Clideo in my browser, the interface immediately feels clean and simple. I can drag and drop my video file or select it from my computer, and the tool loads it quickly.
To trim, I first drag the start and end markers to select the part I want to keep. I also tried the delete option to remove an unwanted section, which worked smoothly. The whole process is intuitive, and I don’t need to look for extra buttons or menus.
One limitation I noticed is that I can only cut by seconds, so very precise edits are a bit tricky. However, for short social media clips or quick trimming, the speed and simplicity make up for that. Exporting the video is fast, and the quality stays consistent with the original file, which is satisfying.
Conclusion
This post explains what a video cutter is, how to choose the best one, and introduces 7 best video cutters. MiniTool MovieMaker and Clipchamp are great for precise, multi-track editing; Photos and Clideo are ideal for quick, simple trims; CapCut excels at fast, short-form social media videos; Bandicut delivers high-speed, frame-accurate cutting; and Kapwing is perfect for online collaborative editing with AI-assisted tools.
Selecting the right video cutter depends on your workflow, platform, and desired level of precision. For questions about using MiniTool MovieMaker, you can reach out to [email protected].
About The Author

Position: Columnist
Alice is a tech writer at MiniTool, specializing in tutorials and guides on video editing and screen recording. She stays up to date with the latest tools and techniques to ensure her content is accurate and easy to follow. By combining hands-on testing with continuous learning, Alice aims to help readers solve tech problems efficiently.
User Comments :