How to use OpenShot video editor? This post from MiniTool MovieMaker gives you the answer. You can go through it to gain more information about OpenShot and its alternatives.
About OpenShot Video Editor
A good video editor is quite essential while doing video editing. Many people may be seeking an easy-to-use video editor. OpenShot Video Editor is a brilliant choice. So how to edit a video on OpenShot? Before that, let’s introduce the overall information about OpenShot first.
What Is OpenShot
OpenShot is a free and open-source video editor, available on Mac, Windows, and Linux. With OpenShot, you can do basic video editing and advanced editing to create amazing videos, films, and animations.
Main Features of OpenShot
OpenShot is designed with rich features. In terms of basic video editing, OpenShot supports many video, audio, and image formats based on FFmpeg. It allows you to resize, rotate, scale, snap, cut, and trim your videos. You can also add transitions, filter effects, and text to your video.
Apart from some basic editing, you can add as many tracks as you need without limit. Moreover, you can fade in or out, slide, bounce, and animate in your video project with its powerful animation framework. What’s more, you can add 3D animated titles and effects, display waveforms on the advanced timeline, separate the audio from your video clip, and much more.
Its main features are as follows:
- Cross-platform
- User-friendly interface
- Support for multiple video, audio, and image formats
- Resize, scale, trim, snap, rotate and cut video
- Unlimited tracks
- Chroma key/Green screen
- 3D animated titles
- Advanced timeline
- Keyframe animations
- Support for 70+ languages
Review About OpenShot
Generally speaking, there are more positive reviews than negative reviews. A user said: “I’ve been using it to edit my videos for Instagram and it’s just a breeze. However, I’m really missing the chroma key (green screen) feature.”
On the other hand, a user said: “I love OpenShot’s features as well. Its features include, but are not limited to, color correction, visual and audio effects, titles, filters, and (my personal favorite) unlimited layering.” Another user claims that the OpenShot video editor is very easy and simple to use the software. The user can select different options like adding text, images, and audiovisuals to their videos to make them attractive and nice.
You can also read: Best 8 Online Video Editors for Beginners [No Download Required].
Pros and Cons
Next, OpenShot certainly has its pros and cons. Let’s see it together.
Pros:
- Completely free and open-source
- No watermark
- 3D titles
- Multi-lingual
- Easy to use
Cons:
- A little bit difficult for beginners
How to Use Openshot Video Editor
Seeing above, you should have a basic understanding of OpenShot. Are you eager to try to use OpenShot? So how to edit videos with OpenShot?
You should install it first. To install and run it successfully, some requirements are needed:
- 64-bit operating system
- 4GB of RAM
- 500 MB of hard-disk space
Next, go to the OpenShot Video Editor’s official site on your browser to download it to your computer. Then, install and open OpenShot, and let’s start!
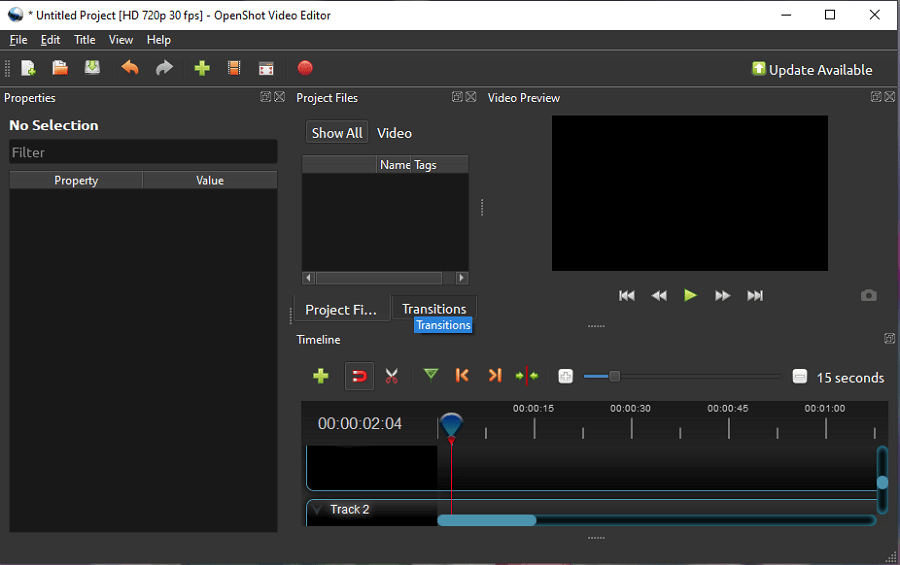
Getting Familiar with OpenShot’s Interface
After opening the OpenShot application, you can see that there are three main windows in the interface of OpenShot.
- Project Files: This is where you’ll have all your imported videos, audio, and images you want to use.
- The Preview window: You can playback to preview your video in this window.
- The timeline: This is where you can see all the tracks you have added and all your video projects.
How to Import Files
Before you begin to edit a video, you need to import files into OpenShot. Remember most video, audio, and image formats are supported. There are five ways for you to import files from your computer.
Way 1: Click on Import Files with a green + button at the top of the screen.
Way 2: Put your mouse on the Project Files window, right-click on it and click Import Files.
Way 3: Press Ctrl + F on your keyboard to import files directly.
Way 4: Just drag and drop files from your desktop to OpenShot.
Way 5: In the main menu, choose Files, and then Import Files.
Then arrange your videos, audio, and images on the timeline by dragging and dropping them. Or select the files you’d like to edit, right-click on them, and choose Add to Timeline.
How to Split and Trim a Video
If you need to split the video into small clips or remove the unwanted parts from your video before you edit it, follow the guide:
Split a video:
Step 1: Click on the razor tool with the red scissors icon on the Edit Toolbar.
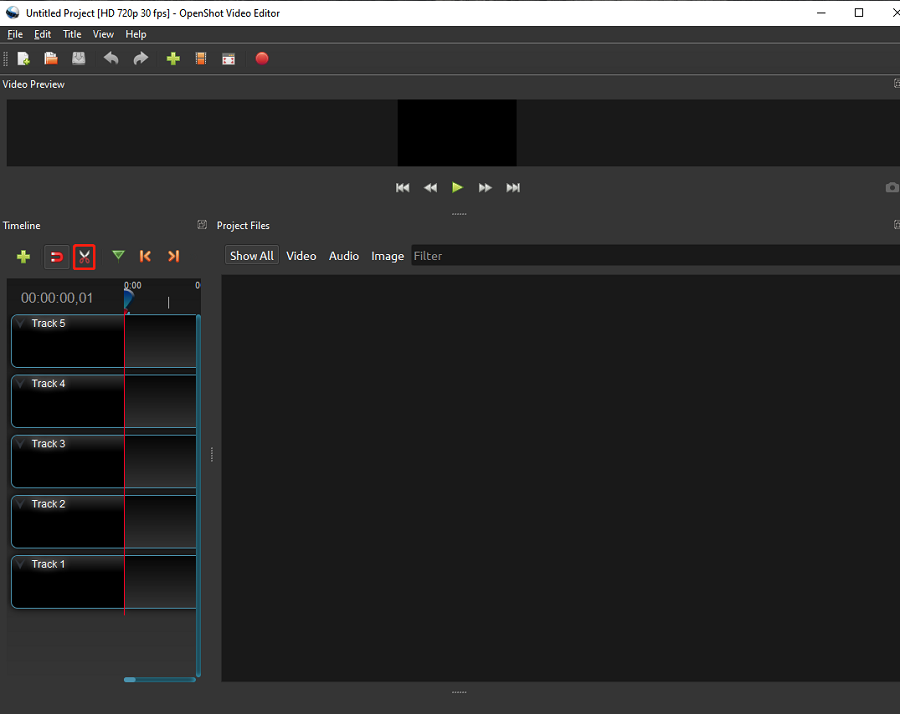
Step 2: Click on a position where you want to split into clips. Then the video is cut into clips easily and quickly.
Step 1: Drag the playhead (a red line) to a position where you want to trim on the timeline.
Step 2: Right-click on the clip, and choose Slice.
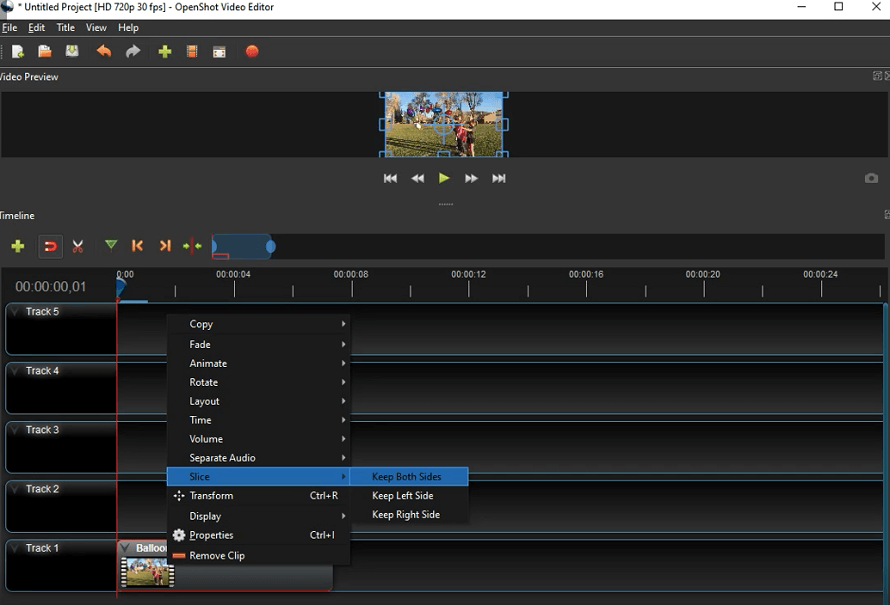
You can repeat these steps until you get your desired part.
How to Crop Video
Suppose that you would like to keep a certain frame only in your final video. In such a case, you can do the video cropping easily with OpenShot. Read following steps mentioned below:
Step 1: Right-click the video and choose Properties. Then it will appear a new panel on the left side.
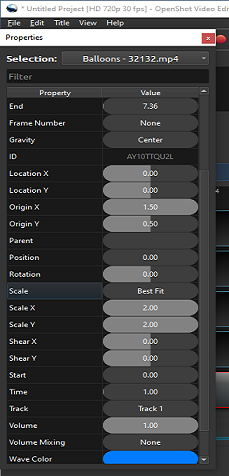
Step 2: Find the Scale, Scale X, and Scale Y options.
Step 3: Change the values of the Scale X, and Scale Y to keep your desired frame range.
How to Add Transitions
After making the video into clips, it’s time to add transitions to play more smoothly between clips. Actually, when you overlap two clips, transitions will be automatically generated. Of course, you can select a transition on the Transition panel manually.
Step 1: Tap on the Transitions, and select a transition you want to add to your video.
Step 2: Drag the transition to the timeline.
Step 3: Then adjust the duration of the transition from the Properties panel on the left side.
You can add as many transitions as you want in OpenShot. If you want to remove a transition from your video, right-click on the transition, and choose Remove Transition.
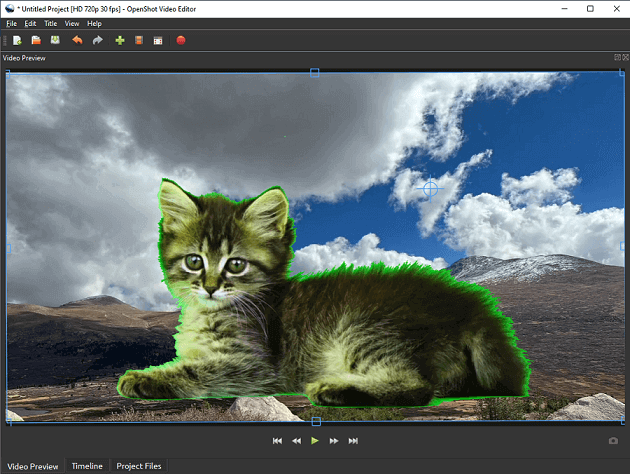
How to Use Green Screen/Chroma Key
It’s available to remove the background of a video clip with OpenShot. Using the green screen feature, you can realize it quickly.
Step 1: Add two files to two tracks on the timeline.
The file with green background should be put on the upper track 2. It could be in other colors, but green works best. Then, the other file used as the background will be placed on the lower track 1.
Step 2: Click the Effects tab, select the Chroma Key effect, and drag it to the green background video on the timeline.
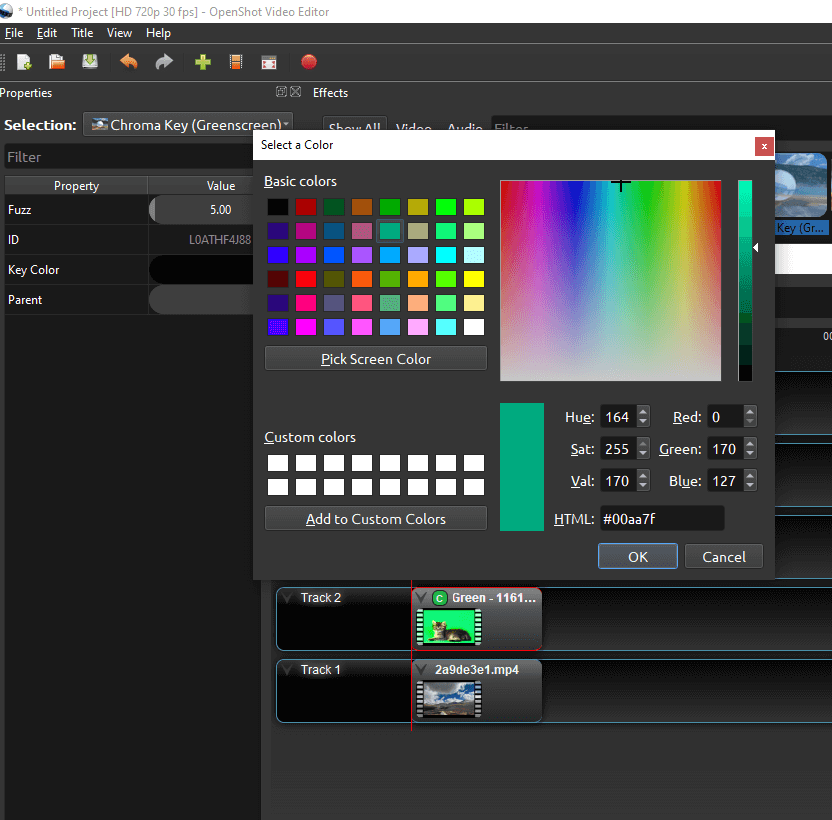
Step 3: Right-click on the effect icon with a green c letter, and select Properties.
Step 4: Double-click the Key Color, then tap on Pick Screen Color to pick a color from the Video Preview window and click the OK button.
Step 5. If the green hasn’t disappeared totally, increase the Fuzz value under the Properties window to get a better result. Until now, the green background has been removed.
How to Separate Audio from Video
OpenShot allows you to separate the audio from the video. Before that, you can see the audio waveform first by right-clicking on the video, selecting Display, and choosing Show Waveform. In this way, you can edit the audio more conveniently. Now, it’s time to separate audio from video, try the following steps.
Step 1: Right-click the video on the track, and select Separate Audio.
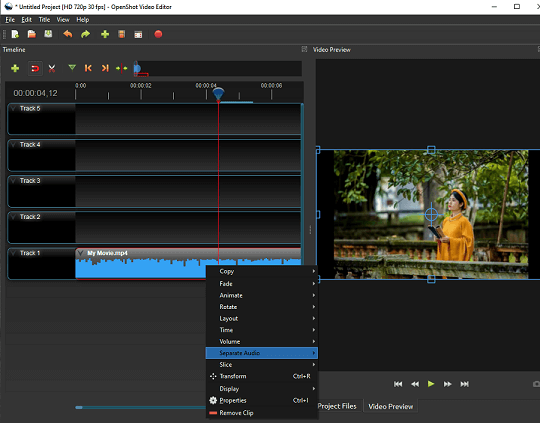
Step 2: Select Single Clip. Then the audio has been separated successfully from the video
Step 3: Drag the separated audio clip to a track and you can edit it selectively.
How to Add 3D Animated Titles
OpenShot supports adding 3D animated titles to your video. Notice that this feature requires you to download the latest version of Blender and update the OpenShot preferences with the executable correct path to Blender. Then, just do the following steps.
Step 1: Click on the Title in the menu area. There are two options: Title and Animated Title. Choose Animated Title or use the shortcut Ctrl + B on the keyboard.
Step 2: Choose a 3D animated title template.
Step 3: Input your title and change the title size and width, title color, and animation length under the title properties tab.
Step 4: After that, tap on Render to render the 3D animation and add it to your video.
How to Export Video
Once the editing is done, you can export the finished video to your computer.
Step 1: There are three ways to access the export window.
- Click on the red dot at the top of the screen.
- Tap on File on the main menu, choose Export Project, then select Export Video.
- Use the shortcut Ctrl + E on the keyboard.
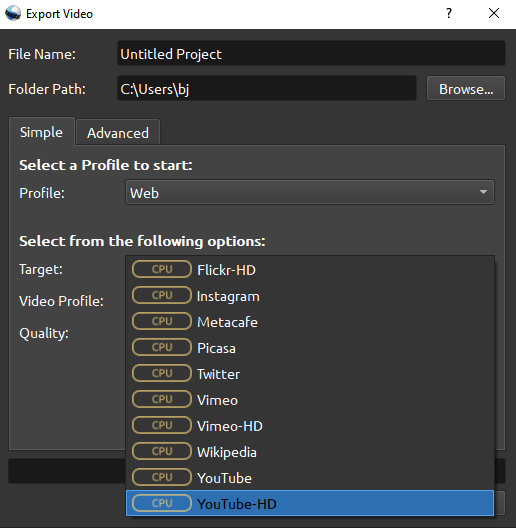
Step 2: On the Export Video window, you can rename the video and choose the storage location.
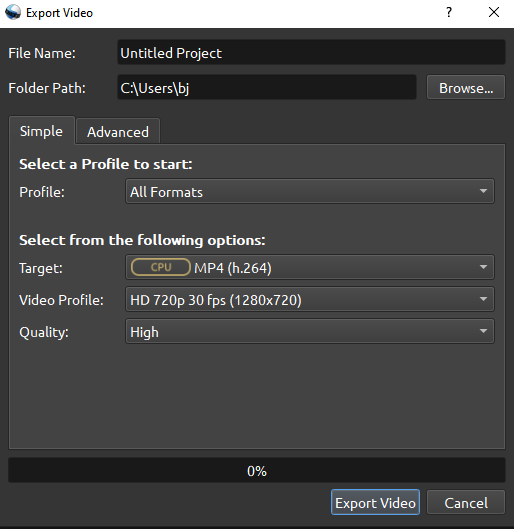
Alternatively, you can change the video format, video resolution, and quality. As for YouTube users, you can choose to export the video which is adapted for YouTube. Just select the Web profile and YouTube-HD option from the Target Menu.
You can also go to the Advanced tab if you need to adjust more advanced options like the bit rate, video codec, frame rate, and much more.
If you want to save your favorite videos from YouTube for offline watching, MiniTool uTube Downloader is a wonderful choice.
MiniTool uTube DownloaderClick to Download100%Clean & Safe
Step 3: Tap on Export Video to save it to your computer.
Alternatives to Openshot
After learning how to use OpenShot video editor, let’s see some alternatives to OpenShot. We recommend MiniTool MovieMaker strongly. It’s a brilliant OpenShot alternative on Windows.
MiniTool MovieMakerClick to Download100%Clean & Safe
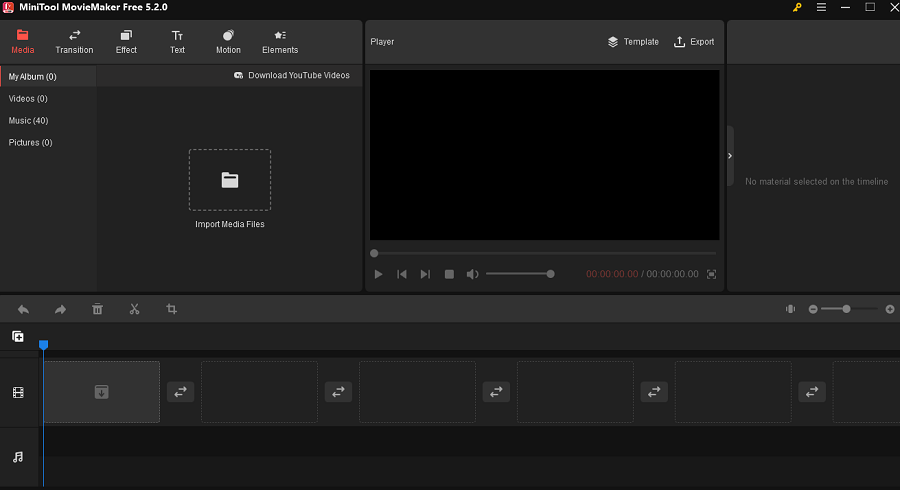
MiniTool MovieMaker is an easy-to-use, free, and stable video editing application without watermarks, ads, or bounds. It has a simple interface and is quite friendly to beginners.
MiniTool MovieMaker supports many video, audio, and image formats. You can import your media files to create stunning videos with movie templates with several clicks. It has four themes: travel, love, family & friends, and festival.
Apart from this, you can add captions, titles, credits, transitions, filter effects, animated elements, and motion effects to your video. With the help of these, your video will become more attractive.
MiniTool MovieMaker also supports splitting, trimming, rotating, flipping, reversing your video, and adjusting video speed. More importantly, it allows you to export videos in many formats and adjust the video resolution, quality, encoder, and bit rate.
Other alternatives to OpenShot:
- Wondershare Filmora
- iMovie
- Windows Movie Maker
- Kdenlive
- Adobe Premiere Pro
- Camtasia
- Shotcut
You can try these alternatives one by one, and choose the most suitable video editor for you.
Conclusion
Now that you have learned how to use OpenShot video editor, you can easily start to do your video editing projects. However, you can try some alternatives to OpenShot if you find it’s not suitable for you.
Finally, if you have any questions or suggestions while using MiniTool MovieMaker, please contact us via [email protected].
User Comments :